Redis源码分析(dict)
源码版本:redis-4.0.1
源码位置:
一、dict 简介
dict (dictionary 字典),通常的存储结构是Key-Value形式的,通过Hash函数对key求Hash值来确定Value的位置,因此也叫Hash表,是一种用来解决算法中查找问题的数据结构,默认的算法复杂度接近O(1),Redis本身也叫REmote DIctionary Server (远程字典服务器),其实也就是一个大字典,它的key通常来说是String类型的,但是Value可以是
String、Set、ZSet、Hash、List等不同的类型,下面我们看下dict的数据结构定义。
二、数据结构定义
与dict相关的关键数据结构有三个,分别是:
dictEntry表示一个Key-Value节点。dictht表示一个Hash表。dict是Redis中的字典结构,包含两个dictht。
dictEntry结构的代码如下:
typedef struct dictEntry {void *key; //key void*表示任意类型指针union { //联合体中对于数字类型提供了专门的类型优化void *val;uint64_t u64;int64_t s64;} v;struct dictEntry *next; //next指针} dictEntry;
dictht的代码如下:
typedef struct dictht {dictEntry **table; //数组指针,每个元素都是一个指向dictEntry的指针unsigned long size; //表示这个dictht已经分配空间的大小,大小总是2^nunsigned long sizemask; //sizemask = size - 1; 是用来求hash值的掩码,为2^n-1unsigned long used; //目前已有的元素数量} dictht;
最后是真正的dict结构:
typedef struct dict {dictType *type; //type中定义了对于Hash表的操作函数,比如Hash函数,key比较函数等void *privdata; //privdata是可以传递给dict的私有数据dictht ht[2]; //每一个dict都包含两个dictht,一个用于rehashint rehashidx; //表示此时是否在进行rehash操作int iterators; //迭代器} dict;
其实通过上面的三个数据结构,已经可以大概看出dict的组成,数据(Key-Value)存储在每一个dictEntry节点;然后一条Hash表就是一个dictht结构,里面标明了Hash表的size,used等信息;最后每一个Redis的dict结构都会默认包含两个dictht,如果有一个Hash表满足特定条件需要扩容,则会申请另一个Hash表,然后把元素ReHash过来,ReHash的意思就是重新计算每个Key的Hash值,然后把它存放在第二个Hash表合适的位置,但是这个操作在Redis中并不是集中式一次完成的,而是在后续的增删改查过程中逐步完成的,这个叫渐进式ReHash,我们后文会专门讨论。
三、创建、插入、键冲突、扩张
下面我们跟随一个例子来看有关dict的创建,插入,键冲突的解决办法以及扩张的问题。在这里推荐一个有关调试Redis数据结构代码的方法:下载一份Redis源码,然后直接把server.c中main函数注释掉,加入自己的代码,直接make之后就可以跑了。我们的例子如下所示:
int main(int argc, char **argv) {int ret;sds key = sdsnew("key");sds val = sdsnew("val");dict *dd = dictCreate(&keyptrDictType, NULL);printf("Add elements to dict\n");for (int i = 0; i < 6 ; ++i) {ret = dictAdd(dd, sdscatprintf(key, "%d", i), sdscatprintf(val, "%d", i));printf("Add ret%d is :%d ,", i, ret);printf("ht[0].used :%lu, ht[0].size :%lu, ""ht[1].used :%lu, ht[1].size :%lu\n", dd->ht[0].used, dd->ht[0].size, dd->ht[1].used, dd->ht[1].size);}printf("\nDel elements to dict\n");for (int i = 0; i < 6 ; ++i) {ret = dictDelete(dd, sdscatprintf(key, "%d", i));printf("Del ret%d is :%d ,", i, ret);printf("ht[0].used :%lu, ht[0].size :%lu, ""ht[1].used :%lu, ht[1].size :%lu\n", dd->ht[0].used, dd->ht[0].size, dd->ht[1].used, dd->ht[1].size);}sdsfree(key);sdsfree(val);dictRelease(dd);return 0;}Out >Add elements to dictAdd ret0 is :0 ,ht[0].used :1, ht[0].size :4, ht[1].used :0, ht[1].size :0Add ret1 is :0 ,ht[0].used :2, ht[0].size :4, ht[1].used :0, ht[1].size :0Add ret2 is :0 ,ht[0].used :3, ht[0].size :4, ht[1].used :0, ht[1].size :0Add ret3 is :0 ,ht[0].used :4, ht[0].size :4, ht[1].used :0, ht[1].size :0Add ret4 is :0 ,ht[0].used :4, ht[0].size :4, ht[1].used :1, ht[1].size :8Add ret5 is :0 ,ht[0].used :3, ht[0].size :4, ht[1].used :3, ht[1].size :8Del elements to dictDel ret0 is :0 ,ht[0].used :5, ht[0].size :8, ht[1].used :0, ht[1].size :0Del ret1 is :0 ,ht[0].used :4, ht[0].size :8, ht[1].used :0, ht[1].size :0Del ret2 is :0 ,ht[0].used :3, ht[0].size :8, ht[1].used :0, ht[1].size :0Del ret3 is :0 ,ht[0].used :2, ht[0].size :8, ht[1].used :0, ht[1].size :0Del ret4 is :0 ,ht[0].used :1, ht[0].size :8, ht[1].used :0, ht[1].size :0Del ret5 is :0 ,ht[0].used :0, ht[0].size :8, ht[1].used :0, ht[1].size :0
dict *dd = dictCreate(&keyptrDictType, NULL);创建了一个名为dd,type为keyptrDictType的dict,创建代码如下,需要注意的是这个操作只给dict本身申请了空间,但是像dict->ht->table这些数据存储节点并没有分配空间,这些空间是dictAdd的时候才分配的。
/* Create a new hash table */dict *dictCreate(dictType *type,void *privDataPtr){dict *d = zmalloc(sizeof(*d)); //申请空间,sizeof(*d)为88个字节_dictInit(d,type,privDataPtr); //一些置NULL操作,type和privdata置为参数指定值return d;}
ret = dictAdd(dd, sdscatprintf(key, "%d", i), sdscatprintf(val, "%d", i));接着我们定义了两个sds,并且for循环分别将他们dictAdd,来看下dictAdd的代码,它实际上调用了dictAddRaw函数:
dictEntry *dictAddRaw(dict *d, void *key, dictEntry **existing){int index;dictEntry *entry;dictht *ht;if (dictIsRehashing(d)) _dictRehashStep(d);/* Get the index of the new element, or -1 if* the element already exists. */if ((index = _dictKeyIndex(d, key, dictHashKey(d,key), existing)) == -1)return NULL;/* Allocate the memory and store the new entry.* Insert the element in top, with the assumption that in a database* system it is more likely that recently added entries are accessed* more frequently. */ht = dictIsRehashing(d) ? &d->ht[1] : &d->ht[0];entry = zmalloc(sizeof(*entry));entry->next = ht->table[index];ht->table[index] = entry;ht->used++;/* Set the hash entry fields. */dictSetKey(d, entry, key);return entry;}
可以看到首先检测是否在进行ReHash(我们先跳过ReHash这个概念),接下来算出了一个index值,然后根据是否在进行ReHash选择了其中一个dt(0或者1),之后进行了头插,而且英文注释中也写的很清楚将数据插在头部基于数据库系统总是会经常访问最近添加的节点,然后将key设置之后就返回了,但是我们貌似还是没有发现申请空间的函数,其实是在算index的时候_dictKeyIndex()会自动判断,如下:
static int _dictKeyIndex(dict *d, const void *key, unsigned int hash, dictEntry **existing){unsigned int idx, table;dictEntry *he;if (existing) *existing = NULL;/* Expand the hash table if needed */if (_dictExpandIfNeeded(d) == DICT_ERR)return -1;for (table = 0; table <= 1; table++) {idx = hash & d->ht[table].sizemask;/* Search if this slot does not already contain the given key */he = d->ht[table].table[idx];while(he) {if (key==he->key || dictCompareKeys(d, key, he->key)) {if (existing) *existing = he;return -1;}he = he->next;}if (!dictIsRehashing(d)) break;}return idx;}
_dictExpandIfNeeded(d)进行空间判断,如果还未申请,就创建默认大小,其中它里面也有dict扩容的策略(见注释):
static int _dictExpandIfNeeded(dict *d){/* Incremental rehashing already in progress. Return. */if (dictIsRehashing(d)) return DICT_OK;//如果正在ReHash,那直接返回OK,其实也表明申请了空间不久。/* If the hash table is empty expand it to the initial size. */if (d->ht[0].size == 0) return dictExpand(d, DICT_HT_INITIAL_SIZE);//如果 0 号哈希表的大小为0,表示还未创建,按照默认大小`DICT_HT_INITIAL_SIZE=4`去创建/* If we reached the 1:1 ratio, and we are allowed to resize the hash* table (global setting) or we should avoid it but the ratio between* elements/buckets is over the "safe" threshold, we resize doubling* the number of buckets. *///如果满足 0 号哈希表used>size &&(dict_can_resize为1 或者 used/size > 5) 那就默认扩两倍大小if (d->ht[0].used >= d->ht[0].size &&(dict_can_resize ||d->ht[0].used/d->ht[0].size > dict_force_resize_ratio)){return dictExpand(d, d->ht[0].used*2);}return DICT_OK;}
对于我们的代码,走的是if (d->ht[0].size == 0) return dictExpand(d, DICT_HT_INITIAL_SIZE);这个分支,也就是会去创建一个dictht的table大小为4的dict,如下:
int dictExpand(dict *d, unsigned long size){dictht n; /* the new hash table */unsigned long realsize = _dictNextPower(size);/* the size is invalid if it is smaller than the number of* elements already inside the hash table */if (dictIsRehashing(d) || d->ht[0].used > size)return DICT_ERR;/* Rehashing to the same table size is not useful. */if (realsize == d->ht[0].size) return DICT_ERR;/* Allocate the new hash table and initialize all pointers to NULL */n.size = realsize;n.sizemask = realsize-1;n.table = zcalloc(realsize*sizeof(dictEntry*));n.used = 0;/* Is this the first initialization? If so it's not really a rehashing* we just set the first hash table so that it can accept keys. */if (d->ht[0].table == NULL) {d->ht[0] = n;return DICT_OK;}/* Prepare a second hash table for incremental rehashing */d->ht[1] = n;d->rehashidx = 0;return DICT_OK;}
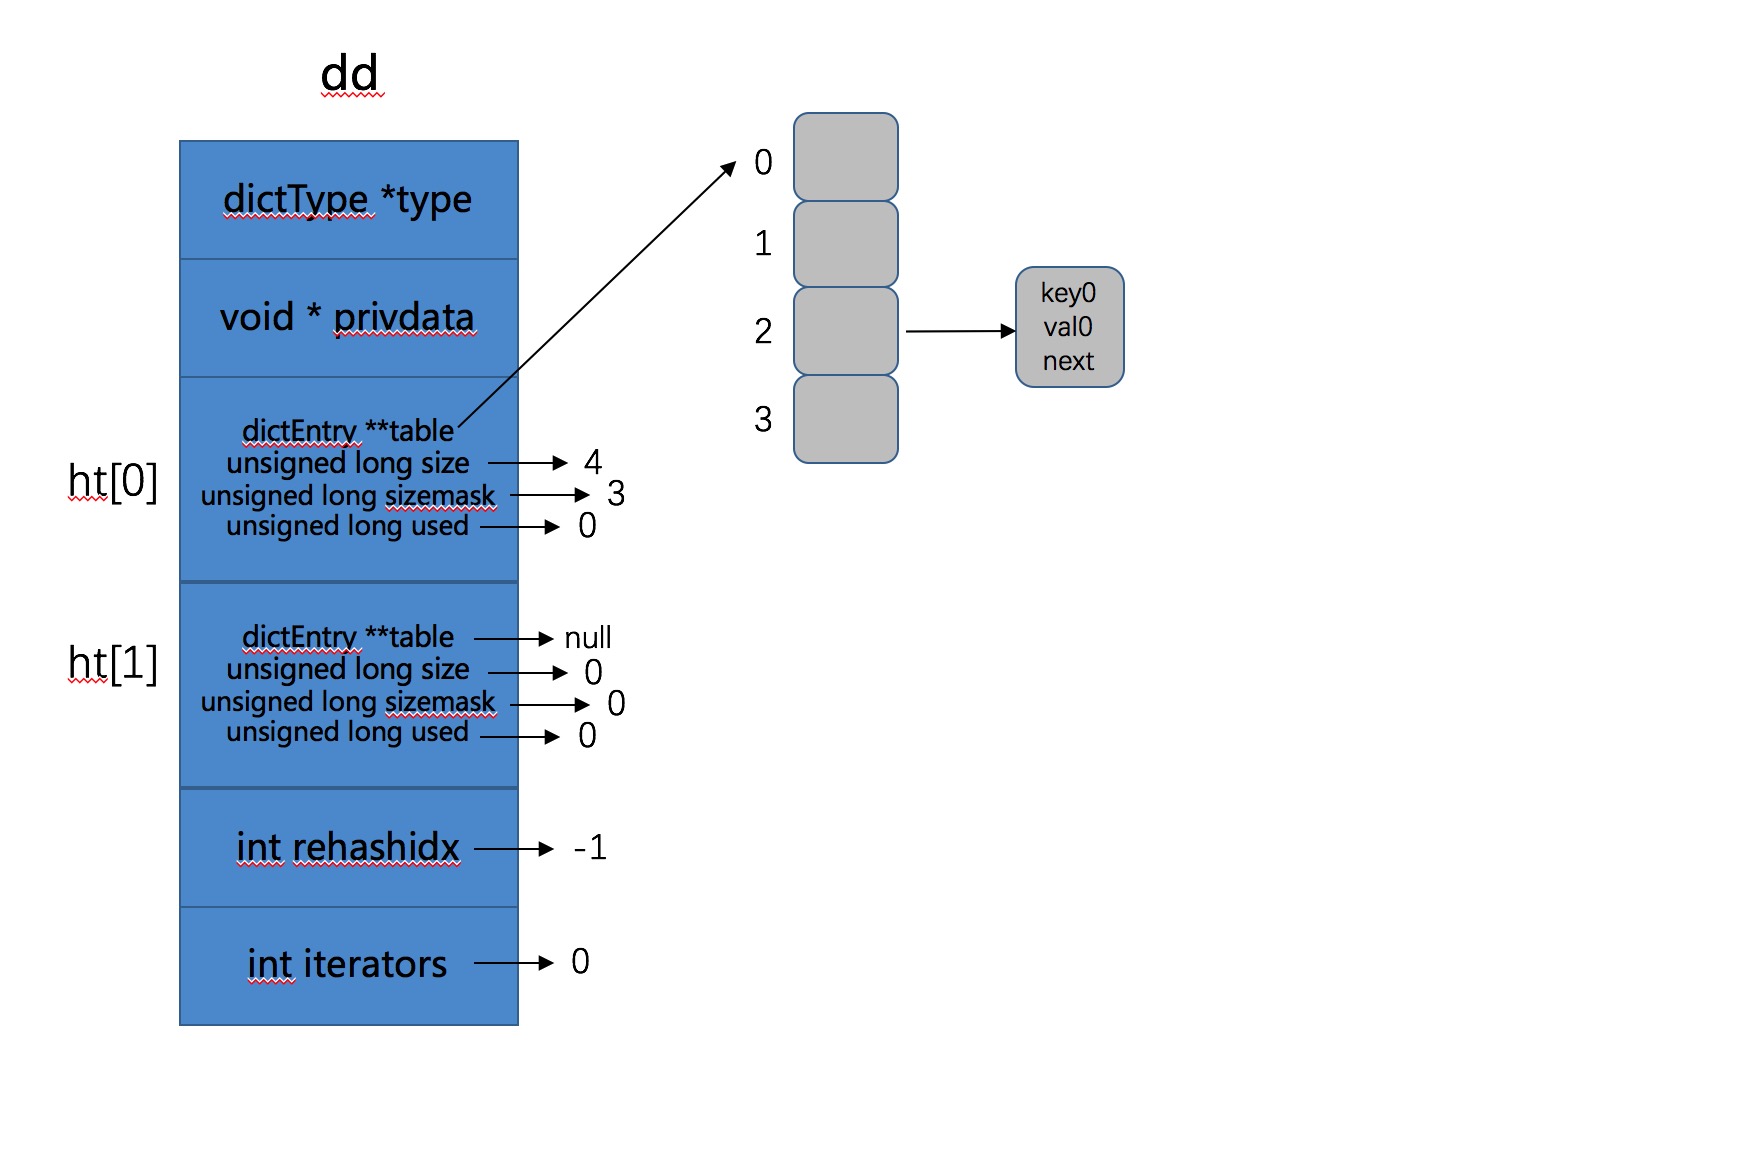
需要注意的是_dictNextPower可以计算出距离size最近,且大于或者等于size的2的次方的值,比如size是4,那距离其最近的值为4(2的平方),size是6,距离其最近的值为8(2的三次方),然后申请空间,之后判断如果d->ht[0].table == NULL也就是我们目前的还未初始化的情况,则初始化 0 号Hash表,之后添加相应的元素,我们程序的输出如下所示:
Add ret0 is :0 ,ht[0].used :1, ht[0].size :4, ht[1].used :0, ht[1].size :0
如果图示目前的Hash表,如下所示:
- 接下来for循环继续添加,当i = 4时,也就是当添加第5个元素时,默认初始化大小为4的Hash表已经不够用了。此时的used=4,我们看看扩张操作发生了什么,代码从
_dictExpandIfNeeded(d)说起,此时满足条件,会执行扩张操作,如下:
if (d->ht[0].used >= d->ht[0].size &&(dict_can_resize ||d->ht[0].used/d->ht[0].size > dict_force_resize_ratio)){return dictExpand(d, d->ht[0].used*2);}
dictExpand(d, d->ht[0].used*2); 表示重新申请了一个大小为之前2倍的Hash表,即 1 号Hash表。然后将d->rehashidx = 0;即表明此时开始ReHash操作。
Rehash就是将原始Hash表(0号Hash表)上的Key重新按照Hash函数计算Hash值,存到新的Hash表(1号Hash表)的过程。
这一步执行之后此时Hash表如下所示:
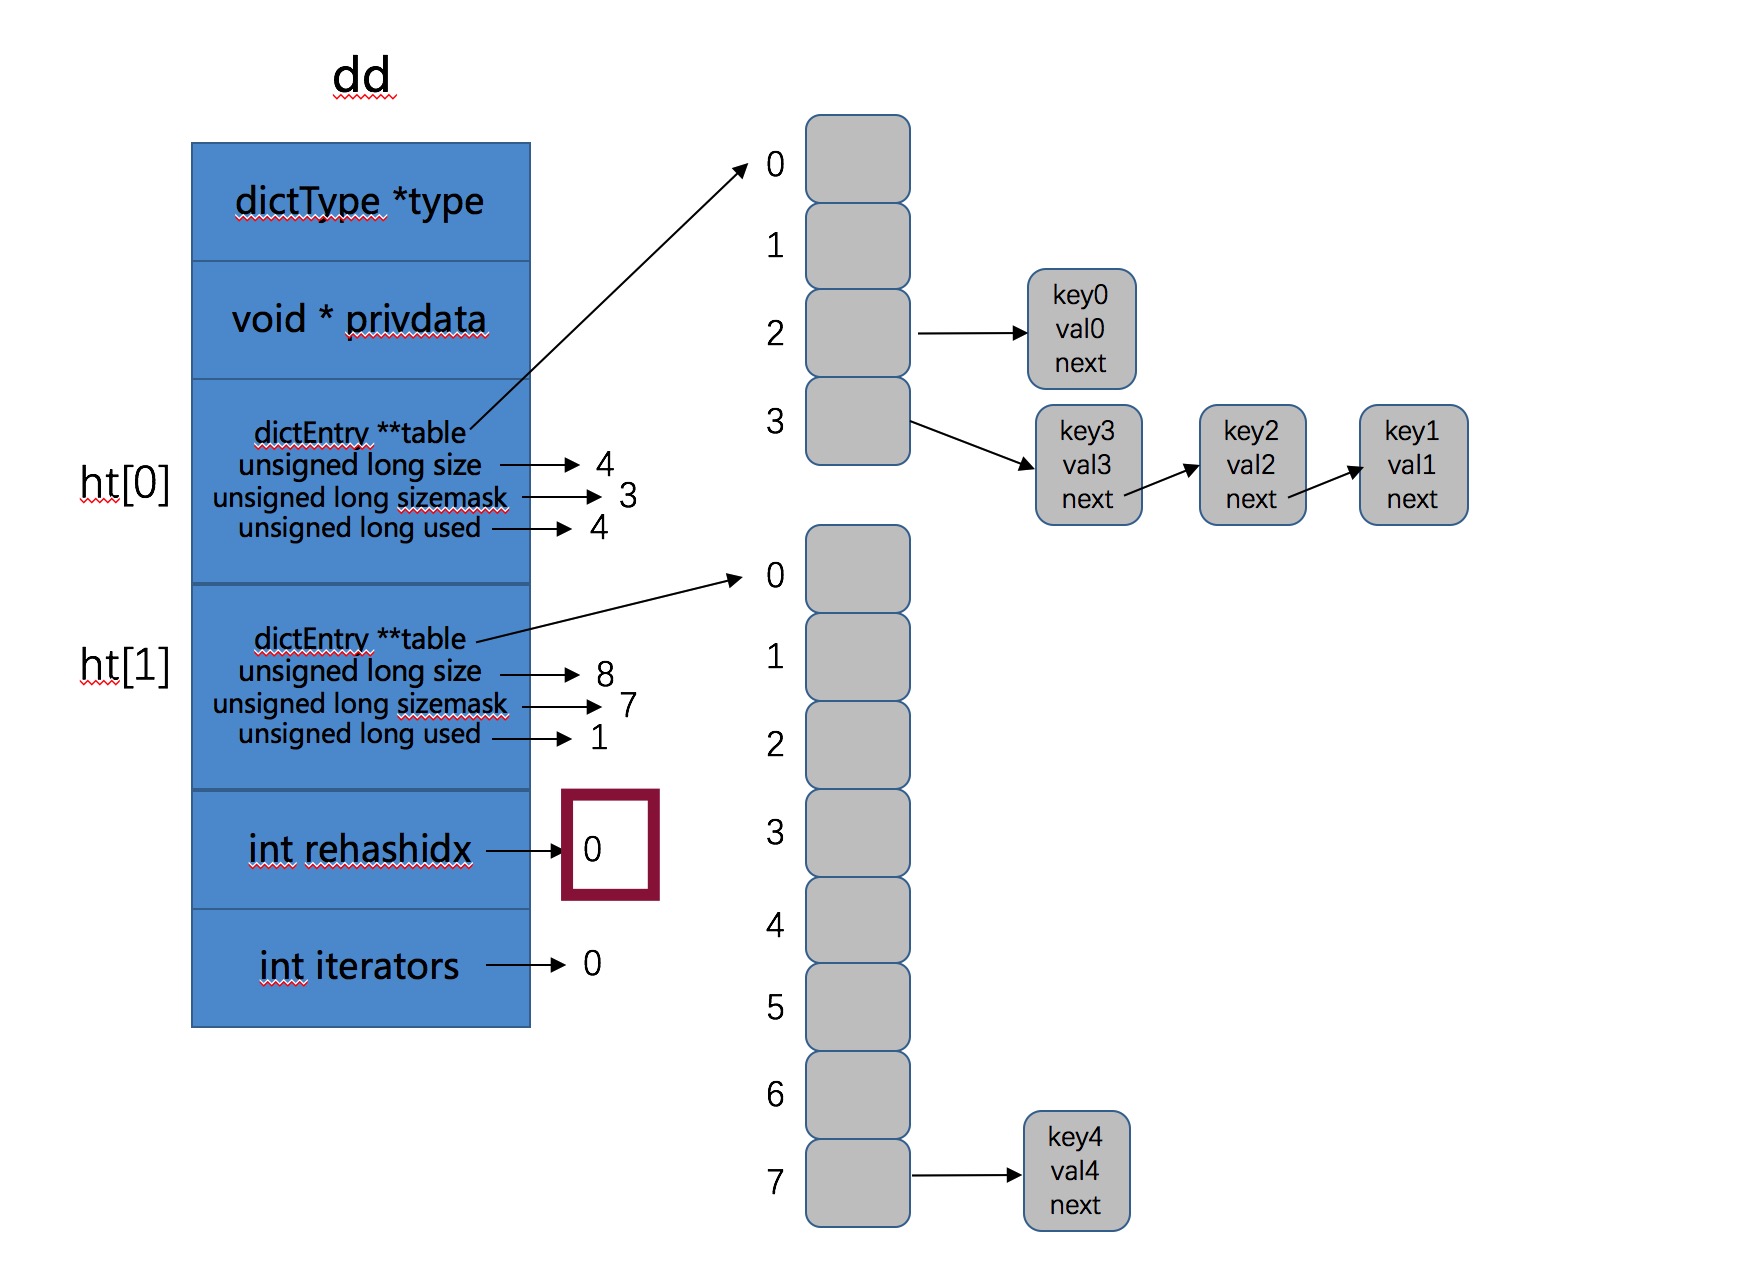
由图可以看到 0 号Hash表已经满了,此时我们的新数据被存到了 1 号哈希表中,接下来我们开始了第6次循环,我们继续看在ReHash的情况下数据是如何存入的,也就是第6次循环,即添加key5的过程,继续调用dictAddRaw函数:
if (dictIsRehashing(d)) _dictRehashStep(d);
此时因为d->rehashidx = 0,所以会执行渐进式Hash操作,即_dictRehashStep(d):
static void _dictRehashStep(dict *d) {if (d->iterators == 0) dictRehash(d,1); //如果迭代器是0,ReHash步长为1}int dictRehash(dict *d, int n) {int empty_visits = n*10; /* Max number of empty buckets to visit. */if (!dictIsRehashing(d)) return 0;while(n-- && d->ht[0].used != 0) {dictEntry *de, *nextde;/* Note that rehashidx can't overflow as we are sure there are more* elements because ht[0].used != 0 */assert(d->ht[0].size > (unsigned long)d->rehashidx);while(d->ht[0].table[d->rehashidx] == NULL) {d->rehashidx++;if (--empty_visits == 0) return 1;}de = d->ht[0].table[d->rehashidx];/* Move all the keys in this bucket from the old to the new hash HT */while(de) {unsigned int h;nextde = de->next;/* Get the index in the new hash table */h = dictHashKey(d, de->key) & d->ht[1].sizemask;de->next = d->ht[1].table[h];d->ht[1].table[h] = de;d->ht[0].used--;d->ht[1].used++;de = nextde;}d->ht[0].table[d->rehashidx] = NULL;d->rehashidx++;}/* Check if we already rehashed the whole table... */if (d->ht[0].used == 0) {zfree(d->ht[0].table);d->ht[0] = d->ht[1];_dictReset(&d->ht[1]);d->rehashidx = -1;return 0;}/* More to rehash... */return 1;}
int empty_visits = n*10; empty_visits表示每次最多跳过10倍步长的空桶(一个桶就是ht->table数组的一个位置),然后当我们找到一个非空的桶时,就将这个桶中所有的key全都ReHash到 1 号Hash表。最后每次都会判断是否将所有的key全部ReHash了,如果已经全部完成,就释放掉ht[0],然后将ht[1]变成ht[0]。
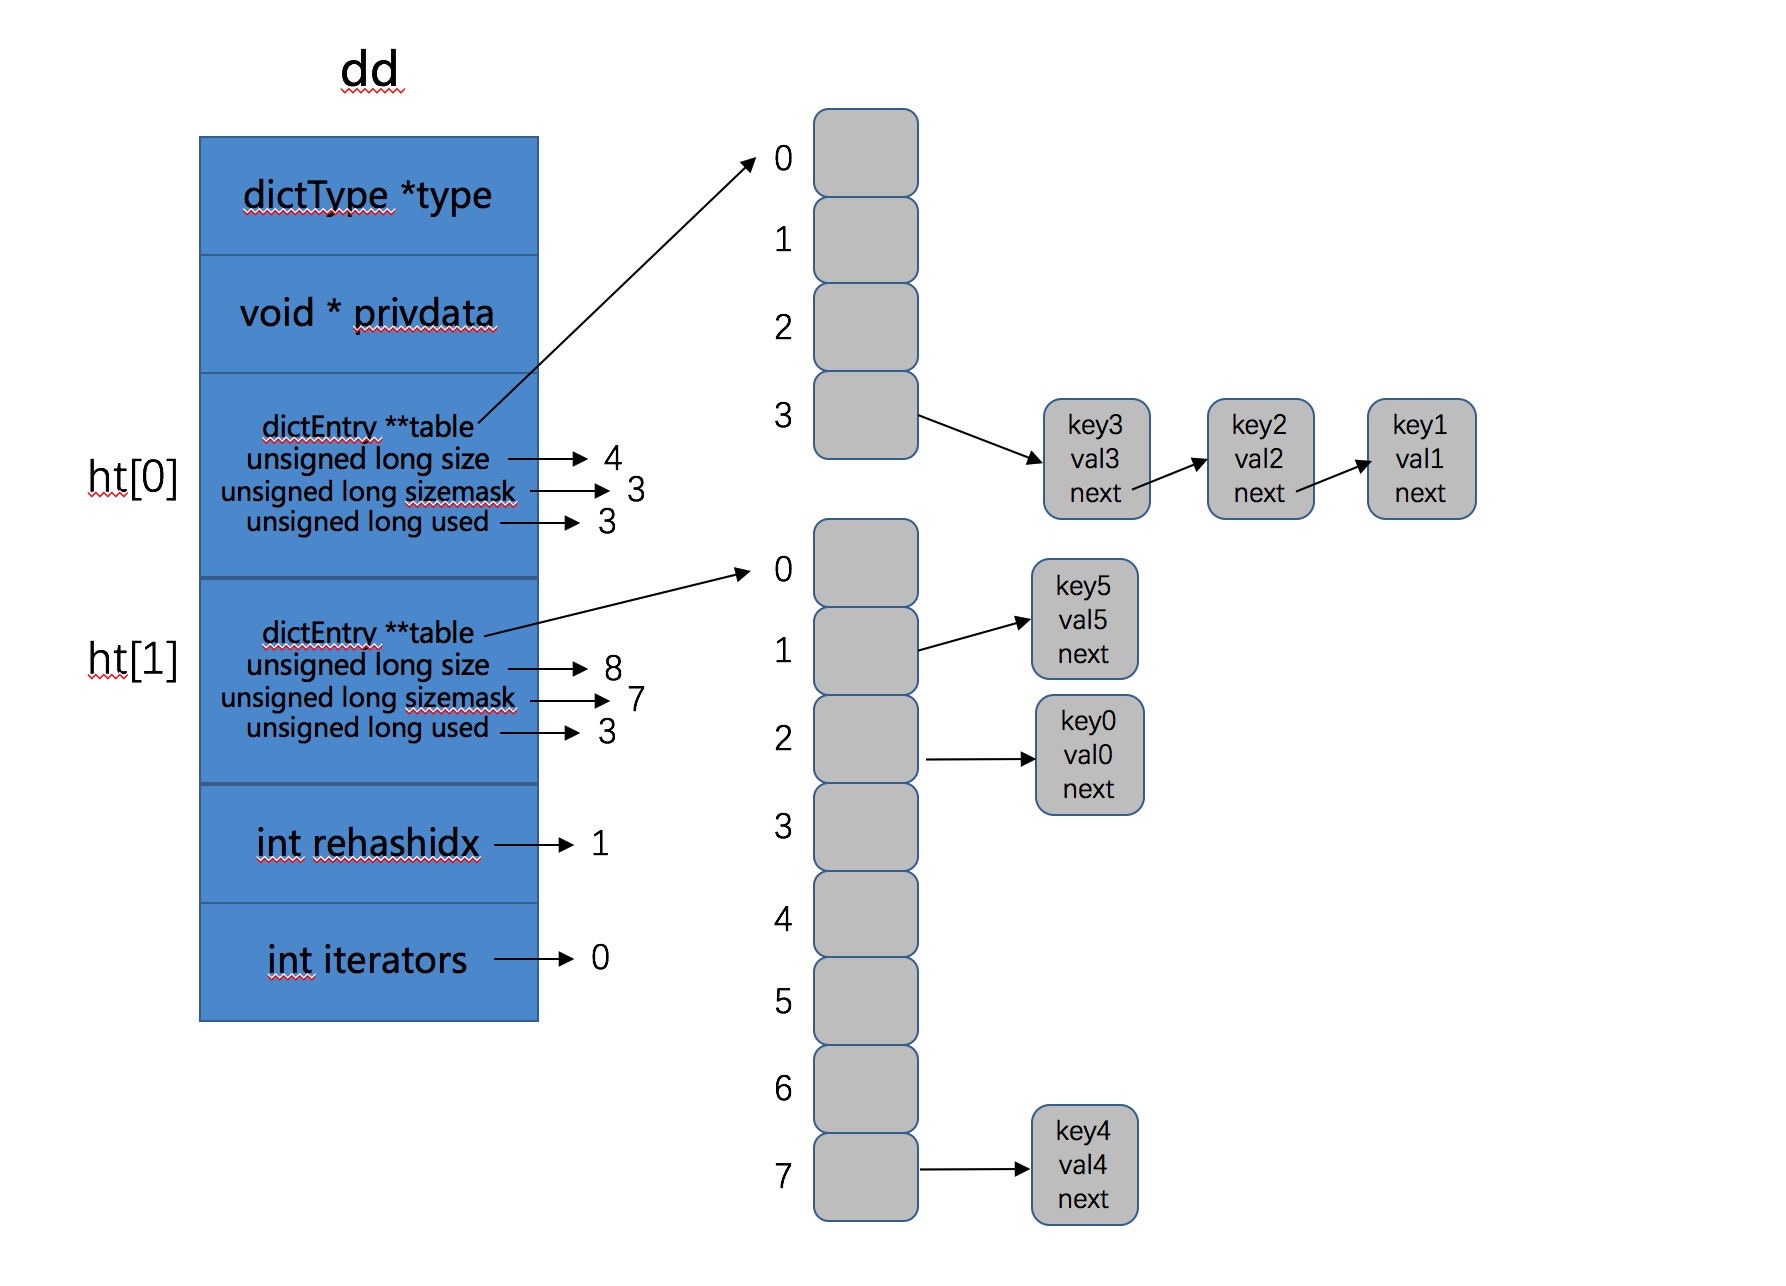
也就是此次dictAdd操作不仅将key5添加进去,还将 0 号Hash表中2号桶中的key0 ReHash到了 1 号Hash表上。所以此时的 2 号Hash表上有3个元素,如下:
Add ret5 is :0 ,ht[0].used :3, ht[0].size :4, ht[1].used :3, ht[1].size :8
图示结果如下所示:
- 接下来我们的程序执行了删除操作,dictDelete函数,实际上调用的是dictGenericDelete函数。
static dictEntry *dictGenericDelete(dict *d, const void *key, int nofree) {unsigned int h, idx;dictEntry *he, *prevHe;int table;if (d->ht[0].used == 0 && d->ht[1].used == 0) return NULL;if (dictIsRehashing(d)) _dictRehashStep(d);h = dictHashKey(d, key);for (table = 0; table <= 1; table++) {idx = h & d->ht[table].sizemask;he = d->ht[table].table[idx];prevHe = NULL;while(he) {if (key==he->key || dictCompareKeys(d, key, he->key)) {/* Unlink the element from the list */if (prevHe)prevHe->next = he->next;elsed->ht[table].table[idx] = he->next;if (!nofree) {dictFreeKey(d, he);dictFreeVal(d, he);zfree(he);}d->ht[table].used--;return he;}prevHe = he;he = he->next;}if (!dictIsRehashing(d)) break;}return NULL; /* not found */}
if (dictIsRehashing(d)) _dictRehashStep(d);实际上也执行了ReHash步骤,这次将 0 号哈希表上的剩余3个key全部ReHash到了 1 号哈希表上,这其实就是渐进式ReHash了,因为ReHash操作不是一次性、集中式完成的,而是多次进行,分散在增删改查中,这就是渐进式ReHash的思想。
渐进式ReHash是指ReHash操作不是一次集中式完成的,对于Redis来说,如果Hash表的key太多,这样可能导致ReHash操作需要长时间进行,阻塞服务器,所以Redis本身将ReHash操作分散在了后续的每次增删改查中。
说到这里,我有个问题:虽然渐进式ReHash分散了ReHash带来的问题,但是带来的问题是对于每次增删改查的时间可能是不稳定的,因为每次增删改查可能就需要带着ReHash操作,所以可不可以fork一个子进程去做这个事情呢?
继续看代码,接下来通过
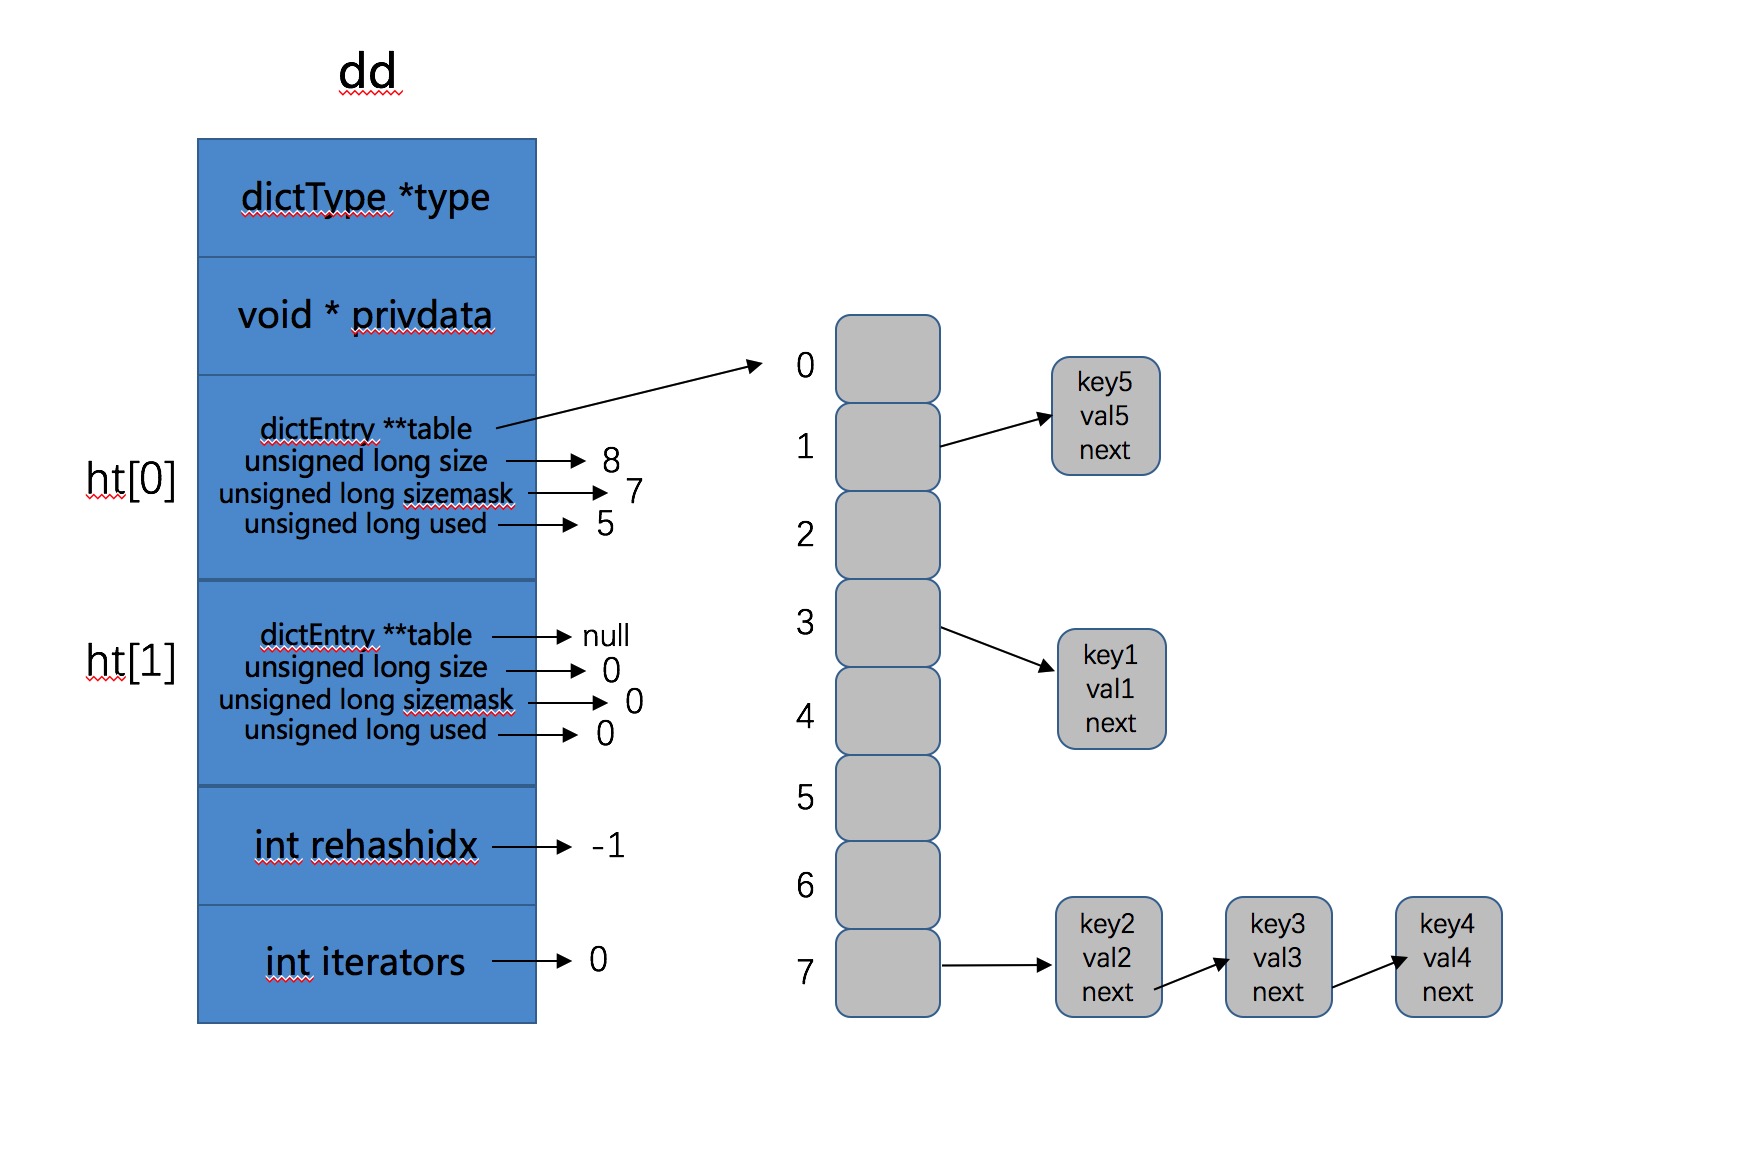
h = dictHashKey(d, key);计算出index,然后根据有无进行ReHash确定遍历2个Hash表还是一个Hash表。因为ReHash操作如果在进行的话,key不确定存在哪个Hash表中,没有被ReHash的话就在0号,否则就在1号。这次Delete操作成功删除了key0,而且将 0 号哈希表上的剩余3个key全部ReHash到了 1 号哈希表上,并且因为ReHash结束,所以将1号Hash表变成了0号哈希表,如图所示:
- 后续的删除操作清除了所有的key,然后我们调用了
dictRelease(dd)释放了这个字典。
void dictRelease(dict *d){_dictClear(d,&d->ht[0],NULL);_dictClear(d,&d->ht[1],NULL);zfree(d);}int _dictClear(dict *d, dictht *ht, void(callback)(void *)) {unsigned long i;/* Free all the elements */for (i = 0; i < ht->size && ht->used > 0; i++) {dictEntry *he, *nextHe;if (callback && (i & 65535) == 0) callback(d->privdata);if ((he = ht->table[i]) == NULL) continue;while(he) {nextHe = he->next;dictFreeKey(d, he);dictFreeVal(d, he);zfree(he);ht->used--;he = nextHe;}}/* Free the table and the allocated cache structure */zfree(ht->table);/* Re-initialize the table */_dictReset(ht);return DICT_OK; /* never fails */}
四、ReHash和渐进式ReHash
- Rehash:就是将原始Hash表(0号Hash表)上的Key重新按照Hash函数计算Hash值,存到新的Hash表(1号Hash表)的过程。
- 渐进式ReHash:是指ReHash操作不是一次性、集中式完成的,对于Redis来说,如果Hash表的key太多,这样可能导致ReHash操作需要长时间进行,阻塞服务器,所以Redis本身将ReHash操作分散在了后续的每次增删改查中。
具体情况看上面例子。
五、ReHash期间访问策略
Redis中默认有关Hash表的访问操作都会先去 0 号哈希表查找,然后根据是否正在ReHash决定是否需要去 1 号Hash表中查找,关键代码如下(dict.c->dictFind()):
for (table = 0; table <= 1; table++) {idx = h & d->ht[table].sizemask;he = d->ht[table].table[idx];while(he) {if (key==he->key || dictCompareKeys(d, key, he->key))return he;he = he->next;}if (!dictIsRehashing(d)) return NULL; //根据这一句判断是否需要在 1 号哈希表中查找。}
五、遍历
可以使用dictNext函数遍历:
dictIterator *i = dictGetIterator(dd); //获取迭代器dictEntry *de;while ((de = dictNext(i)) != NULL) { //只要结尾不为NULL,就继续遍历printf("%s->%s\n",(char*)de->key, (char*)de->v.val);}Out >key3->val3key2->val2key1->val1key5->val5key0->val0key4->val4
有关遍历函数dictSacn()的算法,也是个比较难的话题,有时间再看吧。
六、总结
这篇文章主要分析了dict的数据结构、创建、扩容、ReHash、渐进式ReHash,删除等机制。只是单纯的数据结构的分析,没有和Redis一些机制进行结合映射,这方面后续再补充,但是已经是一篇深度好文了 :)。
[完]
Redis源码分析(dict)的更多相关文章
- Redis源码分析:serverCron - redis源码笔记
[redis源码分析]http://blog.csdn.net/column/details/redis-source.html Redis源代码重要目录 dict.c:也是很重要的两个文件,主要 ...
- redis源码分析之事务Transaction(下)
接着上一篇,这篇文章分析一下redis事务操作中multi,exec,discard三个核心命令. 原文地址:http://www.jianshu.com/p/e22615586595 看本篇文章前需 ...
- redis源码分析之有序集SortedSet
有序集SortedSet算是redis中一个很有特色的数据结构,通过这篇文章来总结一下这块知识点. 原文地址:http://www.jianshu.com/p/75ca5a359f9f 一.有序集So ...
- Redis源码分析(intset)
源码版本:4.0.1 源码位置: intset.h:数据结构的定义 intset.c:创建.增删等操作实现 1. 整数集合简介 intset是Redis内存数据结构之一,和之前的 sds. skipl ...
- redis源码分析之发布订阅(pub/sub)
redis算是缓存界的老大哥了,最近做的事情对redis依赖较多,使用了里面的发布订阅功能,事务功能以及SortedSet等数据结构,后面准备好好学习总结一下redis的一些知识点. 原文地址:htt ...
- redis源码分析之事务Transaction(上)
这周学习了一下redis事务功能的实现原理,本来是想用一篇文章进行总结的,写完以后发现这块内容比较多,而且多个命令之间又互相依赖,放在一篇文章里一方面篇幅会比较大,另一方面文章组织结构会比较乱,不容易 ...
- Redis源码分析系列
0.前言 Redis目前热门NoSQL内存数据库,代码量不是很大,本系列是本人阅读Redis源码时记录的笔记,由于时间仓促和水平有限,文中难免会有错误之处,欢迎读者指出,共同学习进步,本文使用的Red ...
- Redis源码分析(skiplist)
源码版本: redis-4.0.1 源码位置: server.h :zskiplistNode和zskiplist的数据结构定义. t_zset.c: 以zsl开头的函数是SkipList相关的操作函 ...
- redis源码分析
我阅读的源码版本是redis-2.8.19 src目录下总共96个.h,.c文件 1. 数据结构相关源码(15个左右)字符串代码: sds.h, sds.c字典:dict.h, dict.c链表: a ...
随机推荐
- spy++查找窗口句柄
spy++可以用来查找桌面程序(c/s)的窗口句柄,实现自动化测试. def find_idxSubHandle(pHandle, winClass, index=0): ""&q ...
- 关于Postman你必须学会的技能
关于Postman 工欲善其事,必先利其器,在了解了接口测试之后,就要选择一款适用的工具.之所以选择postman是因为它简单.容易上手.能覆盖大多数HTTP接口测试场景,性价比极高. Postman ...
- Mybatis逆向工程和新版本MybatisPlus3.4逆向工程的使用
Mybatis和MybatisPlus3.4的使用 目录 Mybatis和MybatisPlus3.4的使用 1 RESTFUL 2 逆向工程 2.1 tkMybatis逆向工程 2.1.1 导入依赖 ...
- NOIP 模拟六 考试总结
T1辣鸡 T1就搞得这莫不愉快.. 大致题意是给你几个矩形,矩形覆盖的点都标记上,每个矩形无重复部分,求满足(x,y) (x+1,y+1)都标记过的点对数,范围1e9. 看起来很牛的样子,我确实也被1 ...
- display:none、visibility:hidden,opacity:0三者区别
1. display:none 设置display:none,让这个元素消失 消失不占据原本任何位置 连带子元素一起消失 元素显示:display:block 2. visibility:hidden ...
- SpringPlugin-Core在业务中的应用
前言 一直负责部门的订单模块,从php转到Java也是如此,换了一种语言来实现订单相关功能.那么Spring里有很多已经搭建好基础模块的设计模式来帮助我们解耦实际业务中的逻辑,用起来非常的方便!就比如 ...
- Linear Referencing Tools(线性参考工具)
线性参考工具 # Process: 创建路径 arcpy.CreateRoutes_lr("", "", 输出路径要素类, "LENGTH" ...
- Miller-Rabin and Pollard-Rho
实话实说,我自学(肝)了两天才学会这两个随机算法 记录: Miller-Rabin 她是一个素数判定的算法. 首先需要知道费马小定理 \[a^{p-1}\equiv1\pmod{p}\quad p\i ...
- 虚拟机Parallels Desktop 17 (PD17)支持M1 自己动手制作启动器解锁
个人博客:xzajyjs.cn 如果自己有能力的话,直接查看这个视频即可.点此 前段时间刚出pd17,作为mac上最最强(没有之一)的虚拟机,版本17更是更进一步,性能提升极大,更是支持了Monter ...
- Java只有值传递
二哥,好久没更新面试官系列的文章了啊,真的是把我等着急了,所以特意过来催催.我最近一段时间在找工作,能从二哥的文章中学到一点就多一点信心啊! 说句实在话,离读者 trust you 发给我这段信息已经 ...