AntD02 Table组件的使用
1 前提准备
1.1 创建一个angular项目
1.2 将 Ant Design 整合到 Angular 项目中
1.3 官方文档
2 简单使用
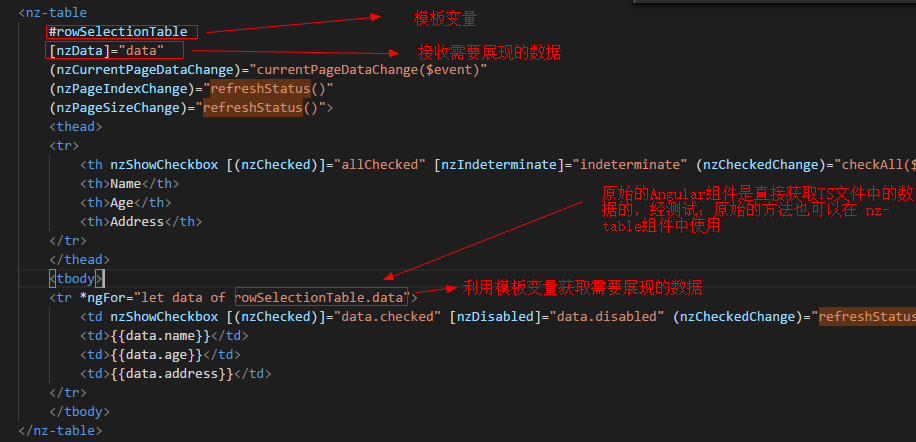
<nz-table

    #rowSelectionTable

    [nzData]="data"

    (nzCurrentPageDataChange)="currentPageDataChange($event)"

    (nzPageIndexChange)="refreshStatus()"

    (nzPageSizeChange)="refreshStatus()">

    <thead>

    <tr>

        <th nzShowCheckbox [(nzChecked)]="allChecked" [nzIndeterminate]="indeterminate" (nzCheckedChange)="checkAll($event)"></th>

        <th>Name</th>

        <th>Age</th>

        <th>Address</th>

    </tr>

    </thead>

    <tbody>

    <tr *ngFor="let data of rowSelectionTable.data">

        <td nzShowCheckbox [(nzChecked)]="data.checked" [nzDisabled]="data.disabled" (nzCheckedChange)="refreshStatus($event)"></td>

        <td>{{data.name}}</td>

        <td>{{data.age}}</td>

        <td>{{data.address}}</td>

    </tr>

    </tbody>

</nz-table>
.html
import { Component, OnInit } from '@angular/core';

import { HttpClient } from '@angular/common/http';

@Component({

  selector: 'app-test-demo',

  templateUrl: './test-demo.component.html',

  styleUrls: ['./test-demo.component.css']

})

export class TestDemoComponent implements OnInit {

  allChecked = false; // 判断是否全部被选中(PS: 有效的全部被选中)

  indeterminate = false;  // 只要有选中但是不是全部选中就会变成true

  displayData = []; // 存放本页数据

  data = [ // 模拟后台数据

    {

      name    : 'John Brown',

      age     : 32,

      address : 'New York No. 1 Lake Park',

      checked : false,

      disabled: false

    },

    {

      name    : 'Jim Green',

      age     : 42,

      address : 'London No. 1 Lake Park',

      checked : false,

      disabled: false

    },

    {

      name    : 'Joe Black',

      age     : 32,

      address : 'Sidney No. 1 Lake Park',

      checked : false,

      disabled: false

    },

    {

      name    : 'Disabled User',

      age     : 32,

      address : 'Sidney No. 1 Lake Park',

      checked : false,

      disabled: true

    }

  ];

  ngOnInit() {

  }

  currentPageDataChange($event: Array<{ name: string; age: number; address: string; checked: boolean; disabled: boolean; }>): void {

    this.displayData = $event; // 获取本页数据

    // console.log(this.displayData);

    alert("currentPageDataChange");

    this.refreshStatus(); // 刷新操作

  }

  /** 选中一行后触发被触发的方法 */

  refreshStatus(): void {

    alert("refreshStatus");

    const allChecked = this.displayData.filter(value => !value.disabled).every(value => value.checked === true); // 判断是否选中所有行(PS:针对有效的)

    const allUnChecked = this.displayData.filter(value => !value.disabled).every(value => !value.checked); // 判断是否所有的没被选中(PS:针对无效的)

    this.allChecked = allChecked;

    this.indeterminate = (!allChecked) && (!allUnChecked);

  }

  // 选中所有行(PS:有效的所有行)

  checkAll(value: boolean): void {

    alert("checkAll");

    this.displayData.forEach(data => {

      if (!data.disabled) {

        data.checked = value;

      }

    });

    this.refreshStatus();

  }

}
.ts
2.1 nz-table 组件的属性
2.1.1 nzData 属性
antD的table组件接收的数据类型必须是数组类型;nz-table 组件的 nzData 属性用来接收需要展现的数据
技巧01:如果使用了 nzData 属性来接收数据的话,就可以为 nz-table 组件指定一个模板变量,然后就可以用这个模板变量来获取 nzData 属性接收到的数据了
2.1.2 nzIndeterminate 属性
判断是否还有有效数据没被选中,如果所有的有效数据都被选中或者所有有效数据都没被选中 nzIndeterminate 就为 false; 如果只有部分有效数据被选中就为 true
2.1.3 nzDisabled 属性
接收 boolean 类型数据,该属性表示该行数据是否有效;如果为 true 表示数据有效,反之数据无效
2.2 nz-table 组件的事件
2.2.1 nzCurrentPageDataChange 事件
该事件用来获取当前页的所有展现出来的数据;在进行翻页操作的时候就会触发该方法
技巧01:table组件默认每页显示10条数据
技巧02:可以利用 nzCurrentPageDataChange 来获取当页数据;但是需要自己编写对应的时间处理方法, 例如
  currentPageDataChange($event: Array<{ name: string; age: number; address: string; checked: boolean; disabled: boolean; }>): void {

    this.displayData = $event; // 获取本页数据

    // console.log(this.displayData);

    alert("currentPageDataChange");

    this.refreshStatus(); // 刷新操作

  }
2.2.2 nzPageIndexChange 事件
2.2.3 nzPageSizeChange 事件
2.2.3 nzCheckedChange 事件
复选框被选中时触发的事件
技巧01:如果 nzCheckedChange 用在表头可以用于选中所有有效数据
技巧02:如果 nzCheckedChange 用在除表头以外的行时可以用于获取当前行数据
技巧03:nzCheckedChange 对应的事件处理方法需要自己定义, 例如:
  /** 选中一行后触发被触发的方法 */

  refreshStatus(): void {

    alert("refreshStatus");

    const allChecked = this.displayData.filter(value => !value.disabled).every(value => value.checked === true); // 判断是否选中所有行(PS:针对有效的)

    const allUnChecked = this.displayData.filter(value => !value.disabled).every(value => !value.checked); // 判断是否所有的没被选中(PS:针对无效的)

    this.allChecked = allChecked;

    this.indeterminate = (!allChecked) && (!allUnChecked);

  }

  // 选中所有行(PS:有效的所有行)

  checkAll(value: boolean): void {

    alert("checkAll");

    this.displayData.forEach(data => {

      if (!data.disabled) {

        data.checked = value;

      }

    });

    this.refreshStatus();

  }
技巧04:如果在 html 文件中调用自定义方法时传入的实参是 $event, 那么自定义处理 nzCheckedChange 的方法的形参就只能是 boolean 类型;当然将形参指定文任意值,然后在html中调用时随便传入即可,最常见的做法就是将选中行的数据传过去
2.3 nz-table 组件的指令
2.3.1 nzShowCheckbox 指令
增加 nzShowCheckbox 后的th/td将获得和 nz-checkbox 一样的功能,即:成为一个复选框
2.4 nz-table 组件的双向绑定
2.4.1 nzChecked 双向绑定
nzChecked 接收 boolean 类型的数据;他的作用是指定复选框是否被选中;nzChecked 为 true 时表示选中,反之未选中
技巧01:nzChecked 只能用在使用了 nzShowCheckbox 的 th/td 上
3 选择和操作
<!-- 处理选中的数据 start  -->

<div style="margin-bottom: 16px;">

    <button nz-button [disabled]="disabledButton" [nzType]="'primary'" [nzLoading]="operating" (click)="operateData()">

        执行选中

    </button>

    <span style="margin-left: 8px;" *ngIf="checkedNumber">Selected {{checkedNumber}} items</span>

</div>

<!-- 处理选中的数据 end -->

<nz-table

    #rowSelectionTable

    [nzData]="dataSet"

    (nzCurrentPageDataChange)="currentPageDataChange($event)"

    (nzPageIndexChange)="refreshStatus()"

    (nzPageSizeChange)="refreshStatus()">

    <thead>

        <tr>

        <th nzShowCheckbox [(nzChecked)]="allChecked" [nzIndeterminate]="indeterminate" (nzCheckedChange)="checkAll($event)"></th>

        <th>Name</th>

        <th>Age</th>

        <th>Address</th>

        </tr>

    </thead>

    <tbody>

        <tr *ngFor="let data of rowSelectionTable.data">

        <td nzShowCheckbox [(nzChecked)]="data.checked" (nzCheckedChange)="refreshStatus($event)"></td>

        <td>{{data.name}}</td>

        <td>{{data.age}}</td>

        <td>{{data.address}}</td>

        </tr>

    </tbody>

</nz-table>
.html
import { Component, OnInit } from '@angular/core';

import { HttpClient } from '@angular/common/http';

@Component({

  selector: 'app-test-demo',

  templateUrl: './test-demo.component.html',

  styleUrls: ['./test-demo.component.css']

})

export class TestDemoComponent implements OnInit {

  allChecked = false; // 是否全部选中

  disabledButton = true; // 按钮是否失效

  checkedNumber = 0; // 选中行数

  displayData: Array<{ name: string; age: number; address: string; checked: boolean }> = []; // 选中的数据

  operating = false; // 操作样式是否生效

  dataSet = []; // 模拟后台数据

  indeterminate = false; // 是否还有不确定的

  /** 获取当前页数据 */

  currentPageDataChange($event: Array<{ name: string; age: number; address: string; checked: boolean }>): void {

    this.displayData = $event;

    console.log(this.displayData);

  }

  /** 刷新 */

  refreshStatus(): void {

    const allChecked = this.displayData.every(value => value.checked === true); // 判断有效数据是否全部选中

    const allUnChecked = this.displayData.every(value => !value.checked); // 判断无效数据是否都没选中

    this.allChecked = allChecked; // 刷新是否全选中

    this.indeterminate = (!allChecked) && (!allUnChecked); // 刷新是否有不确定数据

    this.disabledButton = !this.dataSet.some(value => value.checked); // 刷新按钮是否有效(PS:只要有有效数据被选中disabledButton就会变成false)

    this.checkedNumber = this.dataSet.filter(value => value.checked).length; // 刷新选中行数

  }

  /** 全选事件执行方法 + 刷新 */

  checkAll(value: boolean): void {

    this.displayData.forEach(data => data.checked = value);

    this.refreshStatus();

  }

  /** 数据处理方法  */

  operateData(): void {

    this.operating = true;  // 使数据操作样式生效

    // 延时1秒钟来模拟数据操作

    setTimeout(_ => {

      // 官方例子:对选中的数据进行取消选中操作

      // this.dataSet.forEach(value => value.checked = false); // 数据操作完成后将所有选中的数据变成未选中状态

      // 三少的例子:删除被选中的数据

      let newData = [];

      newData = this.dataSet.filter(value => value.checked == false);

      this.dataSet = newData;

      this.refreshStatus(); // 刷新

      this.operating = false; // 使数据操作样式失效

    }, 1000);

  }

  ngOnInit(): void {

    // 模拟数据

    for (let i = 0; i < 46; i++) {

      this.dataSet.push({

        name   : `Edward King ${i}`,

        age    : 32,

        address: `London, Park Lane no. ${i}`,

        checked: false

      });

    }

  }

}
.ts
AntD02 Table组件的使用的更多相关文章
- React中使用Ant Table组件
一.Ant Design of React http://ant.design/docs/react/introduce 二.建立webpack工程 webpack+react demo下载 项目的启 ...
- 使用 antd Table组件, 异步获取数据
使用React.js + Redux + antd 制作CMS 后台内容管理系统,分享一点点积累,欢迎讨论. 在this.state中初始化数据: this.state = { pageNum:1, ...
- 【Ireport】利用Ireport5.2的table组件迅速制作表格导出pdf
转载请注明网址.Ireport table dataset Ireport在半年前还是4.7,今天无意发现,居然出到了5.2就搞一把. 首先,去下载Ireport,并进行安装.这个我就不演示了.下载完 ...
- Ant Table组件
http://www.cnblogs.com/hujunzheng/p/5689650.html React中使用Ant Table组件 v一.Ant Design of React http:/ ...
- iview中,table组件在缩进时产生的bug。
问题描述: 在父元素因为缩进的关系撑开时,table组件不会因为父元素的撑开而自适应,问题如图 解决办法:在父一级的组件中使用table {width: 100% !important},强制使表格宽 ...
- react ,ant Design UI中table组件合并单元格并展开详情的问题
需求:购物车订单列表,如图: 一:单元格合并 遇到这种你会怎么办呢? 单元格合并? 还是其他的方法? 下面是我的处理方式,就是在table 组件的columns上处理,这里拿商品举例,其余的类似, ...
- 在 Element-UI 的 Table 组件上添加列拖拽效果
Element-UI 的 Table组件很强大,但是我们的需求更强大... 简单粗暴的来一发效果图: 一.数据驱动 传统的拖动效果,都是基于通过 mousedown.mousemove.mouseup ...
- 微信小程序简易table组件实现
前提:微信小程序自1.6.3基础库版本库开始支持简洁组件,之前的版本因不支持,故在引用组件处默认为空节点.关于微信小程序已有模板为何还需构建组件?一是因为组件可以更方便的自定义并绑定行为,二是在其他页 ...
- elment-ui table组件 -- 远程筛选排序
elment-ui table组件 -- 远程筛选排序 基于 elment-ui table组件 开发,主要请求后台实现筛选 排序的功能. 需求 排序 筛选 是对后台整个数据进行操作,而不是对当前页面 ...
随机推荐
- 【前端】HTML入门笔记
教程 HTML 指的是超文本标记语言 (Hyper Text Markup Language).使用标记标签来描述网页 HTML 提示:使用小写标签\属性\属性参考手册\HTML颜色\HTML颜色名 ...
- [BZOJ5133][CodePlus2017年12月]白金元首与独舞
bzoj luogu 题意 给你一个\(n*m\)的网格,每个位置上有一个箭头指向上或下或左或右.有些位置上还没有箭头,现在要求你在这些没有箭头的位置上填入箭头,使得从网格的任意一个位置开始,都可以沿 ...
- 2.1 一个简单的Web工程例子
一个简单的Web工程例子 开发环境: Eclipse: Neon Release (4.6.0) JDK:1.8.0_92 Tomcat:8.5.9 Maven:3.3.9 1. 在Eclipse中创 ...
- 【CSS3】 - 初识CSS3
.navdemo{ width:560px; height: 50px; font:bold 0/50px Arial; text-align:center; margin:40px auto 0; ...
- FastAdmin 导出 Excel 相关资料收集 (2018-08-14)
FastAdmin 导出 Excel 相关资料收集 导出 Excel 文件时身份证号变成科学计数法怎么办? https://forum.fastadmin.net/thread/1346 姊妹篇 Fa ...
- PHP MysqlI操作数据库(转)
1连接数据库. Code highlighting produced by Actipro CodeHighlighter (freeware) http://www.CodeHighlighter. ...
- hbase使用中需要注意一些问题
接触hbase已经两年之久,但是真正的在实际项目中使用却只有半年的时间,使用过程中,一方面在在为hbase强大的性能兴奋之余,另一方面却也给我和我的团队造成了很多的麻烦,起初在使用我的水平也就停留在会 ...
- implicit declaration of function 'init_MUTEX'
'init_MUTEX' 在新版本系统上已被淘汰 改用sema_init(sem, 1);
- 蓝桥杯 算法训练 ALGO-36 传纸条
算法训练 传纸条 时间限制:1.0s 内存限制:512.0MB 问题描述 小渊和小轩是好朋友也是同班同学,他们在一起总有谈不完的话题.一次素质拓展活动中,班上同学安排做成一个m行n列的矩阵,而 ...
- 自定义第三方YUM源
1.切换到cloudboot系统目录中 2.拷贝repodata目录的*-repo.xml文件到系统目录下 3.删除系统目录的repodata目录 4.编辑repo.xml内容,base添加rpm包包 ...