ActiveMQ(2) ActiveMQ创建HelloWorld
启动ActiveMQ:
创建Maven工程:
pom文件:
 <project xmlns="http://maven.apache.org/POM/4.0.0" xmlns:xsi="http://www.w3.org/2001/XMLSchema-instance"

   xsi:schemaLocation="http://maven.apache.org/POM/4.0.0 http://maven.apache.org/xsd/maven-4.0.0.xsd">

   <modelVersion>4.0.0</modelVersion>

   <groupId>com.itdoc.learn</groupId>

   <artifactId>activemq</artifactId>

   <version>1.0-SNAPSHOT</version>

   <packaging>jar</packaging>

   <name>activemq</name>

   <url>http://maven.apache.org</url>

   <properties>

     <project.build.sourceEncoding>UTF-8</project.build.sourceEncoding>

   </properties>

   <dependencies>

     <dependency>

       <groupId>org.apache.activemq</groupId>

       <artifactId>activemq-all</artifactId>

       <version>5.15.2</version>

     </dependency>

     <dependency>

       <groupId>junit</groupId>

       <artifactId>junit</artifactId>

       <version>3.8.1</version>

       <scope>test</scope>

     </dependency>

   </dependencies>

 </project>
pom.xml
创建消息生产者:
 /**

  * @filename Sender.Java

  * @desc 消息生产者

  * @blog http://www.cnblogs.com/goodcheap

  * @author Chinda Wang

  * @create 2017-12-02 16:06

  * @version v1.0

  * @copyright Copyright © 2017 达华信息科技有限公司 版权所有

  * @modifyhistory 2017-12-02 16:06

  * @modifyauthor Chinda Wang

  * @modifydesc

  */

 package com.itdoc.learn.activemq.helloworld;

 import org.apache.activemq.ActiveMQConnectionFactory;

 import javax.jms.*;

 /**

  * @author Chinda Wang

  * @desc 消息生产者

  * @create 2017-12-02 16:06

  */

 public class Sender {

     public static void main(String[] args) throws Exception {

         // 第一步: 建立 ConnectionFactory 工厂对象, 需要填入用户名、密码、以及要连接的地址, 均使用默认即可, 默认端口为"tcp//loclhost:61616"

         ConnectionFactory connectionFactory = new ActiveMQConnectionFactory(

                 ActiveMQConnectionFactory.DEFAULT_USER,

                 ActiveMQConnectionFactory.DEFAULT_PASSWORD,

                 "tcp://localhost:61616");

         // 第二步: 通过ConnectionFactory工厂对象创建一个Connection连接, 并且调用Connection的start方法开启连接, Connection默认是关闭的。

         Connection connection = connectionFactory.createConnection();

         connection.start();

         /*

          * 第三步: 通过Connection对象创建Session会话(上下文环境对象), 用于接收消息, 参数位置1为是否启用事务, 参数位置2为签收模式,

          * 一般设置为自动签收。

          */

         Session session = connection.createSession(Boolean.FALSE, Session.AUTO_ACKNOWLEDGE);

         /*

          * 第四步: 通过Session创建Destination对象, 指的是一个客户端用来指定生产消息目标和消费消息来源的对象, 在PTP模式中, Destination

          * 被称作为Queue, 即队列; 在Pub/Sub模式, Destination被称作Topic, 即主题。在程序中可以使用多个Queue和Topic。

          */

         Destination destination = session.createQueue("queue1");

         // 第五步: 需要通过Session对象创建消息的发送和接收对象(生产者和消费者)MessageProducer/MessageConsumer

         MessageProducer producer = session.createProducer(destination);

         // 第六步: 可以使用MessageProducer的setDeliveryMode()方法为其设置持久化特性和非持久化特性(DeliveryMode)。

         producer.setDeliveryMode(DeliveryMode.NON_PERSISTENT);

         /*

          * 第七步: 使用JMS规范的TextMessage形式创建数据(通过Session对象), 并用MessageProducer的send()方法发送数据。同理, 客户端使用

          * receive()方法进行接收数据。

          */

         TextMessage textMessage = session.createTextMessage();

         for (int i = 1; i <= 10; i++) {

             textMessage.setText("I am Message! id: " + i);

             producer.send(textMessage);

             System.out.println("生产者: " + textMessage.getText());

         }

         // 第八步: 关闭Connection连接

         if (connection != null) {

             connection.close();

         }

     }

 }
Sender.Java
创建消息消费者:
 /**

  * @filename Receiver.Java

  * @desc 消息消费者

  * @blog http://www.cnblogs.com/goodcheap

  * @author Chinda Wang

  * @create 2017-12-02 16:07

  * @version v1.0

  * @copyright Copyright © 2017 达华信息科技有限公司 版权所有

  * @modifyhistory 2017-12-02 16:07

  * @modifyauthor Chinda Wang

  * @modifydesc

  */

 package com.itdoc.learn.activemq.helloworld;

 import org.apache.activemq.ActiveMQConnectionFactory;

 import javax.jms.*;

 /**

  * @desc 消息消费者

  * @author Chinda Wang

  * @create 2017-12-02 16:07

  */

 public class Receiver {

     public static void main(String[] args) throws Exception {

         // 第一步: 建立 ConnectionFactory 工厂对象, 需要填入用户名、密码、以及要连接的地址, 均使用默认即可, 默认端口为"tcp//loclhost:61616"

         ConnectionFactory connectionFactory = new ActiveMQConnectionFactory(

                 ActiveMQConnectionFactory.DEFAULT_USER,

                 ActiveMQConnectionFactory.DEFAULT_PASSWORD,

                 "tcp://localhost:61616");

         // 第二步: 通过ConnectionFactory工厂对象创建一个Connection连接, 并且调用Connection的start方法开启连接, Connection默认是关闭的。

         Connection connection = connectionFactory.createConnection();

         connection.start();

         /*

          * 第三步: 通过Connection对象创建Session会话(上下文环境对象), 用于接收消息, 参数位置1为是否启用事务, 参数位置2为签收模式,

          * 一般设置为自动签收。

          */

         Session session = connection.createSession(Boolean.FALSE, Session.AUTO_ACKNOWLEDGE);

         /*

          * 第四步: 通过Session创建Destination对象, 指的是一个客户端用来指定生产消息目标和消费消息来源的对象, 在PTP模式中, Destination

          * 被称作为Queue, 即队列; 在Pub/Sub模式, Destination被称作Topic, 即主题。在程序中可以使用多个Queue和Topic。

          */

         Destination destination = session.createQueue("queue1");

         // 第五步: 需要通过Session对象创建消息的发送和接收对象(生产者和消费者)MessageProducer/MessageConsumer

         MessageConsumer consumer = session.createConsumer(destination);

         /*

          * 第六步: 使用JMS规范的TextMessage形式创建数据(通过Session对象), 并用MessageProducer的send()方法发送数据。同理, 客户端使用

          * receive()方法进行接收数据。

          */

         while (true) {

             TextMessage msg = (TextMessage) consumer.receive();

             if (msg == null) {

                 break;

             }

             System.out.println("收到内容: " + msg.getText());

         }

         // 第七步: 关闭Connection连接

         if (connection != null) {

             connection.close();

         }

     }

 }
Receiver.Java
运行消息生产者,控制台输出:

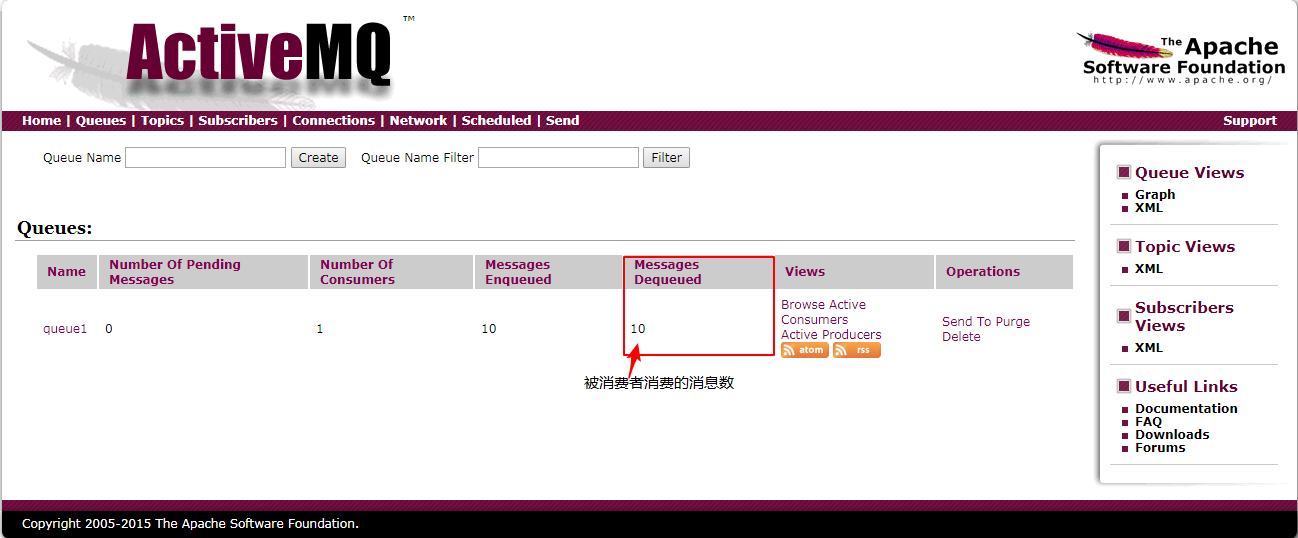
ActiveMQ消息页:

消息生产者创建了一个名称为 queue1的消息队列, 队列中有10条消息待消费, 通过Browse查询消息详情。

这些队列中的消息被删除, 消息消费者则无法消费此消息。
运行消息消费者, 控制台输出:

消息页:
ActiveMQ(2) ActiveMQ创建HelloWorld的更多相关文章
- 【分布式系列之ActiveMq】ActiveMq入门示例
前言 github地址:https://github.com/AndyFlower/web-back/tree/master/ActiveMq01 下载ActiveMQ :http://activem ...
- 【ActiveMQ】ActiveMQ在CentOS的搭建与使用
下载 到ActiveMQ官网,找到下载点. 目前, 官网为http://activemq.apache.org/. 我们下载目前最新的版本吧,当前的Linux版本下载地址之一为:http://apac ...
- ActiveMQ之一--ActiveMQ入门
MQ的消费-生产者模型的一个典型的代表,一端往消息队列中不断的写入消息,而另一端则可以读取或者订阅队列中的消息.MQ和JMS类似,但不同的是JMS是SUN JAVA消息中间件服务的一个标准和API定义 ...
- (转)Android Studio系列教程一下载与安装 背景Android Studio VS Eclipse准备下载创建HelloWorld项目
背景 相信大家对Android Studio已经不陌生了,Android Studio是Google于2013 I/O大会针对Android开发推出的新的开发工具,目前很多开源项目都已经在采用,Goo ...
- 跟着刚哥学习Spring框架--创建HelloWorld项目(一)
1.Spring框架简介 Spring是一个开源框架,Spring是在2003年兴起的一个轻量级的开源框架,由Rod johnson创建.主要对JavaBean的生命周期进行管理的轻量级框架,Spri ...
- linux下配置python环境 django创建helloworld项目
linux下配置python环境 1.linux下安装python3 a. 准备编译环境(环境如果不对的话,可能遇到各种问题,比如wget无法下载https链接的文件) yum groupinstal ...
- 2.Android-sdk目录介绍、ADT使用介绍、创建helloworld
1.android中常用名词介绍 ADT: ADT为Eclipse的插件.为Eclipse和SDK之间起了一个桥梁的作用. SDK: 软件开发工具包(Soft Development Kit),它为 ...
- ActiveMQ P2P版的HelloWorld
1.2 JMS应用程序接口 ConnectionFactory: 用户用来创建到JMS提供者的连接的被管对象.JMS客户通过可移植的接口访问连接,这样当下层的实现改变时,代码不需要进行修改. 管理员 ...
- ActiveMQ(3) ActiveMQ创建(simpleAuthenticationPlugin)安全认证
控制端安全认证: ActiveMQ目录conf下jetty.xml: <bean id="securityLoginService" class="org.ecli ...
随机推荐
- Create Fiori List App Report with ABAP CDS view – PART 1
From Create Fiori List App Report with ABAP CDS view – PART 1 In this blog, I am going to show How C ...
- python, pycharm, virtualenv 的使用
创建虚拟环境,一次安装多个库 pip freeze > requirements.txt (库的名字都在里面) 产生requirements.txt文件 在另一个环境下使用 pip instal ...
- 521. [NOIP2010] 引水入城 cogs
521. [NOIP2010] 引水入城 ★★★ 输入文件:flow.in 输出文件:flow.out 简单对比时间限制:1 s 内存限制:128 MB 在一个遥远的国度,一侧是风景秀 ...
- React16版本的新特性
React16版本更新的新特性 2018年05月03日 21:27:56 阅读数:188 1.render方法的返回值类型:New render return types 之前的方式: class A ...
- Linux用户态程序计时方式详解[转]
转自: http://www.cnblogs.com/clover-toeic/p/3845210.html 前言 良好的计时器可帮助程序开发人员确定程序的性能瓶颈,或对不同算法进行性能比较.但要精确 ...
- 从一个线上服务器警告谈谈backlog
缘起 双十一如期而至,此时的我因为在处理客户的一个问题已经陷入了忙碌.突然,不断接到驻场实施发来的反馈,都是相同的反馈--"客户端操作缓慢". 我现在负责的服务器是一台接口服务器, ...
- PostgreSQL 10.0 压缩版的 pgAdmin 不能用的问题
PostgreSQL终于发布10.0正式版了!下载压缩版的更新了一下本机的版本,然后打开pgAdmin的时候总是报错“The application server could not be conta ...
- 【紫书】(UVa12563)Jin Ge Jin Qu hao
继续战dp.不提. 题意分析 这题说白了就是一条01背包问题,因为对于给定的秒数你只要-1s(emmmmm)然后就能当01背包做了——那1s送给劲歌金曲(?).比较好玩的是这里面dp状态的保存——因为 ...
- Ubuntu16.04安装Zabbix
基于Zabbix+MySQL+Apache(可选) apt-get install php7.0-bcmath php7.0-xml php7.0-mbstring安装Zabbix所需的几个PHP模块 ...
- JMeter上传图片
JMeter怎样上传图片? 请注意图片的路径要与.jmx脚本的目录保持一致, 或者放在JMeter的bin目录下. 协议:http 服务器名称或IP:www.abcdef.com 方法:POST 路径 ...