ansible安装应用软件
1.创建相应的目录:
mkdir -p /ansible/roles/{nginx,mysql,tomcat,db,zabbix}/{defaults,files,handlers,meta,tasks,templates,vars}
2 文件结构
[root@MSJTVL-MJSP-A35 etc]# tree ansible/
ansible/
├── ansible.cfg
├── hosts #配置主机相关信息
├── roles
│ ├── db
│ │ ├── defaults
│ │ ├── files
│ │ │ └── stu.sql #要导入的sql
│ │ ├── handlers
│ │ ├── meta
│ │ ├── tasks
│ │ │ └── main.yml #创建数据库和导入SQL
│ │ ├── templates
│ │ └── vars
│ ├── mysql
│ │ ├── defaults
│ │ ├── files
│ │ │ └── mysql_install.sh #mysql源码和安装脚本
│ │ ├── handlers
│ │ ├── meta
│ │ ├── tasks
│ │ │ └── main.yml #安装mysql
│ │ ├── templates
│ │ └── vars
│ ├── nginx
│ │ ├── default
│ │ ├── defaults
│ │ ├── files
│ │ │ ├── install_nginx.sh #nginx安装脚本
│ │ │ ├── nginx-1.10.0.tar.gz #nginx安装程序包
│ │ │ └── ngx_cache_purge-2.3.tar.gz
│ │ ├── handlers
│ │ ├── meta
│ │ ├── tasks
│ │ │ └── main.yml #安装nginx
│ │ ├── templates
│ │ │ └── nginx.conf #nginx配置文件
│ │ └── vars
│ ├── tomcat
│ │ ├── defaults
│ │ ├── files
│ │ ├── handlers
│ │ │ └── main.yml #安装后处理
│ │ ├── meta
│ │ ├── tasks
│ │ │ └── main.yml #安装tomcat
│ │ ├── templates
│ │ └── vars
│ └── zabbix
│ ├── defaults
│ ├── files
│ │ ├── install_zabbix.sh #安装zabbix客户端脚本
│ │ ├── zabbix-3.0.7.tar.gz #zabbix安装包
│ │ └── zabbix_agentd.conf #zabbix客户端配置文件
│ ├── handlers
│ ├── meta
│ ├── tasks
│ │ └── main.yml #安装zabbix
│ ├── templates
│ └── vars
├── web.retry
├── webservice.yml
└── web.yml #总的调用文件
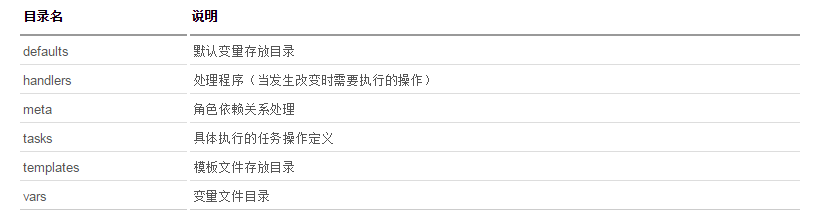
各目录功能说明
3.解决“Aborting, target uses selinux but python bindings (libselinux-python) aren't installed!”问题:
更新python库:
yum -y install libselinux-python
4.playbooks&shell
/etc/ansible/web.yml
- hosts: lzy

  remote_user: root

  roles:

    - nginx

    - zabbix

    - mysql
/etc/ansible/roles/db/tasks/main.yml
---

- name: create db

  mysql_db: name=student state=present login_password=bingoclo123 login_user=root login_unix_socket=/data/mysql/data/mysql.sock

- name: copy sql file

  copy: src=stu.sql dest=/tmp

- name: import sql

  mysql_db: name=student state=import target=/tmp/stu.sql login_password=bingoclo123 login_user=root login_unix_socket=/data/mysql/data/mysql.sock
/etc/ansible/roles/db/files/stu.sql
create table profile(name varchar(20),age tinyint);

 insert into profile(name,age) values('teddy',12);
/etc/ansible/roles/nginx/tasks/main.yml
- name: copy nginx_tar_gz to client

  copy: src=/etc/ansible/roles/nginx/files/nginx-1.10.0.tar.gz dest=/tmp/nginx-1.10.0.tar.gz

- name: copy install_shell to client

  copy: src=/etc/ansible/roles/nginx/files/install_nginx.sh dest=/tmp/install_nginx.sh

- name: copy ngx_cache_purge-2.3.tar.gz to client

  copy: src=/etc/ansible/roles/nginx/files/ngx_cache_purge-2.3.tar.gz dest=/tmp/ngx_cache_purge-2.3.tar.gz

- name: install nginx

  shell: /bin/bash /tmp/install_nginx.sh
/etc/ansible/roles/nginx/files/install_nginx.sh
#!/bin/bash

#yum安装一些依赖的模块

#yum -y install libselinux-python

yum -y install gcc zlib zlib-devel openssl openssl-devel pcre pcre-devel

yum -y install zlib zlib-devel openssl openssl-devel pcre-devel

#groupadd -r nginx

#useradd -s /sbin/nologin -g nginx -r nginx

cd /tmp

tar xf nginx-1.10.0.tar.gz

tar xf ngx_cache_purge-2.3.tar.gz

cd nginx-1.10.0

mkdir -p /opt/nginx/server/sbin

mkdir -p /opt/nginx/server/lib

mkdir -p /opt/nginx/server/log

mkdir -p /opt/nginx/server/run

mkdir -p /opt/nginx/server/cache

mkdir -p /opt/nginx/server/conf

mkdir -p /opt/nginx/server/lib

mkdir -p /opt/nginx/cache

./configure \

--prefix=/opt/nginx/server \

--sbin-path=/opt/nginx/server/sbin/nginx \

--modules-path=/opt/nginx/server/lib/modules \

--conf-path=/opt/nginx/server/conf/nginx.conf \

--error-log-path=/opt/nginx/server/log/error.log \

--http-log-path=/opt/nginx/server/log/access.log \

--pid-path=/opt/nginx/server/run/nginx.pid \

--lock-path=/opt/nginx/server/run/nginx.lock \

--http-client-body-temp-path=/opt/nginx/server/cache/client_temp \

--http-proxy-temp-path=/opt/nginx/server/cache/proxy_temp \

--http-fastcgi-temp-path=/opt/nginx/server/cache/fastcgi_temp \

--http-uwsgi-temp-path=/opt/nginx/server/cache/uwsgi_temp \

--http-scgi-temp-path=/opt/nginx/server/cache/scgi_temp \

--user=nginx \

--group=nginx \

--with-http_ssl_module \

--with-http_realip_module \

--with-http_addition_module \

--with-http_sub_module \

--with-http_dav_module \

--with-http_flv_module \

--with-http_mp4_module \

--with-http_gunzip_module \

--with-http_gzip_static_module \

--with-http_random_index_module \

--with-http_secure_link_module \

--with-http_stub_status_module \

--with-http_auth_request_module \

--with-threads \

--with-stream \

--with-stream_ssl_module \

--with-http_slice_module \

--with-mail \

--with-mail_ssl_module \

--with-file-aio \

--with-http_v2_module \

--with-ipv6 \

--add-module=/tmp/ngx_cache_purge-2.3

make && make install

chown -R nginx:nginx /opt/nginx

#sed  "/^\s*index / i proxy_pass http://localhost:8080;" /etc/nginx/nginx.conf

/opt/nginx/server/sbin/nginx

#sed
/etc/ansible/roles/mysql/tasks/main.yml
- name: copy mysql_tar_gz to client

  copy: src=mysql-5.6.27.tar.gz dest=/tmp/mysql-5.6.27.tar.gz

- name: copy install_script to client

  copy: src=mysql_install.sh dest=/tmp/mysql_install.sh owner=root group=root mode=755

- name: install mysql

  shell: /bin/bash /tmp/mysql_install.sh
etc/ansible/roles/tomcat/tasks/main.yml
- name: install java

  yum: name=java-1.7.0-openjdk state=present

- name: group

  group: name=tomcat

- name: user

  user: name=tomcat group=tomcat home=/usr/tomcat

  sudo: True

- name: copy tomcat_tar_gz

  copy: src=apache-tomcat-7.0.65.tar.gz dest=/tmp/apache-tomcat-7.0.65.tar.gz

- name: Extract archive

  command: /bin/tar xf /tmp/apache-tomcat-7.0.65.tar.gz -C /opt/

- name: Symlink install directory

  file: src=/opt/apache-tomcat-7.0.65/ dest=/usr/share/tomcat state=link

- name: Change ownership of Tomcat installation

  file: path=/usr/share/tomcat/ owner=tomcat group=tomcat state=directory recurse=yes

- name: Configure Tomcat users

  template: src=tomcat-users.xml dest=/usr/share/tomcat/conf/

  notify: restart tomcat

- name: Install Tomcat init script

  copy: src=tomcat-initscript.sh dest=/etc/init.d/tomcat mode=0755

- name: Start Tomcat

  service: name=tomcat state=started enabled=yes
etc/ansible/roles/tomcat/handlers/main.yml
- name: restart tomcat

  service: name=tomcat state=restarted
etc/ansible/roles/mysql/files/mysql_install.sh
#!/bin/bash

DBDIR='/data/mysql/data'

PASSWD='bingoclo123'

[ -d $DBDIR ] || mkdir $DBDIR -p

yum install cmake make gcc-c++ bison-devel ncurses-devel -y

id mysql &> /dev/null

if [ $? -ne 0 ];then

 useradd mysql -s /sbin/nologin -M

fi

chown -R mysql.mysql $DBDIR

cd /tmp/

tar xf mysql-5.6.27.tar.gz

cd mysql-5.6.27

cmake . -DCMAKE_INSTALL_PREFIX=/usr/local/mysql \

-DMYSQL_DATADIR=$DBDIR \

-DMYSQL_UNIX_ADDR=$DBDIR/mysql.sock \

-DDEFAULT_CHARSET=utf8 \

-DEXTRA_CHARSETS=all \

-DENABLED_LOCAL_INFILE=1 \

-DWITH_READLINE=1 \

-DDEFAULT_COLLATION=utf8_general_ci \

-DWITH_EMBEDDED_SERVER=1

if [ $? != 0 ];then

 echo "cmake error!"

 exit 1

fi

make && make install

if [ $? -ne 0 ];then

 echo "install mysql is failed!" && /bin/false

fi

sleep 2

ln -s /usr/local/mysql/bin/* /usr/bin/

cp -f /usr/local/mysql/support-files/my-default.cnf /etc/my.cnf

cp -f /usr/local/mysql/support-files/mysql.server /etc/init.d/mysqld

chmod 700 /etc/init.d/mysqld

/usr/local/mysql/scripts/mysql_install_db  --basedir=/usr/local/mysql --datadir=$DBDIR --user=mysql

if [ $? -ne 0 ];then

 echo "install mysql is failed!" && /bin/false

fi

/etc/init.d/mysqld start

if [ $? -ne 0 ];then

 echo "install mysql is failed!" && /bin/false

fi

chkconfig --add mysqld

chkconfig mysqld on

/usr/local/mysql/bin/mysql -e "update mysql.user set password=password('$PASSWD') where host='localhost' and user='root';"

/usr/local/mysql/bin/mysql -e "update mysql.user set password=password('$PASSWD') where host='127.0.0.1' and user='root';"

/usr/local/mysql/bin/mysql -e "delete from mysql.user where password='';"

/usr/local/mysql/bin/mysql -e "flush privileges;"

if [ $? -eq 0 ];then

 echo "ins_done"

fi
5执行安装&检查
[root@MSJTVL-MJSP-A35 ansible]# ansible-playbook web.yml

PLAY [lzy] *********************************************************************

TASK [setup] *******************************************************************

ok: [10.0.110.91]

ok: [10.0.110.47]

TASK [zabbix : copy zabbix_tar_gz to client] ***********************************

changed: [10.0.110.47]

changed: [10.0.110.91]

TASK [zabbix : copy install_shell to client] ***********************************

changed: [10.0.110.91]

changed: [10.0.110.47]

TASK [zabbix : copy zabbix_agentd.conf to client] ******************************

changed: [10.0.110.91]

changed: [10.0.110.47]

TASK [zabbix : install zabbix] *************************************************

changed: [10.0.110.47]

changed: [10.0.110.91]

PLAY RECAP *********************************************************************

10.0.110.47                : ok=5    changed=4    unreachable=0    failed=0

10.0.110.91                : ok=5    changed=4    unreachable=0    failed=0
6、常见错误
7.补充
1.使用ssh-copy-id命令来复制Ansible公钥到节点中。
ssh-copy-id -i sm01@10.0.110.47
ansible安装应用软件的更多相关文章
- 初探ansible安装
一.ansible介绍常用的自动化运维工具 Puppet —基于 Ruby 开发,采用 C/S 架构,扩展性强,基于 SSL,远程命令执行相对较弱SaltStack —基于 Python 开发,采用 ...
- Ansible安装配置Nginx
一.思路 现在一台机器上编译安装好nginx.打包,然后在用ansible去下发 cd /etc/ansible 进入ansible配置文件目录 mkdir roles/{common,install ...
- Ansible安装配置及使用
一.Ansible特点 1.不需要安装客户端,通过sshd通信 2.基于模块工作,模块可以由任何序言开发 3.不仅支持命令行使用模块,也支持编写yaml格式的playbook 4.支持sudo 5.有 ...
- Ansible安装配置
Ansible工具的安装与配置 Ansible基于SSH,不需要在远程端安装任何软件,只需要在管理端安装ansible及其组件即可. Ansible使用前提是已配置ssh密钥免登陆. 一.安装组件: ...
- ansible安装二进制kubernetes-1.14.1
主机信息: 主机IP 主机名 角色 10.10.3.181 k8s-m1 kube-apiserver,kube-controller-manager,kube-scheduler,etcd 10. ...
- Ansible安装部署以及常用模块详解
一. Ansible 介绍Ansible是一个配置管理系统configuration management system, python 语言是运维人员必须会的语言, ansible 是一个基于py ...
- 内网环境使用ansible安装software 需要外网时,如何绑定代理呢
内网环境使用ansible安装software 需要外网时,如何绑定代理呢? 方法一: 在ansible 的脚本里,yum install 的地方,添加语句: environment: https_p ...
- Ansible 安装与配置(一)
公司大概有200多云主机需要进行管理,但是如果通过手工管理费时还累最终结果也容易出错,所以考虑通过自动化的方式来管理云主机,目前开源的自动化工具,大家用的比较多的有Ansible和Saltstack这 ...
- Ansible安装及OS规划
Ansible安装 1.以管理用户mtnsadmin连接服务器后下载安装包(-O表示将下载的文件存放到指定的文件夹下,同时重命名下载的文件) sudo wget -O /etc/yum.re ...
随机推荐
- laravel在wamp中输入地址后总是无法访问
在wamp中的apache中conf的httpd.conf #LoadModule rewrite_module modules/mod_rewrite.so 改为 LoadModule rewrit ...
- iOS Widget简单使用
iOS的Widget类似Android的Notification设置flags为Notification.FLAG_ONGOING_EVENT后 OK,大约知道是什么意思了,现在可以开始码了 ...
- Grokking PyTorch
原文地址:https://github.com/Kaixhin/grokking-pytorch PyTorch is a flexible deep learning framework that ...
- iOS-HTTP浅析
HTTP原理 什么是URL URL中常见的几种协议 什么是HTTP协议 HTTP是做什么的 为什么要使用HTTP协议 HTPP协议的通信过程介绍 HTTP请求 HTTP响应 HTTP请求的选择 两种发 ...
- HLS(HTTP Live Streaming)学习和探讨
Introduction HTTP Live Streaming lets you send audio and video over HTTP from an ordinary web server ...
- 《Microsoft编写优质无错C程序秘诀》提纲
第1章 假想的编译程序1.使用编译程序所有的可选警告设施2.使用lint来查出编译程序漏掉的错误3.如果有单元测试,就进行单元测试第2章 自己设计并使用断言1.既要维护程序的交付版本,又要维护程序的调 ...
- 装了VS2005再装IIS,结果出了些小问题 访问IIS元数据库失败
版本信息: Microsoft .NET Framework 版本:2.0.50727.42; ASP.NET 版本:2.0.50727.42 装了VS2005再装IIS,结果出了些小问题访问IIS元 ...
- iOS和Android使用MQTT协议实现消息推送和即时通讯(替代XMPP,已经有TMS MQTT)
大多数应用都会涉及到即时聊天的功能,在开源方案中有XMPP和MQTT.其中XMPP是基于XML的,并且不支持消息质量QOS, 所以本身并没有消息重传的机制,从而会导致丢消息.而MQTT是基于二进制的, ...
- SQL server 2008 防火墙设置
zh以前应为有特殊需求,需要在副武器外连接数据库,需要打开TCPIP服务. 但是因为有防火墙,经常连接不成功. 根据网上的资料总结,写了一个小的bat,来解决这个问题: @echo ========= ...
- IT职场初体验一
自己学习计算机专业也算有两个年头了吧,对于这个刚刚IT入门的菜鸟,对IT职场充满了好奇和憧憬,本人大学也像很多大学生一样,进入计算机专业也不是自己最初想进入的专业,进入这个原本离自己有点遥远的行业,一 ...