laravel学习之旅
前言:之前写了二篇YII2.0的基本mvc操作,所以,打算laravel也来这一下
*安装现在一般都用composer安装,这里就不讲述了*
一、熟悉laravel
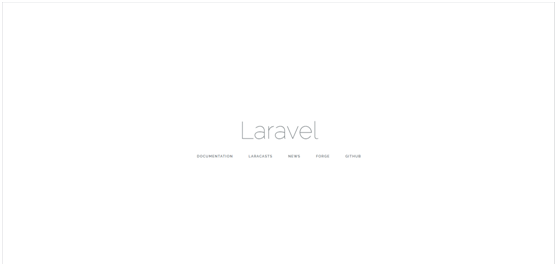
(1)如果看到下面这个页面,就说明你已经安装好框架了
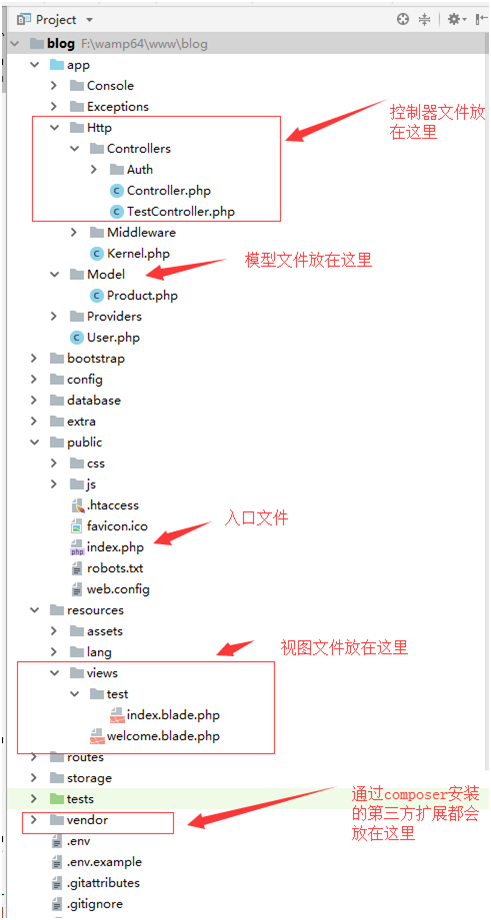
(2)认识一下目录结构
二、mvc操作
*每次增加一个控制器与方法,都要增加路由*
\routes\web.php
Route::get('/', function () {

    return view('welcome');

});

Route::get('/test', 'TestController@index');

Route::get('/test/add', 'TestController@add');

Route::post('/test/add', 'TestController@add');

Route::get('/test/saveshow/{a_id}', 'TestController@saveshow');

Route::post('/test/update', 'TestController@update');
(1)控制器(c)显示方法与接收方法
    /**

     * 列表

     * @return \Illuminate\Contracts\View\Factory|\Illuminate\View\View

     */

    public function index()

    {

        $model = new Article();

        $condition = 'a_id>0';

        $list = $model->getArticleStrsList($condition);

        return view('test.index',['list'=>$list]);

    }

    /**

     * 增加

     * @param Request $request

     * @return \Illuminate\Contracts\View\Factory|\Illuminate\View\View

     */

    public function add(Request $request){

        $model = new Article();

        if($request->isMethod('post')){

            // 校验

            $request->validate([

                'article_title' => 'required',

                'author' => 'required',

            ]);

            // 进行数据操作

            $article_title = $request->input('article_title','');

            $author = $request->input('author','');

            $insertData = array();

            $insertData['article_title'] = $article_title;

            $insertData['author'] = $author;

            $insertData['article_content'] = '';

            $model->addArticle($insertData);

            return redirect('test');

        }else{

            return view('test/add');

        }

    }

    /**

     * 更新显示方法

     * @param Request $request

     */

    public function saveshow($a_id){

        // form参数请求

        $model = new Article();

        $info = $model->getOneById(array('a_id'=>$a_id));

        return view('test/saveshow',['info'=>$info]);

    }

    /**

     * 更新

     * @param Request $request

     */

    public function update(Request $request){

        // form参数请求

        $model = new Article();

        if($request->isMethod('post')){

            // 校验

            $request->validate([

                'article_title' => 'required',

                'author' => 'required',

                'a_id'=>'required'

            ]);

            // 进行数据操作

            $article_title = $request->input('article_title','');

            $author = $request->input('author','');

            $a_id = $request->input('a_id');

            $updateData = array();

            $updateData['article_title'] = $article_title;

            $updateData['author'] = $author;

            $updateData['article_content'] = '';

            $model->editArticle($updateData,array('a_id'=>$a_id));

            return redirect('test');

        }

    }
(二)、模型(m),自己在原来的基础上封装了一下
<?php

namespace App\Model;

use Illuminate\Database\Eloquent\Model;

use Illuminate\Support\Facades\DB;

class Article extends Model

{

    public static $tableName = 'article';

    /**

     * 获取商品列表

     * @param $condition

     * @param string $field

     * @param int $page

     * @param string $order

     * @return mixed

     */

    public function getArticleList($condition, $field = '*', $page = 0, $order = 'a_id desc'){

        $list = DB::table(self::$tableName)

            ->where($condition)

            ->orderBy($order)

            ->get();

        return $list;

    }

    /**

     * 获取商品列表(通过原生字符串方式)

     * @param $condition

     * @param string $field

     * @param int $page

     * @param string $order

     * @return mixed

     */

    public function getArticleStrsList($condition, $field = '*', $offset = 0,$limit = 10, $order = 'a_id desc'){

        $list = DB::table(self::$tableName)

            ->whereRaw($condition)

            ->orderByRaw($order)

            ->offset($offset)

            ->limit($limit)

            ->get();

        return $list;

    }

    /**

     * 添加商品

     * @param type $data

     * @return type

     */

    public function addArticle($data)

    {

        return DB::table(self::$tableName)->insertGetId($data);

    }

    /**

     * 更新商品

     * @param type $data

     * @param type $condition

     * @return type

     */

    public function editArticle($data, $condition)

    {

        return DB::table(self::$tableName)->where($condition)->update($data);

    }

    /**

     * 删除商品

     * @param array $condition 条件

     * @return type

     */

    public function delArticle($condition)

    {

        return DB::table(self::$tableName)->where($condition)->delete();

    }

    /**

     * 根据条件查询一条商品

     *

     * @param array $condition 条件

     * @return array 一维数组

     */

    public function getOneById($condition)

    {

        return DB::table(self::$tableName)->where($condition)->first();

    }

    /**

     * 根据获取总数

     * @param $condition

     * @return mixed

     */

    public function getCount($condition){

        return DB::table(self::$tableName)->where($condition)->count();

    }

    /**

     * 根据获取总数(通过原生字符串方式)

     * @param $condition

     * @return mixed

     */

    public function getCountStrs($condition){

        return DB::table(self::$tableName)->whereRaw($condition)->count();

    }

}
(三)视图(v),laravel下伪造跨站请求保护 CSRF,这个一定要加上
index.blade.php
<!doctype html>

<html lang="{{ app()->getLocale() }}">

<head>

    <meta charset="utf-8">

    <meta http-equiv="X-UA-Compatible" content="IE=edge">

    <meta name="viewport" content="width=device-width, initial-scale=1">

    <title>Laravel</title>

    <!-- Fonts -->

    <link href="https://fonts.googleapis.com/css?family=Raleway:100,600" rel="stylesheet" type="text/css">

    <style>

        .list{

            width: 100%;

        }

        .list .l-l,.l-l-h{

            width:100%;

            text-align: center;

        }

        .l-l-h{

            font-weight: bold;

        }

        .list .l-v,.l-h{

            border: 1px solid #0b72b8;

            display:inline-block;

            width: 150px;

            float:left;

            padding: 0px;

            margin: 0px;

            text-align: center;

        }

        .l-h{

            font-weight: bold;

        }

        .clear{ clear:both}

    </style>

</head>

<body>

    <div>

        <a href="{{url('test/add')}}">添加</a>

    </div>

    <div class="list">

        <div class="l-l-h">

            <p class="l-h">

                标题

            </p>

            <p class="l-h">

                作者

            </p>

            <p class="l-h">

                操作

            </p>

            <div class="clear"></div>

        </div>

        @foreach ($list as $key=>$value)

            <div class="l-l">

                <p class="l-v">

                    {{$value->article_title}}

                </p>

                <p class="l-v">

                    {{$value->author}}

                </p>

                <p class="l-v">

                    <a href="{{url('test/saveshow',['a_id'=>$value->a_id])}}">编辑</a>

                </p>

                <div class="clear"></div>

            </div>

        @endforeach

    </div>

</body>

</html>
add.blade.php
<!doctype html>

<html lang="{{ app()->getLocale() }}">

<head>

    <meta charset="utf-8">

    <meta http-equiv="X-UA-Compatible" content="IE=edge">

    <meta name="viewport" content="width=device-width, initial-scale=1">

    <title>Laravel学习之旅</title>

    <!-- Fonts -->

    <link href="https://fonts.googleapis.com/css?family=Raleway:100,600" rel="stylesheet" type="text/css">

    <style>

        p{

            margin: 0px;

            padding: 0px;

        }

    </style>

</head>

<body>

<!-- /resources/views/post/add.blade.php -->

<h1>Create Post</h1>

@if ($errors->any())

    <div class="alert alert-danger">

        <ul>

            @foreach ($errors->all() as $error)

                <li>{{ $error }}</li>

            @endforeach

        </ul>

    </div>

@endif

<!-- Create Post Form -->

    <div>

        <form action="{{url('test/add')}}" method="post">

            {{--这里要写上token,一样要加上--}}

            {{ csrf_field() }}

            <p>

                <input type="text" name="article_title" placeholder="标题"/>

            </p>

            <p>

                <input type="text" name="author" placeholder="作者"/>

            </p>

            <p>

                <input type="submit" value="提交"/>

            </p>

        </form>

    </div>

</body>

</html>
saveshow.blade.php
<!doctype html>

<html lang="{{ app()->getLocale() }}">

<head>

    <meta charset="utf-8">

    <meta http-equiv="X-UA-Compatible" content="IE=edge">

    <meta name="viewport" content="width=device-width, initial-scale=1">

    <title>Laravel学习之旅</title>

    <!-- Fonts -->

    <link href="https://fonts.googleapis.com/css?family=Raleway:100,600" rel="stylesheet" type="text/css">

    <style>

        p{

            margin: 0px;

            padding: 0px;

        }

    </style>

</head>

<body>

    <div>

        <form action="{{url('test/update')}}" method="post">

            {{--这里要写上token,一样要加上--}}

            {{ csrf_field() }}

            <input type="hidden" name="a_id" value="{{$info->a_id}}"/>

            <p>

                <input type="text" name="article_title" placeholder="标题" value="{{$info->article_title}}"/>

            </p>

            <p>

                <input type="text" name="author" placeholder="作者" value="{{$info->author}}"/>

            </p>

            <p>

                <input type="submit" value="提交"/>

            </p>

        </form>

    </div>

</body>

</html>
laravel注意事项:
- 访问 laravel 出现 Parse error: syntax error, unexpected '?',说明php版本不适用当前laravel框架版本
- 视图文件是以xxxx.blade.php为后缀命名
操作网址:
laravel中文文档:https://learnku.com/docs/laravel/6.x
laravel学习之旅的更多相关文章
- Laravel学习之旅(三)
视图 一.怎么新建视图: 1.视图默认存放路径:resources/views: 2.laravel模板支持原生的PHP,直接可以在resources/views新建一个PHP文件,例如: index ...
- Laravel学习之旅(二)
控制器 一.怎么编写控制器? 1.控制器文件存放路径:app\Http\Controllers: 2.命名规范如:TestController.php 3.完整的控制器例子如下: <?php n ...
- Laravel学习之旅(一)
路由 1.简介:简单的说就是将用户的请求转发给相应的程序进行处理: 2.作用:就是建立url和程序之间的映射. 3.请求类型:get.post.put.patch.delete 相比于thinkphp ...
- WCF学习之旅—第三个示例之四(三十)
上接WCF学习之旅—第三个示例之一(二十七) WCF学习之旅—第三个示例之二(二十八) WCF学习之旅—第三个示例之三(二十九) ...
- Hadoop学习之旅二:HDFS
本文基于Hadoop1.X 概述 分布式文件系统主要用来解决如下几个问题: 读写大文件 加速运算 对于某些体积巨大的文件,比如其大小超过了计算机文件系统所能存放的最大限制或者是其大小甚至超过了计算机整 ...
- WCF学习之旅—第三个示例之二(二十八)
上接WCF学习之旅—第三个示例之一(二十七) 五.在项目BookMgr.Model创建实体类数据 第一步,安装Entity Framework 1) 使用NuGet下载最新版的Entity Fram ...
- WCF学习之旅—第三个示例之三(二十九)
上接WCF学习之旅—第三个示例之一(二十七) WCF学习之旅—第三个示例之二(二十八) 在上一篇文章中我们创建了实体对象与接口协定,在这一篇文章中我们来学习如何创建WCF的服务端代码.具体步骤见下面. ...
- WCF学习之旅—WCF服务部署到IIS7.5(九)
上接 WCF学习之旅—WCF寄宿前的准备(八) 四.WCF服务部署到IIS7.5 我们把WCF寄宿在IIS之上,在IIS中宿主一个服务的主要优点是在发生客户端请求时宿主进程会被自动启动,并且你可以 ...
- WCF学习之旅—WCF服务部署到应用程序(十)
上接 WCF学习之旅—WCF寄宿前的准备(八) WCF学习之旅—WCF服务部署到IIS7.5(九) 五.控制台应用程序宿主 (1) 在解决方案下新建控制台输出项目 ConsoleHosting.如下 ...
随机推荐
- Service:让客户端发现pod并与之通信
5.1.Service介绍 5.1.1.Serice简介 5.1.1.1什么是Service service是k8s中的一个重要概念,主要是提供负载均衡和服务自动发现. Service 是由 kube ...
- 019 模块2-time库的使用
目录 一.概述 二.time库基本介绍 2.1 time库概述 三.时间获取 四.时间格式化 4.1 格式化控制符 4.2 时间格式化-代码 五.程序计时应用 5.1 程序计时 六.单元小结 参考:h ...
- Java Web总结(二)-- 上传和下载
在Web应用系统开发中,文件上传和下载功能是非常常用的功能,今天来讲一下JavaWeb中的文件上传和下载功能的实现. 对于文件上传,浏览器在上传的过程中是将文件以流的形式提交到服务器端的,如果直接 ...
- Redis 的底层数据结构(SDS和链表)
Redis 是一个开源(BSD许可)的,内存中的数据结构存储系统,它可以用作数据库.缓存和消息中间件.可能几乎所有的线上项目都会使用到 Redis,无论你是做缓存.或是用作消息中间件,用起来很简单方便 ...
- 使用Python SMTP发送邮件
import smtplibfrom email.mime.text import MIMEText # 服务器SMPTserver = "smtp.163.com"# 发送邮件的 ...
- Linux Shell 基础知识(一)
1. 本文知识结构 2. shell 基础知识 2.1 shell 简单介绍 GNU bash shell 能提供对 Linux 系统的交互式访问,一般来说,使用快捷键 Ctrl + Alt + ...
- 表达式树练习实践:C# 五类运算符的表达式树表达
目录 表达式树练习实践:C# 运算符 一,算术运算符 + 与 Add() - 与 Subtract() 乘除.取模 自增自减 二,关系运算符 ==.!=.>.<.>=.<= 三 ...
- windows安装mingw和LuaJIT
1,安装mingw64 先下载mingw64压缩包(不建议下载exe安装包,在线安装太慢),地址如下: https://nchc.dl.sourceforge.net/project/mingw-w6 ...
- Qt线程实现分析-moveToThread vs 继承
最近抽空研究了下QThread,使用起来方式多种多样,但是在使用的同时,我们也应该去了解Qt的线程它到底是怎么玩儿的. Qt的帮助文档里讲述了2种QThread的使用方式,一种是moveToThrea ...
- 新手学习FFmpeg - 调用API编写实现多次淡入淡出效果的滤镜
前面几篇文章聊了聊FFmpeg的基础知识,我也是接触FFmpeg不久,除了时间处理之外,很多高深(滤镜)操作都没接触到.在学习时间处理的时候,都是通过在ffmpeg目前提供的avfilter基础上面修 ...