docker镜像管理(二)
docker镜像
docker镜像含有启动容器所需要的文件系统和内容,因此,其用于创建并启动docker容器
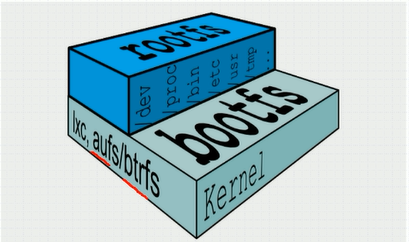
docker镜像采用分层构建机制,最底层为bootfs,其之为rootfs
- bootfs:用于系统引导的文件系统,包括bootloader和kernel,容器启动完成后会被卸载以节省内存资源
- rootfs:位于rootfs上,表现为docker容器的根文件系统
传统模式中,系统启动时,内核挂载rootfs时会首先将其挂载为“只读”模式,完整性自检完成后将其重新挂载为只读模式
docker中,rootfs由内核挂在为“只读”模式,而后通过“联合挂载”技术额外挂载一个“可写”层
Docker Image Layer
位于下层的镜像称为父镜像(parent image),最底层的称之为基础镜像(Base Image)
最上层为“读写”层,其下层为“只读”层
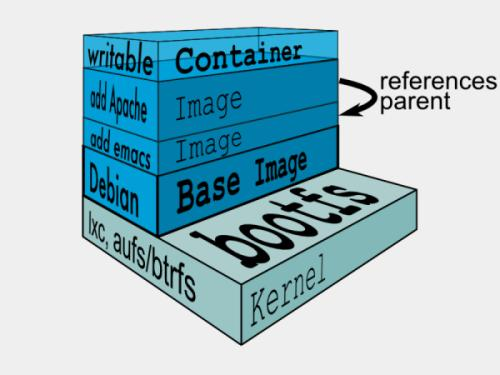
想要联合挂载需要特定的文件系统Aufs
Aufs
advance multi-layered unification filesystem:高级多层统一文件系统
- 用于为linux文件系统实现“联合挂载”
- aufs是之前的UnionFS的重新实现,2006年由Junjiro Okajima开发
- Docker最初使用aufs作为容器文件系统层,它目前仍作为存储后端之一来支持
- aufs的竞争产品是overlayfs,后者后者自从3.18版本开始被合并到了linux内核
- docker的分层镜像,除了aufs,docker还支持btrfs,devicemapper和vfs等
在Ubuntu系统下,默认文件系统为aufs,而在CentOS7上,用的是devicemapper
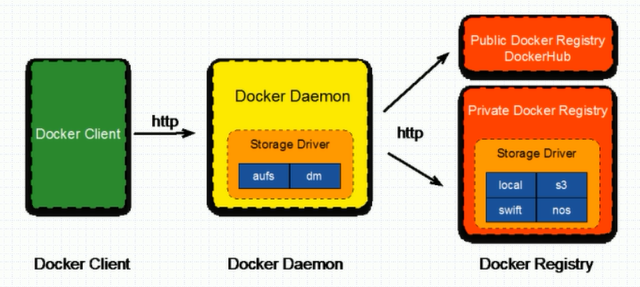
Docker Registry
启动容器时,docker daemon会试图从本地获取相关镜像,本地镜像不存在时,将从Registry中下载该镜像保存至本地中
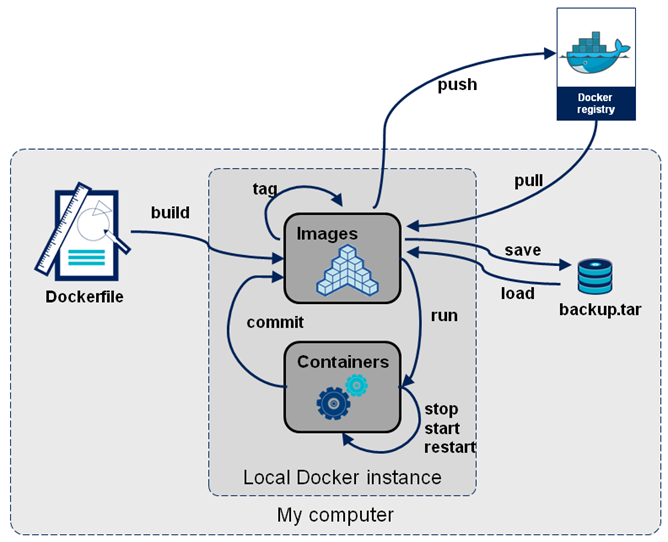
镜像相关操作
镜像的生成途径
- dockerfile
- 基于容器制作
- docker hub automated builds
基于容器制作镜像
Usage:  docker commit [OPTIONS] CONTAINER [REPOSITORY[:TAG]]

Create a new image from a container's changes

Options:

  -a, --author string    Author (e.g., "John Hannibal Smith <hannibal@a-team.com>")

  -c, --change list      Apply Dockerfile instruction to the created image

  -m, --message string   Commit message

  -p, --pause            Pause container during commit (default true)
制作镜像案例:
[root@localhost ~]# docker commit -p -a "liwang" -m "myimage" mybox

sha256:de701b01b33656a3c1e04bce397940fc7675dca4e08e60ca19425900a258274d

[root@localhost ~]# docker images

REPOSITORY          TAG                 IMAGE ID            CREATED             SIZE

<none>              <none>              de701b01b336         seconds ago       .22MB

busybox             latest              020584afccce         weeks ago         .22MB
修改标签案例:
[root@localhost ~]# docker tag de701b01b336 liwang/busybox:v1

[root@localhost ~]# docker images

REPOSITORY          TAG                 IMAGE ID            CREATED             SIZE

liwang/busybox      v1                  de701b01b336         minutes ago       .22MB

busybox             latest              020584afccce         weeks ago         .22MB
删除镜像(如果一个镜像有2个标签,其实是删除标签)
[root@localhost ~]# docker image rm liwang/busybox:v1

Untagged: liwang/busybox:v1

Deleted: sha256:de701b01b33656a3c1e04bce397940fc7675dca4e08e60ca19425900a258274d

Deleted: sha256:ecb7306b32fefb8a2c964a217506696a7f41f7085fe317f7416db74a066f284e

[root@localhost ~]# docker images

REPOSITORY          TAG                 IMAGE ID            CREATED             SIZE

busybox             latest              020584afccce         weeks ago         .22MB
修改镜像初始运行的命令
[root@localhost ~]# docker commit -a "liwang<liwang_dc@126.com>" -p -c 'CMD ["/bin/httpd","-f","-h","/data/html"]' mybox liwang/httpd:v1

sha256:02a490f7eb0d771125f9f8a29c9ae8973862c27f7ac2481c8c19f3aa73a55506

[root@localhost ~]# docker ps

CONTAINER ID        IMAGE               COMMAND             CREATED             STATUS              PORTS               NAMES

ddb70a657548        liwang/busybox:v1   "sh"                 minutes ago       Up  minutes                            mybox


[root@localhost ~]# docker ps -a

CONTAINER ID        IMAGE               COMMAND             CREATED             STATUS              PORTS               NAMES

ddb70a657548        liwang/busybox:v1   "sh"                 minutes ago       Up  minutes                            mybox


[root@localhost ~]# docker images

REPOSITORY          TAG                 IMAGE ID            CREATED              SIZE

liwang/httpd        v1                  02a490f7eb0d        About a minute ago   .22MB

liwang/busybox      v1                  6592e65bbc7f         minutes ago       .22MB

nginx               latest              231d40e811cd         hours ago         126MB

busybox             latest              020584afccce         weeks ago          .22MB
[root@localhost ~]# docker run --name myhttpd -itd liwang/httpd:v1
9bbc0271904b9f41150911f2a11117943a7cd44c8e531b76d3f699a970411210
[root@localhost ~]# curl 172.17.0.2
<h1>this is busybox page</h1>
docker hub
上传至docker hub,这里要注意的是本地镜像标签一定要和docker hub上自己的私有仓库名字一致
登录docker hub 创建自己的仓库
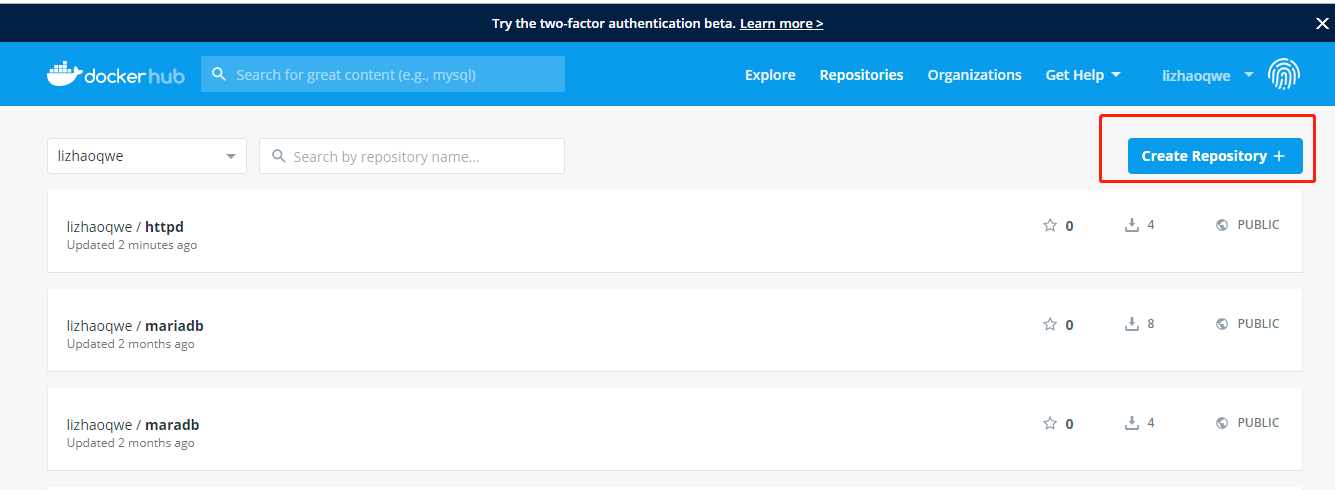
填写仓库名称和描述信息,并且选择是公有仓库还是私有仓库
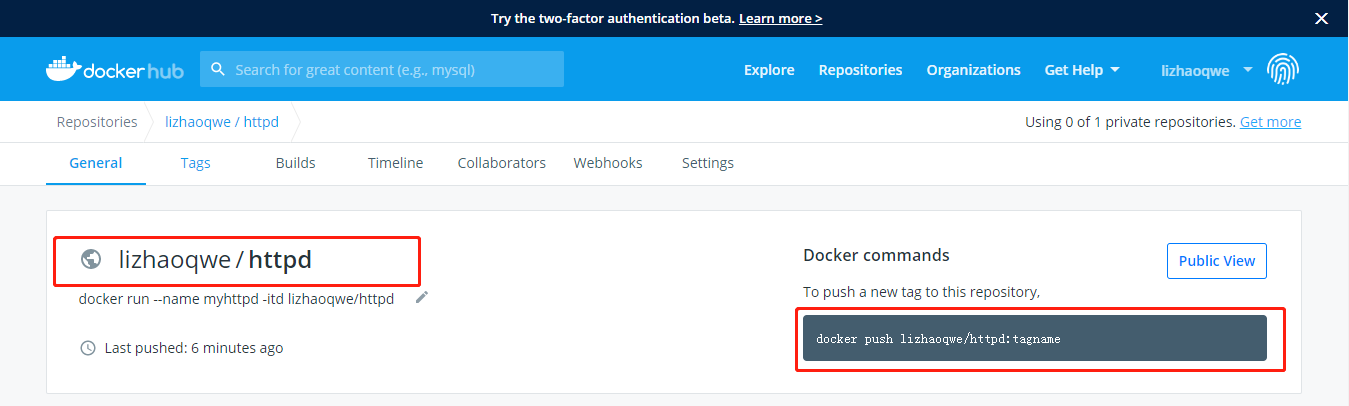
然后把镜像上传至docker hub上
[root@localhost ~]# docker images

REPOSITORY          TAG                 IMAGE ID            CREATED             SIZE

liwang/httpd        v1                  02a490f7eb0d         minutes ago      .22MB

lizhaoqwe/httpd     v1                  02a490f7eb0d         minutes ago      .22MB

liwang/busybox      v1                  6592e65bbc7f        About an hour ago   .22MB

nginx               latest              231d40e811cd         hours ago        126MB

busybox             latest              020584afccce         weeks ago         .22MB
[root@localhost ~]# docker login -u lizhaoqwe
Password:
[root@localhost ~]# docker push lizhaoqwe/httpd:v1

The push refers to repository [docker.io/lizhaoqwe/httpd]

69bc3e032fd9: Pushed

68eb0185b393: Pushed

1da8e4c8d307: Pushed

v1: digest: sha256:593871c722b58b0d8a45978e159896737fa8b91de5cbaffecfdf4379c3598243 size:
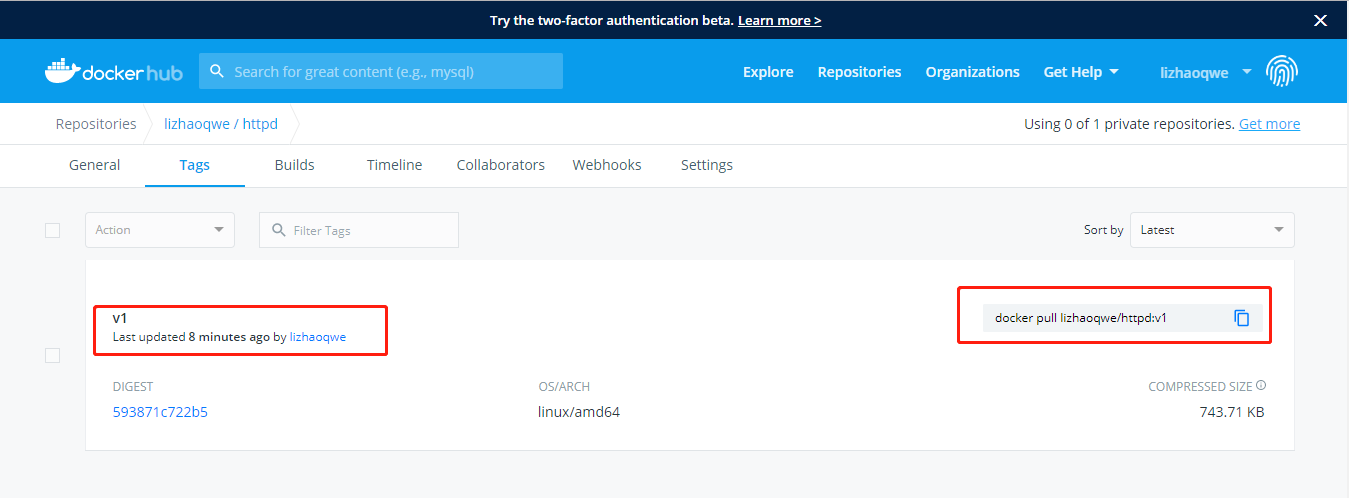
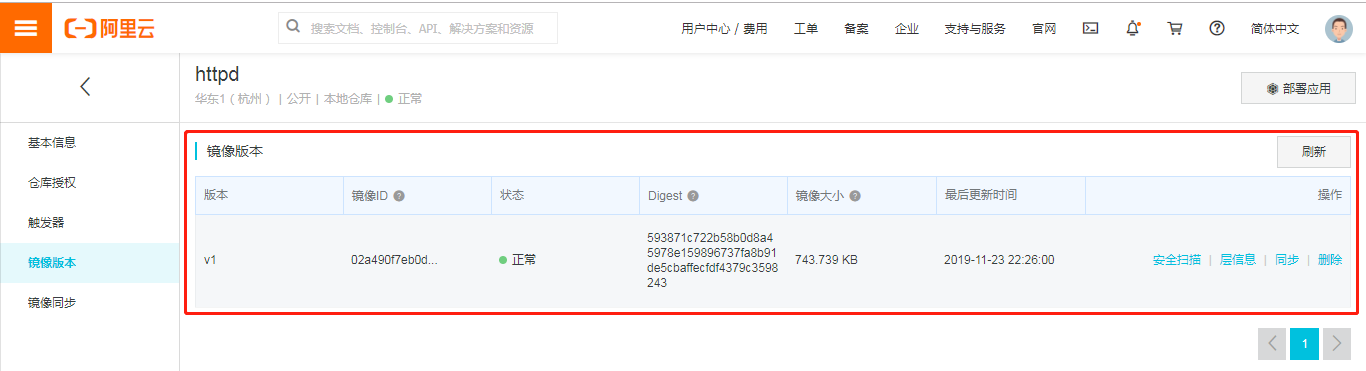
上传完毕后查看docker hub
基于阿里云的镜像仓库
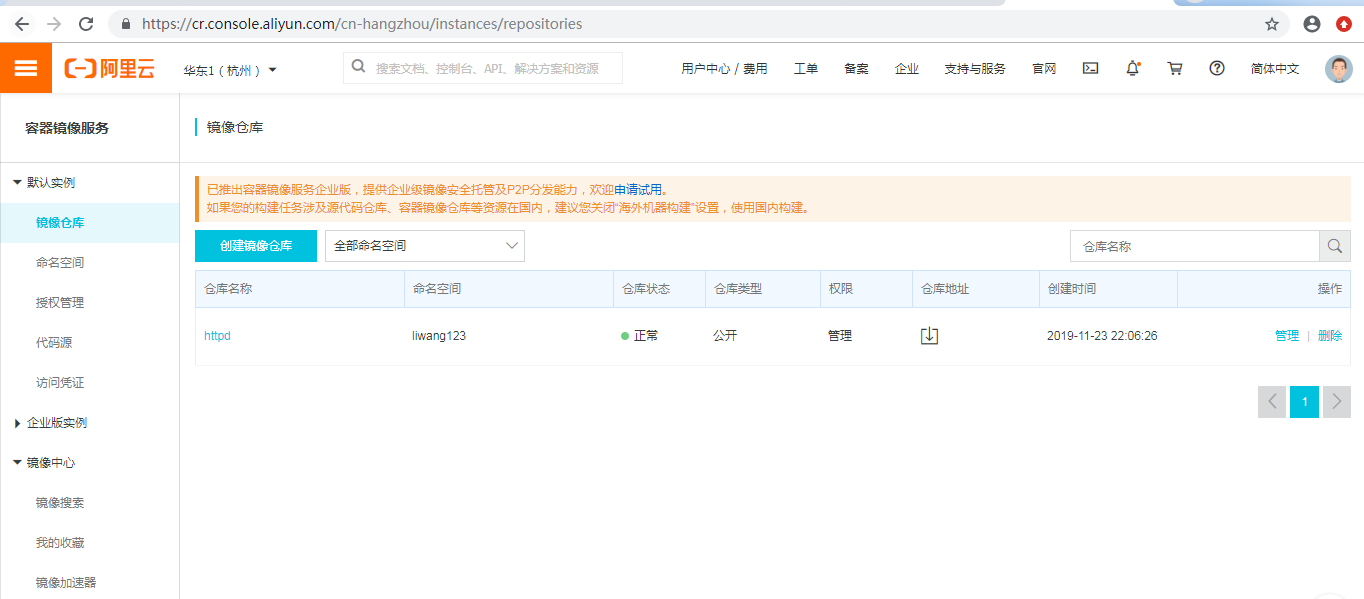
点击管理可以看到阿里云镜像仓库的用法

现在我们就把刚才基于busybox创建的httpd镜像上传至阿里云镜像仓库
[root@localhost ~]# docker push registry.cn-hangzhou.aliyuncs.com/liwang123/httpd

The push refers to repository [registry.cn-hangzhou.aliyuncs.com/liwang123/httpd]

69bc3e032fd9: Pushed

68eb0185b393: Pushed

1da8e4c8d307: Pushed

v1: digest: sha256:593871c722b58b0d8a45978e159896737fa8b91de5cbaffecfdf4379c3598243 size:
验证
镜像打包
镜像的导入导出
如果我们的镜像,别人也想用,但只想用一次就删除掉,那么我们要先打标签在上传,然后测试人员还要pull下来,其实也比较麻烦,那么这个时候我们可以考虑用镜像打包的方式,镜像打包可以把所需要的镜像打包在一起,然后可以用scp等命令拷贝过去,在导入就可以了
打包镜像
[root@localhost ~]# docker images

REPOSITORY                                          TAG                 IMAGE ID            CREATED             SIZE

liwang/httpd                                        v1                  02a490f7eb0d         hours ago         .22MB

liwang123/httpd                                     v1                  02a490f7eb0d         hours ago         .22MB

lizhaoqwe/httpd                                     v1                  02a490f7eb0d         hours ago         .22MB

registry.cn-hangzhou.aliyuncs.com/liwang123/httpd   v1                  02a490f7eb0d         hours ago         .22MB

liwang/busybox                                      v1                  6592e65bbc7f         hours ago         .22MB

nginx                                               latest              231d40e811cd         hours ago        126MB

busybox                                             latest              020584afccce         weeks ago         .22MB

[root@localhost ~]# docker save -o myimages.tar.gz registry.cn-hangzhou.aliyuncs.com/liwang123/httpd nginx busybox

[root@localhost ~]# ls -ltr

总用量

-rw-r--r--    root root   7月    Python-3.6..tgz

-rw-------.   root root       5月   : anaconda-ks.cfg

drwxr-xr-x.   root root        6月   : old

drwxr-xr-x.   root root        6月   : inc1

drwxr-xr-x.   root root        6月   : fullbackup

drwxr-xr-x   root root       6月   : Python-3.6.

-rw-r--r--    root root        6月   : test.yaml

-rw-r--r--    root root         6月   : test.retry

-rw-------   1 root root 131637760 11月 23 22:44 myimages.tar.gz
在另一台机器上执行导入命令并验证
[root@localhost ~]# docker load -i myimages.tar.gz

1da8e4c8d307: Loading layer [==================================================>]  .437MB/.437MB

68eb0185b393: Loading layer [==================================================>]   .12kB/.12kB

69bc3e032fd9: Loading layer [==================================================>]   .56kB/.56kB

Loaded image: registry.cn-hangzhou.aliyuncs.com/liwang123/httpd:v1

831c5620387f: Loading layer [==================================================>]  .48MB/.48MB

5fb987d2e54d: Loading layer [==================================================>]  .67MB/.67MB

4fc1aa8003a3: Loading layer [==================================================>]  .584kB/.584kB

Loaded image: nginx:latest

Loaded image: busybox:latest

[root@localhost ~]# docker images

REPOSITORY                                          TAG                 IMAGE ID            CREATED             SIZE

registry.cn-hangzhou.aliyuncs.com/liwang123/httpd   v1                  02a490f7eb0d         hours ago         .22MB

nginx                                               latest              231d40e811cd         hours ago        126MB

busybox                                             latest              020584afccce         weeks ago         .22MB
docker镜像管理(二)的更多相关文章
- Docker镜像管理基础篇
Docker镜像管理基础篇 作者:尹正杰 版权声明:原创作品,谢绝转载!否则将追究法律责任. 一.Docker Images Docker镜像还有启动容器所需要的文件系统及其内容,因此,其用于创建并启 ...
- Devops(四):Docker 镜像管理
参考 <Docker中上传镜像到docker hub中> <Docker 镜像管理> <通过容器提交镜像(docker commit)以及推送镜像(docker push ...
- 2、docker镜像管理
Docker镜像管理 镜像是Docker容器的基础,想运行一个Docker容器就需要有镜像.我们上面已经学会了使用search搜索镜像.那么这个镜像是怎么创建的呢? 创建镜像 镜像的创建有以下几种方法 ...
- Docker学习第一天(Docker入门&&Docker镜像管理)
简介 今天小区的超市买零食老板给我说再过几天可能就卖完了我有点诧异,老板又说厂家不生产了emmm 今天总算开始docker了! 1.Docker? 1.什么是Docker Docker 是一个开源的应 ...
- Dockerfile自动制作Docker镜像(二)—— 其它常用命令
Dockerfile自动制作Docker镜像(二)-- 其它常用命令 前言 a. 本文主要为 Docker的视频教程 笔记. b. 环境为 CentOS 7.0 云服务器 c. 上一篇:Dockerf ...
- 三、docker镜像管理
一.docker镜像管理 1.1.镜像搜索-search 从docker镜像仓库模糊搜索镜像 用法: docker search 镜像关键字 [root@zutuanxue ~]# docker se ...
- 004.Docker镜像管理
一 镜像基本操作 镜像是一个包含程序运行必要依赖环境和代码的只读文件,其本质是磁盘上一系列文件的集合.它采用分层的文件系统,将每一次改变以读写层的形式增加到原来的只读文件上.镜像是容器运行的基石. 1 ...
- 搭建docker镜像仓库(二):使用harbor搭建本地镜像仓库
目录 一.系统环境 二.前言 三.Harbor 四.使用harbor搭建私有镜像仓库 4.1 环境介绍 4.2 k8smaster节点安装配置harbor 4.2.1 安装harbor离线包 4.2. ...
- paas架构之docker——镜像管理
1. 镜像管理 1.1. 列出镜像 Sudo docker images 1.2. 查看镜像 Sudo docker images xxxx 1.3. 拉取镜像 Sudo docker pull ub ...
随机推荐
- cell右侧的状态(accessoryType)
Cell.accessoryType = UITableViewCellAccessoryDisclosureIndicator; Cell.accessoryType = UITableViewCe ...
- tensorflow dataloader 相关内容
Tensorflow dataloader 相关调研:数据读取是训练的开始,是非常关键的一步:下面是调研时搜集到的一些相关链接: 十图详解tensorflow数据读取机制 https://zhuanl ...
- [JavaScript]父子窗口间参数传递
概述 当页面嵌入一个iframe,或者打开一个子窗口.这个时候如果父窗口需要与子窗口之间通讯,如果直接用DOM访问对方窗口window,会受到跨于安全机制影响. javascript提供一个方法,可以 ...
- WPF DataGrid 双击行 获得绑定数据
原文:WPF DataGrid 双击行 获得绑定数据 1)增加事件 2)增加对象获取 1)事件代码 Datagrid 增加事件 MouseDoubleClick="dataGrid_Mous ...
- js正则高级函数(replace,matchAll用法),实现正则替换(实测很有效)
有这么一个文档,这是在PC端显示的效果,如果放在移动端,会发现字体大小是非常大的,那么现在想让这个字体在移动端能按照某个比例缩小,后台返回的数据格式是: <html> <head&g ...
- Note | 北航《网络安全》复习笔记
目录 1. 引言 2. 计算机网络基础 基础知识 考点 3. Internet协议的安全性 基础知识 考点 4. 单钥密码体制 基础知识 考点 5. 双钥密码体制 基础知识 考点 6. 消息认证与杂凑 ...
- 《Spring Cloud微服务 入门 实战与进阶》
很少在周末发文,还是由于昨晚刚收到实体书,还是耐不住性子马上发文了. 一年前,耗时半年多的时间,写出了我的第一本书<Spring Cloud微服务-全栈技术与案例解析>. 时至今日,一年的 ...
- python面试题及答案 2019
利用切片操作,实现一个trim()函数,去除字符串首尾的空格,注意不要调用str的strip()方法. 正解1: def trim(s): while s[:1] == ' ': s = s[1:] ...
- web自动化针对PO模式进行二次封装之basepage
在PO模式当中,我们做到了页面对象与测试用例的分离,但在页面对象编写时,我们仍然还有优化的空间.页面对象有一些共同的基本操作,可以封装起来,并可以在基本操作当中加上日志和异常截图的处理.比如说我们在查 ...
- Springmvc配置定时任务注解开发
1.添加命名空间和xsd约束 xmlns:task="http://www.springframework.org/schema/task" http://www.springfr ...