web端自动化——python多线程
Python通过两个标准库thread和threading提供对线程的支持。thread提供了低级别的、原始的线程以及一个简单的锁。threading基于Java的线程模型设计。
锁(Lock)条件变量(Condition)在Java中是对象的基本行为(每一个对象都自带了锁和条件变量),而在 Python中则是独立的对象。
注意:我们应该避免使用thread模块,原因是thread模块不支持守护线程。当主线程退出时,所有的子线程不管它们是否还在工作,都会被强行退出。
threading模块支持守护线程。
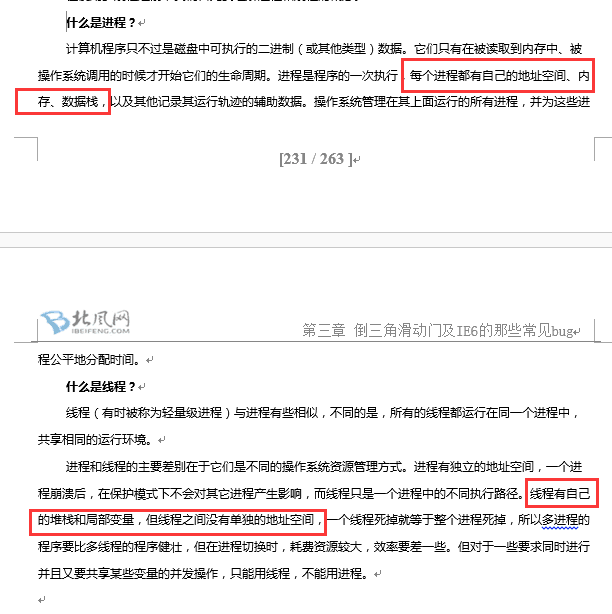
1、进程与线程的区别:

2、multiprocessing多进程模块
多进程multiprocessing模块的使用与多线程threading模块的用法类似。multiprocessing提供了本地和远程的并发性,有效地通过全局解释锁(Global InterceptorLock,GIL)来使用进程(而不是线程)。由于GIL的存在,在CPU密集型的程序当中,使用多线程并不能有效地利用多核CPU的优势,因为一个解释器在同一时刻只会有一个线程在执行。所以,multiprocessing模块可以充分利用硬件的多处理器来进行工作。它支持UNlX和Windows系统上的运行。
3、threading 多线程模块
threading模块支持守护线程。
4、Pipe和Queue
multiprocessing提供threading包中没有的IPC(进程间通信),效率上更高。应优先考虑Pipe和Queue,避免使用Lock/Event/Semaphore/Condition等同步方式(因为它们根据的不是用户进程的资源)。
multiprocessing包中有Pipe类和Queue类来分别支持这两种IPC机制。Pipe和Queue 可以用来传送常见的对象。
① Pip可以是单向化(half-duplex),也可以是双向(duplex)。我们通过multiprocessing.Pipe (duplex=False)创建单向管道(默认为双向)。一个进程从pipe—端输入对象,然后被pipe 另一端的进程接收。单向管道只允许管道一端的进程输入,而双向管道则允许从两端输入。
Pipe.py
import multiprocessing
def proc1(pipe):
pipe.send('hello')
print('proc1 rec:', pipe.recv())
def proc2(pipe):
print('proc2 rec:', pipe.recv())
pipe.send('hello, too')
if __name__ == "__main__":
multiprocessing.freeze_support()
pipe = multiprocessing.Pipe()
p1 = multiprocessing.Process(target=proc1,args=(pipe[0],))
p2 = multiprocessing.Process(target=proc2,args=(pipe[1],))
p1.start()
p2.start()
p1.join()
p2.join()
这里的pipe是双向的。pipe对象建立的时候,返回一个含有两个元素的表,每个元素 代表pipe的一端(Connection对象)。我们对pipe的某一端调用send()方法来传送对象,在另一端使用recv()来接收。
② Queue类与Pipe相类似,都是先进先出结构。但Queue类允许多个进程放入,多个进程从队列取出对象。Queue类使用Queue (maxsize)创建,maxsize表示队列中可以存放对象的最大数量。
queue.py
import multiprocessing
import os, time
def inputQ(queue):
#getpid是获得当前进程的进程号。系统每开辟一个新进程就会为他分配一个进程号。
info = str(os.getpid()) + '(put):'+str(time.time())
#put方法用以插入数据到队列中
queue.put(info)
def outputQ(queue, lock):
#get方法可以从队列读取并且删除一个元素
info = queue.get()
lock.acquire()
print((str(os.getpid()) + '(get):'+info))
lock.release()
if __name__=='__main__':
record1 =[]
record2 =[]
lock = multiprocessing.Lock()#加锁,为防止散乱的打印
queue = multiprocessing.Queue(3)
for i in range(10):
process = multiprocessing.Process(target=inputQ,args=(queue,))
process.start()
record1.append(process)
for i in range(10):
process = multiprocessing.Process(target=outputQ,args=(queue,lock))
process.start()
record2.append(process)
for p in record1:
p.join()
for p in record2:
p.join()
queue.close() #没有更多的对象进来,关闭queue
5、多线程分布式执行测试用例
Selenium Grid只是提供多系统、多浏览器的执行环境,Selenium Grid本身并不提供并行的执行测试用例,这个我们在前面己经反复强调。下面就通过演示使用多线程技术结合Selenium Grid实现分布式并行地执行测试用例。
启动 Selenium Server
在本机打开两个命令提示符窗口。
本机启动一个主hub和一个node节点(端口号别分为4444和5555),本机IP地址为: 172.16.101.239。
>java -jar selenium-server-standalone-2.47.0.jar -role hub
>java -jar selenium-server-standalone-2.47.0.jar -role node -port 5555
启动一个远程的node(设罝端口号为6666),IP地址假设为:172.16.101.238。
>java -jar selenium-server-standalone-2.47.jar -role node -port 6666 -hub http://172.16.101.239:4444/grid/register
运行测试脚本。
grid_thread.py
from threading import Thread
from selenium import webdriver
from time import sleep,ctime
#测试用例
def test_baidu(host,browser):
print('start:%s' %ctime())
print(host, browser)
dc = {'browserName':browser}
driver = webdriver.Remote(conunand_executor=host,
desired_capabilities=dc)
driver.get('http://www.baidu.com')
driver.find_element_by_id("kw").send_keys(browser)
driver.find_element_by_id("su").click()
sleep(2)
driver.quit()
if __name__ =='__main__':
#启动参数(指定运行主机与浏览器)
lists = {'http://127.0.0.1:4444/wd/hub': 'chrome',
'http://127.0.0.1:5555/wd/hub': 'internet explorer',
'http://172.16.101.238:6666/wd/hub':'firefox', # 远程节点
}
threads =[]
files = range(len(lists))
#创建线程
for host, browser in lists.items():
t = Thread(target=test_baidu, args=(host, browser))
threads.append(t)
#启动线程
for i in files:
threads[i].start()
for i in files:
threads [i].join()
print('end:%s' %ctime())
6、多线程执行测试用例
- from threading import Thread
from selenium import webdriver
from time import ctime,sleep
#测试用例
def test_baidu(browser,search):
print('start:%s' %ctime())
print('browser:%s ,' %browser)
if browser == "chrome":
driver = webdriver.Chrome()
elif browser == "ff":
driver = webdriver.Firefox()
else:
print('browser参数有误,只能为ff、chrome')
driver.get('http://www.baidu.com')
driver.find_element_by_id("kw").send_keys(search)
driver.find_element_by_id('su').click()
sleep(2)
driver.quit()
if __name__ == "__main__":
#启动参数(指浏览器与百度搜索内容)
lists ={'chrome':'threading', 'ff':'python'}
threads =[]
files = range(len(lists))
#创建线程
for browser, search in lists.items():
t = Thread(target=test_baidu,args=(browser,search))
threads.append(t)
#启动线程
for t in files:
threads[t].start()
for t in files:
threads[t].join()
print('end:%s' %ctime())
web端自动化——python多线程的更多相关文章
- web端自动化——Python的smtplib发送电子邮件
SMTP (Simple Mail Transfer Protocol)是简单邮件传输协议,它是一组用于由源地址到目的地址传送邮件的规则,由它来控制信件的中转方式. Python的smtplib模块提 ...
- web端自动化——Python读取txt文件、csv文件、xml文件
1.读取txt文件 txt文件是我们经常操作的文件类型,Python提供了以下几种读取txt文件的方式. 1)read(): 读取整个文件. 2)readline(): 读取一行数据. 3)readl ...
- 接口自动化、移动端、web端自动化如何做?
1.<Python+Appium移动端自动化项目实战>-带您进入APP自动化测试的世界https://yuedu.baidu.com/ebook/765b38a5690203d8ce2f0 ...
- web端自动化——Selenium3+python自动化(3.7版本)-火狐62版本环境搭建
前言 目前selenium版本已经升级到3.0了,网上的大部分教程是基于2.0写的,所以在学习前先要弄清楚版本号,这点非常重要.本系列依然以selenium3为基础. 一.selenium简介 Sel ...
- web端自动化——Selenium3+python自动化(3.7版本)-chrome67环境搭建
前言 目前selenium版本已经升级到3.0了,网上的大部分教程是基于2.0写的,所以在学习前先要弄清楚版本号,这点非常重要.本系列依然以selenium3为基础. 一.selenium简介 Sel ...
- web端自动化——自动化测试准备工作
准备工作# 在开始自己项目的自动化测试之前,我们最好已经完成了下面的准备工作: 1.熟悉待测系统 对项目的待测系统整体功能和业务逻辑有比较清晰的认识. 2.编写系统的自动化测试用例大纲和自动化测试用例 ...
- web端自动化——selenium3用法详解
selenium中文学习文档链接:https://selenium-python-zh.readthedocs.io/en/latest/getting-started.html selenium3+ ...
- 低代码开发,推荐一款Web 端自动化神器:Automa
1. Automa介绍 又到了优秀工具推荐的时候了,今天给大家分享一款前端自动化操作神器: Automa . 首先了解一下Automa是什么? Automa它定位是一款 Chrome 插件,也就意味着 ...
- 移动端穿插着PC端自动化-Python基础(干货)
1.前面已经把所有前期工作完成了 下面进行一些简单的小脚本来更好的了解Python.对Python有一些基础的童鞋理解起来会比较容易,我刚接触的时候也会有点懵的,现在简单的也是没问题了. 大牛请不要喷 ...
随机推荐
- Kubernetes 学习8 Pod控制器
一.回顾 1.Pod是标准的kubernetes资源,因此其遵循为其资源清单配置定义的基本格式,包含:apiVersion,kind,metadata,spec,status(只读) 2.spec的内 ...
- 目录——创建、切换、pwd、删除、复制、剪切
1.创建目录: (1)在已经存在的目录下新建一个目录: 可以看出在创建1997目录后,在tmp中能够顺利找到. (2)在一个不存在的目录下新建一个目录: 直接在tmp目录下新建一个a目录,再在a目录下 ...
- 1-STM32+W5500+GPRS物联网开发基础篇-工控板简介
最近这些日子都在忙活STM+W5500+GPRS的板子,所以前面的那块板子的教程耽搁了些时间. 这次的板子和上一版相比更贴近了使用,是因为有朋友督促我要做一块直接可以在工厂使用的板子,所以设计了这一块 ...
- Linux下搭建iSCSI共享存储的方法 Linux-IO Target 方式 Debian9.5下实现
iSCSI(internet SCSI)技术由IBM公司研究开发,是一个供硬件设备使用的.可以在IP协议的上层运行的SCSI指令集,这种指令集合可以实现在IP网络上运行SCSI协议,使其能够在诸如高速 ...
- PHP 源码安装常用配置参数和说明
常用的配置参数1. --prefix=/usr/local/php指定 php 安装目录install architecture-independent files in PREFIX 默认/usr/ ...
- LibreOJ #525. 「LibreOJ β Round #4」多项式
二次联通门 : LibreOJ #525. 「LibreOJ β Round #4」多项式 官方题解 : /* LibreOJ #525. 「LibreOJ β Round #4」多项式 由于会有多种 ...
- 《挑战30天C++入门极限》C++中利用构造函数与无名对象简化运算符重载函数
C++中利用构造函数与无名对象简化运算符重载函数 在完整描述思想之前,我们先看一下如下的例子,这个例子中的加运算符重载是以非成员函数的方式出现的: //程序作者:管宁 //站点:www.cn ...
- phpstorm 2019.1 修改浏览器
如图,修改如下浏览器的位置,由于我安装了虚拟机,导致每次点击谷歌浏览器后,都是打开的虚拟机里面的谷歌浏览器,需要重新设置浏览器的位置 打开设置 打开浏览器设置界面 双击可以选择浏览器的路径,然后就可以 ...
- Xtrabackup--备份mysql
Xtrabackup介绍 Xtrabackup是由percona开源的免费数据库热备份软件,它能对InnoDB数据库和XtraDB存储引擎的数据库非阻塞地备份(对于MyISAM的备份同样需要加表锁): ...
- What is content-type and datatype in an AJAX request?
https://api.jquery.com/jquery.ajax/ What is content-type and datatype in an AJAX request? contentTyp ...
