ssm(spring+springmvc+mybatis)整合之环境配置
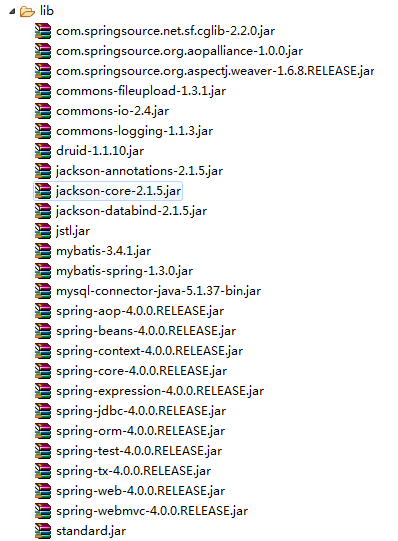
1-1、导包

1-2、创建并配置web.xml文件
<?xml version="1.0" encoding="UTF-8"?>

<web-app xmlns:xsi="http://www.w3.org/2001/XMLSchema-instance" xmlns="http://xmlns.jcp.org/xml/ns/javaee" xsi:schemaLocation="http://xmlns.jcp.org/xml/ns/javaee http://xmlns.jcp.org/xml/ns/javaee/web-app_3_1.xsd" id="WebApp_ID" version="3.1">

  <display-name>ssm</display-name>

    <!-- 制定spring的配置文件的路径和名称 -->

    <context-param>

        <param-name>contextConfigLocation</param-name>

        <param-value>classpath:beans.xml</param-value>

    </context-param>

    <!-- Bootstraps the root web application context before servlet initialization -->

    <listener>

        <listener-class>org.springframework.web.context.ContextLoaderListener</listener-class>

    </listener>

    <!-- 配置springMVC的前端控制器 -->

    <servlet>

        <servlet-name>springDispatcherServlet</servlet-name>

        <servlet-class>org.springframework.web.servlet.DispatcherServlet</servlet-class>

        <init-param>

            <param-name>contextConfigLocation</param-name>

            <param-value>classpath:springmvc.xml</param-value>

        </init-param>

        <load-on-startup>1</load-on-startup>

    </servlet>

    <!-- Map all requests to the DispatcherServlet for handling -->

    <servlet-mapping>

        <servlet-name>springDispatcherServlet</servlet-name>

        <url-pattern>/</url-pattern>

    </servlet-mapping>

    <!-- 配置处理post请求乱码的过滤器 -->

    <filter>

        <filter-name>characterEncodingFilter</filter-name>

        <filter-class>org.springframework.web.filter.CharacterEncodingFilter</filter-class>

        <init-param>

            <param-name>encoding</param-name>

            <param-value>UTF-8</param-value>

        </init-param>

    </filter>

    <filter-mapping>

        <filter-name>characterEncodingFilter</filter-name>

        <url-pattern>/*</url-pattern>

    </filter-mapping>

    <!-- 配置将post请求转化为put或者delete请求的过滤器 -->

    <filter>

        <filter-name>hiddenHttpMethodFilter</filter-name>

        <filter-class>org.springframework.web.filter.HiddenHttpMethodFilter</filter-class>

    </filter>

    <filter-mapping>

        <filter-name>hiddenHttpMethodFilter</filter-name>

        <url-pattern>/*</url-pattern>

    </filter-mapping>

</web-app>
1-3、springmvc.xml文件
<?xml version="1.0" encoding="UTF-8"?>

<beans xmlns="http://www.springframework.org/schema/beans"

    xmlns:xsi="http://www.w3.org/2001/XMLSchema-instance"

    xmlns:context="http://www.springframework.org/schema/context"

    xmlns:mvc="http://www.springframework.org/schema/mvc"

    xsi:schemaLocation="http://www.springframework.org/schema/mvc http://www.springframework.org/schema/mvc/spring-mvc-4.0.xsd

        http://www.springframework.org/schema/beans http://www.springframework.org/schema/beans/spring-beans.xsd

        http://www.springframework.org/schema/context http://www.springframework.org/schema/context/spring-context-4.0.xsd">

    <!-- 配置扫描包 -->

    <context:component-scan base-package="com.pk" use-default-filters="false">

        <context:include-filter type="annotation" expression="org.springframework.stereotype.Controller"/>

        <context:include-filter type="annotation" expression="org.springframework.web.bind.annotation.ControllerAdvice"/>

    </context:component-scan>

    <!-- 配置内部资源扫描器 -->

    <bean class="org.springframework.web.servlet.view.InternalResourceViewResolver">

        <property name="prefix" value="/WEB-INF/" />

        <property name="suffix" value=".jsp" />

    </bean>

    <!-- 配置处理静态资源的标签 -->

    <mvc:default-servlet-handler/>

    <mvc:annotation-driven/>

</beans>
1-4、beans.xml(applicationContext.xml)文件
<?xml version="1.0" encoding="UTF-8"?>

<beans xmlns="http://www.springframework.org/schema/beans"

    xmlns:xsi="http://www.w3.org/2001/XMLSchema-instance"

    xmlns:context="http://www.springframework.org/schema/context"

    xmlns:tx="http://www.springframework.org/schema/tx"

    xsi:schemaLocation="http://www.springframework.org/schema/beans http://www.springframework.org/schema/beans/spring-beans.xsd

        http://www.springframework.org/schema/context http://www.springframework.org/schema/context/spring-context-4.0.xsd

        http://www.springframework.org/schema/tx http://www.springframework.org/schema/tx/spring-tx-4.0.xsd">

    <!-- 配置扫描包 -->

    <context:component-scan base-package="com.pk">

        <context:exclude-filter type="annotation" expression="org.springframework.stereotype.Controller"/>

        <context:exclude-filter type="annotation" expression="org.springframework.web.bind.annotation.ControllerAdvice"/>

    </context:component-scan>

    <!-- 加载properties文件 -->

    <context:property-placeholder location="classpath:jdbc.properties"/>

    <!-- 配置数据源 -->

    <bean id="dataSource" class="com.alibaba.druid.pool.DruidDataSource">

        <property name="username" value="${jdbc.username}"/>

        <property name="password" value="${jdbc.password}"/>

        <property name="url" value="${jdbc.url}"/>

        <property name="driverClassName" value="${jdbc.driverclass}"/>

    </bean>

    <!-- 配置数据源管理器 -->

    <bean id="transactionManager" class="org.springframework.jdbc.datasource.DataSourceTransactionManager">

        <property name="dataSource" ref="dataSource"></property>

    </bean>

    <!-- 开启基于注解的事务支持 -->

    <tx:annotation-driven transaction-manager="transactionManager"/>

    <!-- 加载mybatis全局配置文件 -->

    <bean class="org.mybatis.spring.SqlSessionFactoryBean">

        <property name="dataSource" ref="dataSource"/>

        <property name="configLocation" value="classpath:mybatis-config.xml" />

    </bean>

    <!-- 扫描Mapper接口 -->

    <bean class="org.mybatis.spring.mapper.MapperScannerConfigurer">

        <property name="basePackage" value="com.pk.dao"/>

    </bean>

</beans>
1-5、mybatis的全局配置文件
<?xml version="1.0" encoding="UTF-8"?>

<!DOCTYPE configuration PUBLIC "-//mybatis.org//DTD Config 3.0//EN"

        "http://mybatis.org/dtd/mybatis-3-config.dtd">

<configuration>

    <settings>

        <!--全局开启懒加载机制-->

        <setting name="lazyLoadingEnabled" value="true" />

        <!--为false的时候才开启按需加载-->

        <setting name="aggressiveLazyLoading" value="false" />

    </settings>

</configuration>
1-6、jdbc.properties配置文件
jdbc.username=root(用户名,一般为root)

jdbc.password=root(自己的密码)

jdbc.driverclass=com.mysql.jdbc.Driver

jdbc.url=jdbc:mysql://localhost:3306/student(确保有盖数据库)
1-7、创建测试类
package com.pk.test;

import java.sql.Connection;

import java.sql.SQLException;

import javax.sql.DataSource;

import org.junit.Test;

import org.junit.runner.RunWith;

import org.springframework.beans.factory.annotation.Autowired;

import org.springframework.test.context.ContextConfiguration;

import org.springframework.test.context.junit4.SpringJUnit4ClassRunner;

@RunWith(SpringJUnit4ClassRunner.class)

@ContextConfiguration(locations = {"classpath:applicationContext.xml"})

public class TestApp {

    @Autowired

    private DataSource dataSource;

    @Test

    public void test() throws SQLException {

        Connection connection = dataSource.getConnection();

        System.out.println(connection);

    }

}
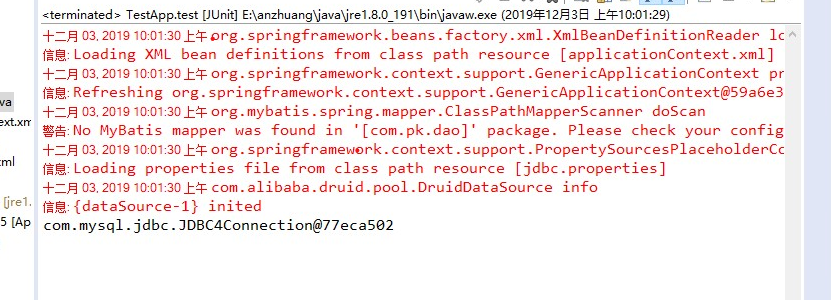
1-8、运行结果截图

ssm(spring+springmvc+mybatis)整合之环境配置的更多相关文章
- SSM Spring +SpringMVC+Mybatis 整合配置 及pom.xml
SSM Spring +SpringMVC+Mybatis 配置 及pom.xml SSM框架(spring+springMVC+Mybatis) pom.xml文件 maven下的ssm整合配置步骤
- SSM Spring+SpringMVC+mybatis+maven+mysql环境搭建
SSM Spring+SpringMVC+mybatis+maven环境搭建 1.首先右键点击项目区空白处,选择new->other..在弹出框中输入maven,选择Maven Project. ...
- Spring+springmvc+Mybatis整合案例 xml配置版(myeclipse)详细版
Spring+springmvc+Mybatis整合案例 Version:xml版(myeclipse) 文档结构图: 从底层开始做起: 01.配置web.xml文件 <?xml version ...
- SSM(Spring+SpringMvc+Mybatis)整合笔记
1.使用开发工具 jdk1.8 eclipse Tomcat7.0 MySql 2.创建数据库和表,由于重点是整合,所以数据库就随意加几条数据. 3.创建动态Web项目(推荐使用Maven可以用配置来 ...
- SSM(Spring+SpringMVC+Mybatis)框架环境搭建(整合步骤)(一)
1. 前言 最近在写毕设过程中,重新梳理了一遍SSM框架,特此记录一下. 附上源码:https://gitee.com/niceyoo/jeenotes-ssm 2. 概述 在写代码之前我们先了解一下 ...
- SSM(Spring,SpringMVC,Mybatis)框架整合项目
快速上手SSM(Spring,SpringMVC,Mybatis)框架整合项目 环境要求: IDEA MySQL 8.0.25 Tomcat 9 Maven 3.6 数据库环境: 创建一个存放书籍数据 ...
- ssm之spring+springmvc+mybatis整合初探
1.基本目录如下 2.首先是向lib中加入相应的jar包 3.然后在web.xml中加入配置,使spring和springmvc配置文件起作用. <?xml version="1. ...
- 框架篇:Spring+SpringMVC+Mybatis整合开发
前言: 前面我已搭建过ssh框架(http://www.cnblogs.com/xrog/p/6359706.html),然而mybatis表示不服啊. Mybatis:"我抗议!" ...
- Spring+SpringMVC+MyBatis整合(easyUI、AdminLte3)
实战篇(付费教程) 花了几天的时间,做了一个网站小 Demo,最终效果也与此网站类似.以下是这次实战项目的 Demo 演示. 登录页: 富文本编辑页: 图片上传: 退出登录: SSM 搭建精美实用的管 ...
随机推荐
- Optional int parameter 'resourceState' is present but cannot be translated into a null value
错误日志: java.lang.IllegalStateException: Optional int parameter 'resourceState' is present but cannot ...
- web程序设计关于我们
项目名称 福大咸鱼市场 开发团队 项目板块 负责人 美工 黄鸿杰 后端 胡继文 前端 葛家灿 联系方式:1175204449@qq.com
- How to Install Ruby on CentOS/RHEL 7/6
How to Install Ruby on CentOS/RHEL 7/6 . Ruby is a dynamic, object-oriented programming language foc ...
- 24V低压检测电路 - 低压检测电压(转)
24V低压检测电路 - 低压检测电压 参考: ADC采样工作原理详解 使用单片机的ADC采集电阻的分压 问题: 当ADC采集两个电阻分压后的电压的时候,ADC转换出来的电压值和万用表量出来的不一样差异 ...
- Nginx配置proxy_pass转发/路径问题
proxy_ignore_client_abort on; #不允许代理端主动关闭连接 upstream的负载均衡,四种调度算法 #调度算法1:轮询.每个请求按时间顺序逐一分配到不同的后端服务器,如果 ...
- spark 监控--WebUi、Metrics System(转载)
转载自:https://www.cnblogs.com/barrenlake/p/4364644.html Spark 监控相关的部分有WebUi 及 Metrics System; WebUi用于展 ...
- RabbitMQ安装后无法访问15672端口
切换到RabbitMQ的安装目录 sbin 目录下执行: rabbitmq-plugins enable rabbitmq_management 即可打开管理界面. rabbitmq的web管理界面无 ...
- Python 处理异常栈模块——traceback 模块
异常捕捉 通常我们在项目中,针对异常的捕捉会使用 try + except,基本形式如下: try: # 主代码 except IndexError as e: # 索引异常时执行这里 logger. ...
- 升级到11.2.0.4后用srvctl无法启用数据库实例,报CRS-0254: authorization failure
在standby database上从11.2.0.3升级11.2.0.4,然后打了补丁PATCH SET UPDATE 11.2.0.4.190115后,无法用srvctl启动第二个节点数据库实例: ...
- LeetCode_476. Number Complement
476. Number Complement Easy Given a positive integer, output its complement number. The complement s ...
