JAVA:ssm框架搭建
文章来源:http://www.cnblogs.com/hello-tl/p/8328071.html
环境简介 : jdk1.7.0_25/jdk1.8.0_31 tomcat-7.0.81 maven-3.3.9 MyEclipse-2013 spring-4.0.2 springMvc-4.0.2 mybatis-3.2.8
SSM(Spring+SpringMVC+MyBatis)框架集由Spring、SpringMVC、MyBatis三个开源框架整合而成,常作为数据源较简单的web项目的框架。
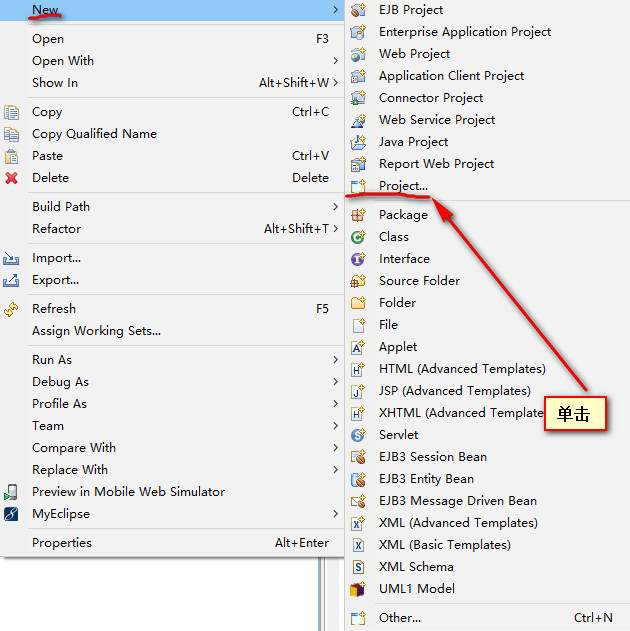
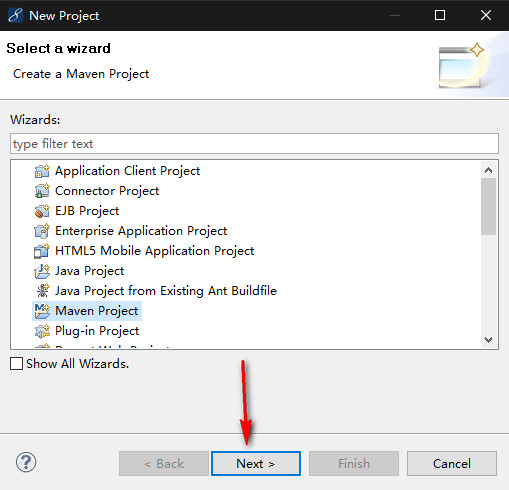
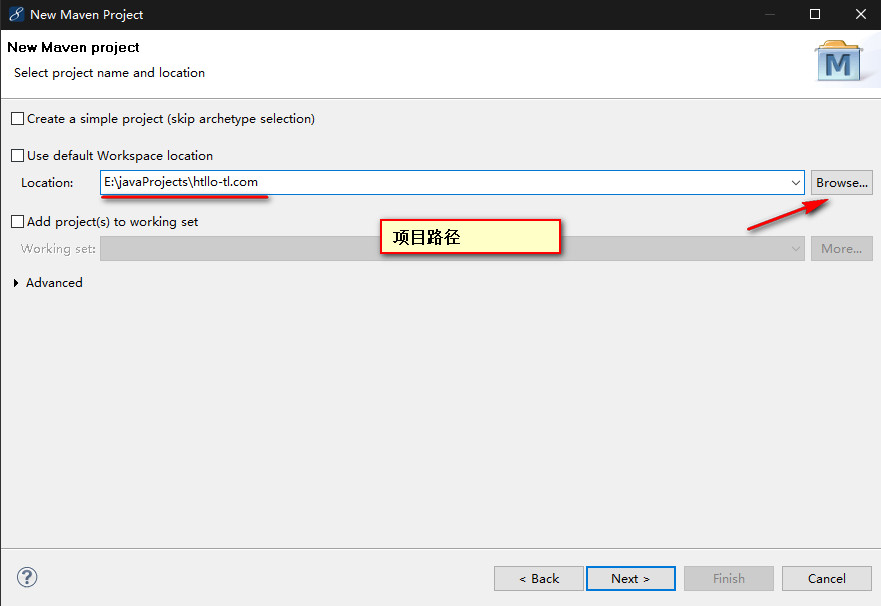
选择项目路径 -> Next
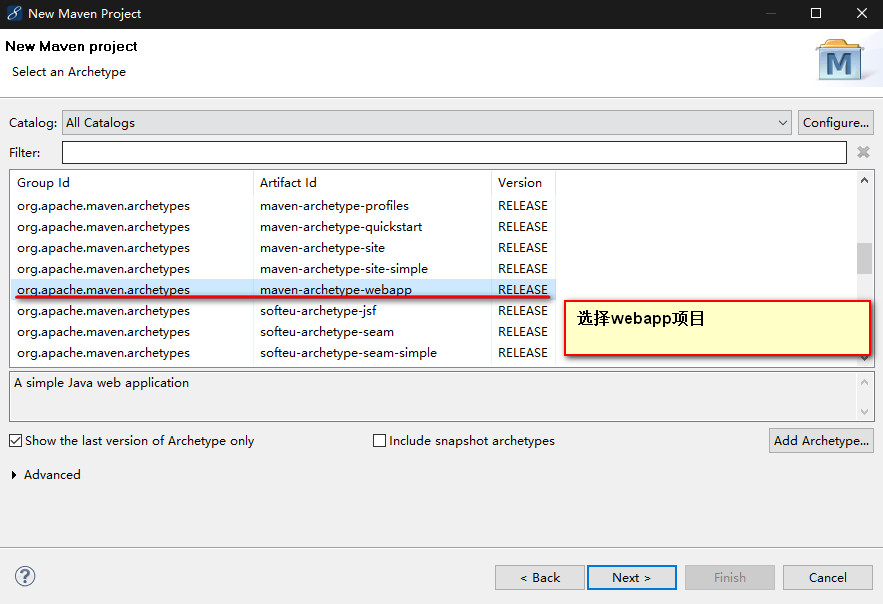
选择项目类型 webapp
填写 Group Id / Artifact Id -> Fubush
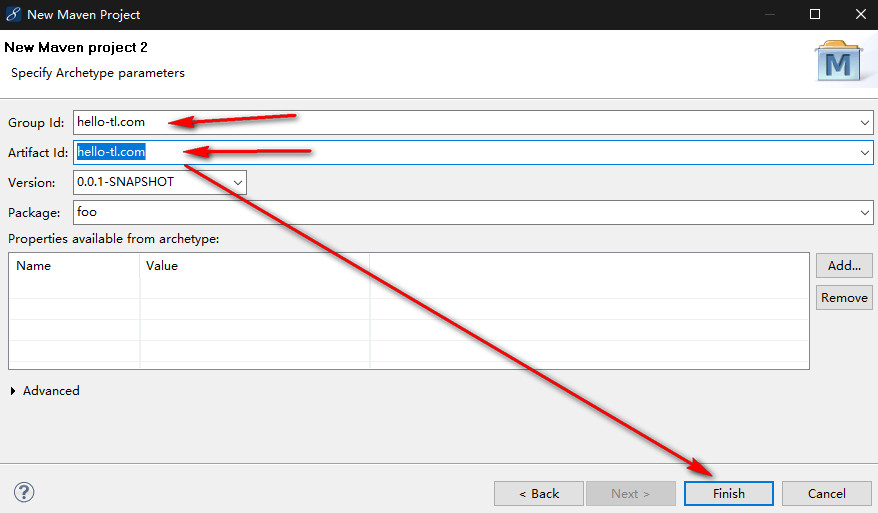
之后会出现一下
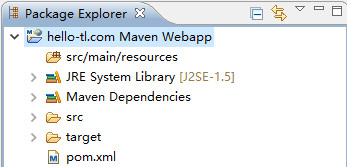
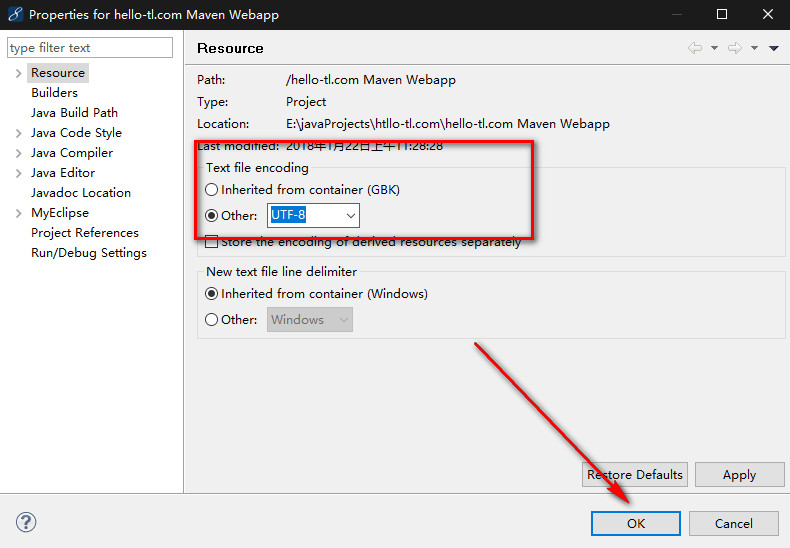
项目右键单击 properties 设置项目字符编码
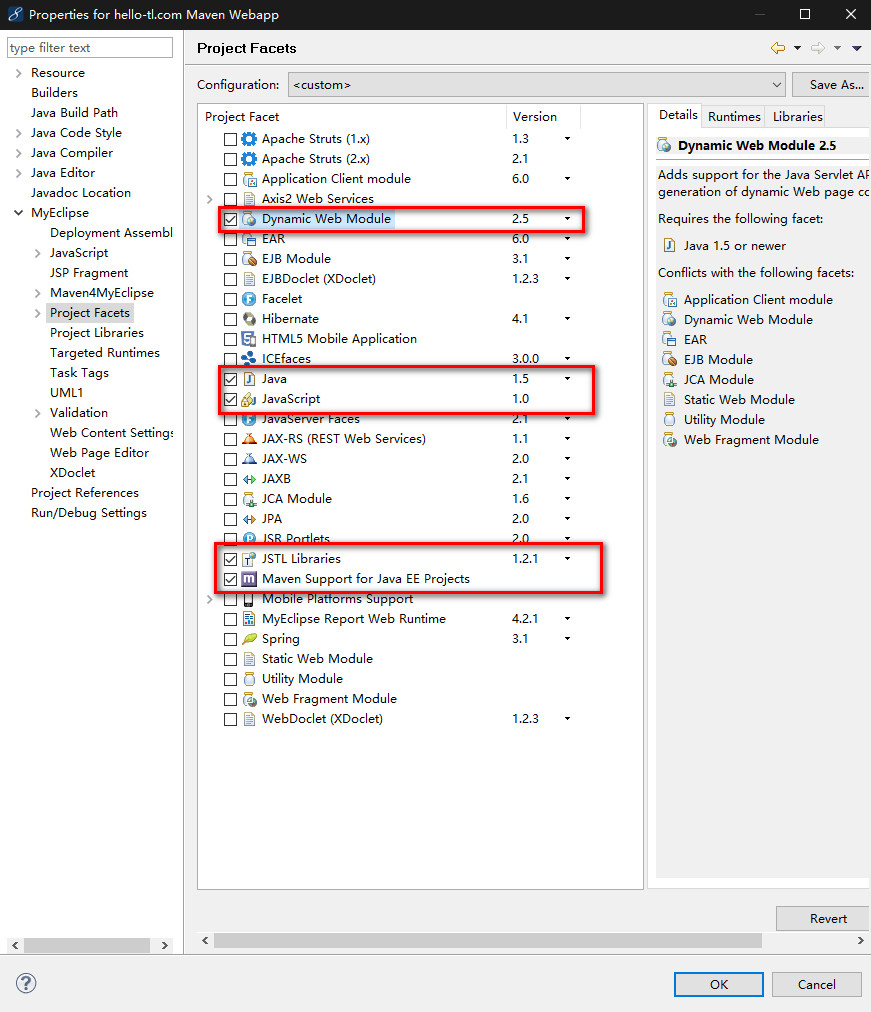
设置包 完事之后 maven 项目就创建完毕
1、ssm jar包下载
1) 下载ssm框架所需jar包
pom.xml
<!-- 用来设置版本号 -->

	<properties>

		<srping.version>4.0.2.RELEASE</srping.version>

		<mybatis.version>3.2.8</mybatis.version>

		<slf4j.version>1.7.12</slf4j.version>

		<log4j.version>1.2.17</log4j.version>

	</properties>

	<!-- 用到的jar包 -->

	<dependencies>

		<!-- 单元测试 -->

		<dependency>

			<groupId>junit</groupId>

			<artifactId>junit</artifactId>

			<version>4.11</version>

			<!-- 表示开发的时候引入,发布的时候不会加载此包 -->

			<scope>test</scope>

		</dependency>

		<!-- java ee包 -->

		<dependency>

			<groupId>javax</groupId>

			<artifactId>javaee-api</artifactId>

			<version>7.0</version>

		</dependency>

		<!-- spring框架包 start -->

		<dependency>

			<groupId>org.springframework</groupId>

			<artifactId>spring-test</artifactId>

			<version>${srping.version}</version>

		</dependency>

		<dependency>

			<groupId>org.springframework</groupId>

			<artifactId>spring-core</artifactId>

			<version>${srping.version}</version>

		</dependency>

		<dependency>

			<groupId>org.springframework</groupId>

			<artifactId>spring-oxm</artifactId>

			<version>${srping.version}</version>

		</dependency>

		<dependency>

			<groupId>org.springframework</groupId>

			<artifactId>spring-tx</artifactId>

			<version>${srping.version}</version>

		</dependency>

		<dependency>

			<groupId>org.springframework</groupId>

			<artifactId>spring-jdbc</artifactId>

			<version>${srping.version}</version>

		</dependency>

		<dependency>

			<groupId>org.springframework</groupId>

			<artifactId>spring-aop</artifactId>

			<version>${srping.version}</version>

		</dependency>

		<dependency>

			<groupId>org.springframework</groupId>

			<artifactId>spring-context</artifactId>

			<version>${srping.version}</version>

		</dependency>

		<dependency>

			<groupId>org.springframework</groupId>

			<artifactId>spring-context-support</artifactId>

			<version>${srping.version}</version>

		</dependency>

		<dependency>

			<groupId>org.springframework</groupId>

			<artifactId>spring-expression</artifactId>

			<version>${srping.version}</version>

		</dependency>

		<dependency>

			<groupId>org.springframework</groupId>

			<artifactId>spring-orm</artifactId>

			<version>${srping.version}</version>

		</dependency>

		<dependency>

			<groupId>org.springframework</groupId>

			<artifactId>spring-web</artifactId>

			<version>${srping.version}</version>

		</dependency>

		<dependency>

			<groupId>org.springframework</groupId>

			<artifactId>spring-webmvc</artifactId>

			<version>${srping.version}</version>

		</dependency>

		<!-- spring框架包 end -->

		<!-- mybatis框架包 start -->

		<dependency>

			<groupId>org.mybatis</groupId>

			<artifactId>mybatis</artifactId>

			<version>${mybatis.version}</version>

		</dependency>

		<dependency>

			<groupId>org.mybatis</groupId>

			<artifactId>mybatis-spring</artifactId>

			<version>1.2.2</version>

		</dependency>

		<!-- mybatis框架包 end -->

		<!-- 数据库驱动 -->

		<dependency>

			<groupId>mysql</groupId>

			<artifactId>mysql-connector-java</artifactId>

			<version>5.1.35</version>

		</dependency>

		<!-- 导入dbcp的jar包,用来在applicationContext.xml中配置数据库 -->

		<dependency>

			<groupId>commons-dbcp</groupId>

			<artifactId>commons-dbcp</artifactId>

			<version>1.4</version>

		</dependency>

		<!-- jstl标签类 -->

		<dependency>

			<groupId>jstl</groupId>

			<artifactId>jstl</artifactId>

			<version>1.2</version>

		</dependency>

		<!-- log start -->

		<dependency>

			<groupId>log4j</groupId>

			<artifactId>log4j</artifactId>

			<version>${log4j.version}</version>

		</dependency>

		<dependency>

			<groupId>org.slf4j</groupId>

			<artifactId>slf4j-api</artifactId>

			<version>${slf4j.version}</version>

		</dependency>

		<dependency>

			<groupId>org.slf4j</groupId>

			<artifactId>slf4j-log4j12</artifactId>

			<version>${slf4j.version}</version>

		</dependency>

		<!-- log END -->

		<!-- Json -->

		<!-- 格式化对象,方便输出日志 -->

		<dependency>

			<groupId>com.alibaba</groupId>

			<artifactId>fastjson</artifactId>

			<version>1.2.6</version>

		</dependency>

		<dependency>

			<groupId>org.codehaus.jackson</groupId>

			<artifactId>jackson-mapper-asl</artifactId>

			<version>1.9.13</version>

		</dependency>

		<!-- 上传组件包 start -->

		<dependency>

			<groupId>commons-fileupload</groupId>

			<artifactId>commons-fileupload</artifactId>

			<version>1.3.1</version>

		</dependency>

		<dependency>

			<groupId>commons-io</groupId>

			<artifactId>commons-io</artifactId>

			<version>2.4</version>

		</dependency>

		<dependency>

			<groupId>commons-codec</groupId>

			<artifactId>commons-codec</artifactId>

			<version>1.10</version>

		</dependency>

		<!-- 上传组件包 end -->

	</dependencies>
2) 创建几个必要的包
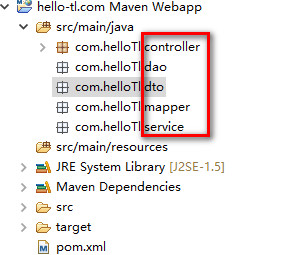
包的作用
| dao 数据访问层(接口) | 与数据打交道,可以是数据库操作,也可以是文件读写操作,甚至是redis缓存操作,总之与数据操作有关的都放在这里,也有人叫做dal或者数据持久层都差不多意思。为什么没有daoImpl,因为我们用的是mybatis,所以可以直接在配置文件中实现接口的每个方法。 |
| dto数据传输层 | 刚学框架的人可能不明白这个有什么用,其实就是用于service层与web层之间传输,为什么不直接用entity(pojo)?其实在实际开发中发现,很多时间一个entity并不能满足我们的业务需求,可能呈现给用户的信息十分之多,这时候就有了dto,也相当于vo,记住一定不要把这个混杂在entity里面,答应我好吗? |
| service业务逻辑接口 | 写我们的业务逻辑,也有人叫bll,在设计业务接口时候应该站在“使用者”的角度。额,不要问我为什么这里没显示!IDE调皮我也拿它没办法~ |
| controller控制器 | springmvc就是在这里发挥作用的,一般人叫做controller控制器,相当于struts中的action。 |
| mapper实体类 | 一般与数据库的表相对应,封装dao层取出来的数据为一个对象,也就是我们常说的pojo,一般只在dao层与service层之间传输。 |
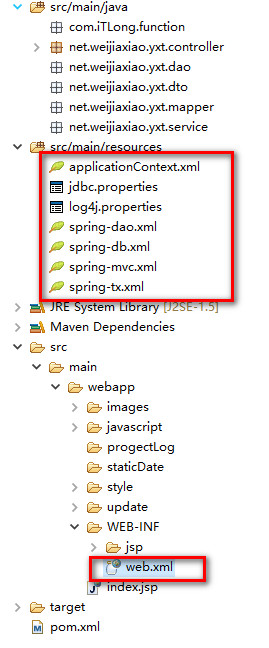
2、配置ssm相关的xml文件
xml文件注释齐全我这里就不解释 配置文件都在 resources 文件下
文件都有:
applicationContext.xml
spring-dao.xml
spring-db.xml
spring-mvc.xml
spring-tx.xml
jdbc.properties
log4j.properties
applicationContext.xml
<?xml version="1.0" encoding="UTF-8"?>

<beans xmlns="http://www.springframework.org/schema/beans"

	xmlns:xsi="http://www.w3.org/2001/XMLSchema-instance" xmlns:p="http://www.springframework.org/schema/p"

	xmlns:context="http://www.springframework.org/schema/context"

	xmlns:mvc="http://www.springframework.org/schema/mvc"

	xsi:schemaLocation="http://www.springframework.org/schema/beans

                        http://www.springframework.org/schema/beans/spring-beans-3.1.xsd

                        http://www.springframework.org/schema/context

                        http://www.springframework.org/schema/context/spring-context-3.1.xsd

                        http://www.springframework.org/schema/mvc

                        http://www.springframework.org/schema/mvc/spring-mvc-4.0.xsd">

	<!-- 使用注解式注入 -->

	<context:annotation-config />

	<!-- 自动扫描 -->

	<context:component-scan base-package="com.helloTl" />

	<!-- 导入DAO配置 -->

	<import resource="spring-dao.xml" />

	<!-- 导入数据库配置 -->

	<import resource="spring-db.xml" />

	<!-- 导入数据库配置 -->

	<import resource="spring-tx.xml" />

</beans>
spring-dao.xml
<?xml version="1.0" encoding="UTF-8"?>

<beans xmlns="http://www.springframework.org/schema/beans"

	xmlns:xsi="http://www.w3.org/2001/XMLSchema-instance" xmlns:p="http://www.springframework.org/schema/p"

	xmlns:context="http://www.springframework.org/schema/context"

	xmlns:mvc="http://www.springframework.org/schema/mvc"

	xsi:schemaLocation="http://www.springframework.org/schema/beans

                        http://www.springframework.org/schema/beans/spring-beans-3.1.xsd

                        http://www.springframework.org/schema/context

                        http://www.springframework.org/schema/context/spring-context-3.1.xsd

                        http://www.springframework.org/schema/mvc

                        http://www.springframework.org/schema/mvc/spring-mvc-4.0.xsd">

	<!-- DAO接口所在包名,Spring会自动查找其下的类 -->

	<bean class="org.mybatis.spring.mapper.MapperScannerConfigurer">

		<!--basePackage指定要扫描的包,在此包之下的映射器都会被搜索到。 可指定多个包,包与包之间用逗号或分号分隔 -->

		<property name="basePackage" value="com.helloTl.controller.dao" />

		<property name="sqlSessionFactoryBeanName" value="sqlSessionFactory"></property>

	</bean>

</beans>
spring-db.xml
<?xml version="1.0" encoding="UTF-8"?>

<beans xmlns="http://www.springframework.org/schema/beans"

	xmlns:xsi="http://www.w3.org/2001/XMLSchema-instance" xmlns:p="http://www.springframework.org/schema/p"

	xmlns:context="http://www.springframework.org/schema/context"

	xmlns:mvc="http://www.springframework.org/schema/mvc"

	xsi:schemaLocation="http://www.springframework.org/schema/beans

                        http://www.springframework.org/schema/beans/spring-beans-3.1.xsd

                        http://www.springframework.org/schema/context

                        http://www.springframework.org/schema/context/spring-context-3.1.xsd

                        http://www.springframework.org/schema/mvc

                        http://www.springframework.org/schema/mvc/spring-mvc-4.0.xsd">

	<!-- 引入配置文件 -->

	<bean id="propertyConfigurer"

		class="org.springframework.beans.factory.config.PropertyPlaceholderConfigurer">

		<property name="location" value="classpath:jdbc.properties" />

	</bean>

	<bean id="dataSource" class="org.apache.commons.dbcp.BasicDataSource"

		destroy-method="close">

		<property name="driverClassName" value="${driver}" />

		<property name="url" value="${url}" />

		<property name="username" value="${username}" />

		<property name="password" value="${password}" />

		<!-- 初始化连接大小 -->

		<property name="initialSize" value="${initialSize}"></property>

		<!-- 连接池最大数量 -->

		<property name="maxActive" value="${maxActive}"></property>

		<!-- 连接池最大空闲 -->

		<property name="maxIdle" value="${maxIdle}"></property>

		<!-- 连接池最小空闲 -->

		<property name="minIdle" value="${minIdle}"></property>

		<!-- 获取连接最大等待时间 -->

		<property name="maxWait" value="${maxWait}"></property>

	</bean>

	<!-- spring和MyBatis完美整合,不需要mybatis的配置映射文件 -->

	<bean id="sqlSessionFactory" class="org.mybatis.spring.SqlSessionFactoryBean">

		<property name="dataSource" ref="dataSource" />

		<!-- 自动扫描mapping.xml文件 -->

		<property name="mapperLocations" value="classpath:com/helloTl/mapper/*.xml"></property>

	</bean>

	<!-- DAO接口所在包名,Spring会自动查找其下的类 -->

	<bean class="org.mybatis.spring.mapper.MapperScannerConfigurer">

		<property name="basePackage" value="com.helloTl.dao" />

		<property name="sqlSessionFactoryBeanName" value="sqlSessionFactory"></property>

	</bean>

	<!-- (事务管理)transaction manager, use JtaTransactionManager for global tx -->

	<bean id="transactionManager"

		class="org.springframework.jdbc.datasource.DataSourceTransactionManager">

		<property name="dataSource" ref="dataSource" />

	</bean>

</beans>
spring-mvc.xml
<?xml version="1.0" encoding="UTF-8"?>

<beans xmlns="http://www.springframework.org/schema/beans"

	xmlns:xsi="http://www.w3.org/2001/XMLSchema-instance" xmlns:p="http://www.springframework.org/schema/p"

	xmlns:context="http://www.springframework.org/schema/context"

	xmlns:mvc="http://www.springframework.org/schema/mvc"

	xsi:schemaLocation="http://www.springframework.org/schema/beans

                        http://www.springframework.org/schema/beans/spring-beans-3.1.xsd

                        http://www.springframework.org/schema/context

                        http://www.springframework.org/schema/context/spring-context-3.1.xsd

                        http://www.springframework.org/schema/mvc

                        http://www.springframework.org/schema/mvc/spring-mvc-4.0.xsd">

	<!--避免IE执行AJAX时,返回JSON出现下载文件 -->

	<bean id="mappingJacksonHttpMessageConverter"

		class="org.springframework.http.converter.json.MappingJacksonHttpMessageConverter">

		<property name="supportedMediaTypes">

			<list>

				<value>text/html;charset=UTF-8</value>

			</list>

		</property>

	</bean>

	<!-- 添加注解驱动 -->

	<mvc:annotation-driven />

	<mvc:default-servlet-handler />

	<!-- 设置使用注解的类所在的包 -->

	<context:component-scan base-package="com.helloTl.controller" />

	<!-- 完成请求和注解POJO的映射 -->

	<bean

		class="org.springframework.web.servlet.mvc.annotation.AnnotationMethodHandlerAdapter">

		<property name="messageConverters">

			<list>

				<ref bean="mappingJacksonHttpMessageConverter" /> <!-- JSON转换器 -->

			</list>

		</property>

	</bean>

	<!-- 定义跳转的文件的前后缀 ,视图模式配置 -->

	<bean

		class="org.springframework.web.servlet.view.InternalResourceViewResolver">

		<!-- 这里的配置我的理解是自动给后面action的方法return的字符串加上前缀和后缀,变成一个 可用的url地址 -->

		<property name="prefix" value="/WEB-INF/jsp/" />

		<property name="suffix" value=".jsp" />

	</bean>

	<!-- SpringMVC上传文件时,需要配置MultipartResolver处理器 -->

	<bean id="multipartResolver"

		class="org.springframework.web.multipart.commons.CommonsMultipartResolver">

		<!-- 默认编码 -->

		<property name="defaultEncoding" value="utf-8" />

		<!-- 文件大小最大值 -->

		<property name="maxUploadSize" value="10485760000" />

		<!-- 内存中的最大值 -->

		<property name="maxInMemorySize" value="40960" />

	</bean>

</beans>
spring-tx.xml
<?xml version="1.0" encoding="UTF-8"?>

<beans xmlns="http://www.springframework.org/schema/beans"

	xmlns:xsi="http://www.w3.org/2001/XMLSchema-instance" xmlns:p="http://www.springframework.org/schema/p"

	xmlns:context="http://www.springframework.org/schema/context"

	xmlns:mvc="http://www.springframework.org/schema/mvc"

	xsi:schemaLocation="http://www.springframework.org/schema/beans

                        http://www.springframework.org/schema/beans/spring-beans-3.1.xsd

                        http://www.springframework.org/schema/context

                        http://www.springframework.org/schema/context/spring-context-3.1.xsd

                        http://www.springframework.org/schema/mvc

                        http://www.springframework.org/schema/mvc/spring-mvc-4.0.xsd">

	<!-- (事务管理)transaction manager, use JtaTransactionManager for global tx -->

	<bean id="transactionManager"

		class="org.springframework.jdbc.datasource.DataSourceTransactionManager">

		<property name="dataSource" ref="dataSource" />

	</bean>

</beans>
jdbc.properties
driver=com.mysql.jdbc.Driver

url=jdbc:mysql://localhost:3306/helloTL

username=root

password=root

#\u5B9A\u4E49\u521D\u59CB\u8FDE\u63A5\u6570

initialSize=0

#\u5B9A\u4E49\u6700\u5927\u8FDE\u63A5\u6570

maxActive=20

#\u5B9A\u4E49\u6700\u5927\u7A7A\u95F2

maxIdle=20

#\u5B9A\u4E49\u6700\u5C0F\u7A7A\u95F2

minIdle=1

#\u5B9A\u4E49\u6700\u957F\u7B49\u5F85\u65F6\u95F4

maxWait=60000
log4j.properties
#\u5B9A\u4E49LOG\u8F93\u51FA\u7EA7\u522B

log4j.rootLogger=INFO,Console,File

#\u5B9A\u4E49\u65E5\u5FD7\u8F93\u51FA\u76EE\u7684\u5730\u4E3A\u63A7\u5236\u53F0

log4j.appender.Console=org.apache.log4j.ConsoleAppender

log4j.appender.Console.Target=System.out

#\u53EF\u4EE5\u7075\u6D3B\u5730\u6307\u5B9A\u65E5\u5FD7\u8F93\u51FA\u683C\u5F0F\uFF0C\u4E0B\u9762\u4E00\u884C\u662F\u6307\u5B9A\u5177\u4F53\u7684\u683C\u5F0F

log4j.appender.Console.layout = org.apache.log4j.PatternLayout

log4j.appender.Console.layout.ConversionPattern=[%c] - %m%n

#\u6587\u4EF6\u5927\u5C0F\u5230\u8FBE\u6307\u5B9A\u5C3A\u5BF8\u7684\u65F6\u5019\u4EA7\u751F\u4E00\u4E2A\u65B0\u7684\u6587\u4EF6

log4j.appender.File = org.apache.log4j.RollingFileAppender

#\u6307\u5B9A\u8F93\u51FA\u76EE\u5F55

log4j.appender.File.File = logs/ssm.log

#\u5B9A\u4E49\u6587\u4EF6\u6700\u5927\u5927\u5C0F

log4j.appender.File.MaxFileSize = 10MB

# \u8F93\u51FA\u6240\u4EE5\u65E5\u5FD7\uFF0C\u5982\u679C\u6362\u6210DEBUG\u8868\u793A\u8F93\u51FADEBUG\u4EE5\u4E0A\u7EA7\u522B\u65E5\u5FD7

log4j.appender.File.Threshold = ALL

log4j.appender.File.layout = org.apache.log4j.PatternLayout

log4j.appender.File.layout.ConversionPattern =[%p] [%d{yyyy-MM-dd HH\:mm\:ss}][%c]%m%n
最后还需要配置一下web.xml src/main/webapp/WEB-INF/web.xml
web.xml
<?xml version="1.0" encoding="UTF-8"?>

<web-app xmlns:xsi="http://www.w3.org/2001/XMLSchema-instance"

	xmlns="http://java.sun.com/xml/ns/javaee"

	xsi:schemaLocation="http://java.sun.com/xml/ns/javaee http://java.sun.com/xml/ns/javaee/web-app_3_0.xsd"

	version="3.0">

	<display-name>Archetype Created Web Application</display-name>

	<welcome-file-list>

		<welcome-file>/index.jsp</welcome-file>

	</welcome-file-list>

	<!-- 加载spring bean -->

	<context-param>

		<param-name>contextConfigLocation</param-name>

		<param-value>classpath:applicationContext.xml</param-value>

	</context-param>

	<listener>

		<listener-class>org.springframework.web.context.ContextLoaderListener</listener-class>

	</listener>

	<!-- 编码过滤器 -->

	<filter>

		<filter-name>encodingFilter</filter-name>

		<filter-class>org.springframework.web.filter.CharacterEncodingFilter</filter-class>

		<async-supported>true</async-supported>

		<init-param>

			<param-name>encoding</param-name>

			<param-value>UTF-8</param-value>

		</init-param>

	</filter>

	<filter-mapping>

		<filter-name>encodingFilter</filter-name>

		<url-pattern>/*</url-pattern>

	</filter-mapping>

	<!-- Spring MVC servlet -->

	<servlet>

		<servlet-name>SpringMVC</servlet-name>

		<servlet-class>org.springframework.web.servlet.DispatcherServlet</servlet-class>

		<init-param>

			<param-name>contextConfigLocation</param-name>

			<param-value>classpath:spring-mvc.xml</param-value>

		</init-param>

		<load-on-startup>1</load-on-startup>

		<async-supported>true</async-supported>

	</servlet>

	<servlet-mapping>

		<servlet-name>SpringMVC</servlet-name>

		<url-pattern>/</url-pattern>

	</servlet-mapping>

	<!-- 静态资源文件的引入 -->

	<servlet-mapping>

		<servlet-name>default</servlet-name>

		<url-pattern>*.js</url-pattern>

	</servlet-mapping>

	<servlet-mapping>

		<servlet-name>default</servlet-name>

		<url-pattern>*.css</url-pattern>

	</servlet-mapping>

	<servlet-mapping>

		<servlet-name>default</servlet-name>

		<url-pattern>*.png</url-pattern>

	</servlet-mapping>

</web-app>
我们一共配置了8个配置文件我们来看一下结构图
3、测试一下是否完成ssm框架的搭建 我们在网页上打印hello world
com.helloTl.controller/MainController.java
package com.helloTl.controller;

import org.springframework.stereotype.Controller;

import org.springframework.web.bind.annotation.RequestMapping;

@Controller

@RequestMapping("/main")

public class MainController{

    @RequestMapping(value = "/index")

    public String index(){

        return "main/index";

    }

}
src/main/webapp/WEB-INF/jsp/main/index.jsp
<html>

<body>

<h2>Hello World! hello-tl.com</h2>

</body>

</html>
访问浏览器 http://localhost:8080/hello-tl.com/main/index

出现以上情况表示ssm搭建成功
文章来源:http://www.cnblogs.com/hello-tl/p/8328071.html
JAVA:ssm框架搭建的更多相关文章
- SSM框架搭建web服务器实现登录功能(Spring+SpringMVC+Mybatis)
初学java EE,虽然知道使用框架会使开发更加便捷高效,但是对于初学者来说,感到使用框架比较迷惑,尤其是各种jar包的引用.各种框架的配置.注解的使用等等. 最好的学习方法就是实践,于是下载了一个现 ...
- SSM 框架搭建
SSM框架搭建(Spring.SpringMVC.Mybatis) 一:基本概念 Spring : Spring是一个开源框架,Spring是于2003 年兴起的一个轻量级的Java 开发框 ...
- SSM框架搭建教程(从零开始,图文结合)
1.准备 IntelliJ IDEA Tomcat JDK Maven mysql spring.springmvc.mybatis 了解 现在假设如上条件你都具备,那么通过我这篇博客 你一定可以整合 ...
- 实习小结(二)--- SSM框架搭建
SSM项目框架搭建 前几天做了一个学生信息管理的项目,使用纯控制台输入,查询数据库,将信息在控制台中打印,功能完善得差不多之后,老师让将这个项目移植到Web中,使用Spring+SpringMVC+M ...
- SpringMVC笔记——SSM框架搭建简单实例
落叶枫桥 博客园 首页 新随笔 联系 订阅 管理 SpringMVC笔记——SSM框架搭建简单实例 简介 Spring+SpringMVC+MyBatis框架(SSM)是比较热门的中小型企业级项目开发 ...
- ssm框架搭建整合测试
下载各种jar包 mybatis下载 https://github.com/mybatis/mybatis-3/releases mysql驱动下载 http://mvnrepository.com/ ...
- idea ssm框架搭建
1.分享一篇完整的ssm框架搭建连接 大牛博客:https://www.cnblogs.com/toutou/p/ssm_spring.html#_nav_0 2.我的搭建的完整项目连接,可以进入我的 ...
- java ssm框架 mapper文件里的#符号和$符号的区别
Java SSM框架里面,Mapper.xml文件 (一)#符号生成的sql语句是作为传参的 <!-- 获得数据列表(包括课程相关信息) --> <select id="G ...
- SSM框架搭建详细解析
总结了一下搭建SSM框架流程,在以后用到的时候方便回头使用. 使用工具:MyEclipse 2015:Tomcat 8版本:jdk1.8版本. 首先: 1:创建一个WebProject项目,jdk1. ...
随机推荐
- iSCSI 原理和基础使用
终于完成最后一篇了,一上午的时间就过去了. 下文主要是对基本操作和我对iSCSI的理解,网上有很多iSCSI原理,在这里我就不写了,请自行学习. 这篇文章仅对iSCSI的很多误解做一次梳理,你必须对所 ...
- java高分局之jstat命令使用
S0C S1C S0U S1U EC EU OC OU MC MU CCSC CCSU YGC ...
- Iahub and Xors Codeforces - 341D
二维线段树被卡M+T...于是去学二维树状数组区间更新区间查询 树状数组维护数列区间xor的修改.删除(就是把原问题改成一维): 以下p*i实际都指i个p相xor,即(i&1)*pa表示原数列 ...
- Mysql读写分离操作之mysql-proxy
常见的读写方式 基于程序代码内部实现 在代码中根据select.insert进行选择分类:这类方法也是生产常用的,效率最高,但是对开发人员比较麻烦.架构不能灵活调整 基于中间件的读写分离: mysql ...
- PDO相关函数
(PHP 5 >= 5.1.0, PHP 7, PECL pdo >= 0.1.0) PDO::__construct — 创建一个表示数据库连接的 PDO 实例 说明 PDO::__co ...
- Java垃圾回收机制分析
Java的堆是一个运行时数据区,类的实例从中分配空间,堆中存储着正在运行的应用程序所建立的所有对象.垃圾回收是一种动态存储管理技术.它按照特定的垃圾回收算法,自动释放掉不再被引用的对象.堆内存里垃圾的 ...
- SpringMvc之参数绑定注解详解
引言: 前段时间项目中用到了REST风格来开发程序,但是当用POST.PUT模式提交数据时,发现服务器端接受不到提交的数据(服务器端参数绑定没有加任何注解),查看了提交方式为application/j ...
- 使用代码编辑器Sublime Text 3进行前端开发及相关快捷键
推荐理由: Sublime Text:一款具有代码高亮.语法提示.自动完成且反应快速的编辑器软件,不仅具有华丽的界面,还支持插件扩展机制,用她来写代码,绝对是一种享受.相比于浮肿沉重的Eclipse, ...
- 云原生技术图谱 (CNCF Landscape)
转自:https://raw.githubusercontent.com/cncf/landscape/master/landscape/CloudNativeLandscape_latest.jpg
- GitHub简单命令行# 使用命令行传代码到GitHub
第一次提交代码到Github 第一步: 建立本地仓库cd到你的本地项目根目录下,执行git命令 cd到本地项目 git init 第二步: 将本地项目工作区的所有文件添加到暂存区 git add . ...
