redis作为mysql的缓存服务器(读写分离,通过mysql触发器实现数据同步)
一、redis简介
Redis是一个key-value存储系统。和Memcached类似,为了保证效率,数据都是缓存在内存中。区别的是redis会周期性的把更新的数据写入磁盘或者把修改操作写入追加的记录文件,并且在此基础上实现了master-slave(主从)同步。在部分场合可以对关系数据库起到很好的补充作用。它提供了Java,C/C++(hiredis),C#,PHP,JavaScript,Perl,Object-C,Python,Ruby等客户端,使用很方便。
二、架构图
<ignore_js_op>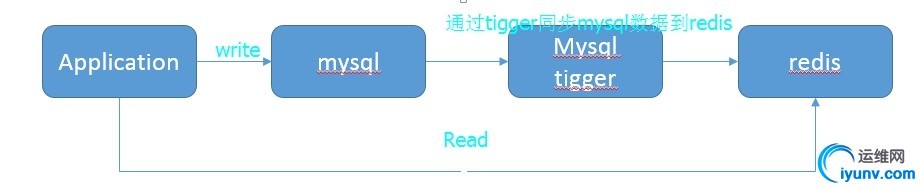
大致结构就是读写分离,将mysql中的数据通过触发器同步到redis中
三、安装LNMP环境(这里为了省事,就是用yum来安装)
1、修改yum源
| 1 2 3 4 5 6 7 8 9 10 11 12 13 |
[iyunv@redis ~]# vim /etc/yum.repos.d/epel.repo #添加这个文件 [epel] name=Extra Packages for Enterprise Linux 6 - $basearch baseurl=http://download.fedoraproject.org/pub/epel/6/$basearch failovermethod=priority enabled=1 gpgcheck=0 [nginx] |
2、yum安装
| 1 | [iyunv@redis ~]# yum -y install nginx php php-fpm php-cli php-common php-gd php-mbstring php-mysql php-pdo php-devel php-xmlrpc php-xml php-bcmath php-dba php-enchant mysql mysql-server |
3、简单配置一下nginx
| 1 2 3 4 5 6 7 8 9 10 11 12 13 14 15 16 17 18 19 20 21 22 |
[iyunv@redis ~]# vim /etc/nginx/nginx.conf server { listen 80; #定义使用www.xx.com访问 server_name www.xx.com; #设定本虚拟主机的访问日志 #默认请求 |
4、启动服务
| 1 2 3 4 5 6 7 8 9 10 11 12 13 14 15 16 17 18 19 20 21 22 23 |
[iyunv@redis ~]# sed -i 's/apache/nginx/g' /etc/php-fpm.d/www.conf [iyunv@redis ~]# /etc/init.d/php-fpm start 正在启动 php-fpm: [确定] [iyunv@redis ~]# /etc/init.d/mysqld start [iyunv@redis ~]# mkdir /{logs,www} [iyunv@redis www]# service iptables stop [iyunv@redis redis]# netstat -tnlp #查看监听 |
5、给mysql授权
| 1 2 3 4 |
[iyunv@redis ~]# mysql mysql> grant all privileges on *.* to root@localhost identified by '123456'; mysql> flush privileges; |
6、测试
| 1 2 3 4 |
[iyunv@redis ~]# vim /www/index.php <?php phpinfo(); ?> |
然后访问页面看到php的相关信息,基础环境就算搭建完成了。
四、安装redis
1、安装redis
| 1 2 3 4 5 6 7 8 9 10 11 12 |
[iyunv@redis ~]# wget -c -t 0 http://download.redis.io/releases/redis-2.8.19.tar.gz
[iyunv@redis ~]# mkdir /usr/local/redis [iyunv@redis ~]# tar xvf redis-2.8.19.tar.gz #编译完成后,将src中的可执行文件拷贝到刚刚创建的目录中 |
Redis-benchmark 压力测试工具
Redis-check-aof 检查redis持久化命令文件的完整性
Redis-check-dump 检查redis持久化数据文件的完整性
Redis-cli redis在linux上的客户端
Redis-sentinel redis-sentinel是集群管理工具,主要负责主从切换。
Redis-server Redis服务器的daemon启动程序
2、安装php的redis扩展
| 1 2 3 4 5 6 7 8 9 10 11 12 13 14 15 |
[iyunv@redis ~]# wget -c -t 0 https://github.com/owlient/phpredis/archive/master.zip [iyunv@redis ~]# unzip master.zip [iyunv@redis ~]# cd phpredis-master/ #修改php的配置文件,如果没有“extension=redis.so”,就加上这一行 [iyunv@redis ~]# /etc/init.d/php-fpm restart |
3、是否安装成功
还是访问phpinfo的那个界面
<ignore_js_op>
看到这个就是安装完成了。
五、读写分离
这里只是简单的做了一下读,没有写操作的相关代码,过一会测试,直接到数据库里执行update来模拟写操作。
1、在mysql中插入一些测试数据
| 1 2 3 4 5 6 7 8 9 10 11 12 13 14 15 16 17 18 |
[iyunv@redis ~]# mysql -u root -p123456 mysql> create database mytest; mysql> CREATE TABLE `test` (`id` int(7) NOT NULL AUTO_INCREMENT, `name` char(8) DEFAULT NULL, PRIMARY KEY (`id`)) ENGINE=InnoDB AUTO_INCREMENT=10 DEFAULT CHARSET=utf8; mysql> INSERT INTO `test` VALUES (1,'sven'),(2,'jim'),(3,'zhu'),(4,'wang'),(5,'ftd'),(6,'test'),(7,'test01'),(8,'test02'),(9,'test03'); mysql> select * from mytest.test; +----+--------+ | id | name | +----+--------+ | 1 | sven | | 2 | jim | | 3 | zhu | | 4 | wang | | 5 | ftd | | 6 | test | | 7 | test01 | | 8 | test02 | | 9 | test03 | +----+--------+ |
2、编写php的测试代码
| 1 2 3 4 5 6 7 8 9 10 11 12 13 14 15 16 17 18 19 20 21 22 23 24 25 26 27 28 29 30 31 32 33 34 35 36 37 38 39 40 |
<?php $redis = new Redis(); $redis->connect('127.0.0.1',6379) or die ("could net connect redis server"); $query = "select * from test limit 8"; //为了简单一点,这里就读取了8条数据 for ($key = 1; $key < 9; $key++) { if (!$redis->get($key)) { $connect = mysql_connect('127.0.0.1','root','123456'); mysql_select_db(mytest); $result = mysql_query($query); //如果没有找到$key,就将该查询sql的结果缓存到redis while ($row = mysql_fetch_assoc($result)) { $redis->set($row['id'],$row['name']); } $myserver = 'mysql'; break; } else { $myserver = "redis"; $data[$key] = $redis->get($key); } } echo $myserver; echo "<br>"; echo "name is <b><font color=#FF0000>$data[$key]</font></b>"; echo "<br>"; |
第一次访问,redis中没有对应的KEY时
<ignore_js_op>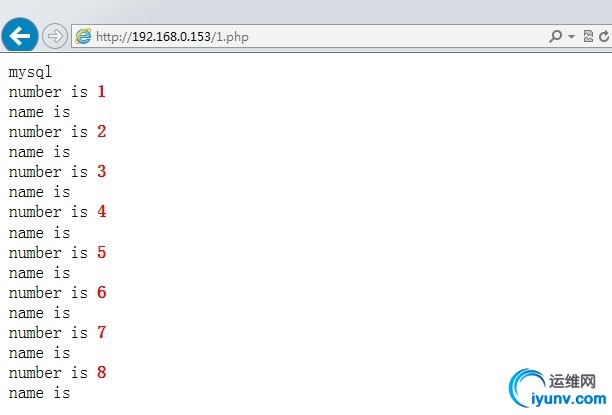
再次访问,此时redis中已有相关数据
<ignore_js_op>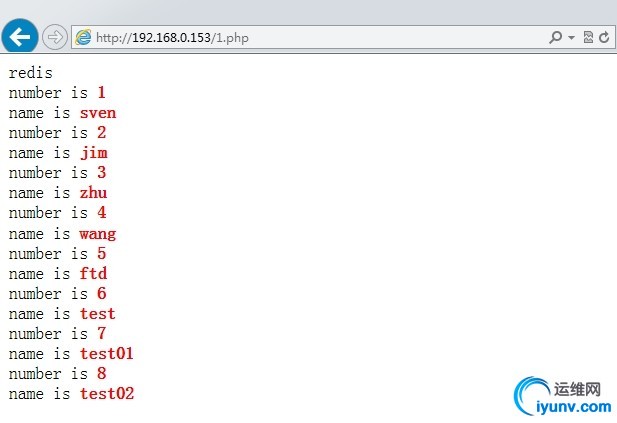
到这里,我们已经实现了redis作为mysql的缓存服务器,但是如果更新了mysql,redis中仍然会有对应的KEY,数据就不会更新,此时就会出现mysql和redis数据不一致的情况。所以接下来就要通过mysql触发器将改变的数据同步到redis中。
六、通过gearman实现同步
1、介绍
Gearman是一个支持分布式的任务分发框架:
Gearman Job Server:Gearman核心程序,需要编译安装并以守护进程形式运行在后台。
Gearman Client:可以理解为任务的请求者。
Gearman Worker:任务的真正执行者,一般需要自己编写具体逻辑并通过守护进程方式运行,Gearman Worker接收到Gearman Client传递的任务内容后,会按顺序处理。
大致流程:
下面要编写的mysql触发器,就相当于Gearman的客户端。修改表,插入表就相当于直接下发任务。然后通过lib_mysqludf_json UDF库函数将关系数据映射为JSON格式,然后在通过gearman-mysql-udf插件将任务加入到Gearman的任务队列中,最后通过redis_worker.php,也就是Gearman的worker端来完成redis数据库的更新。
2、安装启动
| 1 2 3 4 5 |
[iyunv@redis ~]# yum -y install gearmand libgearman-devel [iyunv@redis ~]# /etc/init.d/gearmand start 正在启动 gearmand: [确定] [iyunv@redis ~]# /etc/init.d/gearmand status gearmand (pid 7702) 正在运行... |
3、安装php的gearman扩展
| 1 2 3 4 5 6 7 8 9 10 11 12 13 14 15 |
[iyunv@redis ~]# wget -c -t 0 https://pecl.php.net/get/gearman-1.1.1.tgz
[iyunv@redis ~]# tar xvf gearman-1.1.1.tgz #如果php的配置文件中没有extension = gearman.so,就加上此行 |
<ignore_js_op>
这样就是安装成功了
4、安装lib_mysqludf_json
lib_mysqludf_json UDF库函数将关系数据映射为JSON格式。通常,数据库中的数据映射为JSON格式,是通过程序来转换的。
| 1 2 3 4 5 6 7 8 9 10 11 12 13 14 15 16 17 18 19 20 21 22 23 24 25 26 27 |
[iyunv@redis ~]# wget -c -t 0 https://github.com/mysqludf/lib_mysqludf_json/archive/master.zip [iyunv@redis ~]# unzip master.zip [iyunv@redis ~]# cd lib_mysqludf_json-master/ [iyunv@redis lib_mysqludf_json-master]# gcc $(mysql_config --cflags) -shared -fPIC -o lib_mysqludf_json.so lib_mysqludf_json.c lib_mysqludf_json.c:40:23: 错误:my_global.h:没有那个文件或目录 lib_mysqludf_json.c:41:20: 错误:my_sys.h:没有那个文件或目录 lib_mysqludf_json.c:43:19: 错误:mysql.h:没有那个文件或目录 lib_mysqludf_json.c:44:21: 错误:m_ctype.h:没有那个文件或目录 lib_mysqludf_json.c:45:22: 错误:m_string.h:没有那个文件或目录 #这里编译报错是因为没有安装mysql的开发包,如果是源码安装的mysql,需要在/etc/ld.so.conf.d/ mysql> show global variables like 'plugin_dir'; #将模块拷贝到插件目录下 #注册UDF函数 |
5、安装gearman-mysql-udf
这个插件是用来管理调用 Gearman 的分布式的队列。
| 1 2 3 4 5 6 7 8 9 10 11 12 13 14 15 16 17 18 19 20 21 22 23 24 |
[iyunv@redis ~]# wget -c -t 0 https://launchpad.net/gearman-my ... ysql-udf-0.6.tar.gz [iyunv@redis ~]# tar xvf gearman-mysql-udf-0.6.tar.gz [iyunv@redis ~]# cd gearman-mysql-udf-0.6 #注册UDF函数 #查看函数 #指定gearman的服务信息 |
6、编写mysql触发器(根据实际情况编写)
| 1 2 3 4 5 |
DELIMITER $$ CREATE TRIGGER datatoredis AFTER UPDATE ON test FOR EACH ROW BEGIN SET @RECV=gman_do_background('syncToRedis', json_object(NEW.id as `id`, NEW.name as `name`)); END$$ DELIMITER ; |
7、编写gearman的worker端
| 1 2 3 4 5 6 7 8 9 10 11 12 13 14 15 16 17 18 19 20 21 22 23 24 |
[iyunv@redis ~]# vim /www/redis_worker.php <?php $worker = new GearmanWorker(); $worker->addServer(); $worker->addFunction('syncToRedis', 'syncToRedis'); $redis = new Redis(); while($worker->work()); #后台运行 |
"$redis->set($work->id, $work->name);"这条语句就是将id作KEY和name作VALUE分开存储,需要和前面写的php测试代码的存取一致。
8、更新mysql中的数据
| 1 2 3 4 5 6 7 8 9 10 11 12 13 14 |
mysql> set @RECV = 1; mysql> select @RECV; +------+ | @RECV| +------+ | 1 | +------+ mysql> update test set name = 'ssss' where id = 1; mysql> select @RECV; +------+ | @RECV| +------+ | NULL | +------+ |
从返回值可以看到,触发器是触发成功的(这里的@RECV是上面mysql TIGGER的返回值)。我们在redis中查看数据:
| 1 2 3 |
[iyunv@redis redis]# ./redis-cli 127.0.0.1:6379> get 1 "sven" |
这里的数据居然没有变化,这是我们就要排错了。
| 1 2 3 4 5 6 7 8 9 10 11 |
[iyunv@redis ~]# vim /var/log/audit/audit.log type=AVC msg=audit(1427807674.425:107): avc: denied { name_connect } for pid=12453 comm="mysqld" dest=4730 scontext=unconfined_u:system_r:mysqld_t:s0 tcontext=system_u:o bject_r:port_t:s0 tclass=tcp_socket #看到这样一条日志,就知道是selinux阻止了同步 #现在将selinux的模式调成Permissive |
设置完成以后,再次执行update,进入redis进行查看
| 1 2 |
127.0.0.1:6379> get 1 "ssss" |
刷新一下刚刚的php界面
<ignore_js_op>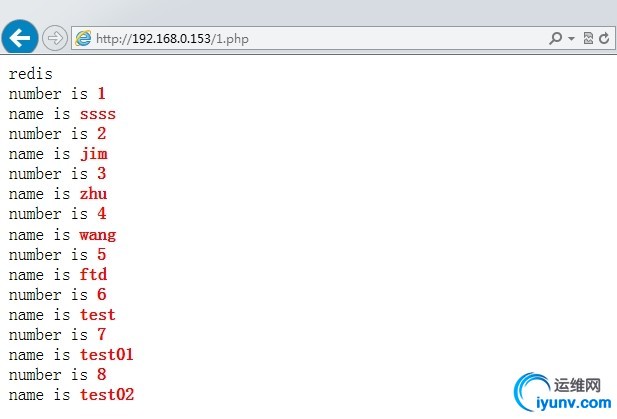
到这里就基本算是大功告成了,只要application将数据写到mysql中,mysql触发器检测到更新,就会通过Gearman将数据同步到redis中。然后读取的话,就直接从redis中进行读取。当然这只是个实验环境,实际上还有很多细节要调整。
redis作为mysql的缓存服务器(读写分离,通过mysql触发器实现数据同步)的更多相关文章
- redis 作为 mysql的缓存服务器(读写分离)
redis 作为 mysql的缓存服务器(读写分离) 一.redis简介 Redis是一个key-value存储系统.和Memcached类似,为了保证效率,数据都是缓存在内存中.区别的是redis会 ...
- redis作为mysql的缓存服务器(读写分离) (转)
一.redis简介Redis是一个key-value存储系统.和Memcached类似,为了保证效率,数据都是缓存在内存中.区别的是redis会周期性的把更新的数据写入磁盘或者把修改操作写入追加的记录 ...
- redis作为mysql的缓存服务器(读写分离)
转自:https://www.iyunv.com/thread-52670-1-1.html 一.redis简介Redis是一个key-value存储系统.和Memcached类似,为了保证效率,数据 ...
- Database基础(六):实现MySQL读写分离、MySQL性能调优
一.实现MySQL读写分离 目标: 本案例要求配置2台MySQL服务器+1台代理服务器,实现MySQL代理的读写分离: 用户只需要访问MySQL代理服务器,而实际的SQL查询.写入操作交给后台的2台M ...
- sql server 本地复制订阅 实现数据库服务器 读写分离(转载)
转载地址:http://www.cnblogs.com/echosong/p/3603270.html 再前段echosong 写了一遍关于mysql 数据同步实现业务读写分离的文章,今天咱们来看下S ...
- sql server 本地复制订阅 实现数据库服务器 读写分离
再前段echosong 写了一遍关于mysql 数据同步实现业务读写分离的文章,今天咱们来看下SQL Server的复制订阅实现数据的读写分离 比起mysql的复制,SQL server 复制相对强大 ...
- MySql的主从复制以及读写分离详解
MySQL主从复制(Master-Slave)与读写分离(MySQL-Proxy)实践 Mysql作为目前世界上使用最广泛的免费数据库,相信所有从事系统运维的工程师都一定接触过.但在实际的生产环境中, ...
- 基于Mysql-Proxy实现Mysql的主从复制以及读写分离(下)
基于Mysql-Proxy实现Mysql的主从复制以及读写分离(下) 昨天谈到了Mysql实现主从复制,但由于时间原因并未讲有关读写分离的实现,之所以有读写分离,是为了使数据库拥有双机热备功能,至于双 ...
- 基于Mysql-Proxy实现Mysql的主从复制以及读写分离(上)
基于Mysql-Proxy实现Mysql的主从复制以及读写分离(上) 上周BOSS给分配任务让实现一下Mysql数据库的主从复制以及读写分离,然后花了一盏茶的功夫进行了调研,发现主从复制数据库进行一番 ...
随机推荐
- 题目1444:More is better
时间限制:3 秒 内存限制:100 兆 特殊判题:否 提交:1362 解决:640 题目描述: Mr Wang wants some boys to help him with a project. ...
- HDU 1159
Description A subsequence of a given sequence is the given sequence with some elements (possible non ...
- php使用注意点
php使用时间之前要将php.ini中时区设置好,否则会报警告.截图如下:“;date.timezone =”设置为“date.timezone =Asia/Shanghai”即可. apache如果 ...
- 九度OJ - 题目1481:Is It A Tree?
题目描述: A tree is a well-known data structure that is either empty (null, void, nothing) or is a set o ...
- 让用户打开你app的位置功能
+运动 http://www.ccidnet.com/2015/0819/10014152.shtml 让你的app不再是一个购物网站, 而是一种生活方式, 逛街,在实体店逛街积累里程,兑换积分 送 ...
- iOS 通览(一) - 技巧、特性及规范
一.编译器特性 1.ARC. ARC是编译器特性.项目中使用了ARC,编译器会在项目编译的时候自动添加OC对象计数器release代码.并且使用了ARC,项目中将不允许出现release.retain ...
- Web网站架构设计
目录 [隐藏/显示] 1 - Web负载均衡 1.1 - 使用商业硬件实现 1.2 - 使用开源软件 1.3 - 使用windows自带的互载均衡软件 1.4 - 总结2 - 静态网站 ...
- XML 创建
using unityEngine; using System.Collections; using System.Linq; using System.Xml.Linq; using System; ...
- 在WIN32 DLL中使用MFC库遇到的问题
今天写了一个DLL,DLL中用到的一个类里用到的MSXML的COM组件,所以在DLL中要包含afx.h头文件,也就不可避免的要用到MFC的类库了,但在编译时出现了错误:mfcs42d.lib(dllm ...
- BZOJ 4003 JLOI2015 城池攻占
做法和APIO2012派遣 那道题目类似 在树上DFS,维护当前子树的小根堆 因为需要合并孩子们的信息,使用左偏树就可以了 每次弹出死亡骑士,对剩余骑士打上奖励标记 至于标记的下传和更改,只需要每次在 ...