【OpenGL】纹理(Texture)
纹理是一个2D图片(也有1D和3D),它用来添加物体的细节;这就像有一张绘有砖块的图片贴到你的3D的房子上,你的房子看起来就有了一个砖墙。因为我们可以在一张图片上插入足够多的细节,这样物体就会拥有很多细节而不会增加额外的顶点。
为了能够把纹理映射到三角形上,我们需要说明三角形的每个顶点各自对应纹理的哪个部分。这样每个顶点就会有一个纹理坐标(texture coordinate),它指明从纹理图像的哪个地方采样。之后在所有的其他的像素上进行像素插值。
纹理坐标与顶点坐标不同。纹理坐标的范围为(0,0)-(1,1) 分别代指左下角和右上角。
过程
1. 初始化OpenGL环境
2. 设置顶点&纹理坐标数组
GLfloat vertices[] = {

// Positions                    // Texture Coords

0.5f, 0.5f,  0.0f, 1.0f, -1.0f, // Top Right

0.5f, -0.5f,  0.0f, 1.0f, 0.0f, // Bottom Right

-0.5f, -0.5f,  1.0f, 0.0f, 0.0f, // Bottom Left

-0.5f, 0.5f,  0.0f, 0.0f, -1.0f  // Top Left
3. 创建并载入着色器
顶点着色器:
#version 330 core

layout (location = 0) in vec3 position;

layout (location = 1) in vec2 texCoord;

out vec2 TexCoord;

void main()

{

    gl_Position = vec4(position, 1.0f);

    TexCoord = texCoord;

}
像素着色器:
#version 330 core

in vec3 ourColor;

in vec2 TexCoord;

out vec4 color;

uniform sampler2D ourTexture;

void main()

{

    color = texture(ourTexture, TexCoord);

}
4. 设置VAO、VBO、EBO
GLuint indices[] = {  // Note that we start from 0!

		0, 1, 3, // First Triangle

		1, 2, 3  // Second Triangle

	};

	GLuint VBO, VAO, EBO;

	glGenVertexArrays(1, &VAO);

	glGenBuffers(1, &VBO);

	glGenBuffers(1, &EBO);

	glBindVertexArray(VAO);

	glBindBuffer(GL_ARRAY_BUFFER, VBO);

	glBufferData(GL_ARRAY_BUFFER, sizeof(vertices), vertices, GL_STATIC_DRAW);

	glBindBuffer(GL_ELEMENT_ARRAY_BUFFER, EBO);

	glBufferData(GL_ELEMENT_ARRAY_BUFFER, sizeof(indices), indices, GL_STATIC_DRAW);

	// Position attribute

	glVertexAttribPointer(0, 3, GL_FLOAT, GL_FALSE, 5 * sizeof(GLfloat), (GLvoid*)0);

	glEnableVertexAttribArray(0);

	// TexCoord attribute

	glVertexAttribPointer(1, 2, GL_FLOAT, GL_FALSE, 5 * sizeof(GLfloat), (GLvoid*)(3 * sizeof(GLfloat)));

	glEnableVertexAttribArray(1);

	glBindVertexArray(0); // Unbind VAO
5. 创建并载入纹理 (这里载入图片使用SOIL库,推荐使用FreeImage)
// Load and create a texture

	GLuint texture;

	glGenTextures(1, &texture);

	glBindTexture(GL_TEXTURE_2D, texture); // All upcoming GL_TEXTURE_2D operations now have effect on this texture object

	// Set the texture wrapping parameters

	glTexParameteri(GL_TEXTURE_2D, GL_TEXTURE_WRAP_S, GL_REPEAT);	// Set texture wrapping to GL_REPEAT (usually basic wrapping method)

	glTexParameteri(GL_TEXTURE_2D, GL_TEXTURE_WRAP_T, GL_REPEAT);

	// Set texture filtering parameters

	glTexParameteri(GL_TEXTURE_2D, GL_TEXTURE_MIN_FILTER, GL_LINEAR);

	glTexParameteri(GL_TEXTURE_2D, GL_TEXTURE_MAG_FILTER, GL_LINEAR);

	// Load image, create texture and generate mipmaps

	int width, height;

	unsigned char* image = SOIL_load_image("image.jpg", &width, &height, 0, SOIL_LOAD_RGB);

	glTexImage2D(GL_TEXTURE_2D, 0, GL_RGB, width, height, 0, GL_RGB, GL_UNSIGNED_BYTE, image);

	glGenerateMipmap(GL_TEXTURE_2D);

	SOIL_free_image_data(image);

	glBindTexture(GL_TEXTURE_2D, 0); // Unbind texture when done, so we won't accidentily mess up our texture.
6. 绘制及善后工作
	while (!glfwWindowShouldClose(window))

	{

		// Check if any events have been activiated (key pressed, mouse moved etc.) and call corresponding response functions

		glfwPollEvents();

		// Render

		// Clear the colorbuffer

		glClearColor(0.2f, 0.3f, 0.3f, 1.0f);

		glClear(GL_COLOR_BUFFER_BIT);

		// Bind Texture

		glBindTexture(GL_TEXTURE_2D, texture);

		// Activate shader

		ourShader.Use();

		// Draw container

		glBindVertexArray(VAO);

		glDrawElements(GL_TRIANGLES, 6, GL_UNSIGNED_INT, 0);

		glBindVertexArray(0);

		// Swap the screen buffers

		glfwSwapBuffers(window);

	}

	// Properly de-allocate all resources once they've outlived their purpose

	glDeleteVertexArrays(1, &VAO);

	glDeleteBuffers(1, &VBO);

	glDeleteBuffers(1, &EBO);

	// Terminate GLFW, clearing any resources allocated by GLFW.

	glfwTerminate();
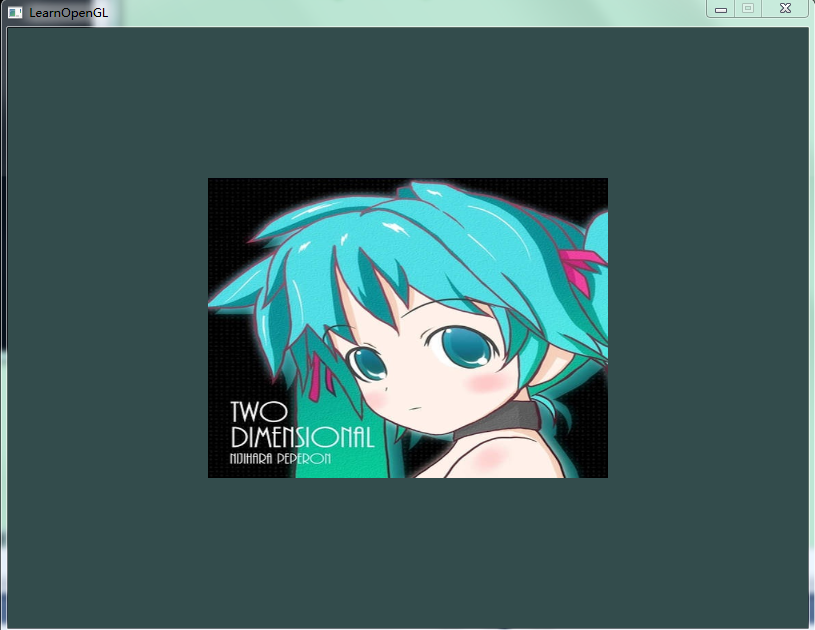
效果

参考:http://bullteacher.com/7-textures.html
【OpenGL】纹理(Texture)的更多相关文章
- Unity 用户手册用户指南二维纹理 (Texture 2D)
http://www.58player.com/blog-2327-953.html 二维纹理 (Texture 2D) 纹理 (Textures) 使您的 网格 (Meshes).粒子 (Parti ...
- OpenGL 纹理贴图
前一节实例代码中有个贴图操作. 今天就简单说明一下纹理贴图... 为了使用纹理贴图.我们首先需要启用纹理贴图功能. 我们可以在Renderer实现的onSurfaceCreated中定义启用: // ...
- openGL 纹理05
纹理(Texture) 为了能够把纹理映射(Map)到三角形上,我们需要指定三角形的每个顶点各自对应纹理的哪个部分. 这样每个顶点就会关联着一个纹理坐标(Texture Coordinate) 用来标 ...
- OpenGL: 纹理采样 texture sample
Sampler (GLSL) Sampler通常是在Fragment shader(片元着色器)内定义的,这是一个uniform类型的变量,即处理不同的片元时这个变量是一致不变的.一个sampler和 ...
- OpenGL纹理
如果不用头文件,把所有东西堆在同一个cpp文件中,会出现“超出GPU内存的错误!” 1 //我们自己的着色器类 #ifndef SHADER_H #define SHADER_H #include & ...
- [OpenGL]纹理贴图实现 总结
实现步骤 第一步:设置所需要的OpenGL环境 设置上下文环境 删除已经存在的渲染的缓存 设置颜色缓存 设置帧缓存 清除缓存 设置窗口大小 开启功能 编译shander 使用program 获取sha ...
- 二维纹理 Texture 2D
Textures bring your Meshes, Particles, and interfaces to life! They are image or movie files that yo ...
- Qt5.6.0+OpenGL 纹理贴图首战告捷
重要的话写在前面~~通过今晚的实验,知道了EBO是不能随便release的~~~一直不要release就可以了,否则vao会失效 Display.h #ifndef DISPLAYWIDGET_H # ...
- three.js学习:纹理Texture之平面纹理
index.html <!DOCTYPE html> <html lang="en"> <head> <meta charset=&quo ...
随机推荐
- TP5中文件的写入路径有的会被自动重定向到首页
TP5中文件的写入路径有的会被自动重定向到public public function export() { $model=model('FanweUser'); $list=$model->w ...
- 29.Mongodb可视化工具 Studio 3t
Studio 3T 链接地址:https://pan.baidu.com/s/1X-Sqk50Xm76NJIZOz0ehFw 密码:td2a 安装配置成功链接本地如图所示:
- GPUImage中对比度调整的实现——GPUImageContrastFilter
对比度指的是一幅图像中明暗区域最亮的白和最暗的黑之间不同亮度层级的测量,差异范围越大代表对比越大,图像越鲜亮,差异范围越小代表对比越小,图像越灰. GPUImage中实现了对比度调整的Filter,其 ...
- springboot与mybatis相结合
1.异常 发生受察时异常提交请求发生运行时异常 回滚 2.yml配置 server: port: 8888 # 配置mybatis mybatis: mapper-locations: classpa ...
- PHP 字符串两边填充补零
str_pad顾名思义这个函数是针对字符串来说的这个可以对指定的字符串填补任何其它的字符串 例如:str_pad(带填补的字符串,填补后的长度,填补字符串,填补位置) 其中填补后的长度必须是个正整数, ...
- APP-10-文字识别-票据识别
1.Postman测试 2.参数 https://cloud.baidu.com/doc/OCR/OCR-API.html#.E9.80.9A.E7.94.A8.E7.A5.A8.E6.8D.AE.E ...
- Delphi与各数据库数据类型比较
Delphi数据类型与各数据库数据类型对比如下表,如有具体说明见表中脚注: Delphi Type Oracle Types SQL Server Types MySQL Types [1] Inte ...
- servlet编码问题
建议每个servlet都写上 request.setCharacterEncoding("UTF-8")
- VMware安装RHEL5.5后修改分辨率设置
1.进入桌面后,点击System -> Administration -> Display,选择Hardware,点击Monitor Type后面的Configure(默认是autocon ...
- 检测浏览器是否支持cookie功能
<script> if(navigator.cookieEnabled) { document.write("你的浏览器支持cookie功能!"); } else{ d ...
