在Mybatis-spring上基于注解的数据源实现方案
一、遇到的痛点
最近在学习Spring-boot过程中,涉及到操作数据库。按照DOC引入mybatis-spring-boot-starter,然后按照套路配置application.properties、码Mapper、dataobject、xxx-mapper.xml的代码就OK了。这个时候,采用DataSourceAutoConfiguration默认方式实现的,这时单数据源可用了。这种方式,网上有很Blog。
但是,我是测试开发工程师,自动化工程经常要连N个数据源。对于多数据源,网上提供了重写DataSourceAutoConfiguration的方式。代码如下:
@Configuration

@MapperScan(basePackages = "com.youzan.springboot.dal.master", sqlSessionTemplateRef  = "masterSST")

public class MasterSouceConfig {

    private String localMapper = "classpath:mapper/*.xml";

    @Bean(name = "masterDataSource")

    @ConfigurationProperties(prefix = "spring.datasource")

    @Primary

    public DataSource buildDataSource() {

        return DataSourceBuilder.create().build();

    }

    @Bean(name = "masterSSF")

    @Primary

    public SqlSessionFactory buildSqlSessionFactory(@Qualifier("masterDataSource") DataSource dataSource) throws  Exception {

        SqlSessionFactoryBean bean;

        bean = new SqlSessionFactoryBean();

        bean.setDataSource(dataSource);

        bean.setMapperLocations(new PathMatchingResourcePatternResolver().getResources(localMapper));

        return bean.getObject();

    }

    @Bean(name = "masterTM")

    @Primary

    public DataSourceTransactionManager buildTransactionManager(@Qualifier("masterDataSource") DataSource dataSource) {

        return new DataSourceTransactionManager(dataSource);

    }

    @Bean(name = "masterSST")

    @Primary

    public SqlSessionTemplate buildSqlSessionTemplate(@Qualifier("masterSSF") SqlSessionFactory sqlSessionFactory) throws Exception {

        return new SqlSessionTemplate(sqlSessionFactory);

    }

}
这个方式,确实可用,不足在于,需要根据不同数据源建立不同的package,一旦数据源发生变更,需要更改所在的package。也看过了动态数据源,那也不是我想要的。
二、方案探索
我在思考能不能基于注解来指定数据源呢?
然后开始写个注解DataSourceRoute。
@Target(ElementType.TYPE)

@Retention(RetentionPolicy.RUNTIME)

public @interface DataSourceRoute {

    String name() default "master";

}
之后,写了AOP处理器来检测这个注解,一直无法正确切入。那我在想是不是可以通过重写mybatis启动扫描方式实现多数据源呢?然后,阅读了下mybatis-spring的源码。org.mybatis.spring.mapper.ClassPathMapperScanner.processBeanDefinitions发现,启动时,mybatis生成了MapperFactoryBean对象。
private void processBeanDefinitions(Set<BeanDefinitionHolder> beanDefinitions) {

    GenericBeanDefinition definition;

    for (BeanDefinitionHolder holder : beanDefinitions) {

      definition = (GenericBeanDefinition) holder.getBeanDefinition();

      if (logger.isDebugEnabled()) {

        logger.debug("Creating MapperFactoryBean with name '"

                      + holder.getBeanName() + "' and '"

                      + definition.getBeanClassName()

                      + "' mapperInterface");

      }

      definition.getConstructorArgumentValues()

           .addGenericArgumentValue(definition.getBeanClassName());

      definition.setBeanClass(this.mapperFactoryBean.getClass());

      definition.getPropertyValues()

           .add("addToConfig",this.addToConfig);
然后,我通过Debug看下生成的对象,验证对代码的理解。那就朝着创建MapperFactoryBean去就好了。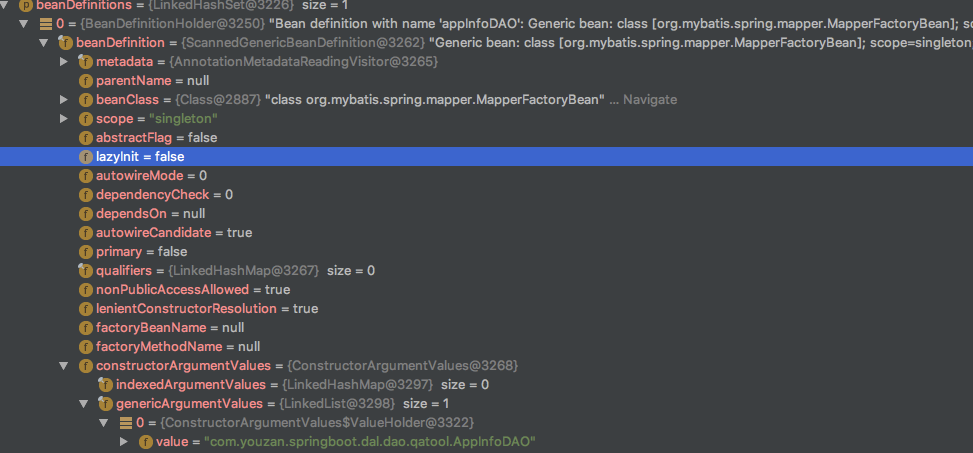
三、具体方案实现
3.1 知识储备
请通过网络等途径了解下BeanDefinition、BeanDefinitionRegistryPostProcessor、ApplicationContextAware、BeanFactoryPostProcessor、InitializingBean、MapperFactoryBean、MapperProxyFactory、ClassPathMapperScanner、GenericBeanDefinition。前面这些,在你阅读mybatis源码时会看到,请先了解。
3.2 实现内容
- 实现多数据源的加载
- Mapper对象扫描加载
- 生成MapperFactoryBean对象与装配
下面直接上代码。
3.2.1 读取配置文件公共类
@Data

public class Config {

    // dao的package,现在只支持一个包名

    private String daoPath;

    //  *-mapper.xml的目录信息

    private String mapperPath;

    /**

     *

     * @author:  lvguoyong@youzan.com 无影

     * @date: 17/9/20 下午6:56

     * @modify history:

     *

     * @desc:

     *   1、读取数据库、DAO初始化需要的一些配置信息

     *

     */

    public Config() {

        InputStream in =

             this.getClass().getClassLoader()

                 .getResourceAsStream("application-db.properties");

        if (in != null) {

            Properties properties = new Properties();

            try {

                properties.load(in);

            } catch (IOException e) {

                throw new BeanInitializationException("加载属性配置文件过程失败。", e);

            }

            daoPath = properties.getProperty("mybatis.dao-path");

            mapperPath = properties.getProperty("mybatis.mapper-locations");

        }

    }

}
3.2.2 实现多数据源的加载
第一步、构造多数据源的DataSource
/**

 * youzan.com Inc.

 * Copyright (c) 2012-2017 All Rights Reserved.

 *

 * @author: lvguoyong@youzan.com 无影

 * @date 17/9/20 下午1:20

 * @desc

 */

@Data

public class DataSourceBuilder {

    /**

     * 存储实例化后的多数据元对象

     */

    private Map<String, DataSource>  dataSourceMap  = new HashMap<>();

    /**

     * 存储数据库别名,在DAO类中,只能使用这些别名

     */

    private List<String>  dataSourceAlias = new ArrayList<>();

    /**

     *

     * 存储数据源配置信息,按照数据源分组

     */

    private Map<String, Map<String, String>> dataSourceProperties = new HashMap<>();

    /**

     *

     * @author:  lvguoyong@youzan.com 无影

     * @date: 17/9/20 下午2:10

     * @modify history:

     *

     * @desc:

     * 1、读取系统classpath环境下,application-db.properties文件的数据库配置

     * 2、将数据库配置按照数据源进行分组

     * 3、实例化javax.sql.DataSource对象

     *

     * @return DataSourceBuilder

     *

     */

    public DataSourceBuilder builder() {

        InputStream in = this.getClass().getClassLoader().

                              getResourceAsStream("application-db.properties");

        if (in != null) {

            Properties properties = new Properties();

            try {

                properties.load(in);

            } catch (IOException e) {

                throw new BeanInitializationException("read property file error!", e);

            }

            //结束数据库配置信息

            Iterator<String> propertyKeys = properties.stringPropertyNames().iterator();

            while (propertyKeys.hasNext()) {

                String key = propertyKeys.next();

                String value = properties.getProperty(key);

                String[] keys = key.split("[.]");

                if (dataSourceProperties.containsKey(keys[0])) {

                    dataSourceProperties.get(keys[0]).put(key, value);

                } else {

                    Map<String, String> innerMap = new HashMap<>();

                    innerMap.put(key, value);

                    dataSourceProperties.put(keys[0], innerMap);

                    dataSourceAlias.add(keys[0]);

                }

            }

            /**

             * 生成数据源

             */

            Iterator<String> DSNames = dataSourceProperties.keySet().iterator();

            while (DSNames.hasNext()) {

                String dsName = DSNames.next();

                Map<String, String> dsconfig = dataSourceProperties.get(dsName);

                DataSource dataSource = org.springframework.boot.autoconfigure.jdbc

                    .DataSourceBuilder.create()

                    .type(MysqlDataSource.class).

                    .driverClassName(dsconfig.get(dsName + ".datasource.driver-class-name")

                    .url(dsconfig.get(dsName + ".datasource.url"))

                    .username(dsconfig.get(dsName + ".datasource.username"))

                    .password(dsconfig.get(dsName + ".datasource.password")).build();

                dataSourceMap.put(dsName, dataSource);

            }

        }

        return this;

    }

}
第二步、构造SqlSessionFactoryBean对象
@Data

public class SqlSessionFactoryBuilder {

    /**

     * 数据库与实体对象间映射文件目录

     */

    private String localMapper = "classpath:mapper/*.xml";

    /**

     * @author:  lvguoyong@youzan.com 无影

     * @date: 17/9/20 下午2:28

     * @modify history:

     * @desc:

     * 1、创建一个SqlSessionFactoryBean实例对象

     *

     * @param dbAlias

     * @param dataSource

     * @return

     */

    public SqlSessionFactoryBean builder(String dbAlias, DataSource dataSource)throws Exception{

        SqlSessionFactoryBean bean;

        bean = new SqlSessionFactoryBean();

        bean.setDataSource(dataSource);

        bean.setMapperLocations(new PathMatchingResourcePatternResolver().getResources(localMapper));

        bean.afterPropertiesSet();

        return bean;

    }

}
第三步、构造SqlSessionFactoryBean对象
/**

 * youzan.com Inc.

 * Copyright (c) 2012-2017 All Rights Reserved.

 *

 * @author: lvguoyong@youzan.com 无影

 * @date 17/9/20 下午2:31

 * @desc

 */

@Data

public class SqlSessionTemplateBuilder {

    /**

     * SqlSessionFactory构建实体

     */

    SqlSessionFactoryBuilder  ssfb = new SqlSessionFactoryBuilder();

    /**

     *

     * @author:  lvguoyong@youzan.com 无影

     * @date: 17/9/20 下午2:31

     * @modify history:

     *

     * @desc:

     * 1、创建一个SqlSessionFactoryBean实例对象

     *

     * @param dbAlias

     * @param dataSource

     * @return

     */

    public SqlSessionTemplate builder(String dbAlias, DataSource dataSource)throws Exception{

        SqlSessionFactoryBean bean = ssfb.builder(dbAlias,dataSource);

        return new SqlSessionTemplate(bean.getObject());

    }

}
3.2.3 Mapper对象扫描加载
/**

 *

 * youzan.com Inc.

 * Copyright (c) 2012-2017 All Rights Reserved.

 *

 * @author: lvguoyong@youzan.com 无影

 * @date 17/9/20 下午3:29

 * @desc

 *   1、扫描指定package路径下的类文件列表

 */

public class ClassScanner {

    /**

     * 扫描的包路径

     */

    String scanpPackage ;

    /**

     * @author:  lvguoyong@youzan.com 无影

     * @date: 17/9/20 下午6:49

     * @modify history:

     *

     * @desc:

     *    1、扫描指定package下的所有*DAO文件,并转换成Class<?>

     *

     * @return Map<String, Class<?>>

     *     key:为DAO的alais,例如 AppInfoDao,key则为appInfoDao。

     *     value: Class类型的类信息,非实例化的

     *

     * @throws Exception

     */

    public Map<String, Class<?>> scan() throws Exception{

        Config config =  new Config();

        scanpPackage = config.getDaoPath();

        Map<String,Class<?>>  classMap = new HashMap<>();

        ClassLoader loader = Thread.currentThread().getContextClassLoader();

        String packagePath = scanpPackage.replace(".", "/");

        URL url = loader.getResource(packagePath);

        List<String> fileNames = null;

        if (url != null) {

            String type = url.getProtocol();

            if ("file".equals(type)) {

                fileNames = getClassNameByFile(url.getPath(), null, true);

            }

        }

        for (String classPath : fileNames) {

            classMap.putAll(this.getClassByPath(classPath));

        }

        return classMap;

    }

    /**

     *

     * @author:  lvguoyong@youzan.com 无影

     * @date: 17/9/20 下午6:51

     * @modify history:

     *

     * @desc:

     *   1、读取package下的所有类文件

     *

     * @param filePath

     * @param className

     * @param childPackage

     * @return

     */

    private static List<String> getClassNameByFile(String filePath, List<String> className, boolean childPackage) {

        List<String> myClassName = new ArrayList<String>();

        File file = new File(filePath);

        File[] childFiles = file.listFiles();

        for (File childFile : childFiles) {

            if (childFile.isDirectory()) {

                if (childPackage) {

                    myClassName.addAll(getClassNameByFile(childFile.getPath(), myClassName, childPackage));

                }

            } else {

                String childFilePath = childFile.getPath();

                if (childFilePath.endsWith(".class")) {

                    childFilePath = childFilePath.substring(childFilePath.indexOf("\\classes") + 9,

                        childFilePath.lastIndexOf("."));

                    childFilePath = childFilePath.replace("\\", ".");

                    myClassName.add(childFilePath);

                }

            }

        }

        return myClassName;

    }

    /**

     *

     * @author:  lvguoyong@youzan.com 无影

     * @date: 17/9/20 下午6:52

     * @modify history:

     *

     * @desc:

     *   1、将DAO的标准文件,转成 DAO Class

     *

     * @param classPath

     * @return

     * @throws Exception

     */

    public Map<String, Class<?>> getClassByPath(String classPath)

     throws Exception{

        ClassLoader loader = Thread.currentThread().getContextClassLoader();

        Map<String, Class<?>> classMap = new HashMap<>();

        classMap.put(this.getClassAlias(classPath),loader.loadClass(this.getFullClassName(classPath)));

        return classMap;

    }

    /**

     *

     * @author:  lvguoyong@youzan.com 无影

     * @date: 17/9/20 下午6:53

     * @modify history:

     *

     * @desc:

     *   1、将DAO的标准文件,转成java标准的类名称

     *

     * @param classPath

     * @return

     * @throws Exception

     */

    private String getFullClassName(String classPath)

      throws Exception{

        int comIndex = classPath.indexOf("com");

        classPath = classPath.substring(comIndex);

        classPath = classPath.replaceAll("\\/", ".");

        return classPath;

    }

    /**

     *

     * @author:  lvguoyong@youzan.com 无影

     * @date: 17/9/20 下午6:54

     * @modify history:

     *

     * @desc:

     *   1、根据类地址,获取类的Alais,即根据名称,按照驼峰规则,生成可作为变量的名称

     *

     * @param classPath

     * @return

     * @throws Exception

     */

    private String getClassAlias(String classPath)

     throws Exception{

        String  split = "\\/";

        String[] classTmp = classPath.split(split);

        String className = classTmp[classTmp.length-1];

        return this.toLowerFisrtChar(className);

    }

    /**

     *

     * @author:  lvguoyong@youzan.com 无影

     * @date: 17/9/20 下午6:55

     * @modify history:

     *

     * @desc:

     *  1、将字符串的第一个字母转小写

     *

     * @param className

     * @return

     */

    private String toLowerFisrtChar(String className){

        String  fisrtChar = className.substring(0,1);

        fisrtChar = fisrtChar.toLowerCase();

        return fisrtChar+className.substring(1);

    }

}
3.2.4 生成MapperFactoryBean对象与装配
前面获取了所有DAO类的Map集合,同时实现了多数据源的加载。这里通过org.mybatis.spring.mapper.MapperFactoryBean把DAO、数据源模板进行绑定,并注入到Spring Bean工程池了。
@Component

public class MapperScanner implements BeanFactoryPostProcessor, InitializingBean {

    /**

     * SqlSessionTemplate集合,按照数据库Alias分组

     */

    Map<String, SqlSessionTemplate> sstMap = new HashMap<>();

    @Override

    public void afterPropertiesSet() throws Exception {

    }

    public void buildSqlSessionTemplate(Map<String, DataSource> dataSourceMap) throws Exception {

        Iterator<String> dataSourceIter = dataSourceMap.keySet().iterator();

        while (dataSourceIter.hasNext()) {

            String dbAlias = dataSourceIter.next();

            DataSource db = dataSourceMap.get(dbAlias);

            SqlSessionTemplateBuilder sstb = new SqlSessionTemplateBuilder();

            sstMap.put(dbAlias, sstb.builder(dbAlias, db));

        }

    }

    @Override

    public void postProcessBeanFactory(ConfigurableListableBeanFactory beanFactory)

      throws BeansException {

        /**

         * 加载所有到DAO类

         */

        ClassScanner classScanner = new ClassScanner();

        Map<String, Class<?>> daoClasses = new HashMap<>();

        try {

            daoClasses = classScanner.scan();

        } catch (Exception e) {

            throw new BeanInstantiationException(this.getClass(), e.getMessage());

        }

        /**

         * 加载多数据源

         */

        DataSourceBuilder dsBuiler = new DataSourceBuilder();

        Map<String, DataSource> dataSourceMap = dsBuiler.builder().getDataSourceMap();

        try {

            this.buildSqlSessionTemplate(dataSourceMap);

        } catch (Exception e) {

            throw new BeanInstantiationException(this.getClass(), e.getMessage());

        }

        /**

         * 生命可执行数据库DAO代理对象

         */

        try {

            Iterator<String> classIter = daoClasses.keySet().iterator();

            while (classIter.hasNext()) {

                String classAlias = classIter.next();

                Class<?> classBean = daoClasses.get(classAlias);

                /**

                 * 获取该类上的数据源注解

                 */

                DataSourceRoute annotation = classBean.getAnnotation(DataSourceRoute.class);

                //实例化MapperFactory

                MapperFactoryBean bean = new MapperFactoryBean();

                // 给MapperFactory指定其应该使用的数据库模

                String  dbAlias = annotation.name();

                bean.setSqlSessionTemplate(sstMap.get(dbAlias));

                // 指定DAO

                bean.setMapperInterface(classBean);

                // 刷新

                bean.afterPropertiesSet();

                // 写入Spring Bean工厂里

                beanFactory.registerSingleton(classAlias, bean.getObject());

            }

        } catch (Exception e) {

            throw new BeanInstantiationException(this.getClass(), e.getMessage());

        }

    }

}
3.2.5 应用
这时,我们就可以修改DAO的实现。指定的数据源名称为配置文件里数据库配置信息的第一段名称,例如:「master.datasource.url=jdbc:mysql://127.0.0.1:3006/testdb」,这时名称就是master。同时去掉了Spring-boot指导方案中的@Mapper注解。
@DataSourceRoute(name="master")

public interface AppInfoDAO {

    int delete(Integer id);

    int insert(AppInfoDO appInfoDO);

    int insertSelective(AppInfoDO appInfoDO);

    AppInfoDO select(Integer id);

    int updateByPrimaryKeySelective(AppInfoDO appInfoDO);

    int update(AppInfoDO appInfoDO);

}
修改Spring-boot启动的入口Application类,排除DataSourceAutoConfiguration的加载。
@SpringBootApplication

@EnableAutoConfiguration(exclude={DataSourceAutoConfiguration.class})

public class Bootstrap {

    public static void main(String[] args) {

        SpringApplication.run(Bootstrap.class,args);

    }

}
至此,就可以启动测试了。
这个方案,只是做个引子,没有完全按照Spring的标准实现。Spring的标准要求,应该把DataSoure、SqlSessionFactoryBean、SqlSessionTemplate注入Spring工程池里,并给所有DAO类指定Bean的生命周期等。
在Mybatis-spring上基于注解的数据源实现方案的更多相关文章
- Spring boot 基于注解方式配置datasource
Spring boot 基于注解方式配置datasource 编辑 Xml配置 我们先来回顾下,使用xml配置数据源. 步骤: 先加载数据库相关配置文件; 配置数据源; 配置sqlSessionF ...
- Spring:基于注解的Spring MVC
什么是Spring MVC Spring MVC框架是一个MVC框架,通过实现Model-View-Controller模式来很好地将数据.业务与展现进行分离.从这样一个角度来说,Spring MVC ...
- SpringMVC4 + Spring + MyBatis3 基于注解的最简配置
本文使用最新版本(4.1.5)的springmvc+spring+mybatis,采用最间的配置方式来进行搭建. 1. web.xml 我们知道springmvc是基于Servlet: Dispatc ...
- 【Spring】基于注解的实现SpringMVC+MySQL
目录结构: // contents structure [-] SprinigMVC是什么 SpringMVC工作原理 @Controller和@RequestMapping注解 @Controlle ...
- springAOP实现基于注解的数据源动态切换
需求 代码实现读写数据库分离 武器 spring3.0以上版本 实现思路 1.继承org.springframework.jdbc.datasource.lookup.AbstractRoutingD ...
- spring mvc 基于注解的使用总结
本文转自http://blog.csdn.net/lufeng20/article/details/7598801 概述 继 Spring 2.0 对 Spring MVC 进行重大升级后,Sprin ...
- Spring IoC — 基于注解的配置
基于XML的配置,Bean定义信息和Bean实现类本身是分离的,而采用基于注解的配置方式时,Bean定义信息即通过在Bean实现类上标注注解实现. @Component:对类进行标注,Spring容器 ...
- spring中基于注解使用AOP
本文内容:spring中如何使用注解实现面向切面编程,以及如何使用自定义注解. 一个场景 比如用户登录,每个请求发起之前都会判断用户是否登录,如果每个请求都去判断一次,那就重复地做了很多事情,只要是有 ...
- SPRINGAOP实现基于注解的数据源动态切换(转)
需求 代码实现读写数据库分离 武器 spring3.0以上版本 实现思路 1.继承org.springframework.jdbc.datasource.lookup.AbstractRoutingD ...
随机推荐
- 进程间通信——IPC之共享内存
共享内存是三个IPC机制中的一个.它允许两个不相关的进程访问同一个逻辑内存.共享内存是在两个正在进行的进程之间传递数据的一种非常有效的方式. 大多数的共享内存的实现,都把由不同进程之间共享 ...
- 6.4 Schema 设计对系统的性能影响
前面两节中,我们已经分析了在一个数据库应用系统的软环境中应用系统的架构实现和系统中与数据库交互的SQL 语句对系统性能的影响.在这一节我们再分析一下系统的数据模型设计实现对系统的性能影响,更通俗一点就 ...
- Access Treeview树节点代码二
Private Sub Form_Load() '引用C:\windows\system32\MSCOMCTL.OCX,否则提示出错. Dim Rec As New ADODB.Recordset D ...
- C++中,用类和重载运算符写高精模板
先放代码: #include<iostream> #include<cstdio> #include<cstring> using namespace std; s ...
- Maven的使用
在项目中,我们通常会为项目添加多种多样的依赖包(jar包),去网上下载,然后引入到项目中,很是麻烦. 但是用maven后,这一切都将变得简单起来.由于我的MyEclipse已经集成了maven插件,这 ...
- Windows远程桌面连接 出现身份错误 要求的函数不受支持
原因 CVE-2018-0886 的 CredSSP 更新 将默认设置从"易受攻击"更改为"缓解"的更新. ## 官方更新 摘要 凭据安全支持提供程序协议 (C ...
- System.Drawing.image 与ImageSource 互转
private BitmapSource bs(Bitmap bt) { IntPtr ip = bt.GetHbitmap(); BitmapSource bitmapSource = System ...
- 想要薪资20-30K,Python程序员认真敲代码就够了!
在这个年代,互联网的飞速壮大大家有目共睹,除了表露出的公共受益,其中计算机编程者也是做出了巨大的贡献,即使外国编程语言仍旧属于领导者,但是在互联网的壮大下,我们这是"地球村",国内 ...
- 架构之Nginx(负载均衡/反向代理)
Nginx ("engine x") 是一个高性能的 HTTP 和 反向代理 服务器 ,也是一个 IMAP/POP3/SMTP 代理 服务器 . Nginx 是由 Igor Sys ...
- Java多线程:synchronized的可重入性
从Java多线程:线程间通信之volatile与sychronized这篇文章中我们了解了synchronized的基本特性,知道了一旦有一个线程访问某个对象的synchronized修饰的方法或代码 ...