搭建ssm框架项目基本原理和主要的配置文件小结
原文地址:https://blog.csdn.net/baidu_32739019/article/details/73928040
1.springmvc是spring框架的一个模块,springmvc和spring无需通过中间整合层进行整合。springmvc是一个基于mvc的web框架。
mvc的思想大家已经很熟悉了,简称“Model-View-Controller”。
下面先简单介绍下我对spring-mvc的理解。

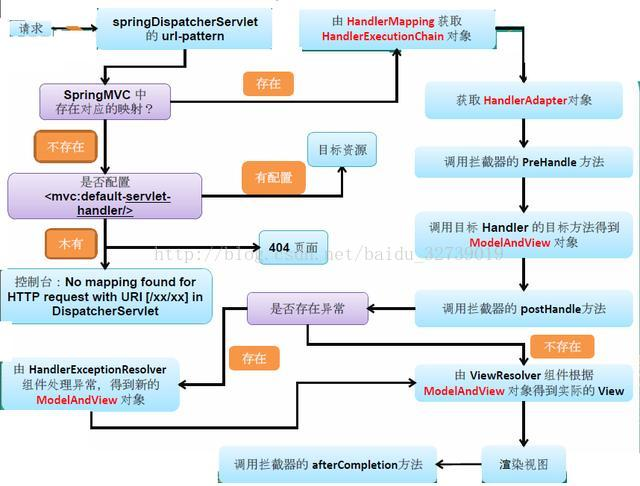
上面这张图大概说明了springmvc的运行过程,看起来可能有点云里雾里的,总结起来就是下面这些:
客户端发起请求到前端控制器(DispatcherServlet).
前端控制器请求HandlerMappering 查找Handler,可以根据xml配置、注解进行查找。
DispatcherServlet将请求提交到Controller;
Controller调用业务逻辑处理后,返回ModelAndView;
DispatcherServlet查询一个或多个ViewResoler视图解析器,找到ModelAndView指定的视图;
视图负责将结果显示到客户端。
这里稍微解释下常用的几个组件名称和作用。
前端控制器(DispatcherServlet):用于接收请求,响应结果
处理器映射器(HandlerMapping):根据请求的url查找Handler(三大核心组件之一)
处理器适配器(HandlerAdapter):按照特定的规则去执行Handler(三大核心组件之一)
处理器(Handler):编写Handler时按照HandlerAdapter的要求去做,这样适配器才可以去正确执行Handler
视图解析器(View resolver):进行视图解析(三大核心组件之一)
视图(View):包括jsp、pdf等
在了解了上面的基础原理后下面来讲下几个主要的配置文件。项目开发前所需要的jar包提前要导入项目工程里面去。

有几个主要的配置文件,先了解下每个配置文件的作用。
1. web.xml:当服务启动时首先会去加载web.xml这个资源文件,里面包括了对前端控制器、乱码问题等配置。
2.applicatonContext.xml : 一般配置数据源,事务,注解 ,指定SqlMapConfig.xml等。
在这里我使用的是applicatonContext-*.xml的形式将DAO层、Service层、Transaction层分开配置,这样便于管理
分别为applicatonContext-dao.xml、applicatonContext-service.xml、applicatonContext-transaction.xml
分开配置时,需要在web.xml中配置上下文位置。
3.springmvc.xml: 里面配置的是控制层的 ,如视图解析器静态资源, mvc 文件上传,拦截器等。
4.SqlMapConfig.xml: 该配置文件为MyBatis的配置文件,里面无需配置,一切交给spring管理,但是xml文件基础配置要有。
以下是配置文件代码:
web.xml:处理配置applicationContext的位置,和前端控制器,前端控制器里面需要配置springMvc.xml。
<?xml version="1.0" encoding="UTF-8"?>

<web-app xmlns:xsi="http://www.w3.org/2001/XMLSchema-instance"

    xmlns="http://java.sun.com/xml/ns/javaee"

    xsi:schemaLocation="http://java.sun.com/xml/ns/javaee http://java.sun.com/xml/ns/javaee/web-app_2_5.xsd"

    id="WebApp_ID" version="2.5">

    <display-name>ssm_boot_crm</display-name>

    <welcome-file-list>

        <welcome-file>index.html</welcome-file>

        <welcome-file>index.htm</welcome-file>

        <welcome-file>index.jsp</welcome-file>

        <welcome-file>default.html</welcome-file>

        <welcome-file>default.htm</welcome-file>

        <welcome-file>default.jsp</welcome-file>

    </welcome-file-list>

    <!-- 上下文的位置 -->

    <context-param>

        <param-name>contextConfigLocation</param-name>

        <param-value>classpath:applicationContext-*.xml</param-value>

    </context-param>

    <!-- Spring的监听器 -->

    <listener>

        <listener-class>org.springframework.web.context.ContextLoaderListener</listener-class>

    </listener>

    <!-- POST提交过滤器 UTF-8 -->

    <filter>

        <filter-name>encoding</filter-name>

        <filter-class>org.springframework.web.filter.CharacterEncodingFilter</filter-class>

        <init-param>

            <param-name>encoding</param-name>

            <param-value>UTF-8</param-value>

        </init-param>

    </filter>

    <filter-mapping>

        <filter-name>encoding</filter-name>

        <url-pattern>*.action</url-pattern>

    </filter-mapping>

    <!-- 前端控制器,就是对控制器的处理,像调用哪个控制器,怎么拦截之类的 -->

    <servlet>

        <servlet-name>crm</servlet-name>

        <servlet-class>org.springframework.web.servlet.DispatcherServlet</servlet-class>

        <init-param>

            <param-name>contextConfigLocation</param-name>

            <!-- 此处不配置 默认找 /WEB-INF/[servlet-name]-servlet.xml -->

            <param-value>classpath:springmvc.xml</param-value>

        </init-param>

        <load-on-startup>1</load-on-startup>

    </servlet>

    <servlet-mapping>

        <servlet-name>crm</servlet-name>

        <!-- 1:*.do *.action 拦截以.do结尾的请求 (不拦截 jsp png jpg .js .css)

        2:/ 拦截所有请求 (不拦截.jsp) 建议使用此种 方式 (拦截 .js.css .png) (放行静态资源)

        3:<!-- 拦截所有请求(包括.jsp) 此种方式 不建议使用 -->

        <url-pattern>*.action</url-pattern>

    </servlet-mapping>

</web-app>
applicationContext-dao.xml: 这个是Dao层,配置数据库,mybatis的sqlsessionFactory,
<?xml version="1.0" encoding="UTF-8"?>

<beans xmlns="http://www.springframework.org/schema/beans"

    xmlns:xsi="http://www.w3.org/2001/XMLSchema-instance" xmlns:mvc="http://www.springframework.org/schema/mvc"

    xmlns:context="http://www.springframework.org/schema/context"

    xmlns:aop="http://www.springframework.org/schema/aop" xmlns:tx="http://www.springframework.org/schema/tx"

    xmlns:task="http://www.springframework.org/schema/task" xmlns:dubbo="http://code.alibabatech.com/schema/dubbo"

    xsi:schemaLocation="http://www.springframework.org/schema/beans

        http://www.springframework.org/schema/beans/spring-beans-4.0.xsd

        http://www.springframework.org/schema/mvc

        http://www.springframework.org/schema/mvc/spring-mvc-4.0.xsd

        http://www.springframework.org/schema/context

        http://www.springframework.org/schema/context/spring-context-4.0.xsd

        http://www.springframework.org/schema/aop

        http://www.springframework.org/schema/aop/spring-aop-4.0.xsd

        http://www.springframework.org/schema/tx

        http://www.springframework.org/schema/tx/spring-tx-4.0.xsd

        http://www.springframework.org/schema/task

           http://www.springframework.org/schema/task/spring-task-4.0.xsd

        http://code.alibabatech.com/schema/dubbo

        http://code.alibabatech.com/schema/dubbo/dubbo.xsd">

    <!-- srping框架 配置文件 用于管理数据库连接池 -->

    <!-- 配置 读取properties文件 db.properties -->

    <context:property-placeholder location="classpath:db.properties" />

    <!-- 配置 数据源 用于连接数据库 -->

    <bean id="dataSource" class="com.alibaba.druid.pool.DruidDataSource">

        <!-- 数据库驱动 -->

        <property name="driverClassName" value="${jdbc.driver}" />

        <!-- 连接地址 -->

        <property name="url" value="${jdbc.url}" />

        <!-- 用户名 -->

        <property name="username" value="${jdbc.username}" />

        <!-- 密码 -->

        <property name="password" value="${jdbc.password}" />

    </bean>

    <!-- 配置 Mybatis的工厂 -->

    <bean class="org.mybatis.spring.SqlSessionFactoryBean">

        <!-- 绑定数据源 -->

        <property name="dataSource" ref="dataSource" />

        <!-- 配置Mybatis的核心 配置文件所在位置 -->

        <property name="configLocation" value="classpath:SqlMapConfig.xml" />

        <!-- 配置pojo别名 -->

        <property name="typeAliasesPackage" value="com.company.ssm.crm.pojo" />

    </bean>

    <!-- 配置  1:原始Dao开发 接口实现类 Mapper.xml 三个

             2:接口开发 接口 不写实现类 Mapper.xml 二个 (UserDao、ProductDao

        、BrandDao。。。。。。。)

             3:接口开发、并支持扫描 cn.itcast.core.dao(UserDao。。。。。) 写在此包下即可被扫描到

    -->

    <bean class="org.mybatis.spring.mapper.MapperScannerConfigurer">

        <property name="basePackage" value="com.company.ssm.crm.dao" />

    </bean>

</beans>
applicationContext-service.xml:配置扫描@Service
<?xml version="1.0" encoding="UTF-8"?>

<beans xmlns="http://www.springframework.org/schema/beans"

    xmlns:xsi="http://www.w3.org/2001/XMLSchema-instance" xmlns:mvc="http://www.springframework.org/schema/mvc"

    xmlns:context="http://www.springframework.org/schema/context"

    xmlns:aop="http://www.springframework.org/schema/aop" xmlns:tx="http://www.springframework.org/schema/tx"

    xmlns:task="http://www.springframework.org/schema/task" xmlns:dubbo="http://code.alibabatech.com/schema/dubbo"

    xsi:schemaLocation="http://www.springframework.org/schema/beans

        http://www.springframework.org/schema/beans/spring-beans-4.0.xsd

        http://www.springframework.org/schema/mvc

        http://www.springframework.org/schema/mvc/spring-mvc-4.0.xsd

        http://www.springframework.org/schema/context

        http://www.springframework.org/schema/context/spring-context-4.0.xsd

        http://www.springframework.org/schema/aop

        http://www.springframework.org/schema/aop/spring-aop-4.0.xsd

        http://www.springframework.org/schema/tx

        http://www.springframework.org/schema/tx/spring-tx-4.0.xsd

        http://www.springframework.org/schema/task

           http://www.springframework.org/schema/task/spring-task-4.0.xsd

        http://code.alibabatech.com/schema/dubbo

        http://code.alibabatech.com/schema/dubbo/dubbo.xsd">

    <!-- 配置扫描包 扫描 @Service    spring代理管理业务层 -->

    <context:component-scan base-package="com.company.ssm.crm.service" />

</beans>
applicationContext-transaction.xml:专门配置数据库的事务管理
<?xml version="1.0" encoding="UTF-8"?>

<beans xmlns="http://www.springframework.org/schema/beans"

    xmlns:context="http://www.springframework.org/schema/context" xmlns:p="http://www.springframework.org/schema/p"

    xmlns:aop="http://www.springframework.org/schema/aop" xmlns:tx="http://www.springframework.org/schema/tx"

    xmlns:xsi="http://www.w3.org/2001/XMLSchema-instance"

    xsi:schemaLocation="http://www.springframework.org/schema/beans http://www.springframework.org/schema/beans/spring-beans-4.0.xsd

    http://www.springframework.org/schema/context http://www.springframework.org/schema/context/spring-context-4.0.xsd

    http://www.springframework.org/schema/aop http://www.springframework.org/schema/aop/spring-aop-4.0.xsd http://www.springframework.org/schema/tx http://www.springframework.org/schema/tx/spring-tx-4.0.xsd

    http://www.springframework.org/schema/util http://www.springframework.org/schema/util/spring-util-4.0.xsd">

    <!-- spring 事务管理器 -->

    <bean id="transactionManager"

        class="org.springframework.jdbc.datasource.DataSourceTransactionManager">

        <!-- 数据源 -->

        <property name="dataSource" ref="dataSource" />

    </bean>

    <!-- 通知 -->

    <tx:advice id="txAdvice" transaction-manager="transactionManager">

        <tx:attributes>

            <!-- 传播行为 -->

            <tx:method name="save*" propagation="REQUIRED" />

            <tx:method name="insert*" propagation="REQUIRED" />

            <tx:method name="add*" propagation="REQUIRED" />

            <tx:method name="create*" propagation="REQUIRED" />

            <tx:method name="delete*" propagation="REQUIRED" />

            <tx:method name="update*" propagation="REQUIRED" />

            <tx:method name="find*" propagation="SUPPORTS" read-only="true" />

            <tx:method name="select*" propagation="SUPPORTS" read-only="true" />

            <tx:method name="get*" propagation="SUPPORTS" read-only="true" />

        </tx:attributes>

    </tx:advice>

    <!-- AOP 切面 -->

    <aop:config>

        <aop:advisor advice-ref="txAdvice"

            pointcut="execution(* cn.itcast.core.service.*.*(..))" />

    </aop:config>

</beans>
springmvc.xml:专门用来配置前端控制器的,配置@Controller注解,视图解析器拦截什么文件
注意:mvc:annotation-driven,之前一直不理解这句话的意思:
用来注解驱动:配置处理器映射器和适配器,也就是:HandlerMapping和HandlerAdapter。
<beans xmlns="http://www.springframework.org/schema/beans"

    xmlns:xsi="http://www.w3.org/2001/XMLSchema-instance" xmlns:mvc="http://www.springframework.org/schema/mvc"

    xmlns:context="http://www.springframework.org/schema/context"

    xmlns:aop="http://www.springframework.org/schema/aop" xmlns:tx="http://www.springframework.org/schema/tx"

    xmlns:task="http://www.springframework.org/schema/task" xmlns:dubbo="http://code.alibabatech.com/schema/dubbo"

    xsi:schemaLocation="http://www.springframework.org/schema/beans

        http://www.springframework.org/schema/beans/spring-beans-4.0.xsd

        http://www.springframework.org/schema/mvc

        http://www.springframework.org/schema/mvc/spring-mvc-4.0.xsd

        http://www.springframework.org/schema/context

        http://www.springframework.org/schema/context/spring-context-4.0.xsd

        http://www.springframework.org/schema/aop

        http://www.springframework.org/schema/aop/spring-aop-4.0.xsd

        http://www.springframework.org/schema/tx

        http://www.springframework.org/schema/tx/spring-tx-4.0.xsd

        http://www.springframework.org/schema/task

           http://www.springframework.org/schema/task/spring-task-4.0.xsd

        http://code.alibabatech.com/schema/dubbo

        http://code.alibabatech.com/schema/dubbo/dubbo.xsd">

    <!-- 加载属性文件 -->

    <context:property-placeholder location="classpath:resource.properties" />

    <!-- 配置扫描 器 -->

    <context:component-scan base-package="com.company.ssm.crm.controller" />

    <!-- 配置处理器映射器 适配器 -->

    <mvc:annotation-driven />

    <!-- 配置视图解释器 jsp -->

    <bean id="jspViewResolver"

        class="org.springframework.web.servlet.view.InternalResourceViewResolver">

        <property name="prefix" value="/WEB-INF/jsp/" />

        <property name="suffix" value=".jsp" />

    </bean>

</beans>
SqlMapConfig.xml(由于这个SqlMapConfig.xml的原文是弄错了,这里放上一共自己的实例吧)
<?xml version="1.0" encoding="UTF-8" ?>

<!DOCTYPE mapper PUBLIC "-//mybatis.org//DTD Mapper 3.0//EN" "http://mybatis.org/dtd/mybatis-3-mapper.dtd" >

<mapper namespace="com.javen.dao.IUserDao" >

  <resultMap id="BaseResultMap" type="com.javen.model.User" >

    <id column="id" property="id" jdbcType="INTEGER" />

    <result column="user_name" property="userName" jdbcType="VARCHAR" />

    <result column="password" property="password" jdbcType="VARCHAR" />

    <result column="age" property="age" jdbcType="INTEGER" />

  </resultMap>

  <sql id="Base_Column_List" >

    id, user_name, password, age

  </sql>

  <select id="selectByPrimaryKey" resultMap="BaseResultMap" parameterType="java.lang.Integer" >

    select

    <include refid="Base_Column_List" />

    from user_t

    where id = #{id,jdbcType=INTEGER}

  </select>

  <delete id="deleteByPrimaryKey" parameterType="java.lang.Integer" >

    delete from user_t

    where id = #{id,jdbcType=INTEGER}

  </delete>

  <insert id="insert" parameterType="com.javen.model.User" >

    insert into user_t (id, user_name, password,

      age)

    values (#{id,jdbcType=INTEGER}, #{userName,jdbcType=VARCHAR}, #{password,jdbcType=VARCHAR},

      #{age,jdbcType=INTEGER})

  </insert>

  <insert id="insertSelective" parameterType="com.javen.model.User" >

    insert into user_t

    <trim prefix="(" suffix=")" suffixOverrides="," >

      <if test="id != null" >

        id,

      </if>

      <if test="userName != null" >

        user_name,

      </if>

      <if test="password != null" >

        password,

      </if>

      <if test="age != null" >

        age,

      </if>

    </trim>

    <trim prefix="values (" suffix=")" suffixOverrides="," >

      <if test="id != null" >

        #{id,jdbcType=INTEGER},

      </if>

      <if test="userName != null" >

        #{userName,jdbcType=VARCHAR},

      </if>

      <if test="password != null" >

        #{password,jdbcType=VARCHAR},

      </if>

      <if test="age != null" >

        #{age,jdbcType=INTEGER},

      </if>

    </trim>

  </insert>

  <update id="updateByPrimaryKeySelective" parameterType="com.javen.model.User" >

    update user_t

    <set >

      <if test="userName != null" >

        user_name = #{userName,jdbcType=VARCHAR},

      </if>

      <if test="password != null" >

        password = #{password,jdbcType=VARCHAR},

      </if>

      <if test="age != null" >

        age = #{age,jdbcType=INTEGER},

      </if>

    </set>

    where id = #{id,jdbcType=INTEGER}

  </update>

  <update id="updateByPrimaryKey" parameterType="com.javen.model.User" >

    update user_t

    set user_name = #{userName,jdbcType=VARCHAR},

      password = #{password,jdbcType=VARCHAR},

      age = #{age,jdbcType=INTEGER}

    where id = #{id,jdbcType=INTEGER}

  </update>

</mapper>
db.properties
jdbc.driver=com.mysql.jdbc.Driver

jdbc.url=jdbc:mysql://localhost:3306/crm?characterEncoding=utf-8

jdbc.username=root

jdbc.password=root
以上就是主要的配置文件的配置,特别注意的是在web.xml中默认加载的资源文件再WEB_INF目录下,如果的你xml不在的话就要写清楚的文件路径,例如写在src目录下面就要写classpath,之前开发过程中忽略了这一点,所以启动一直报错找不到资源文件。
搭建ssm框架项目基本原理和主要的配置文件小结的更多相关文章
- Maven项目搭建(二):Maven搭建SSM框架
上一章给大家讲解了如何使用Maven搭建web项目. 这次给大家介绍一下怎么使用Maven搭建SSM框架项目. 首先我们来看一下pom.xml的属性介绍: project: pom的xml根元素. p ...
- 使用maven搭建ssm框架的javaweb项目
目前主流的javaweb项目,常会用到ssm(Spring+Spring MVC+Mybatis)框架来搭建项目的主体框架,本篇介绍搭建SSM框架的maven项目的实施流程.记之共享! 一.SSM框架 ...
- 快速搭建ssm框架
快速搭建SSM框架 因为最近有很多朋友问我自己的项目搭建的不够完善,并且经常出现一些小问题,那么今天我又整理了一下文档教大家如何快速搭建SSM框架我是用 eclipse搭建的,如果想用idear的话我 ...
- Eclipse中使用Maven搭建SSM框架
Eclipse中不使用Maven搭建SSM框架:https://www.cnblogs.com/xuyiqing/p/9569459.html IDEA中使用Maven搭建SSM框架:https:// ...
- 第n次搭建 SSM 框架
什么说第 N 次搭建SSM框架呢? 刚学习java的时候,搭建 SSM 框架想做一个个人项目之类的,后来没搭起来,也就拖延了,进入公司之后,接触的第一个项目就是SSM的,模仿了一下,也能搭个简简单单的 ...
- 详解intellij idea搭建SSM框架(spring+maven+mybatis+mysql+junit)(下)
在上一篇(详解intellij idea 搭建SSM框架(spring+maven+mybatis+mysql+junit)(上))博文中已经介绍了关于SSM框架的各种基础配置,(对于SSM配置不熟悉 ...
- 详解intellij idea搭建SSM框架(spring+maven+mybatis+mysql+junit)(上)
SSM(Spring+SpringMVC+MyBatis)框架集由Spring.SpringMVC.MyBatis三个开源框架整合而成,常作为数据源较简单的web项目的框架. 其中spring是一个轻 ...
- 使用Springboot快速搭建SSM框架
Spring Boot设计目的是用来简化Spring应用的初始搭建以及开发过程.该框架使用了特定的方式来进行配置,从而使开发人员不再需要定义样板化的配置. 一.环境准备 Idea 2017 或 201 ...
- IDEA搭建ssm框架测试衍生出的问题The APR based Apache Tomcat Native library which allows optimal performance in production environments was not found on the java.library.path: D:\Develop\jdk7\jdk1.7.0_79\bin;
最近玩起IDEA这开发工具,搭建ssm框架测试时,部署项目出现如下问题: 信息: The APR based Apache Tomcat Native library which allows opt ...
随机推荐
- ARCH模型
ARCH模型的基本思想 ARCH模型的基本思想是指在以前信息集下,某一时刻一个噪声的发生是服从正态分布.该正态分布的均值为零,方差是一个随时间变化的量(即为条件异方差).并且这个随时间变化的方差是过去 ...
- 【BLE】CC2541之发现服务与特征值
一.简介 本文以SimpleBLECentral工程为例,解析CC2541作为主机时是如何发现从机的服务和特征值的. 二.实验平台 协议栈版本:BLE-CC254x-1.4.0 编译软件:IAR 8. ...
- leetcode关于数组的问题
关于数组的几道面试题 [Leetcode] 628. 三个数的最大乘积 解题思路: 这个一开始我是没想到思路的(除了遍历),因为有正负号的问题,后来看了一下别人的思路然后自己写的,思路是这样的: 三个 ...
- Error: MDM failed command. Status: Only a single SDC may be mapped to this volume at a time
映射一个volume到多个SDC的时候报错如下: Error: MDM failed command. Status: Only a single SDC may be mapped to this ...
- delphi判断.net FrameWork是否已安装
判断系统中.NET FrameWork已安装版本的方法很多,比如检查C:\Windows\Microsoft.NET\Framework\下的子目录,但是子目录往往是包含版本号,比如v2.0.5072 ...
- 【Eclipse】Eclipse性能调优
Eclipse性能调优 eclipse 吃内存_百度搜索 eclipse 性能调优之内存分配 - Defonds 的专栏 - CSDN博客 优化JVM参数提高eclipse运行速度 - Java综合 ...
- 使用TensorFlow动手实现一个Char-RNN
https://blog.csdn.net/thriving_fcl/article/details/72565455 前言 学习RNN的时候很多人应该都有看过Andrej Karpathy写的The ...
- win7下使用Taste实现协同过滤算法
如果要实现Taste算法,必备的条件是: 1) JDK,使用1.6版本.需要说明一下,因为要基于Eclipse构建,所以在设置path的值之前要先定义JAVA_HOME变量. 2) Maven,使用2 ...
- 转:ffmpeg time_base详解
ffmpeg time_base详解 https://my.oschina.net/u/3054677/blog/866368
- Ubuntu16.04中Docker的卸载
1:利用sudo apt-get remove docker 进行卸载提示如下,docker未按照所以不能卸载 2:再次查看docker版本,依然还在 3:原因是安装的时候安装的是docker-ce版 ...
