Maven + SpringMVC项目集成Swagger
Swagger 是一个规范和完整的框架,用于生成、描述、调用和可视化 RESTful 风格的 Web 服务。总体目标是使客户端和文件系统作为服务器以同样的速度来更新。文件的方法,参数和模型紧密集成到服务器端的代码,允许API来始终保持同步。
作用:
- 接口的文档在线自动生成。
- 功能测试。
下面通过实现一个web项目来演示Swagger的使用。
1. 新建SpringMVC项目
1.1 新建项目
新建基于maven的web项目,导入spring相关依赖如下
<?xml version="1.0" encoding="UTF-8"?>

<project xmlns="http://maven.apache.org/POM/4.0.0" xmlns:xsi="http://www.w3.org/2001/XMLSchema-instance"

    xsi:schemaLocation="http://maven.apache.org/POM/4.0.0 http://maven.apache.org/xsd/maven-4.0.0.xsd">

    <modelVersion>4.0.0</modelVersion>

    <groupId>com.zang.xz</groupId>

    <artifactId>mySwagger</artifactId>

    <version>0.0.1-SNAPSHOT</version>

    <packaging>war</packaging>

    <name>mySwagger Maven Webapp</name>

    <!-- FIXME change it to the project's website -->

    <url>http://www.example.com</url>

    <properties>

        <project.build.sourceEncoding>UTF-8</project.build.sourceEncoding>

        <spring.framework.version>4.3.6.RELEASE</spring.framework.version>

    </properties>

    <dependencies>

        <!-- ********************jackson******************************* -->

        <dependency>

            <groupId>com.fasterxml.jackson.core</groupId>

            <artifactId>jackson-databind</artifactId>

            <version>2.8.9</version>

        </dependency>

        <!-- ********************Spring依赖********************* -->

        <dependency>

            <groupId>org.springframework</groupId>

            <artifactId>spring-core</artifactId>

            <version>${spring.framework.version}</version>

        </dependency>

        <dependency>

            <groupId>org.springframework</groupId>

            <artifactId>spring-context</artifactId>

            <version>${spring.framework.version}</version>

        </dependency>

        <dependency>

            <groupId>org.springframework</groupId>

            <artifactId>spring-webmvc</artifactId>

            <version>${spring.framework.version}</version>

        </dependency>

    </dependencies>

    <build>

        <finalName>mySwagger</finalName>

    </build>

</project>
1.2 配置web.xml和spring-mvc.xml
web.xml
<?xml version="1.0" encoding="UTF-8"?>

<web-app version="3.1"

    xmlns="http://xmlns.jcp.org/xml/ns/javaee"

    xmlns:xsi="http://www.w3.org/2001/XMLSchema-instance"

    xsi:schemaLocation="http://xmlns.jcp.org/xml/ns/javaee http://xmlns.jcp.org/xml/ns/javaee/web-app_3_1.xsd">

  <display-name>Archetype Created Web Application</display-name>

    <!-- Spring MVC 核心控制器 DispatcherServlet 配置-->

    <servlet>

        <servlet-name>spring-mvc</servlet-name>

        <servlet-class>org.springframework.web.servlet.DispatcherServlet</servlet-class>

        <init-param>

            <param-name>contextConfigLocation</param-name>

            <param-value>classpath:spring-mvc.xml</param-value>

        </init-param>

        <load-on-startup>1</load-on-startup>

        <async-supported>true</async-supported>

    </servlet>

    <servlet-mapping>

        <servlet-name>spring-mvc</servlet-name>

        <url-pattern>/</url-pattern>

    </servlet-mapping>

    <!--   配置编码格式过滤器 -->

    <filter>

        <filter-name>encodingFilter</filter-name>

        <filter-class>org.springframework.web.filter.CharacterEncodingFilter</filter-class>

        <init-param>

            <param-name>encoding</param-name>

            <param-value>UTF-8</param-value>

        </init-param>

        <init-param>

            <param-name>forceEncoding</param-name>

            <param-value>true</param-value>

        </init-param>

    </filter>

    <filter-mapping>

        <filter-name>encodingFilter</filter-name>

        <url-pattern>/*</url-pattern>

    </filter-mapping>

</web-app>
spring-mvc.xml
<?xml version="1.0" encoding="UTF-8"?>

<beans xmlns="http://www.springframework.org/schema/beans"

    xmlns:xsi="http://www.w3.org/2001/XMLSchema-instance" xmlns:context="http://www.springframework.org/schema/context"

    xmlns:mvc="http://www.springframework.org/schema/mvc" xmlns:p="http://www.springframework.org/schema/p"

    xsi:schemaLocation="http://www.springframework.org/schema/beans http://www.springframework.org/schema/beans/spring-beans-4.0.xsd

        http://www.springframework.org/schema/context http://www.springframework.org/schema/context/spring-context-4.0.xsd

        http://www.springframework.org/schema/mvc http://www.springframework.org/schema/mvc/spring-mvc-4.0.xsd">

    <!-- 默认的注解映射的支持 ,它会自动注册DefaultAnnotationHandlerMapping 与AnnotationMethodHandlerAdapter -->

    <mvc:annotation-driven />

    <!-- enable autowire 向容器自动注册 -->

    <context:annotation-config />

    <!-- 设置使用注解的类所在的jar包 -->

    <context:component-scan base-package="com.zang.xz" />

    <bean

        class="org.springframework.web.servlet.mvc.annotation.AnnotationMethodHandlerAdapter" />

</beans>
1.3 新建entity和controller测试
为求简便,这里不集成dao层,数据直接从controller中封装返回。
Product.java
package com.zang.xz.entity;

public class Product {

    private static final long serialVersionUID = 1L;

    /** ID */

    private Long id;

    /** 产品名称 */

    private String name;

    /** 产品型号 */

    private String productClass;

    /** 产品ID */

    private String productId;

    public Long getId() {

        return id;

    }

    public void setId(Long id) {

        this.id = id;

    }

    public String getName() {

        return name;

    }

    public void setName(String name) {

        this.name = name;

    }

    public String getProductClass() {

        return productClass;

    }

    public void setProductClass(String productClass) {

        this.productClass = productClass;

    }

    public String getProductId() {

        return productId;

    }

    public void setProductId(String productId) {

        this.productId = productId;

    }

    @Override

    public String toString() {

        return "Product [id=" + id + ", name=" + name + ", productClass="

                + productClass + ", productId=" + productId + "]";

    }

}
ProductController.java
package com.zang.xz.controller;

import java.util.Arrays;

import java.util.List;import org.springframework.http.ResponseEntity;

import org.springframework.web.bind.annotation.PathVariable;

import org.springframework.web.bind.annotation.RequestMapping;

import org.springframework.web.bind.annotation.RequestMethod;

import org.springframework.web.bind.annotation.RestController;

import com.zang.xz.entity.Product;

@RestController

@RequestMapping(value = {"/product/"})public class ProductController {

    @RequestMapping(value = "/{id}", method = RequestMethod.GET)public ResponseEntity<Product> get(@PathVariable Long id) {

        Product product = new Product();

        product.setName("空气净化器");

        product.setId(1L);

        product.setProductClass("filters");

        product.setProductId("T12345");

        return ResponseEntity.ok(product);

    }

}
测试

至此,创建了一个简单的基于SpringMVC的Web项目,并能对外提供REST风格的API接口。接下来,我们要整合SpringFox和SwaggerUI到该SpringMVC项目中去,使其对外接口文档化。
2. 集成Swagger
2.1 添加swagger相关jar包
<!-- swagger2核心依赖 -->

  <dependency>

      <groupId>io.springfox</groupId>

      <artifactId>springfox-swagger2</artifactId>

      <version>2.7.0</version>

  </dependency>

<!-- swagger-ui为项目提供api展示及测试的界面 -->

  <dependency>

      <groupId>io.springfox</groupId>

      <artifactId>springfox-swagger-ui</artifactId>

      <version>2.7.0</version>

  </dependency>
此处swagger 的核心依赖使用springfox-swagger2,SpringFox已经可以代替swagger-springmvc, 目前SpringFox同时支持Swagger 1.2 和 2.0。
2.2 添加SwaggerConfig
package com.zang.xz.controller;

import org.springframework.context.annotation.Bean;

import org.springframework.context.annotation.Configuration;

import springfox.documentation.builders.ApiInfoBuilder;

import springfox.documentation.builders.RequestHandlerSelectors;

import springfox.documentation.service.ApiInfo;

import springfox.documentation.spi.DocumentationType;

import springfox.documentation.spring.web.plugins.Docket;

import springfox.documentation.swagger2.annotations.EnableSwagger2;

@Configuration

@EnableSwagger2

public class SwaggerConfig {

    @Bean

    public Docket api() {

        return new Docket(DocumentationType.SWAGGER_2)

                .select()

                .apis(RequestHandlerSelectors.any())  //显示所有类

                //.apis(RequestHandlerSelectors.withClassAnnotation(Api.class))  //只显示添加@Api注解的类

                .build()

                .apiInfo(apiInfo());

    }

    private ApiInfo apiInfo() {

        return new ApiInfoBuilder()

                .title("开放接口API")  //粗标题

                .description("HTTP对外开放接口")   //描述

                .version("1.0.0")   //api version

                .termsOfServiceUrl("http://xxx.xxx.com")

                .license("LICENSE")   //链接名称

                .licenseUrl("http://xxx.xxx.com")   //链接地址

                .build();

    }

}
2.3 静态资源访问配置
上面引入的springfox-swagger-ui依赖为我们提供了静态资源访问的支持,通过访问他为我们提供的页面,可以直观的看出项目所开放的接口API。

要想访问该页面,还需要增加访问配置,方法有两种:
2.3.1 在spring-mvc.xml中增加配置
 <!-- swagger静态资源访问配置 -->

 <mvc:resources mapping="swagger-ui.html" location="classpath:/META-INF/resources/" />

 <mvc:resources mapping="/webjars/**" location="classpath:/META-INF/resources/webjars/" />
2.3.2 或者增加配置类WebAppConfig
package com.zang.xz.controller;

import org.springframework.context.annotation.Configuration;

import org.springframework.web.servlet.config.annotation.EnableWebMvc;

import org.springframework.web.servlet.config.annotation.ResourceHandlerRegistry;

import org.springframework.web.servlet.config.annotation.WebMvcConfigurerAdapter;

@Configuration

@EnableWebMvc

public class WebAppConfig extends WebMvcConfigurerAdapter  {

    @Override

    public void addResourceHandlers(ResourceHandlerRegistry registry) {

        registry.addResourceHandler("swagger-ui.html").addResourceLocations("classpath:/META-INF/resources/");

        registry.addResourceHandler("/webjars/**").addResourceLocations("classpath:/META-INF/resources/webjars/");

    }

}
3. 测试API接口
3.1 访问“项目地址/swagger-ui.html#/” 查看api
访问 http://localhost:8090/mySwagger/swagger-ui.html#/ 出现如下界面,说明我们的swagger集成项目成功。
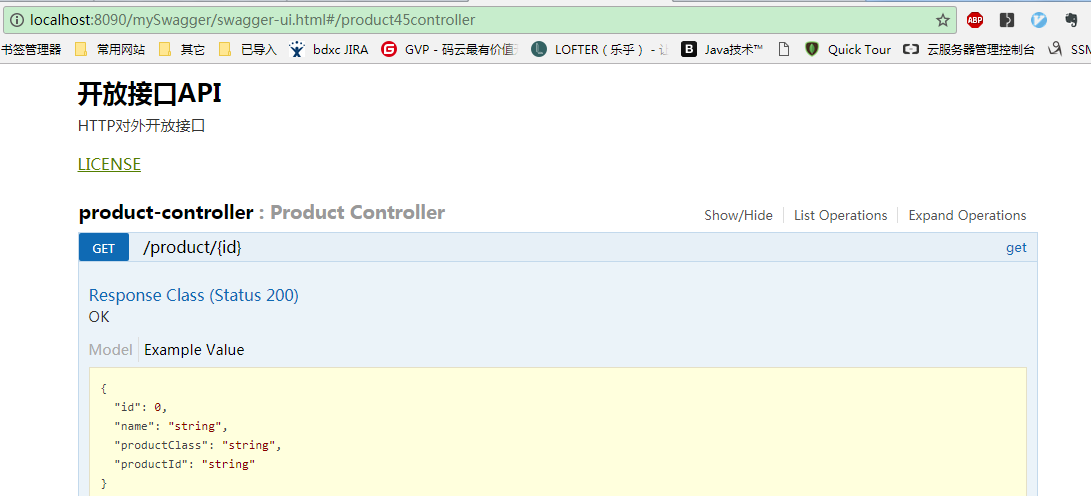
在参数中输入信息,可实现对接口的调用


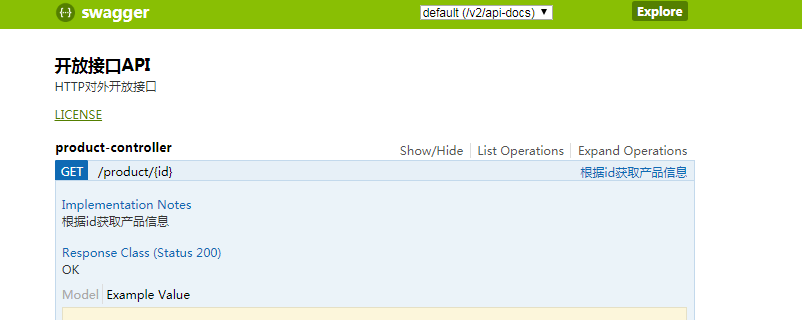
但是单调的页面没有实现swagger作为API文档工具的作用,这需要我们通过注解在接口方法中配置。
3.2 通过注解生成API文档
常用注解如下:
常用注解:
- @Api()用于类; 表示标识这个类是swagger的资源
- @ApiOperation()用于方法; 表示一个http请求的操作
- @ApiParam()用于方法,参数,字段说明; 表示对参数的添加元数据(说明或是否必填等)
- @ApiModel()用于类 表示对类进行说明,用于参数用实体类接收
- @ApiModelProperty()用于方法,字段 ;表示对model属性的说明或者数据操作更改
- @ApiIgnore()用于类,方法,方法参数 ;表示这个方法或者类被忽略
- @ApiImplicitParam() 用于方法 ;表示单独的请求参数
- @ApiImplicitParams() 用于方法,包含多个 @ApiImplicitParam
@RestController

@RequestMapping(value = { "/product/" })

// 类上加@Api注解

@Api(value = "/ProductController", tags = "接口开放示例")

public class ProductController {

    @RequestMapping(value = "/{id}", method = RequestMethod.GET)

    // 方法上加ApiOpreation注解

    @ApiOperation(value = "根据id获取产品信息", notes = "根据id获取产品信息", httpMethod = "GET", response = Product.class)

    public ResponseEntity<Product> get(@PathVariable Long id) {

        Product product = new Product();

        product.setName("空气净化器");

        product.setId(1L);

        product.setProductClass("filters");

        product.setProductId("T12345");

        return ResponseEntity.ok(product);

    }

}
添加注解之后,访问swagger界面如下
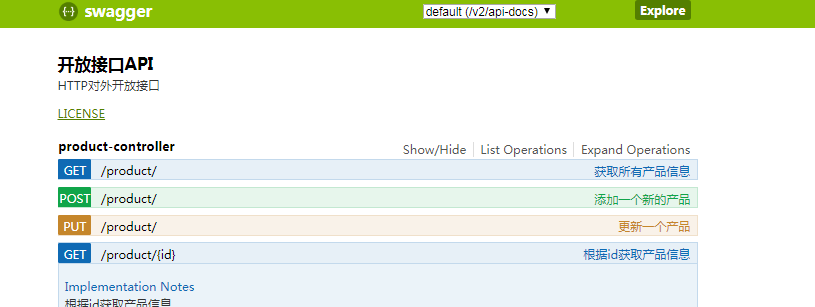
3.3 其他方法测试
多增加几个测试方法
@RequestMapping(method = RequestMethod.POST)

    @ApiOperation(value = "添加一个新的产品")

    @ApiResponses(value = { @ApiResponse(code = 405, message = "参数错误") })

    public ResponseEntity<String> add(Product product) {

        return ResponseEntity.ok("SUCCESS");

    }

    @RequestMapping(method = RequestMethod.PUT)

    @ApiOperation(value = "更新一个产品")

    @ApiResponses(value = { @ApiResponse(code = 400, message = "参数错误") })

    public ResponseEntity<String> update(Product product) {

        return ResponseEntity.ok("SUCCESS");

    }

    @RequestMapping(method = RequestMethod.GET)

    @ApiOperation(value = "获取所有产品信息", notes = "获取所有产品信息", httpMethod = "GET", response = Product.class, responseContainer = "List")

    public ResponseEntity<List<Product>> getAllProducts() {

        Product product = new Product();

        product.setName("七级滤芯净水器");

        product.setId(1L);

        product.setProductClass("seven_filters");

        product.setProductId("T12345");

        return ResponseEntity.ok(Arrays.asList(product, product));

    }
swagger界面为不同方法提供不同颜色显示,可在其中对各个接口进行测试
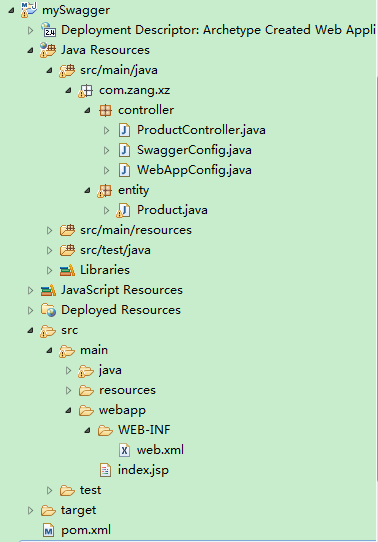
项目结构如下:
参考:https://blog.csdn.net/u014231523/article/details/76522486
https://blog.csdn.net/eleanoryss/article/details/80609677
Maven + SpringMVC项目集成Swagger的更多相关文章
- 项目集成swagger,并暴露指定端点给swagger
项目集成swagger 一:思考: 1.swagger解决了我们什么问题? 传统开发中,我们在开发完成一个接口后,为了测试我们的接口,我们通常会编写单元测试,以测试我们的接口的可用性,或者用postm ...
- 使用IDEA创建基于Maven SpringMvc项目
使用IDEA创建基于Maven SpringMvc项目 1.通过程序启动——create project,或者file--New-projec打开New project 2.自定义groupid等信息 ...
- maven+springmvc项目启动时,request mapping not found……
springmvc项目跑的好好的,跑着跑着,出现request mapping not found的问题. 第一波,网上查问题,stackoverflow上面的各种配置说明,但是我本地就是没查出问题 ...
- 项目集成swagger【转载】
地址链接:https://blog.csdn.net/lx1309244704/article/details/81808788 swagger是一款高效易用的嵌入式文档插件,同时支持在线测试接口,快 ...
- 【Spring Boot&&Spring Cloud系列】Spring Boot项目集成Swagger UI
前言 Swagger 是一个规范和完整的框架,用于生成.描述.调用和可视化 RESTful 风格的 Web 服务.总体目标是使客户端和文件系统作为服务器以同样的速度来更新.文件的方法,参数和模型紧密集 ...
- SpringBoot+SpringCloud+vue+Element开发项目——集成Swagger文档
在pom.xml文件中添加Maven依赖 <!--swagger--> <dependency> <groupId>io.springfox</groupId ...
- MVC项目集成swagger
1.创建WebAPI项目解决方案 2.使用nuget引入Swashbuckle包 引入Swashbuckle包后App_Start文件夹下会多出一个SwaggerConfig文件 3.添加接口注释 项 ...
- SpringBoot项目集成swagger报NumberFormatException: For input string: ""
java.lang.NumberFormatException: For input string: "" at java.lang.NumberFormatException.f ...
- SpringBoot项目集成Swagger启动报错: Failed to start bean 'documentationPluginsBootstrapper'; nested exception is
使用的Swagger版本是2.9.2.knife4j版本是2.0.4. SpringBoot 版本是2.6.2将SpringBoot版本回退到2.5.6就可以正常启动
随机推荐
- Ubuntu升级到18.04
1.更新 sudo apt-get update 2.升级 sudo apt-get upgrade 3.检测最新版本 sudo update-manager -c -d 然后就会弹出窗口,提示ubu ...
- JAVA动态编译(JavaCompiler)
一.简介 在java中javax报下提供了JavaCompiler类,此类可以允许开发人员编译java文件为class文件. 下面示例中是利用JavaCompiler编译文件,并利用URLClassL ...
- Hadoop2.2.0安装配置手册!完全分布式Hadoop集群搭建过程~(心血之作啊~~)
http://blog.csdn.net/licongcong_0224/article/details/12972889 历时一周多,终于搭建好最新版本hadoop2.2集群,期间遇到各种问题,作为 ...
- 【Python】无须numpy,利用map函数与zip(*)函数对数组转置(转)
http://blog.csdn.net/yongh701/article/details/50283689 在Python的numpy中,对类似array=[[1,2,3],[4,5,6],[7,8 ...
- capwap学习笔记——capwap的前世今生(转)
公司要做AP和AC,从今天开始学习capwap. 1 capwap的前世今生 1.1 胖AP.瘦AP.AC 传统的WLAN网络都是为企业或家庭内少量移动用户的接入而组建的.因此,只需要一个无线路由器就 ...
- Anroid 解决小米和魅族不能在mac上调试
第一种方法 1.mac->关于本机->系统报告->usb->copy厂商ID** 2.cmd->echo " 0x2a45" >> ~/. ...
- web自适应手机浏览器的宽度
<meta name="viewport" content="width=device-width, initial-scale=1.0, minimum-scal ...
- POJ 3009:Curling 2.0 推箱子
Curling 2.0 Time Limit: 1000MS Memory Limit: 65536K Total Submissions: 14090 Accepted: 5887 Desc ...
- Xcode missing file or .png is missing from working copy
当不小心在工程文件中删掉文件时.有可能会提示 .xxx is missing from working copy 有可能是SVN引起的.删掉这个文件就好了 如果是单个文件.进入Terminal 相 ...
- iOS开发 - Content hugging priority & Content compression resistance priority
1. 什么是Content hugging priority 你可以把它想象成一根放在视图上的橡皮筋. 这根橡皮筋会组织视图超过它本身的固有大小(intrinsic content size). 它存 ...