一步步完成Maven+SpringMVC+SpringFox+Swagger整合示例
本文给出一个整合Maven+SpringMVC+SpringFOX+Swagger的示例,并且一步步给出完成步骤。
本人在做实例时发现 http://blog.csdn.net/zth1002/article/details/46927187 中,Spring必须是4.0以上版本。
目标
在做项目的时候,有时候需要提供其它平台(如业务平台)相关的HTTP接口,业务平台则通过开放的HTTP接口获取相关的内容,并完成自身业务~
提供对外开放HTTP API接口,比较常用的是采用Spring MVC来完成。
本文的目标是先搭建一个简单的Spring MVC应用,然后为Spring MVC整合SpringFox-Swagger以及SpringFox-Swagger-UI,最终,达到Spring MVC对外开放接口API文档化。
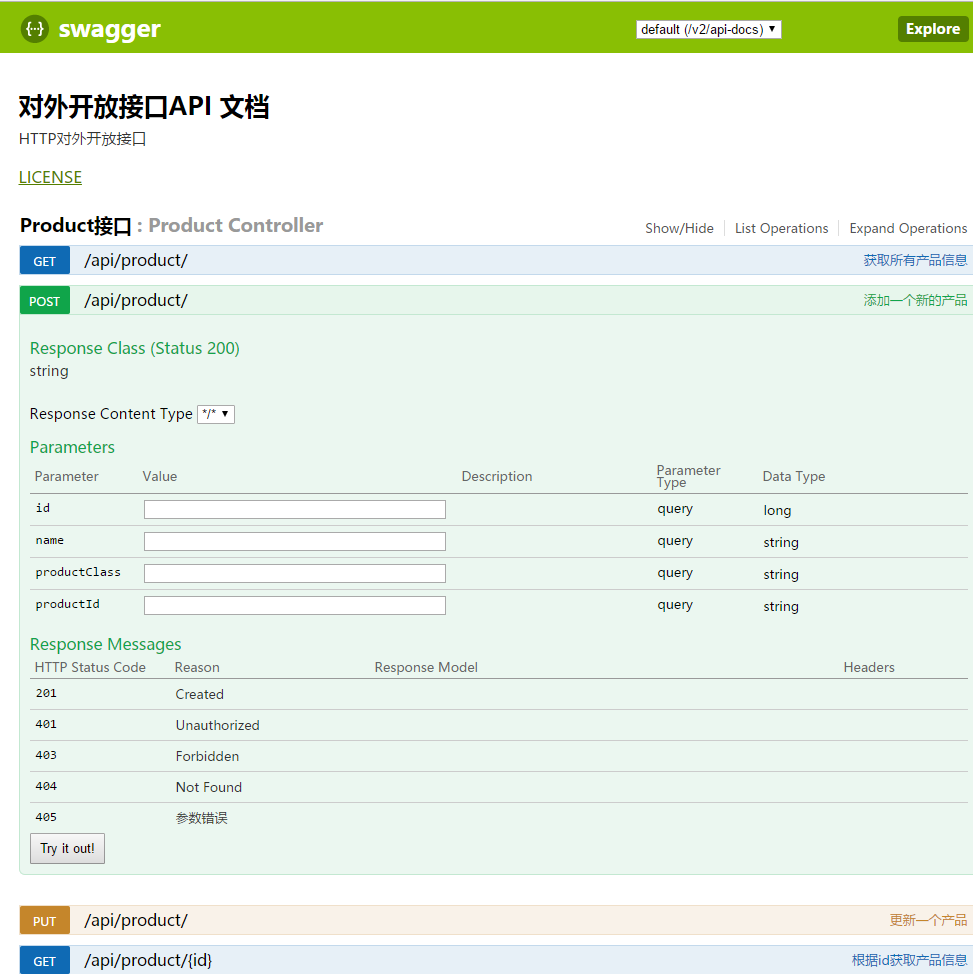
如下图所示:
搭建SpringMVC工程
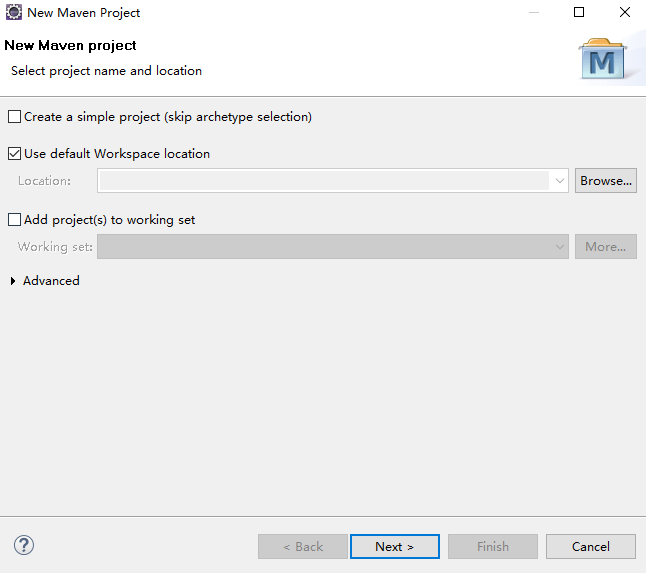
新建Maven工程
Eclipse中,File --> New --> Maven Project,
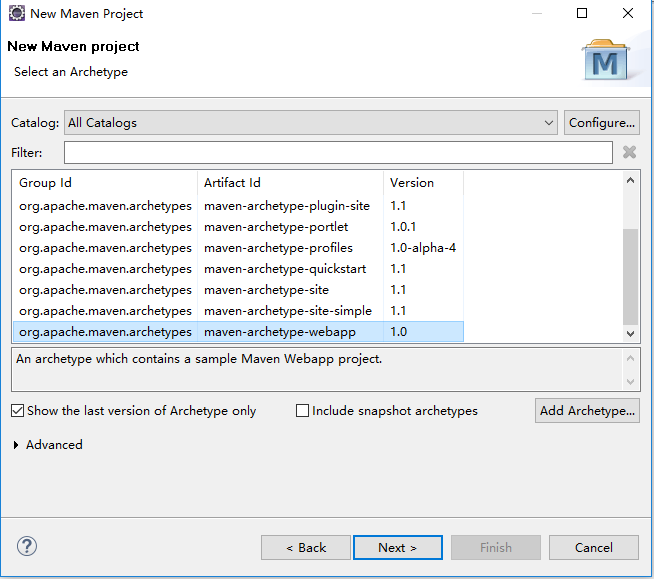
点击“Next”按钮, 然后选择 “maven-archetype-webapp”,
继续点击“Next”按钮,然后指定
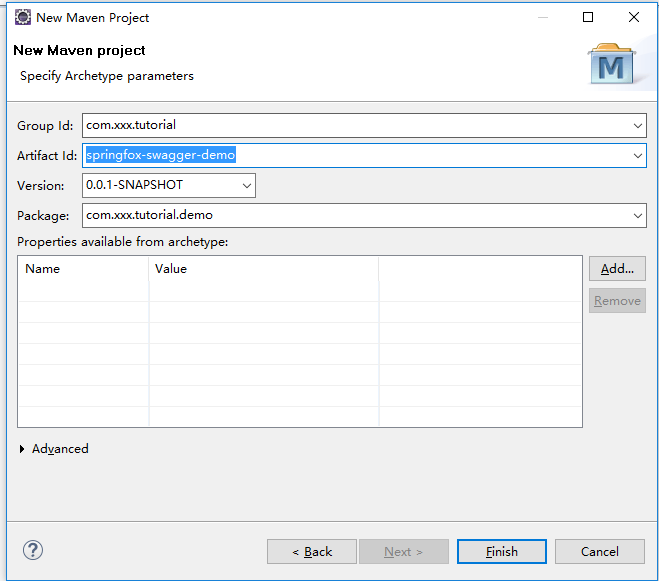
点击“Finish” 按钮结束~ 就这样,一个简单的Web工程就建好了~
但是,
默认是使用J2SE-1.5, 配置一下Build Path,使用本地机器上安装的JDK
(本文中使用的是JDK 1.7),工程默认字体是GBK,将其改成UTF-8
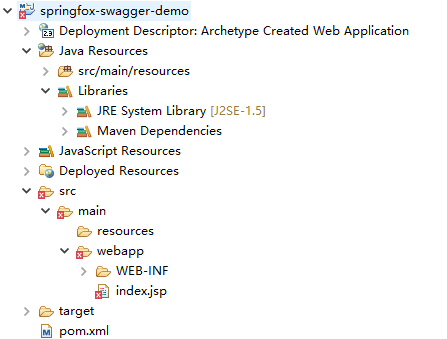
完成后,Maven工程的结构如下图所示:

引入Spring依赖包
在本示例中,因为简单,所以只要引入如下几个jar包就好了~
	<dependencies>

		<!--引入Spring依赖包 -->

		<dependency>

			<groupId>org.springframework</groupId>

			<artifactId>spring-core</artifactId>

			<version>${spring.framework.version}</version>

		</dependency>

		<dependency>

			<groupId>org.springframework</groupId>

			<artifactId>spring-context</artifactId>

			<version>${spring.framework.version}</version>

		</dependency>

		<dependency>

			<groupId>org.springframework</groupId>

			<artifactId>spring-webmvc</artifactId>

			<version>${spring.framework.version}</version>

		</dependency>

	</dependencies>
完整的pom.xml文件内容如下:
<project xmlns="http://maven.apache.org/POM/4.0.0" xmlns:xsi="http://www.w3.org/2001/XMLSchema-instance"

	xsi:schemaLocation="http://maven.apache.org/POM/4.0.0 http://maven.apache.org/maven-v4_0_0.xsd">

	<modelVersion>4.0.0</modelVersion>

	<groupId>com.xxx.tutorial</groupId>

	<artifactId>springfox-swagger-demo</artifactId>

	<packaging>war</packaging>

	<version>0.0.1-SNAPSHOT</version>

	<name>springfox-swagger-demo Maven Webapp</name>

	<url>http://maven.apache.org</url>

	<properties>

		<project.build.sourceEncoding>UTF-8</project.build.sourceEncoding>

		<spring.framework.version>4.3.6.RELEASE</spring.framework.version>

	</properties>

	<dependencies>

		<!--引入Spring依赖包 -->

		<dependency>

			<groupId>org.springframework</groupId>

			<artifactId>spring-core</artifactId>

			<version>${spring.framework.version}</version>

		</dependency>

		<dependency>

			<groupId>org.springframework</groupId>

			<artifactId>spring-context</artifactId>

			<version>${spring.framework.version}</version>

		</dependency>

		<dependency>

			<groupId>org.springframework</groupId>

			<artifactId>spring-webmvc</artifactId>

			<version>${spring.framework.version}</version>

		</dependency>

	</dependencies><build><finalName>springfox-swagger-demo</finalName></build></project>
编写spring-mvc.xml文件
<?xml version="1.0" encoding="UTF-8"?>

<beans xmlns="http://www.springframework.org/schema/beans"

	xmlns:xsi="http://www.w3.org/2001/XMLSchema-instance" xmlns:context="http://www.springframework.org/schema/context"

	xmlns:mvc="http://www.springframework.org/schema/mvc" xmlns:p="http://www.springframework.org/schema/p"

	xsi:schemaLocation="http://www.springframework.org/schema/beans http://www.springframework.org/schema/beans/spring-beans-4.0.xsd

		http://www.springframework.org/schema/context http://www.springframework.org/schema/context/spring-context-4.0.xsd

		http://www.springframework.org/schema/mvc http://www.springframework.org/schema/mvc/spring-mvc-4.0.xsd">

	<!-- 默认的注解映射的支持 ,它会自动注册DefaultAnnotationHandlerMapping 与AnnotationMethodHandlerAdapter -->

	<mvc:annotation-driven />

	<!-- enable autowire 向容器自动注册 -->

	<context:annotation-config />

	<!-- 设置使用注解的类所在的jar包 -->

	<context:component-scan base-package="com.xxx.tutorial" />

	<bean

		class="org.springframework.web.servlet.mvc.annotation.AnnotationMethodHandlerAdapter" />

</beans>
配置web.xml
<?xml version="1.0" encoding="UTF-8"?>

<web-app xmlns:xsi="http://www.w3.org/2001/XMLSchema-instance"

	xmlns="http://java.sun.com/xml/ns/javaee"

	xsi:schemaLocation="http://java.sun.com/xml/ns/javaee http://java.sun.com/xml/ns/javaee/web-app_3_0.xsd"

	id="WebApp_ID" metadata-complete="true" version="3.0">

	<display-name>Spring MVC</display-name>

	<servlet>

		<servlet-name>spring-mvc</servlet-name>

		<servlet-class>org.springframework.web.servlet.DispatcherServlet</servlet-class>

		<init-param>

			<param-name>contextConfigLocation</param-name>

			<param-value>classpath:spring-mvc.xml</param-value>

		</init-param>

		<load-on-startup>1</load-on-startup>

		<async-supported>true</async-supported>

	</servlet>

	<servlet-mapping>

		<servlet-name>spring-mvc</servlet-name>

		<url-pattern>/</url-pattern>

	</servlet-mapping>

	<filter>

		<filter-name>encodingFilter</filter-name>

		<filter-class>org.springframework.web.filter.CharacterEncodingFilter</filter-class>

		<init-param>

			<param-name>encoding</param-name>

			<param-value>UTF-8</param-value>

		</init-param>

		<init-param>

			<param-name>forceEncoding</param-name>

			<param-value>true</param-value>

		</init-param>

	</filter>

	<filter-mapping>

		<filter-name>encodingFilter</filter-name>

		<url-pattern>/*</url-pattern>

	</filter-mapping>

</web-app>
编写Controller并测试
配置好spring-mvc.xml以及web.xml文件之后,咱们继续往下走~
因为,本文Spring MVC示例的作用主要用来暴露对外HTTP API接口,先写一个简单的ProductController,其包含一个按照id查询的方法。
Product.java和ProductController.java的内容如下:
Product.java
package com.xxx.tutorial.model;

import java.io.Serializable;

/**

 *

 * @author wangmengjun

 *

 */

public class Product implements Serializable {

	private static final long serialVersionUID = 1L;

	/**ID*/

	private Long id;

	/**产品名称*/

	private String name;

	/**产品型号*/

	private String productClass;

	/**产品ID*/

	private String productId;

	/**

	 * @return the id

	 */

	public Long getId() {

		return id;

	}

	/**

	 * @param id

	 *            the id to set

	 */

	public void setId(Long id) {

		this.id = id;

	}

	/**

	 * @return the name

	 */

	public String getName() {

		return name;

	}

	/**

	 * @param name

	 *            the name to set

	 */

	public void setName(String name) {

		this.name = name;

	}

	/**

	 * @return the productClass

	 */

	public String getProductClass() {

		return productClass;

	}

	/**

	 * @param productClass

	 *            the productClass to set

	 */

	public void setProductClass(String productClass) {

		this.productClass = productClass;

	}

	/**

	 * @return the productId

	 */

	public String getProductId() {

		return productId;

	}

	/**

	 * @param productId

	 *            the productId to set

	 */

	public void setProductId(String productId) {

		this.productId = productId;

	}

	/*

	 * (non-Javadoc)

	 *

	 * @see java.lang.Object#toString()

	 */

	@Override

	public String toString() {

		return "Product [id=" + id + ", name=" + name + ", productClass=" + productClass + ", productId=" + productId

				+ "]";

	}

}
ProductController.java
package com.xxx.tutorial.controller;

import org.springframework.http.ResponseEntity;

import org.springframework.web.bind.annotation.PathVariable;

import org.springframework.web.bind.annotation.RequestMapping;

import org.springframework.web.bind.annotation.RequestMethod;

import org.springframework.web.bind.annotation.RestController;

import com.xxx.tutorial.model.Product;

@RestController

@RequestMapping(value = { "/api/product/"})

public class ProductController {

	@RequestMapping(value = "/{id}", method = RequestMethod.GET)

	public ResponseEntity<Product> get(@PathVariable Long id) {

		Product product = new Product();

		product.setName("七级滤芯净水器");

		product.setId(1L);

		product.setProductClass("seven_filters");

		product.setProductId("T12345");

		return ResponseEntity.ok(product);

	}

}
注:
鉴于是一个demo示例,所以没有写ProductService以及相关DAO, 直接在方法中返回固定的Product信息~
验证Spring MVC是否ok
完成Controller的代码,运行Spring MVC项目,然后,看一下Spring MVC是否运行ok,访问URL地址
http://localhost:8888/springfox-swagger-demo/api/product/1
- 出现错误
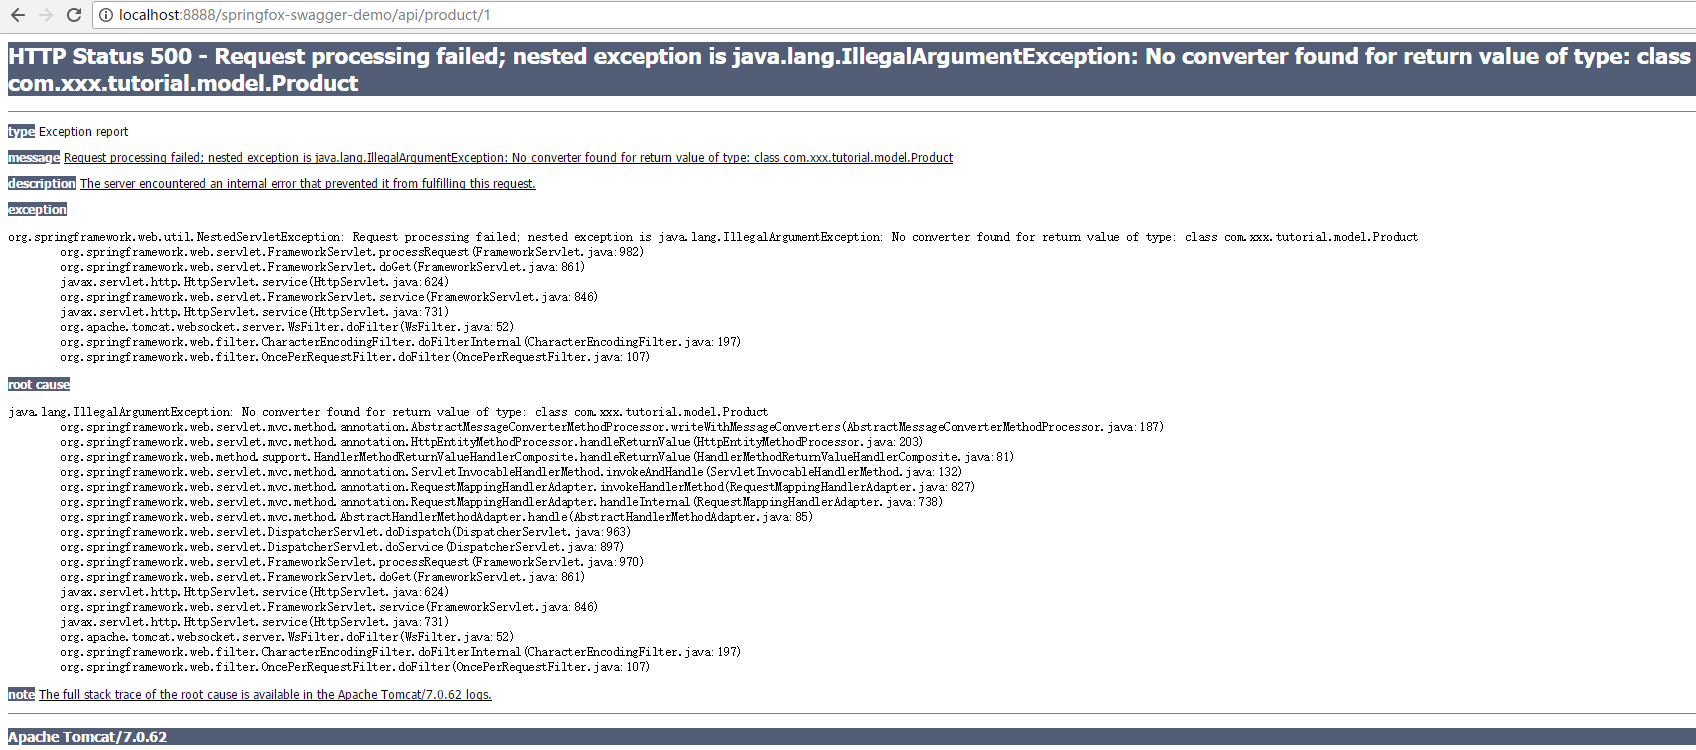
详细的错误信息如下:
五月 23, 2017 3:00:55 下午 org.apache.catalina.core.StandardWrapperValve invoke

严重: Servlet.service() for servlet [spring-mvc] in context with path [/springfox-swagger-demo] threw exception [Request processing failed; nested exception is java.lang.IllegalArgumentException: No converter found for return value of type: class com.xxx.tutorial.model.Product] with root cause

java.lang.IllegalArgumentException: No converter found for return value of type: class com.xxx.tutorial.model.Product

	at org.springframework.web.servlet.mvc.method.annotation.AbstractMessageConverterMethodProcessor.writeWithMessageConverters(AbstractMessageConverterMethodProcessor.java:187)

	at org.springframework.web.servlet.mvc.method.annotation.HttpEntityMethodProcessor.handleReturnValue(HttpEntityMethodProcessor.java:203)

	at org.springframework.web.method.support.HandlerMethodReturnValueHandlerComposite.handleReturnValue(HandlerMethodReturnValueHandlerComposite.java:81)

	at org.springframework.web.servlet.mvc.method.annotation.ServletInvocableHandlerMethod.invokeAndHandle(ServletInvocableHandlerMethod.java:132)

	at org.springframework.web.servlet.mvc.method.annotation.RequestMappingHandlerAdapter.invokeHandlerMethod(RequestMappingHandlerAdapter.java:827)

	at org.springframework.web.servlet.mvc.method.annotation.RequestMappingHandlerAdapter.handleInternal(RequestMappingHandlerAdapter.java:738)

	at org.springframework.web.servlet.mvc.method.AbstractHandlerMethodAdapter.handle(AbstractHandlerMethodAdapter.java:85)

	at org.springframework.web.servlet.DispatcherServlet.doDispatch(DispatcherServlet.java:963)

	at org.springframework.web.servlet.DispatcherServlet.doService(DispatcherServlet.java:897)

	at org.springframework.web.servlet.FrameworkServlet.processRequest(FrameworkServlet.java:970)

	at org.springframework.web.servlet.FrameworkServlet.doGet(FrameworkServlet.java:861)

	at javax.servlet.http.HttpServlet.service(HttpServlet.java:624)

	at org.springframework.web.servlet.FrameworkServlet.service(FrameworkServlet.java:846)

	at javax.servlet.http.HttpServlet.service(HttpServlet.java:731)

	at org.apache.catalina.core.ApplicationFilterChain.internalDoFilter(ApplicationFilterChain.java:303)

	at org.apache.catalina.core.ApplicationFilterChain.doFilter(ApplicationFilterChain.java:208)

	at org.apache.tomcat.websocket.server.WsFilter.doFilter(WsFilter.java:52)

	at org.apache.catalina.core.ApplicationFilterChain.internalDoFilter(ApplicationFilterChain.java:241)

	at org.apache.catalina.core.ApplicationFilterChain.doFilter(ApplicationFilterChain.java:208)

	at org.springframework.web.filter.CharacterEncodingFilter.doFilterInternal(CharacterEncodingFilter.java:197)

	at org.springframework.web.filter.OncePerRequestFilter.doFilter(OncePerRequestFilter.java:107)

	at org.apache.catalina.core.ApplicationFilterChain.internalDoFilter(ApplicationFilterChain.java:241)

	at org.apache.catalina.core.ApplicationFilterChain.doFilter(ApplicationFilterChain.java:208)

	at org.apache.catalina.core.StandardWrapperValve.invoke(StandardWrapperValve.java:220)

	at org.apache.catalina.core.StandardContextValve.invoke(StandardContextValve.java:122)

	at org.apache.catalina.core.StandardHostValve.invoke(StandardHostValve.java:170)

	at org.apache.catalina.valves.ErrorReportValve.invoke(ErrorReportValve.java:103)

	at org.apache.catalina.valves.AccessLogValve.invoke(AccessLogValve.java:957)

	at org.apache.catalina.core.StandardEngineValve.invoke(StandardEngineValve.java:116)

	at org.apache.catalina.connector.CoyoteAdapter.service(CoyoteAdapter.java:423)

	at org.apache.coyote.http11.AbstractHttp11Processor.process(AbstractHttp11Processor.java:1079)

	at org.apache.coyote.AbstractProtocol$AbstractConnectionHandler.process(AbstractProtocol.java:620)

	at org.apache.tomcat.util.net.JIoEndpoint$SocketProcessor.run(JIoEndpoint.java:316)

	at java.util.concurrent.ThreadPoolExecutor.runWorker(Unknown Source)

	at java.util.concurrent.ThreadPoolExecutor$Worker.run(Unknown Source)

	at org.apache.tomcat.util.threads.TaskThread$WrappingRunnable.run(TaskThread.java:61)

	at java.lang.Thread.run(Unknown Source)
解决方法,添加jackson-databind依赖包即可~
		<dependency>

			<groupId>com.fasterxml.jackson.core</groupId>

			<artifactId>jackson-databind</artifactId>

			<version>2.6.6</version>

		</dependency>
重新启动,运行一下,成功返回信息~

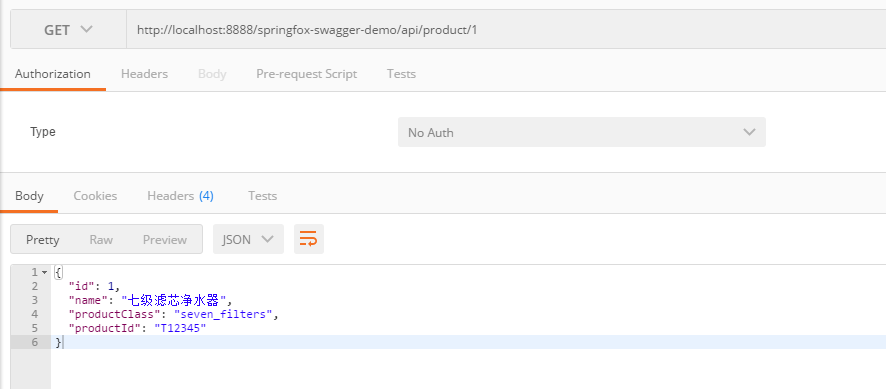
为了看的更加清楚,可以使用postman来完成~, 如~
至此,一个简单的基于SpringMVC的Web项目已经创建,并能对外提供API接口~
接下来,我们要整合SpringFox和SwaggerUI到该SpringMVC项目中去,使其对外接口文档化
整合SpringFox-Swagger
SpringFox【SpringFox链接】已经可以代替Swagger-SpringMVC, 目前SpringFox同时支持Swagger 1.2 和 2.0.
在SpringMVC项目中整合SpringFox-Swagger只要如下几步即可~
- 添加SpringFox-Swagger依赖
- 添加SwaggerConfig
添加依赖
		<dependency>

			<groupId>io.springfox</groupId>

			<artifactId>springfox-swagger2</artifactId>

			<version>2.7.0</version>

		</dependency>
添加SwaggerConfig
package com.xxx.tutorial.config;

import org.springframework.context.annotation.Bean;

import org.springframework.context.annotation.Configuration;

import springfox.documentation.builders.ApiInfoBuilder;

import springfox.documentation.builders.RequestHandlerSelectors;

import springfox.documentation.service.ApiInfo;

import springfox.documentation.spi.DocumentationType;

import springfox.documentation.spring.web.plugins.Docket;

import springfox.documentation.swagger2.annotations.EnableSwagger2;

@Configuration

@EnableSwagger2

public class SwaggerConfig {

	@Bean

	public Docket api() {

		return new Docket(DocumentationType.SWAGGER_2)

				.select()

				.apis(RequestHandlerSelectors.any())

				.build()

				.apiInfo(apiInfo());

	}

	private ApiInfo apiInfo() {

		return new ApiInfoBuilder()

				.title("对外开放接口API 文档")

				.description("HTTP对外开放接口")

				.version("1.0.0")

				.termsOfServiceUrl("http://xxx.xxx.com")

				.license("LICENSE")

				.licenseUrl("http://xxx.xxx.com")

				.build();

	}

}
整合SpringFox-Swagger-UI
在SpringMVC项目中整合SpringFox-Swagger-UI也只要如下两个步骤即可~
- 添加SpringFox-Swagger-UI依赖
- 添加配置
添加依赖
		<dependency>

			<groupId>io.springfox</groupId>

			<artifactId>springfox-swagger-ui</artifactId>

			<version>2.7.0</version>

		</dependency>
添加配置
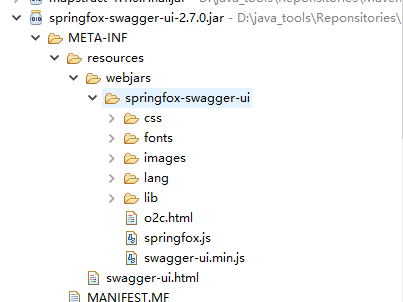
在添加配置之前,一起来看一下swagger-ui中使用的静态资源文件(如swagger-ui.html )放在那里~
spingfox-swagger-ui-2.7.0.jar中的/META-INF/resources/下~ 如下图所示:
为了访问swagger-ui.html,我们配置对这些静态资源的访问~ 如:
package com.xxx.tutorial.config;

import org.springframework.context.annotation.Configuration;

import org.springframework.web.servlet.config.annotation.EnableWebMvc;

import org.springframework.web.servlet.config.annotation.ResourceHandlerRegistry;

import org.springframework.web.servlet.config.annotation.WebMvcConfigurerAdapter;

@Configuration

@EnableWebMvc

public class WebAppConfig extends WebMvcConfigurerAdapter {

    @Override

    public void addResourceHandlers(ResourceHandlerRegistry registry) {

        registry.addResourceHandler("swagger-ui.html").addResourceLocations("classpath:/META-INF/resources/");

        registry.addResourceHandler("/webjars/**").addResourceLocations("classpath:/META-INF/resources/webjars/");

    }

}
该配置代码的效果和如下代码等价~
	<mvc:resources mapping="swagger-ui.html" location="classpath:/META-INF/resources/" />

	<mvc:resources mapping="/webjars/**"

		location="classpath:/META-INF/resources/webjars/" />
在本文中,可以将其配置在spring-mvc.xml中,
<?xml version="1.0" encoding="UTF-8"?>

<beans xmlns="http://www.springframework.org/schema/beans"

	xmlns:xsi="http://www.w3.org/2001/XMLSchema-instance" xmlns:context="http://www.springframework.org/schema/context"

	xmlns:mvc="http://www.springframework.org/schema/mvc" xmlns:p="http://www.springframework.org/schema/p"

	xsi:schemaLocation="http://www.springframework.org/schema/beans http://www.springframework.org/schema/beans/spring-beans-4.0.xsd

		http://www.springframework.org/schema/context http://www.springframework.org/schema/context/spring-context-4.0.xsd

		http://www.springframework.org/schema/mvc http://www.springframework.org/schema/mvc/spring-mvc-4.0.xsd">

	<!-- 默认的注解映射的支持 ,它会自动注册DefaultAnnotationHandlerMapping 与AnnotationMethodHandlerAdapter -->

	<mvc:annotation-driven />

	<!-- enable autowire 向容器自动注册 -->

	<context:annotation-config />

	<!-- 设置使用注解的类所在的jar包 -->

	<context:component-scan base-package="com.xxx.tutorial" />

	<bean

		class="org.springframework.web.servlet.mvc.annotation.AnnotationMethodHandlerAdapter" />

	<mvc:resources mapping="swagger-ui.html" location="classpath:/META-INF/resources/" />

	<mvc:resources mapping="/webjars/**"

		location="classpath:/META-INF/resources/webjars/" />

</beans>
API接口说明代码添加并测试
经过上述几个步骤之后,之前写的ProductController的接口,就可以实现文档化了,如本文通过如下的访问地址访问:
http://localhost:8888/springfox-swagger-demo/swagger-ui.html
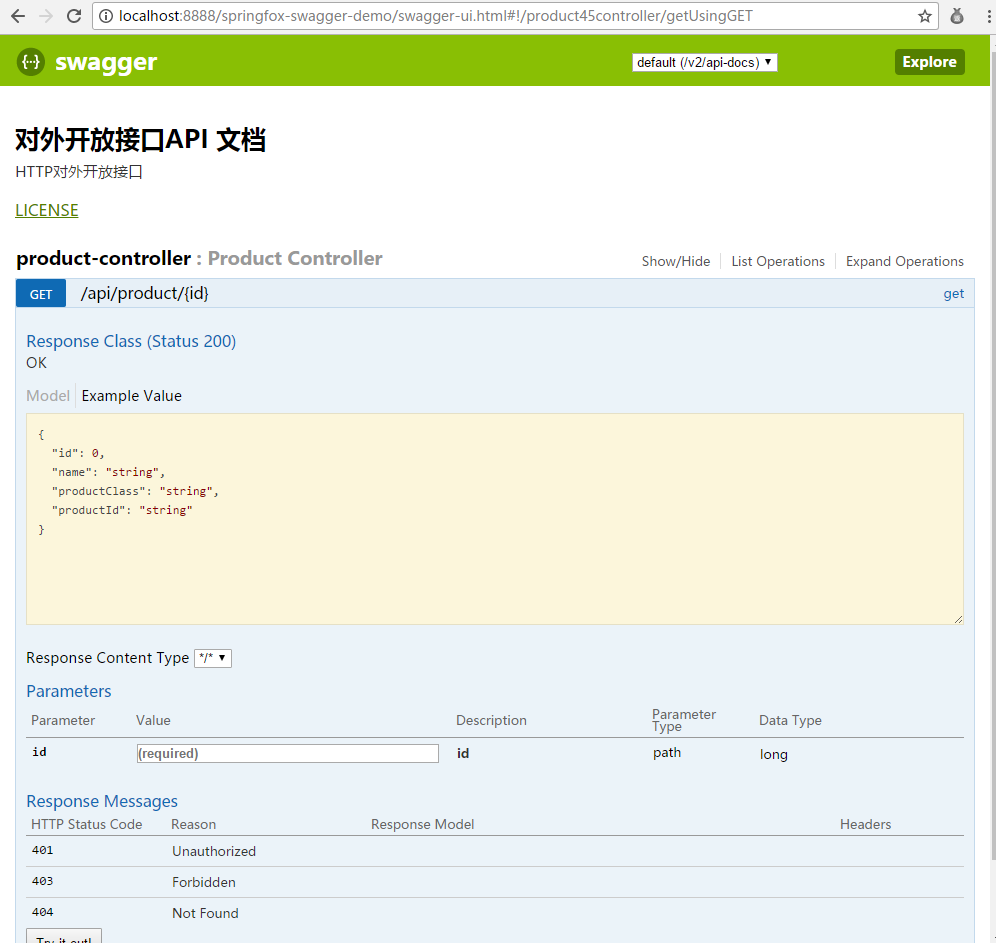
这个接口API雏形出来了,但是还缺少点东西,比如:接口方法的描述等都没有~
修改一下,ProductController.java内容,如:
package com.xxx.tutorial.controller;

import org.springframework.http.ResponseEntity;

import org.springframework.web.bind.annotation.PathVariable;

import org.springframework.web.bind.annotation.RequestMapping;

import org.springframework.web.bind.annotation.RequestMethod;

import org.springframework.web.bind.annotation.RestController;

import com.xxx.tutorial.model.Product;

import io.swagger.annotations.Api;

import io.swagger.annotations.ApiOperation;

@RestController

@RequestMapping(value = { "/api/product/" })

@Api(value = "/product", tags = "Product接口")

public class ProductController {

	@RequestMapping(value = "/{id}", method = RequestMethod.GET)

	@ApiOperation(value = "根据id获取产品信息", notes = "根据id获取产品信息", httpMethod = "GET", response = Product.class)

	public ResponseEntity<Product> get(@PathVariable Long id) {

		Product product = new Product();

		product.setName("七级滤芯净水器");

		product.setId(1L);

		product.setProductClass("seven_filters");

		product.setProductId("T12345");

		return ResponseEntity.ok(product);

	}

}
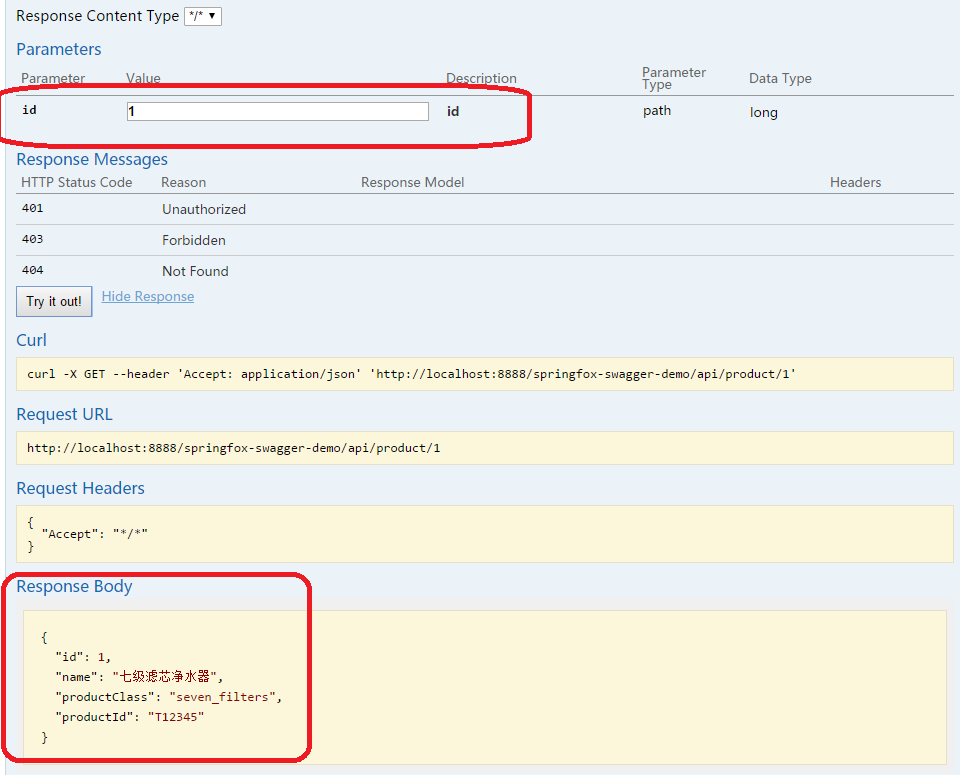
重新访问,接口已经出现多个我们指定的描述信息~
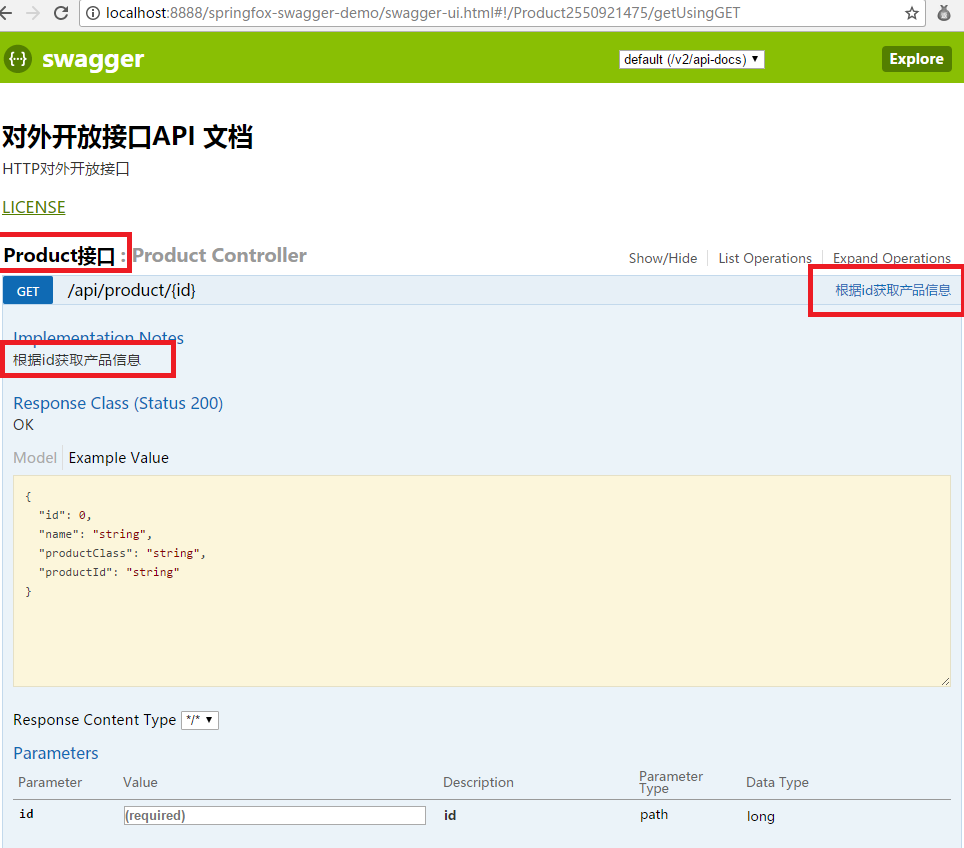
在参数id栏中输入1,然后点击“try it out”按钮~ 可以查看接口调用结果~
至此一个简单的示例就完成了~
稍微增加几个接口
修改ProductController
package com.xxx.tutorial.controller;

import java.util.Arrays;

import java.util.List;

import org.springframework.http.ResponseEntity;

import org.springframework.web.bind.annotation.PathVariable;

import org.springframework.web.bind.annotation.RequestMapping;

import org.springframework.web.bind.annotation.RequestMethod;

import org.springframework.web.bind.annotation.RestController;

import com.xxx.tutorial.model.Product;

import io.swagger.annotations.Api;

import io.swagger.annotations.ApiOperation;

import io.swagger.annotations.ApiResponse;

import io.swagger.annotations.ApiResponses;

@RestController

@RequestMapping(value = { "/api/product/" })

@Api(value = "/product", tags = "Product接口")

public class ProductController {

	@RequestMapping(value = "/{id}", method = RequestMethod.GET)

	@ApiOperation(value = "根据id获取产品信息", notes = "根据id获取产品信息", httpMethod = "GET", response = Product.class)

	public ResponseEntity<Product> get(@PathVariable Long id) {

		Product product = new Product();

		product.setName("七级滤芯净水器");

		product.setId(1L);

		product.setProductClass("seven_filters");

		product.setProductId("T12345");

		return ResponseEntity.ok(product);

	}

	@RequestMapping(method = RequestMethod.POST)

	@ApiOperation(value = "添加一个新的产品")

	@ApiResponses(value = { @ApiResponse(code = 405, message = "参数错误") })

	public ResponseEntity<String> add(Product product) {

		return ResponseEntity.ok("SUCCESS");

	}

	@RequestMapping(method = RequestMethod.PUT)

	@ApiOperation(value = "更新一个产品")

	@ApiResponses(value = { @ApiResponse(code = 400, message = "参数错误") })

	public ResponseEntity<String> update(Product product) {

		return ResponseEntity.ok("SUCCESS");

	}

	@RequestMapping(method = RequestMethod.GET)

	@ApiOperation(value = "获取所有产品信息", notes = "获取所有产品信息", httpMethod = "GET", response = Product.class, responseContainer = "List")

	public ResponseEntity<List<Product>> getAllProducts() {

		Product product = new Product();

		product.setName("七级滤芯净水器");

		product.setId(1L);

		product.setProductClass("seven_filters");

		product.setProductId("T12345");

		return ResponseEntity.ok(Arrays.asList(product, product));

	}

}
swagger-ui展示
由上图可以看出,不同的method(GET / PUT / POST等)都会以不同的颜色展示出来~
Swagger-ui的添加,可以帮助他人查看接口信息,并在页面上进行输入参数来调用接口~
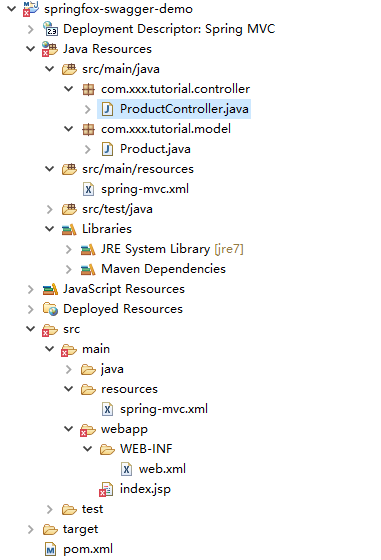
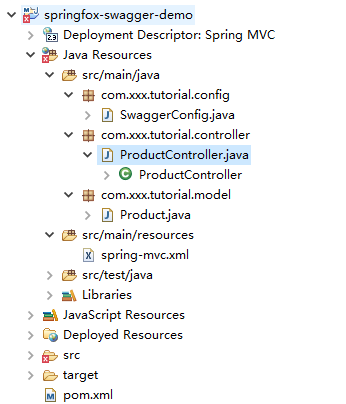
Maven工程的目录如下:
本文只是一个简单的整合示例,大家只要操作一下就能出来结果。
更加详细的文档,有兴趣的小伙伴可以访问swagger-ui的官网查看~
http://blog.csdn.net/u011277123/article/details/76643284
一步步完成Maven+SpringMVC+SpringFox+Swagger整合示例的更多相关文章
- Maven+SpringMVC+SpringFox+Swagger整合示例
查考链接:https://my.oschina.net/wangmengjun/blog/907679 coding地址:https://git.coding.net/conding_hjy/Spri ...
- 关于Maven+Springmvc+Dubbo+Zookeeper整合
为什么要用dubbo? 还是让官方来解释吧: http://dubbo.io/User+Guide-zh.htm http://dubbo.io/ 一般 nginx+tomcat | - ...
- SpringMVC集成Swagger插件以及Swagger注解的简单使用
一.简介 Swagger 是一个规范和完整的框架,用于生成.描述.调用和可视化 RESTful 风格的 Web 服务.总体目标是使客户端和文件系统作为服务器以同样的速度来更新 .接口的方法,参数和模型 ...
- SpringMVC、SpringFox和Swagger整合项目实例
目标 在做项目的时候,有时候需要提供其它平台(如业务平台)相关的HTTP接口,业务平台则通过开放的HTTP接口获取相关的内容,并完成自身业务~ 提供对外开放HTTP API接口,比较常用的是采用Spr ...
- Spring+SpringMVC+MyBatis+easyUI整合基础篇(六)maven整合SSM
写在前面的话 承接前文<Spring+SpringMVC+MyBatis+easyUI整合基础篇(五)讲一下maven>,本篇所讲述的是如何使用maven与原ssm项目整合,使得一个普 ...
- Dubbo与Zookeeper、Spring整合使用 maven+springmvc+dubbo+zookeeper
为什么要用dubbo? 还是让官方来解释吧: http://dubbo.io/User+Guide-zh.htm http://dubbo.io/ 一般 nginx+tomcat | - ...
- 一篇文章带你搞懂 SpringBoot与Swagger整合
Swagger使用由于不喜欢csdn的markwoen编辑器,对代码样式支持不好,看着不舒服,对审美要求比较高的同学移步github:https://github.com/itguang/swagge ...
- Zuul Swagger 整合
疯狂创客圈 Java 高并发[ 亿级流量聊天室实战]实战系列 [博客园总入口 ] 架构师成长+面试必备之 高并发基础书籍 [Netty Zookeeper Redis 高并发实战 ] 前言 Crazy ...
- Swagger整合Jwt授权配置
Swagger整合Jwt授权配置 欢迎关注博主公众号「Java大师」, 专注于分享Java领域干货文章http://www.javaman.cn/sb2/swagger-jwt 一.Swagger入门 ...
随机推荐
- PHP中self和this的用法区别
PHP支持类和面向对象结构,PHP的类的静态函数和变量不与任何特定类的实例相关联(换句话说,一个对象).请看:类与对象的区别. 相反,静态函数和变量与类定义本身相关联.换言之,一个类的所有实例都共享相 ...
- gitblit删除版本库
Git客户端不提供删除远程仓库的方法,gitblit服务器网页也不支持删除版本仓库.若要强制删除,Windows下可以: 先在任务管理器中停止gitblit进程,然后将gitblit版本库文件夹中将版 ...
- 【原创】java socket 和.net socket 通讯 demo
结束符协议"##" import java.io.BufferedReader; import java.io.IOException; import java.io.InputS ...
- 设置sde表空间为自动增长
有的用户在测试数据时,希望在SDE表空间里面不受限制地导入数据,于是需要将SDE的表空间设置为自动增长. 过程描述 1.可以在创建sde表空间的时候,添加参数Autoextend on,修改后创建命令 ...
- net core体系-web应用程序-4net core2.0大白话带你入门-8asp.net core 内置DI容器(DependencyInjection,控制翻转)的一点小理解
asp.net core 内置DI容器的一点小理解 DI容器本质上是一个工厂,负责提供向它请求的类型的实例. .net core内置了一个轻量级的DI容器,方便开发人员面向接口编程和依赖倒置(IO ...
- 将xml 写到内存中再已string类型读出来
System.IO.MemoryStream ms = new System.IO.MemoryStream(); xmlDoc.Save(ms); System.IO.StreamReader sr ...
- Spring Data Redis实现消息队列——发布/订阅模式
一般来说,消息队列有两种场景,一种是发布者订阅者模式,一种是生产者消费者模式.利用redis这两种场景的消息队列都能够实现. 定义:生产者消费者模式:生产者生产消息放到队列里,多个消费者同时监听队列, ...
- 我今天遇到的条件语句Integer类型的
两个Integer类型的值进行比较时,应该用equals进行判断,用"=="判断是错误的,后来想了一下就明白了,Integer毕竟是对象, 而不是int基本数据类型,可以直接比较, ...
- gradle根据不同渠道设置不同的开屏启动页
需求:根据不同渠道,app的开屏启动页不一样 思路:因为app的启动页是在清单文件配置的,而清单文件最后是要和main里面的清单文件合并的,所以每个渠道都要配一个清单文件,在里面设置 然后在Andro ...
- ♣eclipse护眼颜色和关键字颜色设置
eclipse护眼颜色和字体大小设置 ♣eclipse护眼颜色和关键字颜色设置 ♣eclipse字体大小设置(包括jsp , .xml ,.java) 1.Eclipse字体大小调整: 窗口(Wi ...