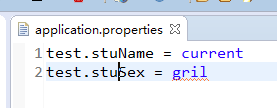
Spring Boot 中配置文件application.properties使用
一、配置文档application.properties的基本使用
三、参数间引用
八.springboot使用spring.profiles.active添加多个properties或者yml配置文件
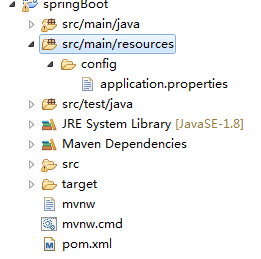
一、配置文档配置项的调用(application.properties可放在resources,或者resources下的config文件夹里)
package com.my.study.controller;

import org.springframework.beans.factory.annotation.Value;

import org.springframework.boot.autoconfigure.SpringBootApplication;

import org.springframework.boot.context.properties.ConfigurationProperties;

import org.springframework.web.bind.annotation.RequestMapping;

import org.springframework.web.bind.annotation.RestController;

import com.my.study.model.Student;

@RestController

@SpringBootApplication

@RequestMapping("/user")

public class UserController {

    @Value("${test.stuName}")

    private String stuName;

    @Value("${test.stuSex}")

    private String stuSex;

    @RequestMapping("/test")

    public Object sayHello() {

        Student student = new Student();

        student.setStuName(stuName);

        student.setStuSex(stuSex);

        return student ;

    }

}
启动后在浏览器直接输入http://localhost:18080/user/test,就直接打印出配置文件中的配置内容。
二、绑定对象bean调用
有时候属性太多了,一个个绑定到属性字段上太累,官方提倡绑定一个对象的bean,这里我们建一个ConfigBean.java类,顶部需要使用注解@ConfigurationProperties(prefix = “test”)来指明使用哪个
注意:类中一定要有get set 和无参的构造方法方法,否则参数无法绑定,
package com.my.study.model;

import org.springframework.boot.context.properties.ConfigurationProperties;

@ConfigurationProperties(prefix ="test")

public class ConfigBean {

    private String stuName;

    private String stuSex;

    /* (non-Javadoc)

     * @see java.lang.Object#toString()

     */

    @Override

    public String toString() {

        return "ConfigBean [stuName=" + stuName + ", stuSex=" + stuSex + "]";

    }

    /**

     * @return the stuName

     */

    public String getStuName() {

        return stuName;

    }

    /**

     * @param stuName the stuName to set

     */

    public void setStuName(String stuName) {

        this.stuName = stuName;

    }

    /**

     * @return the stuSex

     */

    public String getStuSex() {

        return stuSex;

    }

    /**

     * @param stuSex the stuSex to set

     */

    public void setStuSex(String stuSex) {

        this.stuSex = stuSex;

    }

}
此时配置完还需要在spring Boot入口类加上@EnableConfigurationProperties并指明要加载哪个bean,如果没有用此标签指定加载哪个class,在bean类那边添加@Configuration或者@Component ,
@Configuration为Spring中通过Java类配置bean的标签如下所示
package com.my.sb.entity;

import org.springframework.beans.factory.annotation.Value;

import org.springframework.context.annotation.Bean;

import org.springframework.context.annotation.Configuration;

@Configuration

public class Data {

    @Value("${app.user.name}")

    private String name;

    @Value("${app.user.age}")

    private int age;

    @Value("${app.user.sex}")

    private String sex;

    /**

     *

     */

    public Data() {

        super();

    }

    /**

     * @return the name

     */

    public String getName() {

        return name;

    }

    /**

     * @param name

     *            the name to set

     */

    public void setName(String name) {

        this.name = name;

    }

    /**

     * @return the age

     */

    public int getAge() {

        return age;

    }

    /**

     * @param age

     *            the age to set

     */

    public void setAge(int age) {

        this.age = age;

    }

    /**

     * @return the sex

     */

    public String getSex() {

        return sex;

    }

    /**

     * @param sex

     *            the sex to set

     */

    public void setSex(String sex) {

        this.sex = sex;

    }

    @Bean

    public Student getStudent() {

        Student stu = new Student();

        stu.setName(name);

        stu.setSex(sex);

        stu.setAge(age);

        return stu;

    }

}
@Component 为把当前类自动注入为bean,为通过注解配置bean,如下
package com.my.sb.entity;

import org.springframework.boot.context.properties.ConfigurationProperties;

import org.springframework.stereotype.Component;

@Component

@ConfigurationProperties(prefix="app.user")

public class ConfigData {

    private String name;

    private int age;

    private String sex;

    public String sexStr ="boy";

    /**

     *

     */

    public ConfigData() {

        super();

    }

    /**

     * @param name

     * @param age

     * @param sex

     */

    public ConfigData(String name, int age, String sex) {

        super();

        this.name = name;

        this.age = age;

        this.sex = sex;

    }

    /**

     * @return the name

     */

    public String getName() {

        return name;

    }

    /**

     * @param name the name to set

     */

    public void setName(String name) {

        this.name = name;

    }

    /**

     * @return the age

     */

    public int getAge() {

        return age;

    }

    /**

     * @param age the age to set

     */

    public void setAge(int age) {

        this.age = age;

    }

    /**

     * @return the sex

     */

    public String getSex() {

        return sex;

    }

    /**

     * @param sex the sex to set

     */

    public void setSex(String sex) {

        this.sex = sex;

    }

    /* (non-Javadoc)

     * @see java.lang.Object#toString()

     */

    @Override

    public String toString() {

        return "User [name=" + name + ", age=" + age + ", sex=" + sex + "]";

    }

}
加载类
package com.my.study;

import org.springframework.boot.SpringApplication;

import org.springframework.boot.autoconfigure.SpringBootApplication;

import org.springframework.boot.context.properties.EnableConfigurationProperties;

import com.my.study.model.ConfigBean;

@SpringBootApplication

@EnableConfigurationProperties(ConfigBean.class)

public class Application {

    public static void main(String[] args) {

        SpringApplication.run(Application.class, args);

    }

}
最后在Controller中引入ConfigBean使用即可,如下:
package com.my.study.controller;

import org.springframework.beans.factory.annotation.Autowired;

import org.springframework.boot.autoconfigure.SpringBootApplication;

import org.springframework.web.bind.annotation.RequestMapping;

import org.springframework.web.bind.annotation.RestController;

import com.my.study.model.ConfigBean;

@RestController

@SpringBootApplication

@RequestMapping("/user")

public class UserController {

    @Autowired

    ConfigBean configBean;

    @RequestMapping("/test")

    public Object sayHello() {

        return configBean;

    }

}
三、参数间引用
在application.properties中的各个参数之间也可以直接引用来使用,就像下面的设置:
test.stuName = Joe

test.stuSex = gril

test.allInfo = stuName:${test.stuName} stuSex:${test.stuSex}
四、使用自定义新建的配置文件
注意:@PropertySource不支持yml文件读取。
package com.my.study.model;

import org.springframework.boot.context.properties.ConfigurationProperties;

import org.springframework.context.annotation.Configuration;

import org.springframework.context.annotation.PropertySource;

@Configuration

@ConfigurationProperties(prefix ="test")

@PropertySource("classpath:config/my.properties")

public class Config {

    private String stuName;

    private String stuSex;

    /* (non-Javadoc)

     * @see java.lang.Object#toString()

     */

    @Override

    public String toString() {

        return "ConfigBean [stuName=" + stuName + ", stuSex=" + stuSex + "]";

    }

    /**

     * @return the stuName

     */

    public String getStuName() {

        return stuName;

    }

    /**

     * @param stuName the stuName to set

     */

    public void setStuName(String stuName) {

        this.stuName = stuName;

    }

    /**

     * @return the stuSex

     */

    public String getStuSex() {

        return stuSex;

    }

    /**

     * @param stuSex the stuSex to set

     */

    public void setStuSex(String stuSex) {

        this.stuSex = stuSex;

    }

}
主要就是加了一个注解:@PropertySource("classpath:config/my.properties")
Spring Boot 通过@PropertySource或者@PropertySources实现设置多配置文件
注意:@PropertySource不支持yml文件读取。
pring Boot 官网使用的是application.properties文件来实现文件的配置。但是实际情况下一个配置文件是不够用的,比如项目集成redis,mq,以及数据库比如mysql的时候,多个配置文件有利于开发及维护的管理。Spring Boot是通过@PropertySource或者@PropertySources来实现多配置文件的。首先看下@PropertySource源码:
public @interface PropertySource {
/**
* Indicate the name of this property source. If omitted, a name will
* be generated based on the description of the underlying resource.
* @see org.springframework.core.env.PropertySource#getName()
* @see org.springframework.core.io.Resource#getDescription()
*/
String name() default "";
/**
* Indicate the resource location(s) of the properties file to be loaded.
* <p>Both traditional and XML-based properties file formats are supported
* — for example, {@code "classpath:/com/myco/app.properties"}
* or {@code "file:/path/to/file.xml"}.
* <p>Resource location wildcards (e.g. **/*.properties) are not permitted;
* each location must evaluate to exactly one {@code .properties} resource.
* <p>${...} placeholders will be resolved against any/all property sources already
* registered with the {@code Environment}. See {@linkplain PropertySource above}
* for examples.
* <p>Each location will be added to the enclosing {@code Environment} as its own
* property source, and in the order declared.
*/
String[] value();
/**
* Indicate if failure to find the a {@link #value() property resource} should be
* ignored.
* <p>{@code true} is appropriate if the properties file is completely optional.
* Default is {@code false}.
* @since 4.0
*/
boolean ignoreResourceNotFound() default false;
/**
* A specific character encoding for the given resources, e.g. "UTF-8".
* @since 4.3
*/
String encoding() default "";
/**
* Specify a custom {@link PropertySourceFactory}, if any.
* <p>By default, a default factory for standard resource files will be used.
* @since 4.3
* @see org.springframework.core.io.support.DefaultPropertySourceFactory
* @see org.springframework.core.io.support.ResourcePropertySource
*/
Class<? extends PropertySourceFactory> factory() default PropertySourceFactory.class;
}
name
为这里资源指定一个名称,这个没什么好说的。
value
用于指定资源路径,注意通配符(比如/*.properties)在这里是没有用的,路径必须明确指向到一个properties文件。因为这里value的类型是String数组,因此这里可以指定多个配置文件。
ignoreResourceNotFound
是否忽略找不到指定路径的情况。
encoding
指定编码类型,默认为空。
@SpringBootApplication

@ComponentScan(basePackages = {"com.aron"})//通过扫描本路径可不需将ctl包和启动类放在同一目录下

@PropertySource(value= {"classpath:redis.properties","classpath:database.properties"}

                , name="ss"

                , encoding="utf-8"

                ,ignoreResourceNotFound=true)

public class ProjectMainEntranceApplication {

    public static void main(String[] args) {

        SpringApplication.run(ProjectMainEntranceApplication.class, args);

    }

}
而对于@PropertySources 来说,参照其源码:
public @interface PropertySources {

    PropertySource[] value();

}
我们可以看到其实就是PropertySource的数组,因此通过@PropertySources 配置方式为:
@SpringBootApplication

@ComponentScan(basePackages = { "com.aron" }) // 通过扫描本路径可不需将ctl包和启动类放在同一目录下

@PropertySources({ @PropertySource("classpath:redis.properties"),

                   @PropertySource("classpath:database.properties") })

public class ProjectMainEntranceApplication {

    public static void main(String[] args) {

        SpringApplication.run(ProjectMainEntranceApplication.class, args);

    }

}
通过@PropertySource源码解析我们就能够知道应该如何使用该注解。这里假设需要多配置两个配置文件:redis.properties和database.properties:
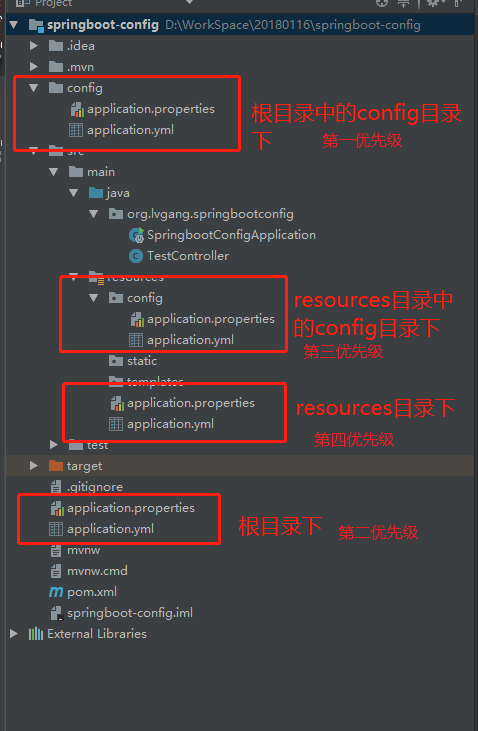
五、配置文件优先级
application.properties和application.yml文件可以放在一下四个位置:
- 外置,在相对于应用程序运行目录的/congfig子目录里。(jar包同级目录下的/config目录)
- 外置,在应用程序运行的目录里(jar包同级目录)
- 内置,在config包内
- 内置,在Classpath根目录
同样,这个列表按照优先级排序,也就是说,src/main/resources/config下application.properties覆盖src/main/resources下application.properties中相同的属性,
此外,如果你在相同优先级位置同时有application.properties和application.yml,那么application.yml里面的属性就会被application.properties里的属性覆盖。
bootstrap.properties优先于application.prperties
properties优先于yml
resources/config优先于resources/
读取顺序
如果在不同的目录中存在多个配置文件,它的读取顺序是:
1、config/application.properties(项目根目录中config目录下)
2、config/application.yml
3、application.properties(项目根目录下)
4、application.yml
5、resources/config/application.properties(项目resources目录中config目录下)
6、resources/config/application.yml
7、resources/application.properties(项目的resources目录下)
8、resources/application.yml
注:
1、如果同一个目录下,有application.yml也有application.properties,默认先读取application.properties。
2、如果同一个配置属性,在多个配置文件都配置了,默认使用第1个读取到的,后面读取的不覆盖前面读取到的。(properties继承自Hashtable不保证读取顺序,yml可以按顺序读取)
3、创建SpringBoot项目时,一般的配置文件放置在“项目的resources目录下”
六.随机值配置
配置文件中${random} 可以用来生成各种不同类型的随机值,从而简化了代码生成的麻烦,例如 生成 int 值、long 值或者 string 字符串。
dudu.secret=${random.value}

dudu.number=${random.int}

dudu.bignumber=${random.long}

dudu.uuid=${random.uuid}

dudu.number.less.than.ten=${random.int(10)}

dudu.number.in.range=${random.int[1024,65536]}
七.外部配置-命令行参数配置
Spring Boot是基于jar包运行的,打成jar包的程序可以直接通过下面命令运行:
java -jar xx.jar
可以以下命令修改tomcat端口号:
java -jar xx.jar --server.port=9090
可以看出,命令行中连续的两个减号--就是对application.properties中的属性值进行赋值的标识。
所以java -jar xx.jar --server.port=9090等价于在application.properties中添加属性server.port=9090。
如果你怕命令行有风险,可以使用SpringApplication.setAddCommandLineProperties(false)禁用它。
实际上,Spring Boot应用程序有多种设置途径,Spring Boot能从多重属性源获得属性,包括如下几种:
- 根目录下的开发工具全局设置属性(当开发工具激活时为
~/.spring-boot-devtools.properties)。 - 测试中的@TestPropertySource注解。
- 测试中的@SpringBootTest#properties注解特性。
- 命令行参数
SPRING_APPLICATION_JSON中的属性(环境变量或系统属性中的内联JSON嵌入)。ServletConfig初始化参数。ServletContext初始化参数。- java:comp/env里的JNDI属性
- JVM系统属性
- 操作系统环境变量
- 随机生成的带random.* 前缀的属性(在设置其他属性时,可以应用他们,比如${random.long})
- 应用程序以外的application.properties或者appliaction.yml文件
- 打包在应用程序内的application.properties或者appliaction.yml文件
- 通过@PropertySource标注的属性源
- 默认属性(通过
SpringApplication.setDefaultProperties指定).
这里列表按组优先级排序,也就是说,任何在高优先级属性源里设置的属性都会覆盖低优先级的相同属性,列如我们上面提到的命令行属性就覆盖了application.properties的属性。
通过命令行来修改属性值固然提供了不错的便利性,但是通过命令行就能更改应用运行的参数,那岂不是很不安全?是的,所以Spring Boot也贴心的提供了屏蔽命令行访问属性的设置,只需要这句设置就能屏蔽:SpringApplication.setAddCommandLineProperties(false)
详细参考:http://tengj.top/2017/02/28/springboot2/
八.springboot使用spring.profiles.active添加多个properties或者yml配置文件
原始配置文件application.properties内容如下:
djg.name=DJG

djg.age=22

djg.desc=${lyw.name} is a boy

#时间格式化

spring.jackson.date-format=yyyy-MM-dd HH:mm:ss
现在想要将配置文件的功能更加清晰化,thymeleaf模板引擎的配置要单独建一个配置文件,那么,可以作如下操作,在原始配置文件application.properties的首行加上”spring.profiles.active=thymeleaf”,变成如下:
spring.profiles.active=thymeleaf#多个中间用逗号隔开

djg.name=DJG

djg.age=22

djg.desc=${lyw.name} is a boy

#时间格式化

spring.jackson.date-format=yyyy-MM-dd HH:mm:ss
然后,在原始配置文件同目录下另建一个名为application-thymeleaf.propertis的配置文件。
也可以用于不同生产环境的切换
@value也可以如下使用
@RequestMapping(value = "/test", method = RequestMethod.GET)

    public ConfigData changeStr(@Value("${new.data}") String data) {

        System.out.println(data);

        return  configData ;

    }
new.data为在properties中配置的值
多环境配置
以上都不是重点,这才是重点,这才是重点,这才是重点,重要的事情说3遍。我们在开发Spring Boot应用时,通常同一套程序会被应用和安装到几个不同的环境,比如:开发、测试、生产等。其中每个环境的数据库地址、服务器端口等等配置都会不同,如果在为不同环境打包时都要频繁修改配置文件的话,那必将是个非常繁琐且容易发生错误的事。
对于多环境的配置,各种项目构建工具或是框架的基本思路是一致的,通过配置多份不同环境的配置文件,再通过打包命令指定需要打包的内容之后进行区分打包,Spring Boot也不例外,或者说更加简单。
在Spring Boot中多环境配置文件名需要满足application-{profile}.properties的格式,其中{profile}对应你的环境标识,比如:
application-dev.properties:开发环境
application-test.properties:测试环境
application-prod.properties:生产环境
至于哪个具体的配置文件会被加载,需要在application.properties文件中通过spring.profiles.active属性来设置,其值对应{profile}值。
如:spring.profiles.active=test就会加载application-test.properties
spring.profiles.include的使用

application.properties
#profiles

spring.profiles.active=test
application-test.properties
new.data=88test

spring.profiles.include=testDb,testInfo
application-testDb.properties
db=111
application-testInfo.properties
info=This is a test!
总结:

多个配置文件中有同一个值,以下情况获取值的效果:

1.启动命令不带--spring.profiles.active参数以application.properties首先启动

按顺序所有文件第一个配置的spring.profiles.active属性中指定的最后一个文件中含有该属性的值为准

如果所有文件都没有spring.profiles.active,那么以pring.profiles.include配置的最后一个属性文件中的值为准

2.启动命令带--spring.profiles.active参数以参数指定的属性文件首先启动

此情况,已命令指定的配置文件中的值为准,其他文件中再配置spring.profiles.active也不会生效,如果不存在值,那么会以pring.profiles.include指定的最后一个文件中的值为准

简要说

启动命令spring.profiles.active指定文件中的值 > 文件中spring.profiles.active指定的文件列表中最后一次出现的值 > 文件中spring.profiles.include指定的文件列表中最后一次出现的值

(注意:无论是否配置启动命令参数指定文件,最后都会加载application.properties,它里边配置的信息也很关键)
九.springboot 加载自定义yml文件
1. ConfigurationProperties注解的locations属性在1.5.X以后没有了,不能指定locations来加载yml文件
2. PropertySource注解不支持yml文件加载,详细见官方文档: https://docs.spring.io/spring-boot/docs/current/reference/htmlsingle/#boot-features-external-config-yaml-shortcomings
3. Spring Framework有两个类加载YAML文件,YamlPropertiesFactoryBean和YamlMapFactoryBean
4. 可以通过PropertySourcePlaceholderConfigurer来加载yml文件,暴露yml文件到spring environment
@Configuration

@ConfigurationProperties(ignoreUnknownFields =true)

@Component("testConfig ")

public class testConfig {

    private Map<String,String> testKey = new HashMap<>();

    public Map<String, String> gettestKey () {

        return testKey ;

    }

    public void settestKey (Map<String, String> testKey ) {

        this.testKey  = testKey ;

    }

    @Bean

    public static PropertySourcesPlaceholderConfigurer properties() {

        PropertySourcesPlaceholderConfigurer configurer = new PropertySourcesPlaceholderConfigurer();

        YamlPropertiesFactoryBean yaml = new YamlPropertiesFactoryBean();

        yaml.setResources(new ClassPathResource("xx.yml"));//class引入

        configurer.setProperties(yaml.getObject());

        return configurer;

    }

}
或者用第三方jar例如snakeyml解析,详见:
Spring Boot 中配置文件application.properties使用的更多相关文章
- Spring Boot中配置文件application.properties使用
一.配置文档配置项的调用 启动后在浏览器直接输入http://localhost:18080/user/test,就直接打印出配置文件中的配置内容. 二.绑定对象bean调用 有时候属性太多了,一个个 ...
- Spring Boot 的配置文件application.properties
Spring Boot 中的application.properties 是一个全局的配置文件,放在src/main/resources 目录下或者类路径的/config下. 作为全局配置文件的app ...
- 一:Spring Boot 的配置文件 application.properties
Spring Boot 的配置文件 application.properties 1.位置问题 2.普通的属性注入 3.类型安全的属性注入 1.位置问题 当我们创建一个 Spring Boot 工程时 ...
- 是时候搞清楚 Spring Boot 的配置文件 application.properties 了!
在 Spring Boot 中,配置文件有两种不同的格式,一个是 properties ,另一个是 yaml . 虽然 properties 文件比较常见,但是相对于 properties 而言,ya ...
- 第二篇:彻底搞清楚 Spring Boot 的配置文件 application.properties
前言 在Spring Boot中,配置文件有两种不同的格式,一个是properties,另一个是yaml. 虽然properties文件比较常见,但是相对于properties而言,yaml更加简洁明 ...
- 如果你的application.properties中还存在明文密码----加密Spring Boot中的application.properties
1 概述 什么?都2020年了还在Spring Boot的配置文件中写明文密码? 虽然是小项目,明文也没人看. 明文简单快捷方便啊!!! 你看直接用户名root密码123456多么简单!!! ... ...
- Spring boot 全局配置文件application.properties
#更改Tomcat端口号 server.port=8090 #修改进入DispatcherServlet的规则为:*.htmlserver.servlet-path=*.html#这里要注意高版本的s ...
- 【spring boot】配置文件 application.properties 属性解析
1.JPA hibernate命名策略 完整命名策略 ,查看:http://www.cnblogs.com/sxdcgaq8080/p/7910474.html 2.hibernate的DDL执行策 ...
- springboot中配置文件application.properties的理解
前言 Spring Boot使用"习惯优于配置"(项目中存在大量的配置,此外还内置了一个习惯性的配置,让你无需手动进行配置)的理念让你的项目快速运行起来.所以,我们要想把Sprin ...
随机推荐
- [EXP]K8 DotNetNuke DNNspot Store <=3.0 GetShell exploit
# Exploit Title: DotNetNuke DNNspot Store <=3.0 GetShell exploit# Date: 31/03/2015# Author: K8拉登哥 ...
- [EXP]CVE-2018-2628 Weblogic GetShell Exploit
漏洞简介 漏洞威胁:RCE--远程代码执行 漏洞组件:weblogic 影响版本:10.3.6.0.12.1.3.0.12.2.1.2.12.2.1.3 代码: # -*- coding: utf-8 ...
- [视频]K8飞刀无代码编程之生成EXP
[视频]K8飞刀无代码编程之生成EXP 链接: https://pan.baidu.com/s/1CTBUpPrW3V8sHMd8yukZ8Q 提取码: ang7
- [SDOI2006] 二进制方程
并查集水题.维护变量的对应位的相关关系,判断不确定点(自由元)的个数即可. 代码中的p数组:p[1] 值的id, p[2~k+1]每个变量的第一位的id. #include <bits/stdc ...
- C# 根据Combobox控件来动态显示TabControl下的子元素
根据下来列表来动态显示TabControl下的元素 需要准备两个控件:Combobox (命名为:cbPrjType)和 TabControl (命名为:tabPrjType),TabControl下 ...
- Sql语句出错:Unknown column 'CLAMP' in 'where clause'
严重: Servlet.service() for servlet [jsp] in context with path [/management] threw exception [javax.se ...
- CentOS安装Memcached
安装&配置 wget http://memcached.org/latest -O memcached.tar.gz tar -zxvf memcached.tar.gz cd memcach ...
- 一个复杂Json的解析
{ "website": { "1": { "basic": { "homepage": "http://py ...
- R语言实战(三)——模拟随机游走数据
一.模拟随机游走数据示例 x <- matrix(0,1000,1) for(i in 1:1000){ x[i+1] <- x[i]+rnorm(1) } plot(x,type=&qu ...
- 数据库的DevOps实践
---------------------------------------------------------------------------------------------------- ...