iOS--手势之谜
原文转至: http://www.cnblogs.com/huangjianwu/p/4675648.html
iOS在手机APP的手势操作中包含了:拖动、捏合、旋转、点按、长按、轻扫、自定义等等,详情如下:
1、UIGestureRecognizer 介绍
手势识别在 iOS 中非常重要,他极大地提高了移动设备的使用便捷性。
iOS 系统在 3.2 以后,他提供了一些常用的手势(UIGestureRecognizer 的子类),开发者可以直接使用他们进行手势操作。
UIPanGestureRecognizer(拖动)
UIPinchGestureRecognizer(捏合)
UIRotationGestureRecognizer(旋转)
UITapGestureRecognizer(点按)
UILongPressGestureRecognizer(长按)
UISwipeGestureRecognizer(轻扫)
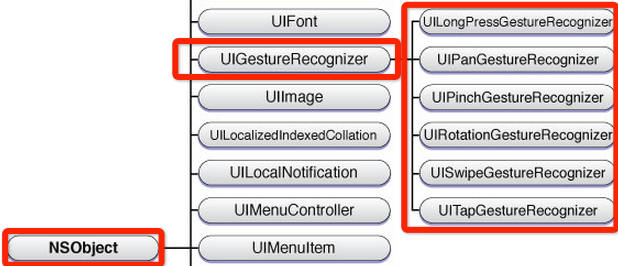
另外,可以通过继承 UIGestureRecognizer 类,实现自定义手势(手势识别器类)。
PS:自定义手势时,需要 #import <UIKit/UIGestureRecognizerSubclass.h>,一般需实现如下方法:
- (void)reset;

- (void)touchesBegan:(NSSet *)touches withEvent:(UIEvent *)event;

- (void)touchesMoved:(NSSet *)touches withEvent:(UIEvent *)event;

- (void)touchesEnded:(NSSet *)touches withEvent:(UIEvent *)event;

- (void)touchesCancelled:(NSSet *)touches withEvent:(UIEvent *)event;

//以上方法在分类 UIGestureRecognizer (UIGestureRecognizerProtected) 中声明,更多方法声明请自行查看
UIGestureRecognizer 的继承关系如下:

2、手势状态
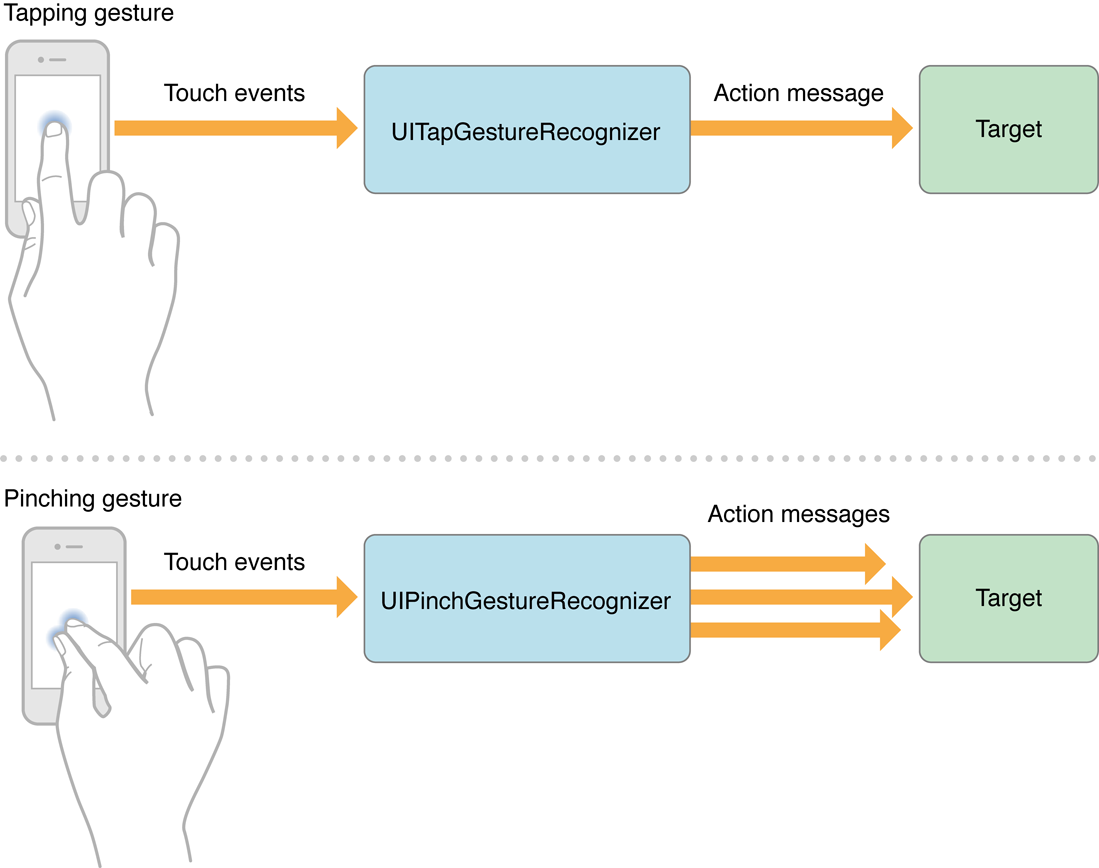
在六种手势识别中,只有一种手势是离散型手势,他就是 UITapGestureRecognizer。
离散型手势的特点就是:一旦识别就无法取消,而且只会调用一次手势操作事件(初始化手势时指定的回调方法)。
换句话说其他五种手势是连续型手势,而连续型手势的特点就是:会多次调用手势操作事件,而且在连续手势识别后可以取消手势。从下图可以看出两者调用操作事件的次数是不同的:

手势状态枚举如下:
typedef NS_ENUM(NSInteger, UIGestureRecognizerState) {

    UIGestureRecognizerStatePossible,   // 尚未识别是何种手势操作(但可能已经触发了触摸事件),默认状态

    UIGestureRecognizerStateBegan,      // 手势已经开始,此时已经被识别,但是这个过程中可能发生变化,手势操作尚未完成

    UIGestureRecognizerStateChanged,    // 手势状态发生转变

    UIGestureRecognizerStateEnded,      // 手势识别操作完成(此时已经松开手指)

    UIGestureRecognizerStateCancelled,  // 手势被取消,恢复到默认状态

    UIGestureRecognizerStateFailed,     // 手势识别失败,恢复到默认状态

    UIGestureRecognizerStateRecognized = UIGestureRecognizerStateEnded // 手势识别完成,同UIGestureRecognizerStateEnded

};
- 对于离散型手势 UITapGestureRecgnizer 要么被识别,要么失败,点按(假设点按次数设置为1,并且没有添加长按手势)下去一次不松开则此时什么也不会发生,松开手指立即识别并调用操作事件,并且状态为3(已完成)。
但是连续型手势要复杂一些,就拿旋转手势来说,如果两个手指点下去不做任何操作,此时并不能识别手势(因为我们还没旋转)但是其实已经触发了触摸开始事件,此时处于状态0;如果此时旋转会被识别,也就会调用对应的操作事件,同时状态变成1(手势开始),但是状态1只有一瞬间;紧接着状态变为2(因为我们的旋转需要持续一会),并且重复调用操作事件(如果在事件中打印状态会重复打印2);松开手指,此时状态变为3,并调用1次操作事件。
3、使用手势的步骤
使用手势很简单,分为三步:
创建手势识别器对象实例。创建时,指定一个回调方法,当手势开始,改变、或结束时,执行回调方法。
设置手势识别器对象实例的相关属性(可选部分)
添加到需要识别的 View 中。每个手势只对应一个 View,当屏幕触摸在 View 的边界内时,如果手势和预定的一样,那就会执行回调方法。
PS:一个手势只能对应一个 View,但是一个 View 可以有多个手势。建议在真机上测试这些手势,模拟器操作不太方便,可能导致认为手势失效的情况。(模拟器测试捏合和旋转手势时,按住 option 键,再用触摸板或鼠标操作)
4、举例说明
功能描述:
附加到两个图片视图 UIImageView 的有『拖动』、『捏合』、『旋转』、『点按』;
而『轻扫』和『自定义手势 KMGestureRecognizer』附加在根视图 UIView 中。
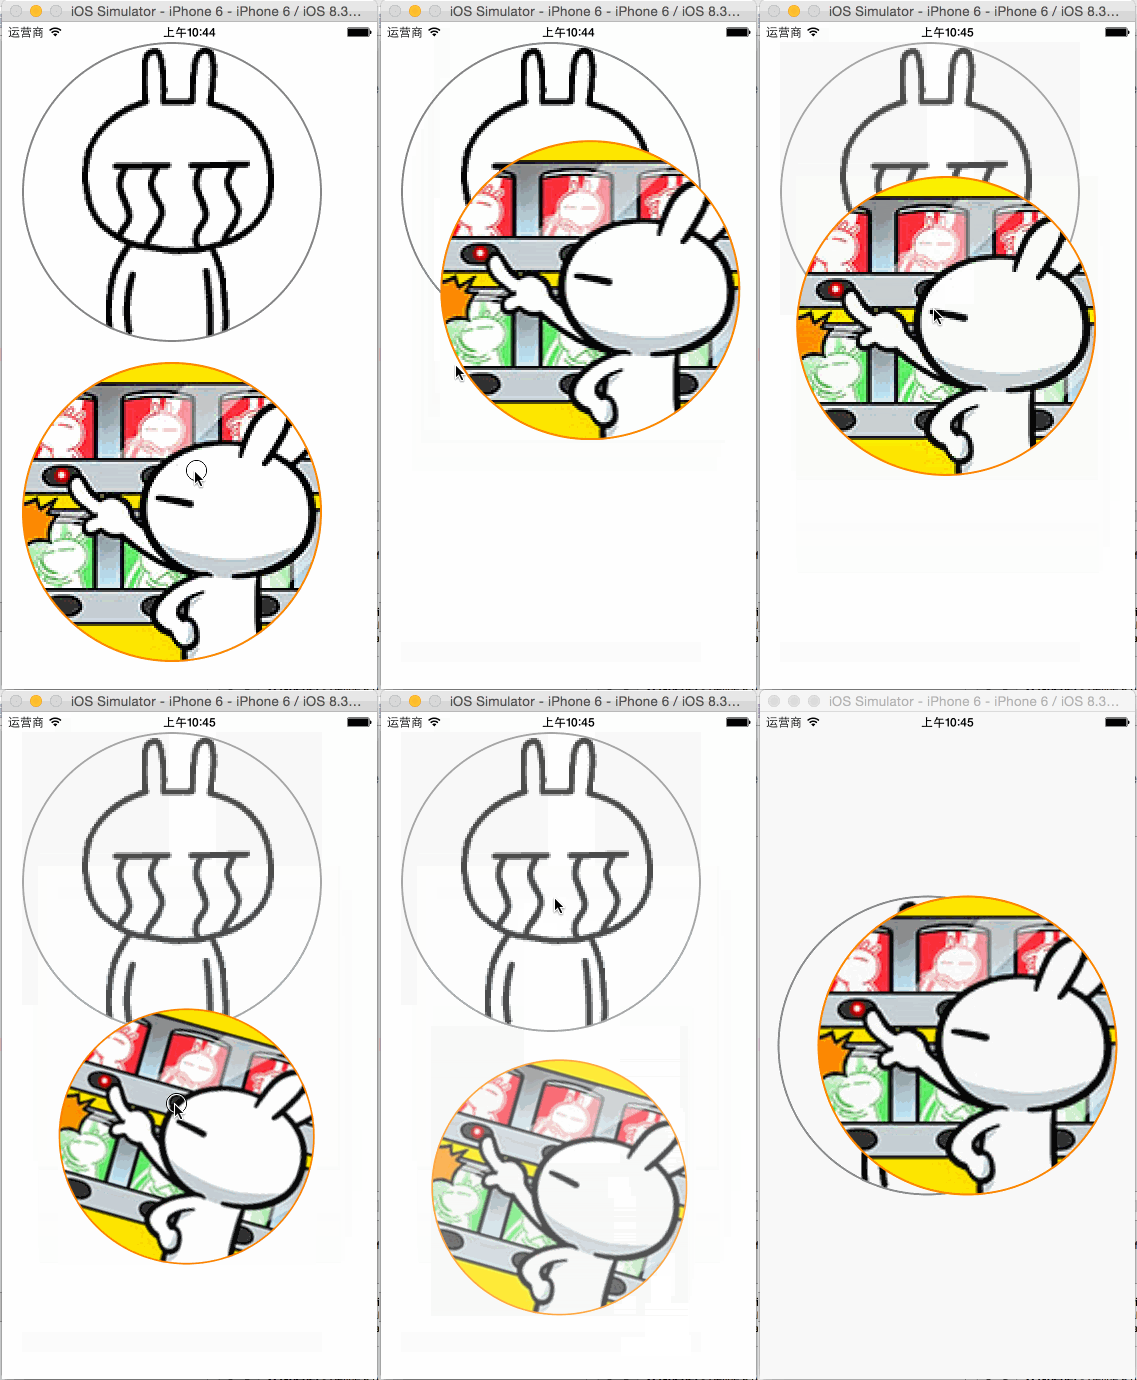
拖动:进行当前图片视图位置移动
捏合:进行当前图片视图缩放
旋转:进行当前图片视图角度旋转
点按:双击恢复当前图片视图的缩放、角度旋转、不透明度
长按:设置当前图片视图的不透明度为0.7
轻扫:左右轻扫设置两个图片视图为居中,同时以垂直居中的特定偏移量定位
自定义手势:挠痒功能,左右扫动共3次或以上,设置两个图片视图为居中,同时以水平居中的特定偏移量定位
效果如下:

KMGestureRecognizer.h
#import <UIKit/UIKit.h>

typedef NS_ENUM(NSUInteger, Direction) {

    DirectionUnknown,

    DirectionLeft,

    DirectionRight

};

@interface KMGestureRecognizer : UIGestureRecognizer

@property (assign, nonatomic) NSUInteger tickleCount; //挠痒次数

@property (assign, nonatomic) CGPoint currentTickleStart; //当前挠痒开始坐标位置

@property (assign, nonatomic) Direction lastDirection; //最后一次挠痒方向

@end
KMGestureRecognizer.m
#import "KMGestureRecognizer.h"

#import <UIKit/UIGestureRecognizerSubclass.h>

@implementation KMGestureRecognizer

#define kMinTickleSpacing 20.0

#define kMaxTickleCount 3

- (void)reset {

    _tickleCount = ;

    _currentTickleStart = CGPointZero;

    _lastDirection = DirectionUnknown;

    if (self.state == UIGestureRecognizerStatePossible) {

        self.state = UIGestureRecognizerStateFailed;

    }

}

- (void)touchesBegan:(NSSet *)touches withEvent:(UIEvent *)event {

    UITouch *touch = [touches anyObject];

    _currentTickleStart = [touch locationInView:self.view]; //设置当前挠痒开始坐标位置

}

- (void)touchesMoved:(NSSet *)touches withEvent:(UIEvent *)event {

    //『当前挠痒开始坐标位置』和『移动后坐标位置』进行 X 轴值比较,得到是向左还是向右移动

    UITouch *touch = [touches anyObject];

    CGPoint tickleEnd = [touch locationInView:self.view];

    CGFloat tickleSpacing = tickleEnd.x - _currentTickleStart.x;

    Direction currentDirection = tickleSpacing <  ? DirectionLeft : DirectionRight;

    //移动的 X 轴间距值是否符合要求,足够大

    if (ABS(tickleSpacing) >= kMinTickleSpacing) {

        //判断是否有三次不同方向的动作,如果有则手势结束,将执行回调方法

        if (_lastDirection == DirectionUnknown ||

            (_lastDirection == DirectionLeft && currentDirection == DirectionRight) ||

            (_lastDirection == DirectionRight && currentDirection == DirectionLeft)) {

            _tickleCount++;

            _currentTickleStart = tickleEnd;

            _lastDirection = currentDirection;

            if (_tickleCount >= kMaxTickleCount && self.state == UIGestureRecognizerStatePossible) {

                self.state = UIGestureRecognizerStateEnded;

                //NSLog(@"自定义手势成功,将执行回调方法");

            }

        }

    }

}

- (void)touchesEnded:(NSSet *)touches withEvent:(UIEvent *)event {

    [self reset];

}

- (void)touchesCancelled:(NSSet *)touches withEvent:(UIEvent *)event {

    [self reset];

}

@end
ViewController.h
#import <UIKit/UIKit.h>

#import "KMGestureRecognizer.h"

@interface ViewController : UIViewController

@property (strong, nonatomic) UIImageView *imgV;

@property (strong, nonatomic) UIImageView *imgV2;

@property (strong, nonatomic) KMGestureRecognizer *customGestureRecognizer;

@end
ViewController.m
#import "ViewController.h"

@interface ViewController ()

- (void)handlePan:(UIPanGestureRecognizer *)recognizer;

- (void)handlePinch:(UIPinchGestureRecognizer *)recognizer;

- (void)handleRotation:(UIRotationGestureRecognizer *)recognizer;

- (void)handleTap:(UITapGestureRecognizer *)recognizer;

- (void)handleLongPress:(UILongPressGestureRecognizer *)recognizer;

- (void)handleSwipe:(UISwipeGestureRecognizer *)recognizer;

- (void)handleCustomGestureRecognizer:(KMGestureRecognizer *)recognizer;

- (void)bindPan:(UIImageView *)imgVCustom;

- (void)bindPinch:(UIImageView *)imgVCustom;

- (void)bindRotation:(UIImageView *)imgVCustom;

- (void)bindTap:(UIImageView *)imgVCustom;

- (void)bindLongPress:(UIImageView *)imgVCustom;

- (void)bindSwipe;

- (void)bingCustomGestureRecognizer;

- (void)layoutUI;

@end

@implementation ViewController

- (void)viewDidLoad {

    [super viewDidLoad];

    [self layoutUI];

}

- (void)didReceiveMemoryWarning {

    [super didReceiveMemoryWarning];

    // Dispose of any resources that can be recreated.

}

#pragma mark - 处理手势操作

/**

 *  处理拖动手势

 *

 *  @param recognizer 拖动手势识别器对象实例

 */

- (void)handlePan:(UIPanGestureRecognizer *)recognizer {

    //视图前置操作

    [recognizer.view.superview bringSubviewToFront:recognizer.view];

    CGPoint center = recognizer.view.center;

    CGFloat cornerRadius = recognizer.view.frame.size.width / ;

    CGPoint translation = [recognizer translationInView:self.view];

    //NSLog(@"%@", NSStringFromCGPoint(translation));

    recognizer.view.center = CGPointMake(center.x + translation.x, center.y + translation.y);

    [recognizer setTranslation:CGPointZero inView:self.view];

    if (recognizer.state == UIGestureRecognizerStateEnded) {

        //计算速度向量的长度,当他小于200时,滑行会很短

        CGPoint velocity = [recognizer velocityInView:self.view];

        CGFloat magnitude = sqrtf((velocity.x * velocity.x) + (velocity.y * velocity.y));

        CGFloat slideMult = magnitude / ;

        //NSLog(@"magnitude: %f, slideMult: %f", magnitude, slideMult); //e.g. 397.973175, slideMult: 1.989866

        //基于速度和速度因素计算一个终点

        float slideFactor = 0.1 * slideMult;

        CGPoint finalPoint = CGPointMake(center.x + (velocity.x * slideFactor),

                                         center.y + (velocity.y * slideFactor));

        //限制最小[cornerRadius]和最大边界值[self.view.bounds.size.width - cornerRadius],以免拖动出屏幕界限

        finalPoint.x = MIN(MAX(finalPoint.x, cornerRadius),

                           self.view.bounds.size.width - cornerRadius);

        finalPoint.y = MIN(MAX(finalPoint.y, cornerRadius),

                           self.view.bounds.size.height - cornerRadius);

        //使用 UIView 动画使 view 滑行到终点

        [UIView animateWithDuration:slideFactor*

                              delay:

                            options:UIViewAnimationOptionCurveEaseOut

                         animations:^{

                             recognizer.view.center = finalPoint;

                         }

                         completion:nil];

    }

}

/**

 *  处理捏合手势

 *

 *  @param recognizer 捏合手势识别器对象实例

 */

- (void)handlePinch:(UIPinchGestureRecognizer *)recognizer {

    CGFloat scale = recognizer.scale;

    recognizer.view.transform = CGAffineTransformScale(recognizer.view.transform, scale, scale); //在已缩放大小基础下进行累加变化;区别于:使用 CGAffineTransformMakeScale 方法就是在原大小基础下进行变化

    recognizer.scale = 1.0;

}

/**

 *  处理旋转手势

 *

 *  @param recognizer 旋转手势识别器对象实例

 */

- (void)handleRotation:(UIRotationGestureRecognizer *)recognizer {

    recognizer.view.transform = CGAffineTransformRotate(recognizer.view.transform, recognizer.rotation);

    recognizer.rotation = 0.0;

}

/**

 *  处理点按手势

 *

 *  @param recognizer 点按手势识别器对象实例

 */

- (void)handleTap:(UITapGestureRecognizer *)recognizer {

    UIView *view = recognizer.view;

    view.transform = CGAffineTransformMakeScale(1.0, 1.0);

    view.transform = CGAffineTransformMakeRotation(0.0);

    view.alpha = 1.0;

}

/**

 *  处理长按手势

 *

 *  @param recognizer 点按手势识别器对象实例

 */

- (void)handleLongPress:(UILongPressGestureRecognizer *)recognizer {

    //长按的时候,设置不透明度为0.7

    recognizer.view.alpha = 0.7;

}

/**

 *  处理轻扫手势

 *

 *  @param recognizer 轻扫手势识别器对象实例

 */

- (void)handleSwipe:(UISwipeGestureRecognizer *)recognizer {

    //代码块方式封装操作方法

    void (^positionOperation)() = ^() {

        CGPoint newPoint = recognizer.view.center;

        newPoint.y -= 20.0;

        _imgV.center = newPoint;

        newPoint.y += 40.0;

        _imgV2.center = newPoint;

    };

    //根据轻扫方向,进行不同控制

    switch (recognizer.direction) {

        case UISwipeGestureRecognizerDirectionRight: {

            positionOperation();

            break;

        }

        case UISwipeGestureRecognizerDirectionLeft: {

            positionOperation();

            break;

        }

        case UISwipeGestureRecognizerDirectionUp: {

            break;

        }

        case UISwipeGestureRecognizerDirectionDown: {

            break;

        }

    }

}

/**

 *  处理自定义手势

 *

 *  @param recognizer 自定义手势识别器对象实例

 */

- (void)handleCustomGestureRecognizer:(KMGestureRecognizer *)recognizer {

    //代码块方式封装操作方法

    void (^positionOperation)() = ^() {

        CGPoint newPoint = recognizer.view.center;

        newPoint.x -= 20.0;

        _imgV.center = newPoint;

        newPoint.x += 40.0;

        _imgV2.center = newPoint;

    };

    positionOperation();

}

#pragma mark - 绑定手势操作

/**

 *  绑定拖动手势

 *

 *  @param imgVCustom 绑定到图片视图对象实例

 */

- (void)bindPan:(UIImageView *)imgVCustom {

    UIPanGestureRecognizer *recognizer = [[UIPanGestureRecognizer alloc] initWithTarget:self

                                                                                 action:@selector(handlePan:)];

    [imgVCustom addGestureRecognizer:recognizer];

}

/**

 *  绑定捏合手势

 *

 *  @param imgVCustom 绑定到图片视图对象实例

 */

- (void)bindPinch:(UIImageView *)imgVCustom {

    UIPinchGestureRecognizer *recognizer = [[UIPinchGestureRecognizer alloc] initWithTarget:self

                                                                                     action:@selector(handlePinch:)];

    [imgVCustom addGestureRecognizer:recognizer];

    //[recognizer requireGestureRecognizerToFail:imgVCustom.gestureRecognizers.firstObject];

}

/**

 *  绑定旋转手势

 *

 *  @param imgVCustom 绑定到图片视图对象实例

 */

- (void)bindRotation:(UIImageView *)imgVCustom {

    UIRotationGestureRecognizer *recognizer = [[UIRotationGestureRecognizer alloc] initWithTarget:self

                                                                                           action:@selector(handleRotation:)];

    [imgVCustom addGestureRecognizer:recognizer];

}

/**

 *  绑定点按手势

 *

 *  @param imgVCustom 绑定到图片视图对象实例

 */

- (void)bindTap:(UIImageView *)imgVCustom {

    UITapGestureRecognizer *recognizer = [[UITapGestureRecognizer alloc] initWithTarget:self

                                                                                 action:@selector(handleTap:)];

    //使用一根手指双击时,才触发点按手势识别器

    recognizer.numberOfTapsRequired = ;

    recognizer.numberOfTouchesRequired = ;

    [imgVCustom addGestureRecognizer:recognizer];

}

/**

 *  绑定长按手势

 *

 *  @param imgVCustom 绑定到图片视图对象实例

 */

- (void)bindLongPress:(UIImageView *)imgVCustom {

    UILongPressGestureRecognizer *recognizer = [[UILongPressGestureRecognizer alloc] initWithTarget:self action:@selector(handleLongPress:)];

    recognizer.minimumPressDuration = 0.5; //设置最小长按时间;默认为0.5秒

    [imgVCustom addGestureRecognizer:recognizer];

}

/**

 *  绑定轻扫手势;支持四个方向的轻扫,但是不同的方向要分别定义轻扫手势

 */

- (void)bindSwipe {

    //向右轻扫手势

    UISwipeGestureRecognizer *recognizer = [[UISwipeGestureRecognizer alloc] initWithTarget:self

                                                                                     action:@selector(handleSwipe:)];

    recognizer.direction = UISwipeGestureRecognizerDirectionRight; //设置轻扫方向;默认是 UISwipeGestureRecognizerDirectionRight,即向右轻扫

    [self.view addGestureRecognizer:recognizer];

    [recognizer requireGestureRecognizerToFail:_customGestureRecognizer]; //设置以自定义挠痒手势优先识别

    //向左轻扫手势

    recognizer = [[UISwipeGestureRecognizer alloc] initWithTarget:self

                                                           action:@selector(handleSwipe:)];

    recognizer.direction = UISwipeGestureRecognizerDirectionLeft;

    [self.view addGestureRecognizer:recognizer];

    [recognizer requireGestureRecognizerToFail:_customGestureRecognizer]; //设置以自定义挠痒手势优先识别

}

/**

 *  绑定自定义挠痒手势;判断是否有三次不同方向的动作,如果有则手势结束,将执行回调方法

 */

- (void)bingCustomGestureRecognizer {

    //当 recognizer.state 为 UIGestureRecognizerStateEnded 时,才执行回调方法 handleCustomGestureRecognizer:

    //_customGestureRecognizer = [KMGestureRecognizer new];

    _customGestureRecognizer = [[KMGestureRecognizer alloc] initWithTarget:self

                                                                    action:@selector(handleCustomGestureRecognizer:)];

    [self.view addGestureRecognizer:_customGestureRecognizer];

}

- (void)layoutUI {

    //图片视图 _imgV

    UIImage *img = [UIImage imageNamed:@"Emoticon_tusiji_icon"];

    CGFloat cornerRadius = img.size.width;

    _imgV = [[UIImageView alloc] initWithImage:img];

    _imgV.frame = CGRectMake(20.0, 20.0,

                             cornerRadius * , cornerRadius * );

    _imgV.userInteractionEnabled = YES;

    _imgV.layer.masksToBounds = YES;

    _imgV.layer.cornerRadius = cornerRadius;

    _imgV.layer.borderWidth = 2.0;

    _imgV.layer.borderColor = [UIColor grayColor].CGColor;

    [self.view addSubview:_imgV];

    //图片视图 _imgV2

    img = [UIImage imageNamed:@"Emoticon_tusiji_icon2"];

    cornerRadius = img.size.width;

    _imgV2 = [[UIImageView alloc] initWithImage:img];

    _imgV2.frame = CGRectMake(20.0, 40.0 + _imgV.frame.size.height,

                              cornerRadius * , cornerRadius * );

    _imgV2.userInteractionEnabled = YES;

    _imgV2.layer.masksToBounds = YES;

    _imgV2.layer.cornerRadius = cornerRadius;

    _imgV2.layer.borderWidth = 2.0;

    _imgV2.layer.borderColor = [UIColor orangeColor].CGColor;

    [self.view addSubview:_imgV2];

    [self bindPan:_imgV];

    [self bindPinch:_imgV];

    [self bindRotation:_imgV];

    [self bindTap:_imgV];

    [self bindLongPress:_imgV];

    [self bindPan:_imgV2];

    [self bindPinch:_imgV2];

    [self bindRotation:_imgV2];

    [self bindTap:_imgV2];

    [self bindLongPress:_imgV2];

    //为了处理手势识别优先级的问题,这里需先绑定自定义挠痒手势

    [self bingCustomGestureRecognizer];

    [self bindSwipe];

}

@end
iOS--手势之谜的更多相关文章
- ios手势
iOS 手势操作:拖动.捏合.旋转.点按.长按.轻扫.自定义 大 中 小 1.UIGestureRecognizer 介绍 手势识别在 iOS 中非常重要,他极大地提高了移动设备的使用便捷性. i ...
- iOS手势学习UIGestureRecognizer & cocos2d 手势推荐
iOS手势学习UIGestureRecognizer & cocos2d 手势推荐 手势识别类型: UILongPressGestureRecognizer // 长按UIPanGestur ...
- iOS手势处理
iOS手势处理 iOS手势有着如下几种: UITapGestureRecognizer UIPinchGestureRecognizer UIRotationGestureRecognizer UIS ...
- iOS 手势识别器概述
手势识别器 iOS 手势识别器(UIGestureRecognizer) 点击手势(UITapGestureRecognizer) 滑动手势(UISwipeGestureRecognizer) 旋转手 ...
- swift 实现iOS手势密码、指纹密码、faceID
本博客包含了如何实现iOS手势密码.指纹密码.faceID全步骤,包括了完整的代码. 先附上demo地址https://github.com/Liuyubao/LYBTouchID,支持swift3. ...
- iOS手势解锁、指纹解锁--Swift代码
一.手势密码 1. 1.1.用UIButton组成手势的节点. 1.2.当手指接触屏幕时,调用重写的 touchesBegan:withEvent方法(在touchesBegan里调用setNeeds ...
- IOS 手势-轻点、触摸、手势、事件
1.概念 手势是从你用一个或多个手指接触屏幕时开始,直到手指离开屏幕为止所发生的所有事件.无论手势持续多长时间,只要一个或多个手指仍在屏幕上,这个手势就存在. 触摸是指把手指放到IOS设备的屏幕上,从 ...
- IOS 手势详解
在IOS中手势可以让用户有很好的体验,因此我们有必要去了解一下手势. (在设置手势是有很多值得注意的地方) *是需要设置为Yes的点击无法响应* *要把手势添加到所需点击的View,否则无法响应* 手 ...
- iOS 手势操作:拖动、捏合、旋转、点按、长按、轻扫、自定义
1.UIGestureRecognizer 介绍 手势识别在 iOS 中非常重要,他极大地提高了移动设备的使用便捷性. iOS 系统在 3.2 以后,他提供了一些常用的手势(UIGestureReco ...
- IOS 手势事件的冲突
关于手操作需要强调几点: UIImageView默认是不支持交互的,也就是userInteractionEnabled=NO ,因此要接收触摸事件(手势识别),必须设置userInteractionE ...
随机推荐
- 【开源】OSharp框架解说系列(1):总体设计及系列导航
系列文章导航 [开源]OSharp框架解说系列(1):总体设计 [开源]OSharp框架解说系列(2.1):EasyUI的后台界面搭建及极致重构 [开源]OSharp框架解说系列(2.2):EasyU ...
- Android标题栏最右边添加按钮
step1:重写activity的onCreateOptionsMenu方法 @Override public boolean onCreateOptionsMenu(Menu menu){ Menu ...
- ES6 - Note2:解构赋值
ES6的解构赋值就是利用模式匹配从按照一定模式的数组或者对象中提取值赋值给变量. 1.数组的解构赋值 在ES6以前,变量的赋值是直接指定的,以后可以这么来写,如下所示 let [a,b,c] = [1 ...
- 如何利用Oracle外部表导入文本文件的数据
同事最近在忙数据一致性比对工作,需要对不同文本文件中的数据进行比对,有的文件较大,记录较多,如果用普通的文本编辑器打开的话,很显然,会很卡,甚至打不开. 基于此,可将该文本文件的数据导入到数据库中,在 ...
- 升级 Visual Studio 2015 CTP 5 的坑、坑、坑
前两天,微软发布了 Visual Studio 2015 CTP 5,全称为 Visual Studio 2015 Community Technology Preview 5,意为社区技术预览版,之 ...
- 【记录】VS2012新建MVC3/MVC4项目时,报:此模板尝试加载组件程序集“NuGet.VisualStudio.Interop...”
最近电脑装了 VisualStudio "14" CTP,由于把其他版本的 VS 卸掉,由高到低版本安装,当时安装完 VisualStudio "14" CTP ...
- Lua 学习笔记(六)迭代器
一.迭代器的定义 “迭代器”就是一种可以遍历一种集合中所有元素的机制.在Lua中迭代器以函数的形式表示,即没掉用一次函数,即可返回集合中的“下一个”元素.迭代器的实现可以借助于闭合函数实现, ...
- Java 线程池框架核心代码分析--转
原文地址:http://www.codeceo.com/article/java-thread-pool-kernal.html 前言 多线程编程中,为每个任务分配一个线程是不现实的,线程创建的开销和 ...
- 数据库join方式分析
前言 不管是博客园还是CSDN,看到很多朋友对数据库的理解.认识还是没有突破一个瓶颈 ,而这个瓶颈往往只是一层窗纸,越过了你将看到一个新世界. 04.05年做项目的时候,用SQL Serv ...
- Spring-Boot - 初步搭建
official document:http://projects.spring.io/spring-boot/ 项目代码: https://github.com/chenxing12/springb ...
