WPF中的简单水动画
原文 https://stuff.seans.com/2008/08/21/simple-water-animation-in-wpf/
很多年前(80年代中期),我在一家拥有Silicon Graphics工作站的公司工作。在旨在展示SGI机器高端图形的少数演示中,有一个模拟了一个小线框网格中的波传播。通过更改网格中的点的高度然后让模拟运行来玩游戏非常有趣。并且SGI机器足够快,结果动画只是令人着迷。
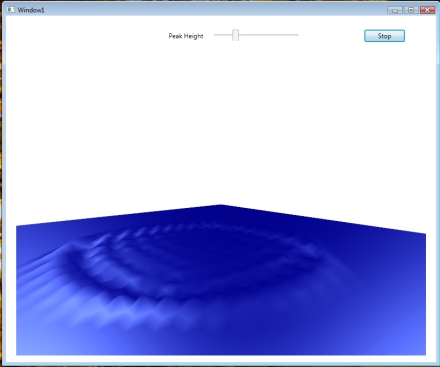
在WPF中重新创建这个水模拟似乎是一个很好的方式来学习WPF中的3D图形。(最终结果在这里)。
第一步是找到一种模拟水中波传播的算法。事实证明,有一种非常简单的算法可以简单地通过获取相邻点的平均高度来实现期望的效果。在2D Water上的文章中详细描述了基本算法。“ 水效应解释”中也描述了相同的算法。
下一步是设置3D视口及其组成元素。我使用了两种不同的定向灯,在水面上创造了更多的对比度,同时为水面定义了漫反射和镜面反射材料特性。
这是相关的XAML。请注意,meshMain是包含水面的网格。
|
1
2
3
4
五
6
7
8
9
10
11
12
13
14
15
16
17
18
19
20
21
22
23
24
25
26
27
28
29
三十
31
32
33
34
35
36
37
38
39
40
41
|
<Viewport3D Name="viewport3D1" Margin="0,8.181,0,0" Grid.Row="1"> <Viewport3D.Camera> <PerspectiveCamera x:Name="camMain" Position="48 7.8 41" LookDirection="-48 -7.8 -41" FarPlaneDistance="100" UpDirection="0,1,0" NearPlaneDistance="1" FieldOfView="70"> </PerspectiveCamera> </Viewport3D.Camera> <ModelVisual3D x:Name="vis3DLighting"> <ModelVisual3D.Content> <DirectionalLight x:Name="dirLightMain" Direction="2, -2, 0"/> </ModelVisual3D.Content> </ModelVisual3D> <ModelVisual3D> <ModelVisual3D.Content> <DirectionalLight Direction="0, -2, 2"/> </ModelVisual3D.Content> </ModelVisual3D> <ModelVisual3D> <ModelVisual3D.Content> <GeometryModel3D x:Name="gmodMain"> <GeometryModel3D.Geometry> <MeshGeometry3D x:Name="meshMain" > </MeshGeometry3D> </GeometryModel3D.Geometry> <GeometryModel3D.Material> <MaterialGroup> <DiffuseMaterial x:Name="matDiffuseMain"> <DiffuseMaterial.Brush> <SolidColorBrush Color="DarkBlue"/> </DiffuseMaterial.Brush> </DiffuseMaterial> <SpecularMaterial SpecularPower="24"> <SpecularMaterial.Brush> <SolidColorBrush Color="LightBlue"/> </SpecularMaterial.Brush> </SpecularMaterial> </MaterialGroup> </GeometryModel3D.Material> </GeometryModel3D> </ModelVisual3D.Content> </ModelVisual3D></Viewport3D> |
接下来,我们创建一个WaveGrid类,实现上述基本算法。基本思想是我们维护两个独立的网格数据缓冲区 - 一个表示水的当前状态,一个表示先前状态。 WaveGrid将此数据存储在两个Point3DCollection对象中。在我们运行模拟时,我们交替使用哪个缓冲区并将我们的MeshGeometry3D.Positions属性附加到最新的缓冲区。请注意,我们只是改变点的垂直高度 - 即Y值。
WaveGrid还建立了对网格的三角形索引,在Int32Collection这也将可以连接到我们的MeshGeometry3D。
所有有趣的东西都发生在ProcessWater中。这是我们实现文章中描述的平滑算法的地方。由于我想要对网格中的每个点进行完全动画处理,因此我不仅处理了具有四个相邻点的内部点,而且还处理了网格边缘上的点。当我们添加相邻点的高度值时,我们会跟踪我们找到的邻居数量,以便我们可以正确地进行平均。
每个点的最终值是平滑(邻居的平均高度)和“速度”的函数,它基本上是 - 在最后一次迭代期间距离均衡的距离是多少?然后我们还应用阻尼因子,因为波将逐渐失去其幅度。
这是WaveGrid类的完整代码:
|
1
2
3
4
五
6
7
8
9
10
11
12
13
14
15
16
17
18
19
20
21
22
23
24
25
26
27
28
29
三十
31
32
33
34
35
36
37
38
39
40
41
42
43
44
45
46
47
48
49
50
51
52
53
54
55
56
57
58
59
60
61
62
63
64
65
66
67
68
69
70
71
72
73
74
75
76
77
78
79
80
81
82
83
84
85
86
87
88
89
90
91
92
93
94
95
96
97
98
99
100
101
102
103
104
105
106
107
108
109
110
111
112
113
114
115
116
117
118
119
120
121
122
123
124
125
126
127
128
129
130
131
132
133
134
135
136
137
138
139
140
141
142
143
144
145
146
147
148
149
150
151
152
153
154
155
156
157
158
159
160
161
162
163
164
165
166
167
168
169
170
171
172
173
174
175
176
177
178
179
180
181
182
183
184
185
186
187
188
189
190
191
192
193
194
195
196
197
198
199
200
201
202
203
204
205
206
207
208
209
210
211
212
213
214
215
216
217
218
219
220
221
222
223
224
225
226
227
228
229
230
231
232
233
234
235
236
237
238
239
240
241
242
243
244
245
246
247
248
249
250
251
252
253
254
255
256
257
258
259
260
261
262
263
264
265
266
267
268
269
270
271
272
273
274
275
276
277
278
279
280
281
282
283
284
285
286
287
288
289
290
291
292
293
294
295
296
297
298
299
300
301
302
303
304
305
306
307
308
309
310
311
312
313
314
315
316
317
318
319
320
321
322
323
324
325
326
327
328
329
330
331
332
333
334
335
336
337
338
339
340
341
342
343
344
345
346
347
348
349
350
351
|
using System;using System.Collections.Generic;using System.Linq;using System.Text;using System.Windows.Media;using System.Windows.Media.Media3D;namespace WaveSim{ class WaveGrid { // Constants const int MinDimension = 5; const double Damping = 0.96; const double SmoothingFactor = 2.0; // Gives more weight to smoothing than to velocity // Private member data private Point3DCollection _ptBuffer1; private Point3DCollection _ptBuffer2; private Int32Collection _triangleIndices; private int _dimension; // Pointers to which buffers contain: // - Current: Most recent data // - Old: Earlier data // These two pointers will swap, pointing to ptBuffer1/ptBuffer2 as we cycle the buffers private Point3DCollection _currBuffer; private Point3DCollection _oldBuffer; /// <summary> /// Construct new grid of a given dimension /// </summary> ///<param name="Dimension"></param> public WaveGrid(int Dimension) { if (Dimension < MinDimension) throw new ApplicationException(string.Format("Dimension must be at least {0}", MinDimension.ToString())); _ptBuffer1 = new Point3DCollection(Dimension * Dimension); _ptBuffer2 = new Point3DCollection(Dimension * Dimension); _triangleIndices = new Int32Collection((Dimension - 1) * (Dimension - 1) * 2); _dimension = Dimension; InitializePointsAndTriangles(); _currBuffer = _ptBuffer2; _oldBuffer = _ptBuffer1; } /// <summary> /// Access to underlying grid data /// </summary> public Point3DCollection Points { get { return _currBuffer; } } /// <summary> /// Access to underlying triangle index collection /// </summary> public Int32Collection TriangleIndices { get { return _triangleIndices; } } /// <summary> /// Dimension of grid--same dimension for both X & Y /// </summary> public int Dimension { get { return _dimension; } } /// <summary> /// Set center of grid to some peak value (high point). Leave /// rest of grid alone. Note: If dimension is even, we're not /// exactly at the center of the grid--no biggie. /// </summary> ///<param name="PeakValue"></param> public void SetCenterPeak(double PeakValue) { int nCenter = (int)_dimension / 2; // Change data in oldest buffer, then make newest buffer // become oldest by swapping Point3D pt = _oldBuffer[(nCenter * _dimension) + nCenter]; pt.Y = (int)PeakValue; _oldBuffer[(nCenter * _dimension) + nCenter] = pt; SwapBuffers(); } /// <summary> /// Leave buffers in place, but change notation of which one is most recent /// </summary> private void SwapBuffers() { Point3DCollection temp = _currBuffer; _currBuffer = _oldBuffer; _oldBuffer = temp; } /// <summary> /// Clear out points/triangles and regenerates /// </summary> ///<param name="grid"></param> private void InitializePointsAndTriangles() { _ptBuffer1.Clear(); _ptBuffer2.Clear(); _triangleIndices.Clear(); int nCurrIndex = 0; // March through 1-D arrays for (int row = 0; row < _dimension; row++) { for (int col = 0; col < _dimension; col++) { // In grid, X/Y values are just row/col numbers _ptBuffer1.Add(new Point3D(col, 0.0, row)); // Completing new square, add 2 triangles if ((row > 0) && (col > 0)) { // Triangle 1 _triangleIndices.Add(nCurrIndex - _dimension - 1); _triangleIndices.Add(nCurrIndex); _triangleIndices.Add(nCurrIndex - _dimension); // Triangle 2 _triangleIndices.Add(nCurrIndex - _dimension - 1); _triangleIndices.Add(nCurrIndex - 1); _triangleIndices.Add(nCurrIndex); } nCurrIndex++; } } // 2nd buffer exists only to have 2nd set of Z values _ptBuffer2 = _ptBuffer1.Clone(); } /// <summary> /// Determine next state of entire grid, based on previous two states. /// This will have the effect of propagating ripples outward. /// </summary> public void ProcessWater() { // Note that we write into old buffer, which will then become our // "current" buffer, and current will become old. // I.e. What starts out in _currBuffer shifts into _oldBuffer and we // write new data into _currBuffer. But because we just swap pointers, // we don't have to actually move data around. // When calculating data, we don't generate data for the cells around // the edge of the grid, because data smoothing looks at all adjacent // cells. So instead of running [0,n-1], we run [1,n-2]. double velocity; // Rate of change from old to current double smoothed; // Smoothed by adjacent cells double newHeight; int neighbors; int nPtIndex = 0; // Index that marches through 1-D point array // Remember that Y value is the height (the value that we're animating) for (int row = 0; row < _dimension ; row++) { for (int col = 0; col < _dimension; col++) { velocity = -1.0 * _oldBuffer[nPtIndex].Y; // row, col smoothed = 0.0; neighbors = 0; if (row > 0) // row-1, col { smoothed += _currBuffer[nPtIndex - _dimension].Y; neighbors++; } if (row < (_dimension - 1)) // row+1, col { smoothed += _currBuffer[nPtIndex + _dimension].Y; neighbors++; } if (col > 0) // row, col-1 { smoothed += _currBuffer[nPtIndex - 1].Y; neighbors++; } if (col < (_dimension - 1)) // row, col+1 { smoothed += _currBuffer[nPtIndex + 1].Y; neighbors++; } // Will always have at least 2 neighbors smoothed /= (double)neighbors; // New height is combination of smoothing and velocity newHeight = smoothed * SmoothingFactor + velocity; // Damping newHeight = newHeight * Damping; // We write new data to old buffer Point3D pt = _oldBuffer[nPtIndex]; pt.Y = newHeight; // row, col _oldBuffer[nPtIndex] = pt; nPtIndex++; } } SwapBuffers(); } }}[/sourcecode]Finally, we need to hook everything up. When our main window fires up, we create an instance of <strong>WaveGrid </strong>and set the center point in the grid to some peak value. When we start the animation, this higher point will fall and trigger the waves.We do all of the animation in the <strong>CompositionTarget.Rendering </strong>event handler. This is the recommended spot to do custom animations in WPF, as opposed to doing the animation in some timer Tick event. (<em>Windows Presentation Foundation Unleashed</em>, Nathan, pg 470).When you attach a handler to the <strong>Rendering </strong>event, WPF just continues rendering frames indefinitely. One problem is that the handler will get called for every frame rendered, which turns out to be too fast for our water animation. To get the water to look right, we keep track of the time that we last rendered a frame and then wait a specified number of milliseconds before rendering another.Here is the full source code for Window1.xaml.cs:using System;using System.Collections.Generic;using System.Diagnostics;using System.Linq;using System.Text;using System.Windows;using System.Windows.Controls;using System.Windows.Data;using System.Windows.Documents;using System.Windows.Input;using System.Windows.Media;using System.Windows.Media.Media3D;using System.Windows.Media.Imaging;using System.Windows.Navigation;using System.Windows.Shapes;using System.Windows.Threading;namespace WaveSim{ /// <summary> /// Interaction logic for Window1.xaml /// </summary> public partial class Window1 : Window { private Vector3D zoomDelta; private WaveGrid _grid; private bool _rendering; private double _lastTimeRendered; private double _firstPeak = 6.5; // Values to try: // GridSize=20, RenderPeriod=125 // GridSize=50, RenderPeriod=50 private const int GridSize = 50; private const double RenderPeriodInMS = 50; public Window1() { InitializeComponent(); _grid = new WaveGrid(GridSize); // 10x10 grid slidPeakHeight.Value = _firstPeak; _grid.SetCenterPeak(_firstPeak); meshMain.Positions = _grid.Points; meshMain.TriangleIndices = _grid.TriangleIndices; // On each WheelMouse change, we zoom in/out a particular % of the original distance const double ZoomPctEachWheelChange = 0.02; zoomDelta = Vector3D.Multiply(ZoomPctEachWheelChange, camMain.LookDirection); } private void Window_MouseWheel(object sender, MouseWheelEventArgs e) { if (e.Delta > 0) // Zoom in camMain.Position = Point3D.Add(camMain.Position, zoomDelta); else // Zoom out camMain.Position = Point3D.Subtract(camMain.Position, zoomDelta); Trace.WriteLine(camMain.Position.ToString()); } // Start/stop animation private void btnStart_Click(object sender, RoutedEventArgs e) { if (!_rendering) { _grid = new WaveGrid(GridSize); // 10x10 grid _grid.SetCenterPeak(_firstPeak); meshMain.Positions = _grid.Points; _lastTimeRendered = 0.0; CompositionTarget.Rendering += new EventHandler(CompositionTarget_Rendering); btnStart.Content = "Stop"; slidPeakHeight.IsEnabled = false; _rendering = true; } else { CompositionTarget.Rendering -= new EventHandler(CompositionTarget_Rendering); btnStart.Content = "Start"; slidPeakHeight.IsEnabled = true; _rendering = false; } } void CompositionTarget_Rendering(object sender, EventArgs e) { RenderingEventArgs rargs = (RenderingEventArgs)e; if ((rargs.RenderingTime.TotalMilliseconds - _lastTimeRendered) > RenderPeriodInMS) { // Unhook Positions collection from our mesh, for performance meshMain.Positions = null; // Do the next iteration on the water grid, propagating waves _grid.ProcessWater(); // Then update our mesh to use new Z values meshMain.Positions = _grid.Points; _lastTimeRendered = rargs.RenderingTime.TotalMilliseconds; } } private void slidPeakHeight_ValueChanged(object sender, RoutedPropertyChangedEventArgs<double> e) { _firstPeak = slidPeakHeight.Value; _grid.SetCenterPeak(_firstPeak); } }} |
最终的结果非常令人满意 - 从最初的干扰中传播出来的一系列涟漪的平滑动画。您可以单击此处安装并运行模拟。请注意,您可以使用鼠标滚轮放大/缩小。
我们可以通过几种不同的方式扩展这个例子:
- 以更逼真的方式渲染水面 - 例如玻璃状,带有反射。
- 添加简单控件以更改视点或旋转网格本身
- 添加旋钮用于玩Damping和SmoothingFactor之类的东西
- 添加使用鼠标“抓取”网格中的点并手动向上/向下移动它们的功能
- 雨滴模拟 - 只需添加定时器,引入新的随机峰值,代表雨滴
- 抗锯齿 - 也将对角相邻的点视为邻居,但在平均时通过加权因子进行调整
WPF中的简单水动画的更多相关文章
- wpf 中 Ellipse 对象对动画性能的影响
vs2019 .NetFramework 4.8 win10-64 1909 接手一个wpf项目,某窗口中包含大量的 Shape 对象(线,矩形,圆形等). 这些内容要匀速的向左平移,类似于游戏&qu ...
- 《深入浅出WPF》笔记——绘画与动画
<深入浅出WPF>笔记——绘画与动画 本篇将记录一下如何在WPF中绘画和设计动画,这方面一直都不是VS的强项,然而它有一套利器Blend:这方面也不是我的优势,幸好我有博客园,能记录一 ...
- 示例:WPF中自定义StoryBoarService在代码中封装StoryBoard、Animation用于简化动画编写
原文:示例:WPF中自定义StoryBoarService在代码中封装StoryBoard.Animation用于简化动画编写 一.目的:通过对StoryBoard和Animation的封装来简化动画 ...
- WindowsXamlHost:在 WPF 中使用 UWP 控件库中的控件
在 WindowsXamlHost:在 WPF 中使用 UWP 的控件(Windows Community Toolkit) 一文中,我们说到了在 WPF 中引入简单的 UWP 控件以及相关的注意事项 ...
- (原创)2. WPF中的依赖属性之二
1 依赖属性 1.1 依赖属性最终值的选用 WPF属性系统对依赖属性操作的基本步骤如下: 第一,确定Base Value,对同一个属性的赋值可能发生在很多地方.还用Button的宽度来进行举例,可能在 ...
- WPF中的动画——(三)时间线(TimeLine)
WPF中的动画——(三)时间线(TimeLine) 时间线(TimeLine)表示时间段. 它提供的属性可以让控制该时间段的长度.开始时间.重复次数.该时间段内时间进度的快慢等等.在WPF中内置了如下 ...
- WPF 3D:简单的Point3D和Vector3D动画创造一个旋转的正方体
原文:WPF 3D:简单的Point3D和Vector3D动画创造一个旋转的正方体 运行结果: 事实上很简单,定义好一个正方体,处理好纹理.关于MeshGeometry3D的正确定义和纹理这里就不多讲 ...
- (转载)WPF中的动画——(一)基本概念
http://www.cnblogs.com/TianFang/p/4050845.html WPF的一个特点就是支持动画,我们可以非常容易的实现漂亮大方的界面.首先,我们来复习一下动画的基本概念.计 ...
- WPF中的动画
动画无疑是WPF中最吸引人的特色之一,其可以像Flash一样平滑地播放并与程序逻辑进行很好的交互.这里我们讨论一下故事板. 在WPF中我们采用Storyboard(故事板)的方式来编写动画,为了对St ...
随机推荐
- Tomcat服务启动,项目链接没反应
该原因是因为tomcat的服务已启动,未停止又重新启动项目造成:只要停止服务,再次重新启动即可
- jframe 设置左上角和任务栏的图标
默认就是 改成有意义的,一眼就能看出来功能的,比如一个小蜘蛛 第一个最简单的做法,把图片扔到工程的根目录,但是这样会相当乱,不便于文件管理 ImageIcon icon = new ImageIcon ...
- 2019.8.12 NOIP模拟测试18 反思总结
写个博客总是符合要求的对吧 回来以后第一次悄悄参加考试,昨天全程围观… 然后喜提爆炸120分wwwwwwwww T1用了全机房最慢的写法,导致改掉死循环T掉的一个点以后还是死活过不了最后一个点.T2全 ...
- oracle习题-emp表查询练习
emp表查询练习 1 查询emp表的全部记录 Select * from emp; 2 查询出每个雇员的编号.姓名.基本工资 Select empno,ename,sal from emp; 3 查询 ...
- react仿豆瓣
最近公司在做一个自己内部的图片上传系统,目的是帮助设计人员方便上传图片,用的是vue技术,但是说到vue,可能要提到更早出来的react,react是facebook搞的一套语法糖,也是革命性的用组件 ...
- Leetcode645.Set Mismatch错误的集合
集合 S 包含从1到 n 的整数.不幸的是,因为数据错误,导致集合里面某一个元素复制了成了集合里面的另外一个元素的值,导致集合丢失了一个整数并且有一个元素重复. 给定一个数组 nums 代表了集合 S ...
- CURL POST PHP
function SendPostCurl($url,$post_data){ $curl = curl_init(); //初始化 curl_setopt($curl, CURLOPT_URL, $ ...
- idea添加jar包
之前一直使用eclipse,现在使用idea,发现两者引用外部jar的时候不太一样,分享一下. 使用eclipse引用外部jar的时候,我们可以在工程下新建一个lib包来存放,然后add to bui ...
- Data Lake Analytics账号和权限体系详细介绍
一.Data Lake Analytics介绍 数据湖(Data Lake)是时下大数据行业热门的概念:https://en.wikipedia.org/wiki/Data_lake.基于数据湖做分析 ...
- Js Array 删除
数组删除操作 Array.prototype.inArray = function (e) {for (i = 0; i < this.length; i++) {if (this[i] == ...