PySide——Python图形化界面入门教程(五)
PySide——Python图形化界面入门教程(五)
——QListWidget
翻译自:http://pythoncentral.io/pyside-pyqt-tutorial-the-qlistwidget/
Qt具有简洁和方便的几个部件,用来作单列表选择,我们称之为列表框。最灵活的方法是使用一个是Qlistview,它提供了一个必须由程序员定义UI视图、高度灵活的列表模式;一个简单的方法是使用QListWidget,它具有一个预先定义的基于项目的模型,用来处理常见的列表框。我们本节从简单的QListWidget开始。
QListWidget
QListWidget的构造器同许多QWidget的子类一样,拥有一个可选的parent参数:
self.list = QListWidget(self)
填充QListWidget
为QListWidget添加项目非常容易。如果项目是纯文本,你可以单独的添加他们:
 for i in range(10):

     self.list.addItem('Item %s' % (i + 1))
或者一起添加他们:
 items = ['Item %s' % (i + 1)

          for i in range(10)]

 self.list.addItems(items)
你还可以使用QListWidgetItem类更复杂的列表项目。QListWidgetItem可以被单独的创建,然后再使用列表的addItem方法添加。
item = QListWidgetItem()

list.addItem(item)
更复杂的QListWidget项目
或者,它还可以直接使用list参数来创建,这样他会自动的被添加到list。
item = QListWidgetItem(list)
项目可以使用setText方法来添加文本,使用setIcon方法添加图标QIcon:
item.setText('I am an item')
item.setIcon(some_QIcon)
同样也可以在构造器中写明文本或图标:
item = QListWidgetItem('A Text-Only Item')

item = QListWidgetItem(some_QIcon, 'An item with text and an icon')
当然, 上面的每个构造器也可选的接受parent参数。
使用QListWidget
QListWidget提供一些方便的信号来响应用户输入。最重要的是currentItemChanged信号,它是当用户改变选择的项目时发出;它连接的槽接收两个参数,current和previous,表示现在和之前选择的QListWidgetItem项。同样它也有对应的信号,当用户单击、双击、激活或按下一个项、改变选择的项目集时。
为获得当前选择的项,你也可以使用currentItemChanged信号传来的参数,或使用QListWidget的currentItem方法。
对QIcon的注解
你可以通过添加一个图标来改变QListWidgetItem,所以有必要了解一下QIcon了。这有许多构造QIcon的方法,如:
- 提供文件名:
icon = QIcon('/some/path/to/icon.png'). - 使用主题图标:
icon = QIcon.fromTheme('document-open'). - 通过
QPixMap:icon = QIcon(some_pixmap)
还有许多其他的。注意:基于文件的创建方法支持许多类型,但并不是所有类型,你可以通过使用QImageReader().supportedImageFormats()来查看你的平台和版本支持哪些。在作者的系统上,它返回了:
 [PySide.QtCore.QByteArray('bmp'),

  PySide.QtCore.QByteArray('gif'),

  PySide.QtCore.QByteArray('ico'),

  PySide.QtCore.QByteArray('jpeg'),

  PySide.QtCore.QByteArray('jpg'),

  PySide.QtCore.QByteArray('mng'),

  PySide.QtCore.QByteArray('pbm'),

  PySide.QtCore.QByteArray('pgm'),

  PySide.QtCore.QByteArray('png'),

  PySide.QtCore.QByteArray('ppm'),

  PySide.QtCore.QByteArray('svg'),

  PySide.QtCore.QByteArray('svgz'),

  PySide.QtCore.QByteArray('tga'),

  PySide.QtCore.QByteArray('tif'),

  PySide.QtCore.QByteArray('tiff'),

  PySide.QtCore.QByteArray('xbm'),
基于主题的创建方法有时候会出问题,当在Windows和OS X还有使用Gnome或KDE的Linux应该没问题,但是如果使用不太常见的桌面环境,像OpenBox或XFCE,Qt或许不能找到你的图标,所以会只有文本。
一个QListWidget例子
我们来创建一个简单的列表widget来显示文件夹中的文件名和为图片显示一个极小的图标。因为这里的项非常简单,足以用QListWidgetItem来创建,我们将从QListWidget继承。
第一步,我们需要知道安装的版本都支持什么类型的图片,这样我们的列表控件才能辨别什么是合法的图片。我们可以使用上面提到的方法,QImageReader().supportedImageFormats()。我们将他们返回前全部转化成字符串:
 def supported_image_extensions():

     ''' Get the image file extensions that can be read. '''

     formats = QImageReader().supportedImageFormats()

     # Convert the QByteArrays to strings

     return [str(fmt) for fmt in formats]
现在我们可以创建我们的图片列表widget了,起一个望名知义的名字——ImageFileWidget。它将继承自QListWidget,还像所有的QWidget一样有一个可选的parent参数,此外,它要求一个dirpath参数:
 class ImageFileList(QListWidget):

     ''' A specialized QListWidget that displays the list

         of all image files in a given directory. '''

     def __init__(self, dirpath, parent=None):

         QListWidget.__init__(self, parent)
我们需要知道给出的文件夹中都有哪些图片。这里给出一个_images方法,这个方法会返回指定目录中所有合法图片的文件名。它利用了glob模块的glob函数,它允许对文件和路径进行shell风格的模式匹配。
 def _images(self):

     ''' Return a list of file-names of all

         supported images in self._dirpath. '''

     # Start with an empty list

     images = []

     # Find the matching files for each valid

     # extension and add them to the images list.

     for extension in supported_image_extensions():

         pattern = os.path.join(self._dirpath,

                                '*.%s' % extension)

         images.extend(glob(pattern))

     return images
现在我们获得了文件夹中的图片文件,再将他们添加到QListWidget就简单了。每一个文件名,我们创建一个以列表为其parent的QListWidgetItem,并将其文件名设置成本文,用图片创建的QIcon设置其图标。
 def _populate(self):

     ''' Fill the list with images from the

         current directory in self._dirpath. '''

     # In case we're repopulating, clear the list

     self.clear()

     # Create a list item for each image file,

     # setting the text and icon appropriately

     for image in self._images():

         item = QListWidgetItem(self)

         item.setText(image)

         item.setIcon(QIcon(image))
最后,我们添加一个方法来设置目录,它每次调用都会重新填充列表。
 def setDirpath(self, dirpath):

     ''' Set the current image directory and refresh the list. '''

     self._dirpath = dirpath

     self._populate()
ImageFileList类的代码如下:
 class ImageFileList(QListWidget):

     ''' A specialized QListWidget that displays the

         list of all image files in a given directory. '''

     def __init__(self, dirpath, parent=None):

         QListWidget.__init__(self, parent)

         self.setDirpath(dirpath)

     def setDirpath(self, dirpath):

         ''' Set the current image directory and refresh the list. '''

         self._dirpath = dirpath

         self._populate()

     def _images(self):

         ''' Return a list of filenames of all

             supported images in self._dirpath. '''

         # Start with an empty list

         images = []

         # Find the matching files for each valid

         # extension and add them to the images list

         for extension in supported_image_extensions():

             pattern = os.path.join(self._dirpath,

                                    '*.%s' % extension)

             images.extend(glob(pattern))

         return images

     def _populate(self):

         ''' Fill the list with images from the

             current directory in self._dirpath. '''

         # In case we're repopulating, clear the list

         self.clear()

         # Create a list item for each image file,

         # setting the text and icon appropriately

         for image in self._images():

             item = QListWidgetItem(self)

             item.setText(image)

             item.setIcon(QIcon(image))
现在把我们的ImageFileList放到一个简单窗口里来看看它是否工作。我们将创建一个QWidget来作为窗口,使用QVBoxLayout布局,添加ImageFileList,并且包含一个可以显示当前选定项的记录widget。我们将使用ImageFileList的currentItemChanged信号来保持他们同步。
我们将创建一个QApplication对象,使用sys.argv[1],以列表形式传递图片文件路径给它。
app = QApplication([])
然后,创建我们的窗口,设置尺寸并添加布局:
 win = QWidget()

 win.setWindowTitle('Image List')

 win.setMinimumSize(600, 400)

 layout = QVBoxLayout()

 win.setLayout(layout)
接下来,传递给ImageFileList图片文件夹路径和我们的窗口。
first = ImageFileList(sys.argv[1], win)
添加记录widget
entry = QLineEdit(win)
将widget添加到布局中去:
layout.addWidget(first)

layout.addWidget(entry)
接下来,我们需要创建一个在当前项被改变时会调用的槽函数。它有两个参数,curr和prev,分别表示当前选定的项和上一个选定的项。它还需要设置记录当前选定的项:
def on_item_changed(curr, prev):

    entry.setText(curr.text())
别忘了和信号连接起来:
lst.currentItemChanged.connect(on_item_changed)
剩下的就是显示窗口和运行app了,最后代码如下:
 if __name__ == '__main__':

     # The app doesn't receive sys.argv, because we're using

     # sys.argv[1] to receive the image directory

     app = QApplication([])

     # Create a window, set its size, and give it a layout

     win = QWidget()

     win.setWindowTitle('Image List')

     win.setMinimumSize(600, 400)

     layout = QVBoxLayout()

     win.setLayout(layout)

     # Create one of our ImageFileList objects using the image

     # directory passed in from the command line

     lst = ImageFileList(sys.argv[1], win)

     layout.addWidget(lst)

     entry = QLineEdit(win)

     layout.addWidget(entry)

     def on_item_changed(curr, prev):

         entry.setText(curr.text())

     lst.currentItemChanged.connect(on_item_changed)

     win.show()

     app.exec_()
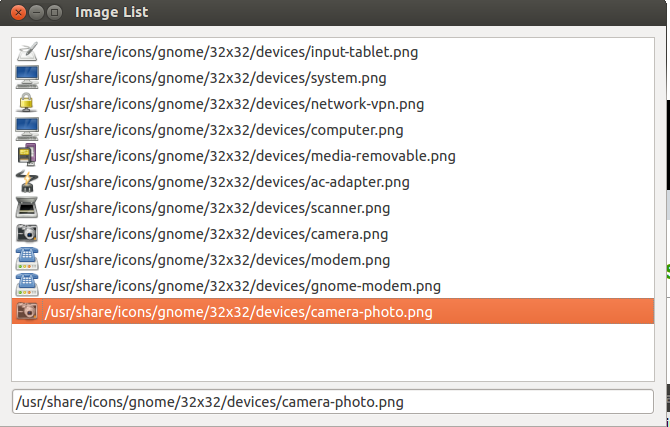
运行这个例子需要你有一个具有图片的文件夹;原文作者使用了/usr/share/icons作为例子,你需要选择自己的文件夹。
python imagelist.py /usr/share/icons/nuoveXT2/48x48/devices
应有些朋友的要求,给出一个运行的截图。另外需要注意自行import一些库才可以运行。

显然,QListWidget是非常简单的widget,不需要提供更多的选项;这就会有许多它不能适应的应用场景。对于难以适应的场景,你或许需要使用QListView,我们在下节讨论它。
By Ascii0x03
转载请注明出处:http://www.cnblogs.com/ascii0x03/p/5502286.html
PySide——Python图形化界面入门教程(五)的更多相关文章
- PySide——Python图形化界面入门教程(四)
PySide——Python图形化界面入门教程(四) ——创建自己的信号槽 ——Creating Your Own Signals and Slots 翻译自:http://pythoncentral ...
- PySide——Python图形化界面入门教程(六)
PySide——Python图形化界面入门教程(六) ——QListView和QStandardItemModel 翻译自:http://pythoncentral.io/pyside-pyqt-tu ...
- PySide——Python图形化界面入门教程(三)
PySide——Python图形化界面入门教程(三) ——使用内建新号和槽 ——Using Built-In Signals and Slots 上一个教程中,我们学习了如何创建和建立交互widget ...
- PySide——Python图形化界面入门教程(二)
PySide——Python图形化界面入门教程(二) ——交互Widget和布局容器 ——Interactive Widgets and Layout Containers 翻译自:http://py ...
- PySide——Python图形化界面入门教程(一)
PySide——Python图形化界面入门教程(一) ——基本部件和HelloWorld 翻译自:http://pythoncentral.io/intro-to-pysidepyqt-basic-w ...
- PySide——Python图形化界面
PySide——Python图形化界面 PySide——Python图形化界面入门教程(四) PySide——Python图形化界面入门教程(四) ——创建自己的信号槽 ——Creating Your ...
- python+pycharm+PyQt5 图形化界面安装教程
python图形化界面安装教程 配置环境变量 主目录 pip所在目录,及script目录 更新pip(可选) python -m pip install --upgrade pip ps:更新出错一般 ...
- Oracle数据库及图形化界面安装教程详解
百度云盘oracle数据库及图形化界面安装包 链接: https://pan.baidu.com/s/1DHfui-D2n1R6_ND3wDziQw 密码: f934 首先在电脑D盘(或者其他不是C盘 ...
- 如何使用python图形化界面wxPython
GUI库主要有三类:tkinter,wxPython和PyQt5,下面主要是针对wxPython的使用说明. 下面的操作均在win10 + pycharm上进行 wxPython的安装: pip in ...
随机推荐
- php自带加密解密函数
php自带加密解密函数 一.总结 一句话总结:可逆和不可逆函数. 二.php自带加密解密函数 1.不可逆的加密函数为:md5().crypt() md5() 用来计算 MD5 哈稀.语法为:strin ...
- Javascript中eval解析的json的几种用法
eval解析json字符串可用的三种方式都可以实现... <!DOCTYPE html> <html> <head> <meta charset=" ...
- app.config中的值获取及设置 以及对log4net配置
修改或新增AppSetting节点 /// <summary> /// 修改AppSettings中配置 /// </summary> /// <param name ...
- Java堆/栈/常量池以及String的详细详解(转)------经典易懂系统
一:在JAVA中,有六个不同的地方可以存储数据: 1. 寄存器(register). 这是最快的存储区,因为它位于不同于其他存储区的地方——处理器内部.但是寄存器的数量极其有限,所以寄存器由编译器根据 ...
- 复杂json解析(json里面嵌套json)
调用第三方接口,返回一堆json,我只想取得里面的某一个属性,但是返回的比较复杂,无法直接拿到属性,格式类似于这样: {"video":{"id":" ...
- reduce 阶段遍历对象添加到ArrayList中的问题
起初遍历values时直接把对象添加到集合中,后来输出结果和预期不符,debug时发现添加到集合中的对象的值全部是最后一个对象的值,网上百度了下,发现是reduce阶段对象重用的问题,reduce阶段 ...
- Android Studio中创建java项目
1.创建普通的android工程 2.创建一个module 3.module类型选择java library 4.填写libary和class的名字 5.生成的工程如图所示 6.然后点击Run --- ...
- Internet protocol optimizer
A method for optimizing the throughput of TCP/IP applications by aggregating user application data a ...
- Application中数据传递及内存泄漏问题
原文地址:http://android.tgbus.com/Android/tutorial/201107/359474.shtml Application的使用 Application和Actovo ...
- 实用WordPress后台MySQL操作命令
关键字: WordPress MySQL 后台 数据库 地址:http://www.cnblogs.com/txw1958/archive/2013/01/06/wordpress-sql.html ...
