Spring Cloud系列(三) 应用监控与管理Actuator
应用监控与管理Actuator
前言:要想使用Spring Cloud ,Spring Boot 提供的spring-boot-starter-actuator模块是必须了解的,这篇文章就先介绍一下actuator的使用。
由于我们把一个复杂高耦合的单体系统拆分成了多个小型服务,所以部署应用的数量在不断增长,造成维护复杂度大大提升。所以我们需要一套自动化的监控运维机制,这套运维机制可以不间断的获取每个服务应用的各种指标,并根据这些指标信息来制定监控预警规则。
Spring Boot提供了一个依赖模块:spring-boot-starter-actuator,这个模块可以自动为Spring Boot创建的应用构建一系列的用于监控的端点,而且Spring Cloud还在这个基础上进行了扩展,当然在不满足我们业务需求时也需要对这个模块进行扩展。
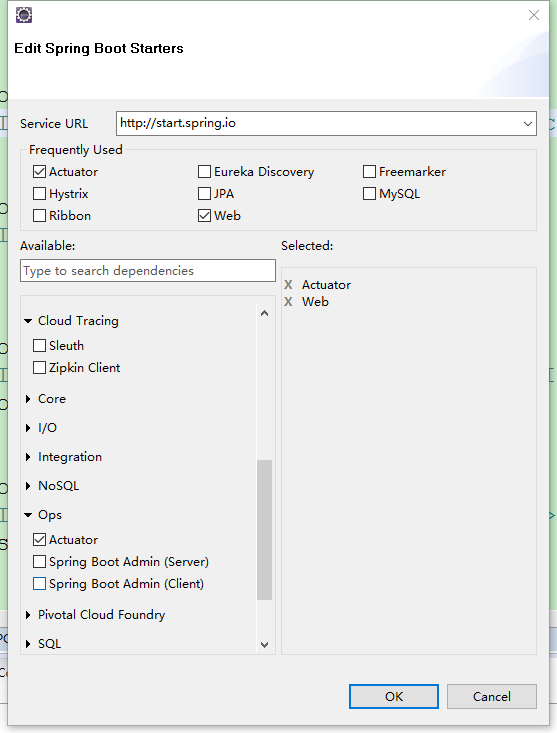
接下来创建一个Spring Boot项目命名actuator,勾选Actuator依赖
或者在你现有的Spring Boot项目里添加依赖
 <dependency>

     <groupId>org.springframework.boot</groupId>

     <artifactId>spring-boot-starter-actuator</artifactId>

 </dependency>
项目创建完毕后的pom文件:
         <parent>

         <groupId>org.springframework.boot</groupId>

         <artifactId>spring-boot-starter-parent</artifactId>

         <version>2.0.2.RELEASE</version>

         <relativePath/> <!-- lookup parent from repository -->

     </parent>

     <properties>

         <project.build.sourceEncoding>UTF-8</project.build.sourceEncoding>

         <project.reporting.outputEncoding>UTF-8</project.reporting.outputEncoding>

         <java.version>1.8</java.version>

     </properties>

     <dependencies>

         <dependency>

             <groupId>org.springframework.boot</groupId>

             <artifactId>spring-boot-starter-actuator</artifactId>

         </dependency>

         <dependency>

             <groupId>org.springframework.boot</groupId>

             <artifactId>spring-boot-starter-web</artifactId>

         </dependency>

         <dependency>

             <groupId>org.springframework.boot</groupId>

             <artifactId>spring-boot-starter-tomcat</artifactId>

             <scope>provided</scope>

         </dependency>

         <dependency>

             <groupId>org.springframework.boot</groupId>

             <artifactId>spring-boot-starter-test</artifactId>

             <scope>test</scope>

         </dependency>

     </dependencies>

     <build>

         <plugins>

             <plugin>

                 <groupId>org.springframework.boot</groupId>

                 <artifactId>spring-boot-maven-plugin</artifactId>

             </plugin>

         </plugins>

     </build>
说一下我的版本:jdk1.8、Spring Boot 2.0.2。
接下来就可以启动应用了,发现控制台打印如下信息:

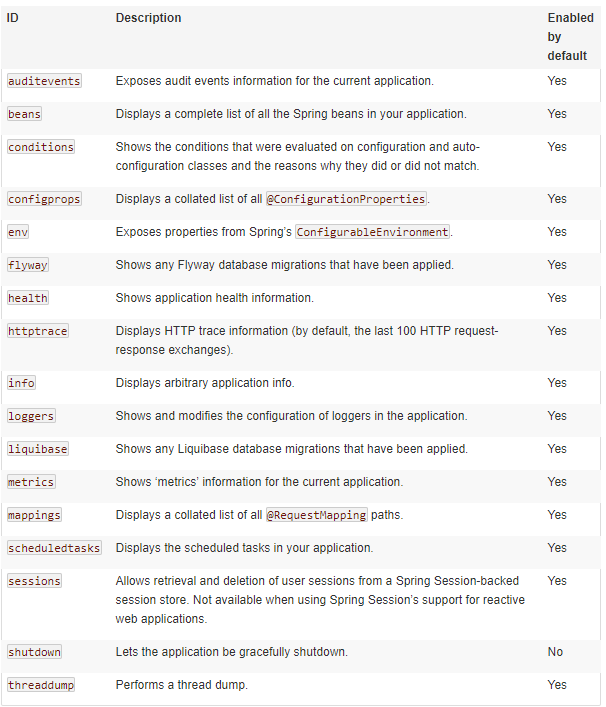
/actuator/health和/actuator/info以及/actuator这三个就是actuator提供的端点,注意以前的版本是没有/actuator前缀的,2.0以后的版本都加了/actuator前缀,而且看官方文档actuator提供了如下端点:
我们只有health和info端点是因为actuator默认只暴露了health和info端点,我们可以选择全部暴露或者指定暴露部分端点,修改application.yml
 management:

   endpoints:

     web:

       exposure:

         include: "*" #暴露所有端点 默认是info,health
重新启动应用,控制台打印发生了变化,其余的端点也被暴露出来了:

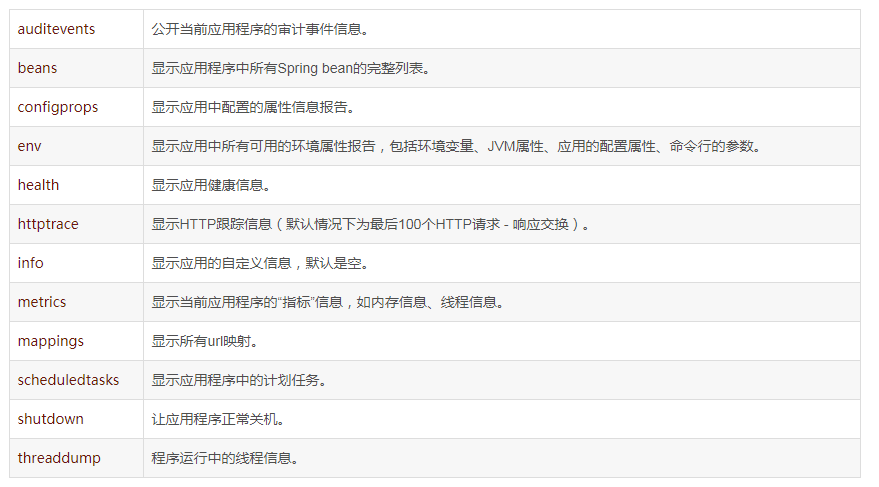
下面是对部分常用端点的简要说明
详细说明请查看actuator-api文档actuator-api,注意这是Spring Boot2.0.2的文档,其余版本请去官网自行查找。
开启和关闭端点
使用management.endpoint.<id>.enabled来修改端点的开启关闭状态,如以关闭health端点为例
management.endpoint.health.enabled=false
如果希望端点启用选择加入而不是选择退出,请将management.endpoints.enabled-by-default属性设置为false并设置想选择加入端点的enabled=true重新加入。以下示例启用info端点并禁用所有其他端点:
 management.endpoints.enabled-by-default = false

 management.endpoint.info.enabled = true
修改路径
1、修改前缀:现在所有端点的前缀默认是/actuator,如果想修改的话用management.endpoints.web.base-path属性。
2、修改路径:如果想修改端点的路径,可以用management.endpoints.web.path-mapping属性。
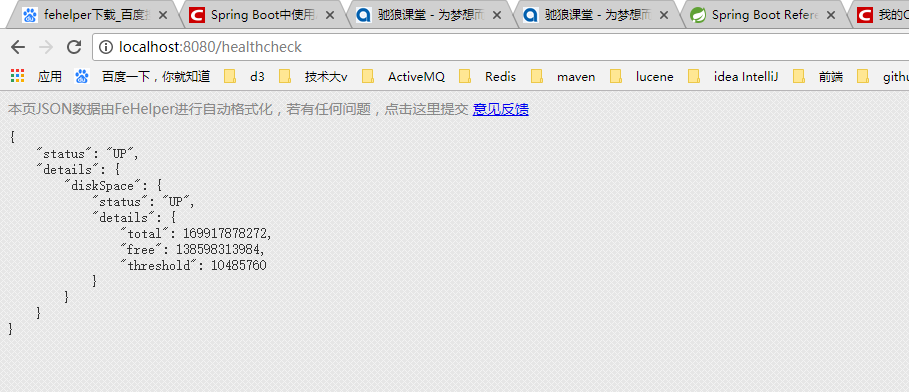
比如我们想把/autuator/health修改为/healthcheck。
management.endpoints.web.base-path=/

management.endpoints.web.path-mapping.health=healthcheck
重启项目后所有端点都去掉了/actuator前缀,并且health端点的路径变成了healthcheck
当然,如果你想修改端点的端口,也是可以的,可以通过以下属性修改
management.server.port = 8081
如果您不想通过HTTP公开端点,则可以将管理端口设置为-1
management.server.port = -1
关于shutdown端点
shutdown端点可以用来远程关闭应用,此端点默认是关闭的,如果使用的话,需要开启,使用以下属性
management.endpoint.shutdown.enabled = true
你就可以在应用启动后远程通过调用/actuator/shutdown来关闭应用,注意只能POST请求调用。
关于health端点
我们尝试访问/actuator/health端点,返回
{"status":"UP"}
只有status一个属性,查看官方文档health端点的management.endpoint.health.show-details属性默认不展示细节,我们可以修改一下
management:

  endpoints:

    web:

      exposure:

        include: "*" #暴露所有端点 默认是info和health

  endpoint:

    health:

      show-details: always #默认是never
重新启动再次请求,会发现多了一个磁盘空间的状态信息,返回
{"status":"UP","details":{"diskSpace":{"status":"UP","details":{"total":169917878272,"free":138603999232,"threshold":10485760}}}}
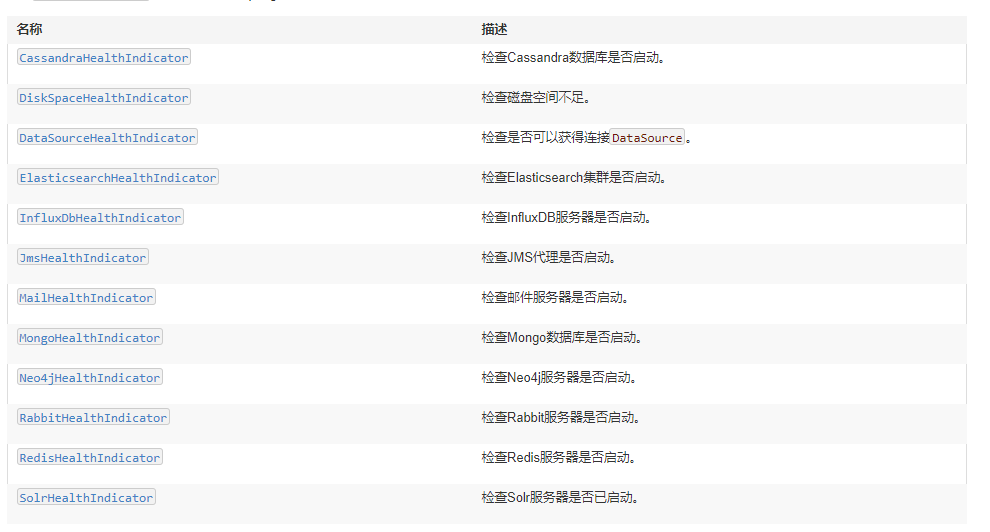
health端点默认自带了一些常用资源的健康指标检测器,只要你引入了以下依赖就会自动添加到health里
我们也可以自己扩展一个健康指标检测器
/**
* 1.实现HealthIndicator接口
* 2.类名要求 xxxHealthIndicator xxx将会是你自定义得健康指标名称
* 3.@Component注入到容器内
* 4.重写health()方法
* @author Administrator
*
*/
@Component
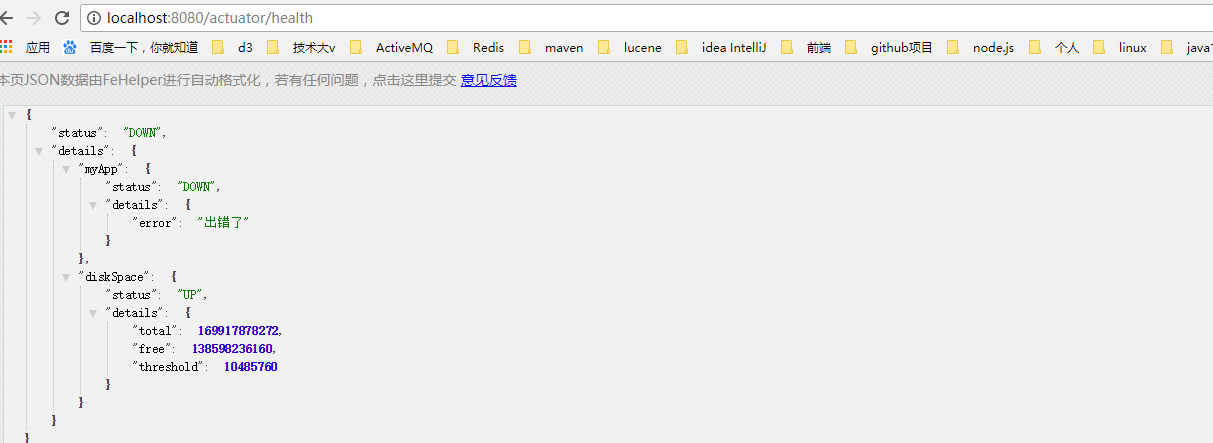
public class MyAppHealthIndicator implements HealthIndicator{ @Override
public Health health() {
if(check()!=0){
return Health.up().build();
}
return Health.down().withDetail("error", "出错了").build();
} private int check(){
// 检测是否健康的自定义逻辑
return 0;
}
}
然后重启应用发现多了自定义的健康指标
关于info端点
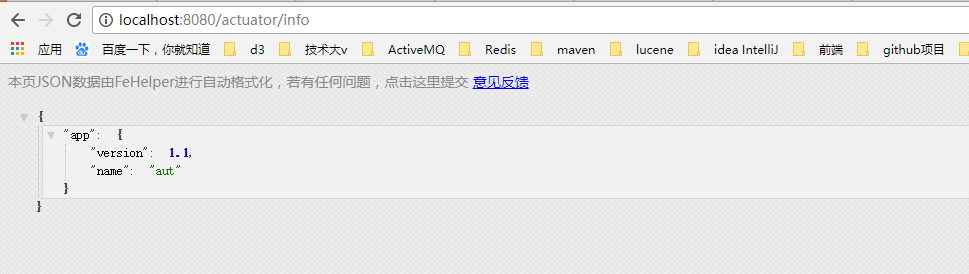
info端点默认是空的,我们可以在application配置文件中配置info前缀的属性来完善
 info:

     app:

       version: 1.1

       name: aut   #/actuator/info 自定义的info端点 否则是空的
访问/actuator/info
我们也可以用info端点描述Git版本信息,在application.yml或者application.properties同级目录创建git.properties,添加属性git.branch=master,再次重启访问/actuator/info。
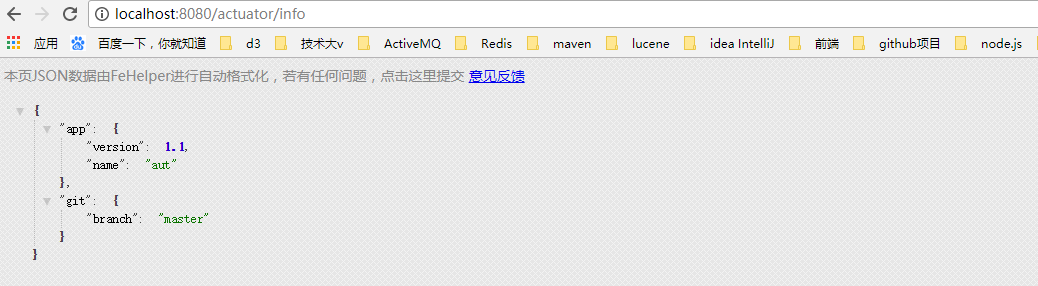
git.属性名是来自于GitProperties类,eclipse中使用ctrl+shift+t输入GitProperties就可以查看了,前提是你下载了源码,当然你也可以引入git的插件,具体我就不介绍了,想了解的可以看下这篇文章http://blog.didispace.com/spring-boot-actuator-info-git/,总的来说info端点用途并不大。
---------------------
原文:https://blog.csdn.net/WYA1993/article/details/80540981
版权声明:本文为博主原创文章,转载请附上博文链接!
Spring Cloud系列(三) 应用监控与管理Actuator的更多相关文章
- Spring Cloud 系列之 Sleuth 链路追踪(三)
本篇文章为系列文章,未读前几集的同学请猛戳这里: Spring Cloud 系列之 Sleuth 链路追踪(一) Spring Cloud 系列之 Sleuth 链路追踪(二) 本篇文章讲解 Sleu ...
- Spring Cloud 系列之 Config 配置中心(三)
本篇文章为系列文章,未读前几集的同学请猛戳这里: Spring Cloud 系列之 Config 配置中心(一) Spring Cloud 系列之 Config 配置中心(二) 本篇文章讲解 Conf ...
- spring cloud 系列第5篇 —— hystrix+turbine 服务的熔断与监控 (F版本)
源码Gitub地址:https://github.com/heibaiying/spring-samples-for-all 一.hystrix 简介 1.1 熔断器 在分布式系统中,由于服务之间相互 ...
- Spring Cloud 系列之 Apollo 配置中心(三)
本篇文章为系列文章,未读前几集的同学请猛戳这里: Spring Cloud 系列之 Apollo 配置中心(一) Spring Cloud 系列之 Apollo 配置中心(二) 本篇文章讲解 Apol ...
- Spring Cloud系列(三):Eureka源码解析之服务端
一.自动装配 1.根据自动装配原理(详见:Spring Boot系列(二):Spring Boot自动装配原理解析),找到spring-cloud-starter-netflix-eureka-ser ...
- Spring Cloud 系列之 Gateway 服务网关(三)
本篇文章为系列文章,未读第一集的同学请猛戳这里: Spring Cloud 系列之 Gateway 服务网关(一) Spring Cloud 系列之 Gateway 服务网关(二) 本篇文章讲解 Ga ...
- spring cloud系列教程第一篇-介绍
spring cloud系列教程第一篇-介绍 前言: 现在Java招聘中最常见的是会微服务开发,微服务已经在国内火了几年了,而且也成了趋势了.那么,微服务只是指spring boot吗?当然不是了,微 ...
- spring cloud系列教程第四篇-Eureka基础知识
通过前三篇文章学习,我们搭建好了两个微服务工程.即:order80和payment8001这两个服务.有了这两个基础的框架之后,我们将要开始往里面添加东西了.还记得分布式架构的几个维度吗?我们要通过一 ...
- Spring Cloud系列(二) 介绍
Spring Cloud系列(一) 介绍 Spring Cloud是基于Spring Boot实现的微服务架构开发工具.它为微服务架构中涉及的配置管理.服务治理.断路器.智能路由.微代理.控制总线.全 ...
随机推荐
- MySql 同一个列中的内容进行批量改动
问题重现: MySql 数据库中,一给列的内容中包含 ".wmv" 须要将 "." 后的wmv格式 换为"flv" 解决的方法 up ...
- Vue项目打包部署到apache服务器
vue项目在开发环境下,让项目运行起来,是通过npm run dev命令,原理是在本地搭建了一个express服务器. 但是在服务器上就不是这样的,必须要通npm run build命令来对整个项目进 ...
- 2015 多校赛 第三场 1002 (hdu 5317)
Description Mr. Hdu is interested in Greatest Common Divisor (GCD). He wants to find more and more i ...
- python3和python2共存 django-admin Fatal error in launcher: Unable to create process using ‘"‘
python3和python2共存 django-admin Fatal error in launcher: Unable to create process using ‘"‘ 出现这个 ...
- 使用GetInvocationList对委托链进行更多的控制
委托链中所有项都会被调用,因为委托类型的 Invoke 方法包含了对数组中的所有项进行遍历的代码.这是一个很简单的算法.尽管这个简单的算法足以应付很多情形,但也有它的局限性.例如,除了最后一个返回值, ...
- PANDAS 数据分析初学者教程
Pandas 初学者教程 2018-05-19 六尺巷人 对于数据科学家,无论是数据分析还是数据挖掘来说,Pandas是一个非常重要的Python包.它不仅提供了很多方法,使得数据处理非常 ...
- android 将手机号中间隐藏为星号(*)
){ StringBuilder sb =new StringBuilder(); ; i < pNumber.length(); i++) { char c = pNumber.charAt( ...
- APP开发中的弹窗体系,UI设计师不能忽视的地方
1. 弹窗的定义 弹窗分为模态弹窗和非模态弹窗两种. 弹窗分类 模态弹窗:很容易打断用户的操作行为,用户必须回应,否则不能进行其他操作. 非模态弹窗:不会影响用户的操作,用户可以不对其进行回应,非模态 ...
- Deutsch lernen (02)
1. fließend a. 流利的 Meine französische Freundin spricht fließend Deutsch. 流动的 Der Verkehr wickelt ...
- C# tostring("0000000")
public string ConverNo(string str) { string result = ""; ]; ; i < chars.Length; i++) ch ...