PureBasic 集成Form设计器的使用
The PureBasic IDE has a very powerful integrated form designer, which allows to design easily windows and arrange gadgets on them. It supports almost all native PureBasic gadgets, menu and even status bar. A form file is a regular PureBasic file, so it can be easily modified without even open the form designer. The code parser isn't the same used by the compiler and therefore doesn't support all features, so when doing manual changes to a form file, it has to remain basic.
Contents of the "Form" menu:
New Form
Create a new empty form. It will bring automatically the form panel tool on top.Switch Code/Design View
Change the form view, switch from design mode to code view. A form is built from code, so if a change is made directly in code view, it will be reflected visually.Duplicate Object
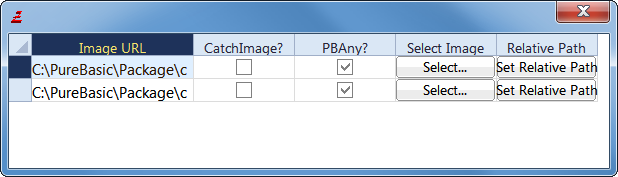
Duplicate the currently selected object.Image manager
Display all the images currently used by the form. The image and its path can be changed easily here.

Form design panel
This panel list all available gadgets. Select one, and draw directly on the form the size needed. When a gadget is selected on the form, its properties are display on this panel and can be modified here.

Using the form designer in real world projects
The form designer has been created to allow modular forms and easy maintenance. Each form has to be in its own file. It can not have two form in the file (in other words, it should never have two OpenWindow() in the same file). An event procedure can be assigned to every gadget, and will be handled automatically in the event loop. The event procedures needs to be defined somewhere in the source code. Every form file should be named with the '.pbf' extension, so it will be correctly opened by the IDE. Form files can also be added to a project.
For example, to build a program which handle two windows, we will have to create two form files and one main file. The directory structure could look like that:
- Main.pb ; The main PureBasic file, which will includes the two forms file, and defines the events
- MainWindow.pbf ; The main window
- DateWindow.pbf ; Another window
If we assume MainWindow.pbf has two buttons ('OK' and 'Cancel') and DateWindow.pbf has one calendar gadget, here is how the main file would look like (the main file is not handled by the form designer, it has to be written manually):
- XIncludeFile "MainWindow.pbf" ; Include the first window definition
- XIncludeFile "DateWindow.pbf" ; Include the second window definition
- OpenMainWindow() ; Open the first window. This procedure name is always 'Open' followed by the window name
- OpenDateWindow() ; Open the second window
- ; The event procedures, as specified in the 'event procedure' property of each gadget
- Procedure OkButtonEvent(EventType)
- Debug "OkButton event"
- EndProcedure
- Procedure CancelButtonEvent(EventType)
- Debug "CancelButton event"
- EndProcedure
- Procedure TrainCalendarEvent(EventType)
- Debug "TrainCalendar event"
- EndProcedure
- ; The main event loop as usual, the only change is to call the automatically
- ; generated event procedure for each window.
- Repeat
- Event = WaitWindowEvent()
- Select EventWindow()
- Case MainWindow
- MainWindow_Events(Event) ; This procedure name is always window name followed by '_Events'
- Case DateWindow
- DateWindow_Events(Event)
- EndSelect
- Until Event = #PB_Event_CloseWindow ; Quit on any window close
As seen, it's easy to integrate visually designed forms in a program. Indeed it's also possible to continue to create window manually, or mix the two. To have all the control over the generated code, just switch to code mode and inspect it.
例子:
main.pbf:
- XIncludeFile "pp.pbf"
- OpenWindow_()
- Procedure OkButtonEvent(EventType)
- Select EventType()
- Case #PB_EventType_LeftClick : Debug "Click with left mouse button"
- Case #PB_EventType_RightClick : Debug "Click with right mouse button"
- Case #PB_EventType_LeftDoubleClick : Debug "Double-click with left mouse button"
- Case #PB_EventType_RightDoubleClick : Debug "Double-click with right mouse button"
- EndSelect
- EndProcedure
- Procedure PButtonEvent(EventType)
- Debug "pkButton event"
- EndProcedure
- Repeat
- Event = WaitWindowEvent()
- Select EventWindow()
- Case Window_
- Select EventGadget()
- Case Button_
- OkButtonEvent(EventType)
- Case Button_
- PButtonEvent(EventType)
- EndSelect
- EndSelect
- Until Event = #PB_Event_CloseWindow ; Quit on any window close
pp.pb:
- Global Window_
- Global Button_, Button_
- Procedure OpenWindow_()
- Window_ = OpenWindow(#PB_Any, , , , , "", #PB_Window_SystemMenu | #PB_Window_Tool | #PB_Window_BorderLess)
- Button_ = ButtonGadget(#PB_Any, , , , , "")
- Button_ = ButtonGadget(#PB_Any, , , , , "")
- EndProcedure
- Procedure Window__Events(event)
- Select event
- Case #PB_Event_CloseWindow
- ProcedureReturn #False
- Case #PB_Event_Menu
- Select EventMenu()
- EndSelect
- Case #PB_Event_Gadget
- Select EventGadget()
- EndSelect
- EndSelect
- ProcedureReturn #True
- EndProcedure

PureBasic 集成Form设计器的使用的更多相关文章
- Springboot2集成Activiti设计器并去除security
前言 鉴于项目需要将acitiviti设计器整合到原工程中,在网上查了不少资料都不太适用,经过借鉴和自己倒腾终于搞定了,分享一下经验,如果有问题,可以在留言区咨询. 文中用到的资源代码链接: http ...
- C#自定义运行时窗体设计器Runtime FormDesigner
写在前面:因为业务的需要,有时会使用到自定义运行时窗体设计器Runtime FormDesigner,实现的功能,就是IDE设计器的简化.设想一下,如果可以在程序运行时,再设计一个Form,然后编译代 ...
- Activiti(二) springBoot2集成activiti,集成activiti在线设计器
摘要 本篇随笔主要记录springBoot2集成activiti流程引擎,并且嵌入activiti的在线设计器,可以通过浏览器直接编辑出我们需要的流程,不需要通过eclipse或者IDEA的actiB ...
- 如何在CRM系统中集成ActiveReports最终报表设计器
有时候,将ActiveReports设计器集成到业务系统中,为用户提供一些自定义的数据表,用户不需要了解如何底层的逻辑关系和后台代码,只需要选择几张关联的数据表,我们会根据用户的选择生成可供用户直接使 ...
- java 工作流项目源码 SSM 框架 Activiti-master springmvc 集成web在线流程设计器
即时通讯:支持好友,群组,发图片.文件,消息声音提醒,离线消息,保留聊天记录 (即时聊天功能支持手机端,详情下面有截图) 工作流模块---------------------------------- ...
- .NET 开源工作流: Slickflow流程引擎高级开发(十) -- BpmnJS流程设计器集成
前言: 在Slickflow产品开发过程中,前端流程设计器经历了几个不同的版本(jsPlumb, mxGraph等),目的是为了在设计流程时的用户体验更加良好,得到客户的好评和认可.BpmnJS流程设 ...
- SSH框架集成Activiti Modeler在线设计器页面出现问号及乱码的解决办法
文·原创/朱季谦 工作流是一个针对企业用户.开发人员.系统管理员的轻量级工作流业务管理平台,其核心是使用Java开发的快速.稳定的BPMN2.0流程引擎.在我们日常开发当中,例如oa系统里的请假功能, ...
- YbSoftwareFactory 代码生成插件【十六】:Web 下灵活、强大的审批流程实现(含流程控制组件、流程设计器和表单设计器)
程序=数据结构+算法,而企业级的软件=数据+流程,流程往往千差万别,客户自身有时都搞不清楚,随时变化的情况更是家常便饭,抛开功能等不谈,需求变化很大程度上就是流程的变化,流程的变化会给开发工作造成很大 ...
- F2工作流引擎之-纯JS Web在线可拖拽的流程设计器(八)
Web纯JS流程设计器无需编程,完全是通过鼠标拖.拉.拽的方式来完成,支持串行.并行.分支.异或分支.M取N路分支.会签.聚合.多重聚合.退回.传阅.转交,都可以非常方便快捷地实现,管理员 ...
随机推荐
- java中基本输入输出流的解释(flush方法的使用)
转自:http://fsz521job.itpub.net/post/5606/34827 网络程序的很大一部分是简单的输入输出,即从一个系统向另一个系统移动字节.字节就是字节,在很大程度上,读服务器 ...
- 面试整理之DOM事件阶段
因为快面试了,打开<JavaScript高级程序设计>,对DOM事件进行整理了下 本文主要解决的问题: 事件流 DOM事件流的三个阶段 先理解流的概念 在现今的JavaScript中随处可 ...
- 把一个SVN项目的目录结构 导入到另外一个空白的SVN项目里
1 选好源目录,选中“check out” 2 选中想要的目录结构 3 选择具体的目录 4 确定,最后开始更新,成功!
- HDU 4342History repeat itself 数学
C - History repeat itself Time Limit:1000MS Memory Limit:32768KB Description Tom took the D ...
- JVM的类加载机制
虚拟机把描述类的数据从Class文件加载到内存,并对数据进行校验.转换解析和初始化,最终形成可以被虚拟机直接使用的Java类型,这就是虚拟机的类加载机制. 类加载的过程: 包括加载.链接(含验证.准备 ...
- 转:EasyHook远程代码注入
EasyHook远程代码注入 最近一段时间由于使用MinHook的API挂钩不稳定,经常因为挂钩地址错误而导致宿主进程崩溃.听同事介绍了一款智能强大的挂钩引擎EasyHook.它比微软的detours ...
- BZOJ1829 : [Usaco2010 Mar]starc星际争霸
设出$x,y,z$三个未知量分别表示三种单位的战斗力. 那么各种不等式都可以表示成$ax+by+cz\geq 0$的形式. 注意到$z>0$,那么两边都除以$z$得到$ax+by+c\geq 0 ...
- Session赋值(备注)
Session赋值也是在后台赋,不是在前台赋 追问 不好意思 那还真能在AJAX中赋值 我已经解决了 加一个接口IRequiresSessionState 就OK 提问者评价 太感谢了,真心有用
- CSS3盒模型display:box详解
display:box;box-flex是css3新添加的盒子模型属性,它的出现可以解决我们通过N多结构.css实现的布局方式.经典的一个布局应用就是布局的垂直等高.水平均分.按比例划分. 目前box ...
- MyEclipse10整合Axis2插件
1.下载axis2的eclipse插件 2.把下载好的两个插件包解压后放置myeclipse10安装目录下的dropins文件夹中 3.重启MyEclipse10后 File->New-> ...