详细介绍如何自研一款"博客搬家"功能
前言
现在的技术博客(社区)越来越多,比如:imooc、spring4All、csdn、cnblogs或者iteye等,有很多朋友可能在这些网站上都发表过博文,当有一天我们想自己搞一个博客网站时就会发现好多东西已经写过了,我们不可能再重新写一遍,况且多个平台上都有自己发表的文章,也不可能挨个去各个平台ctrl c + ctrl v。鉴于此, 我在我的开源博客里新开发了一个“博客迁移”的功能,目前支持imooc、csdn、iteye和cnblogs,后期会适配更多站点。
功能介绍
如下视频所示:
抓取展示:

功能特点
使用方便,抓取规则已内置,只需修改很少的配置就可运行。支持同步抓取文章标签、description和keywords,支持转存图片文件。使用开源的国产爬虫框架webMagic,方便扩展爬虫功能。
使用教程
目前,该功能已内置了以下几个平台(imooc、csdn、cnblogs和iteye),根据不同的平台,程序已默认了一套抓取规则,如下图系列
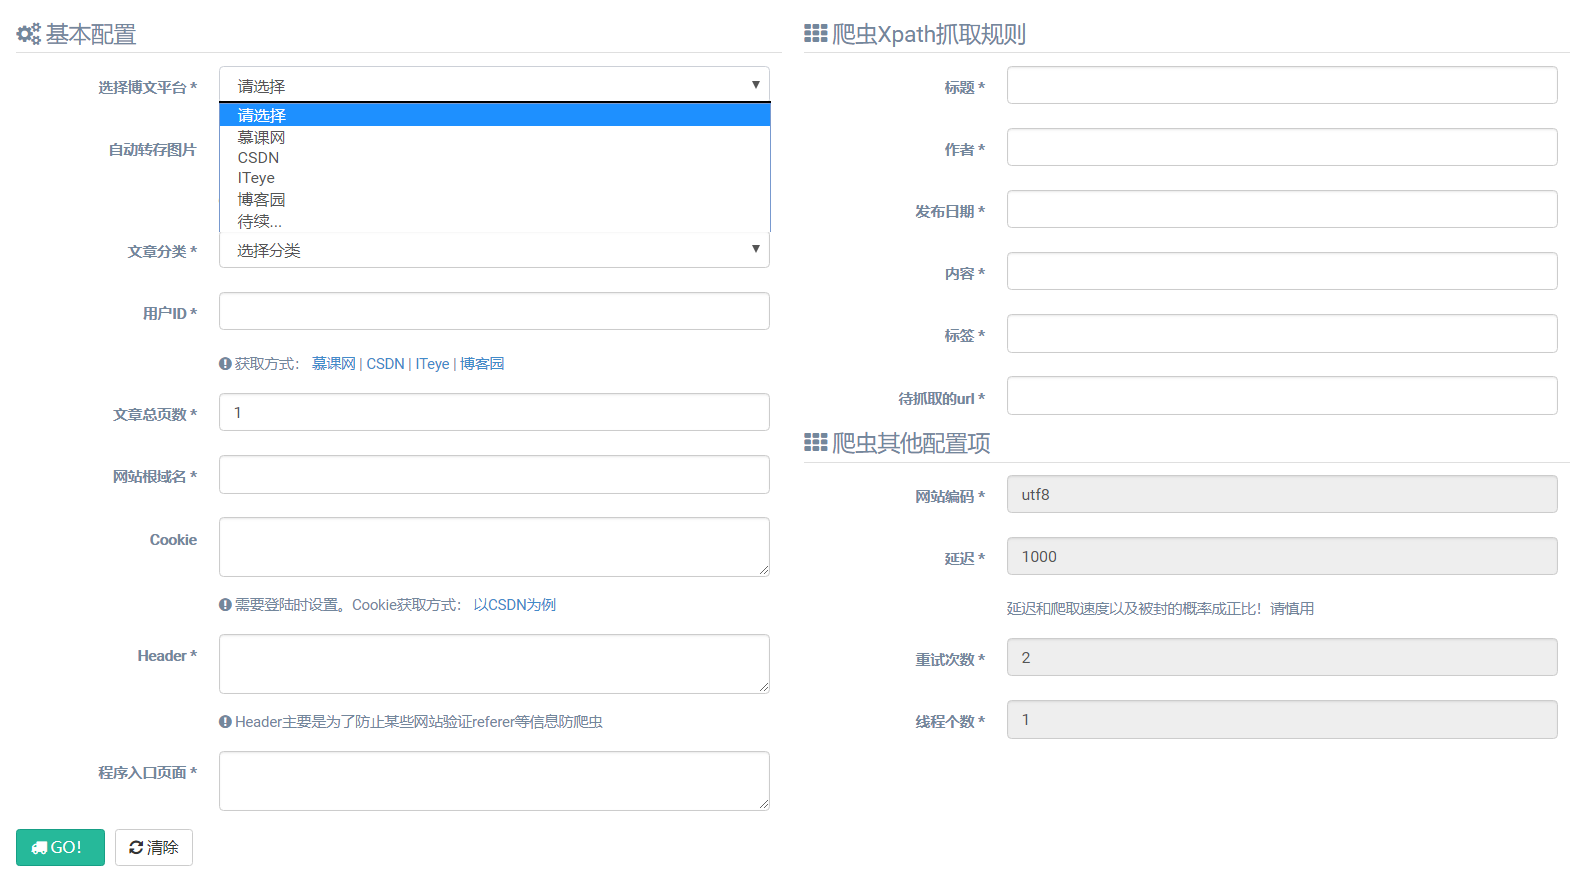
cnblogs抓取规则:
使用时,只需要手动指定以下几项配置即可
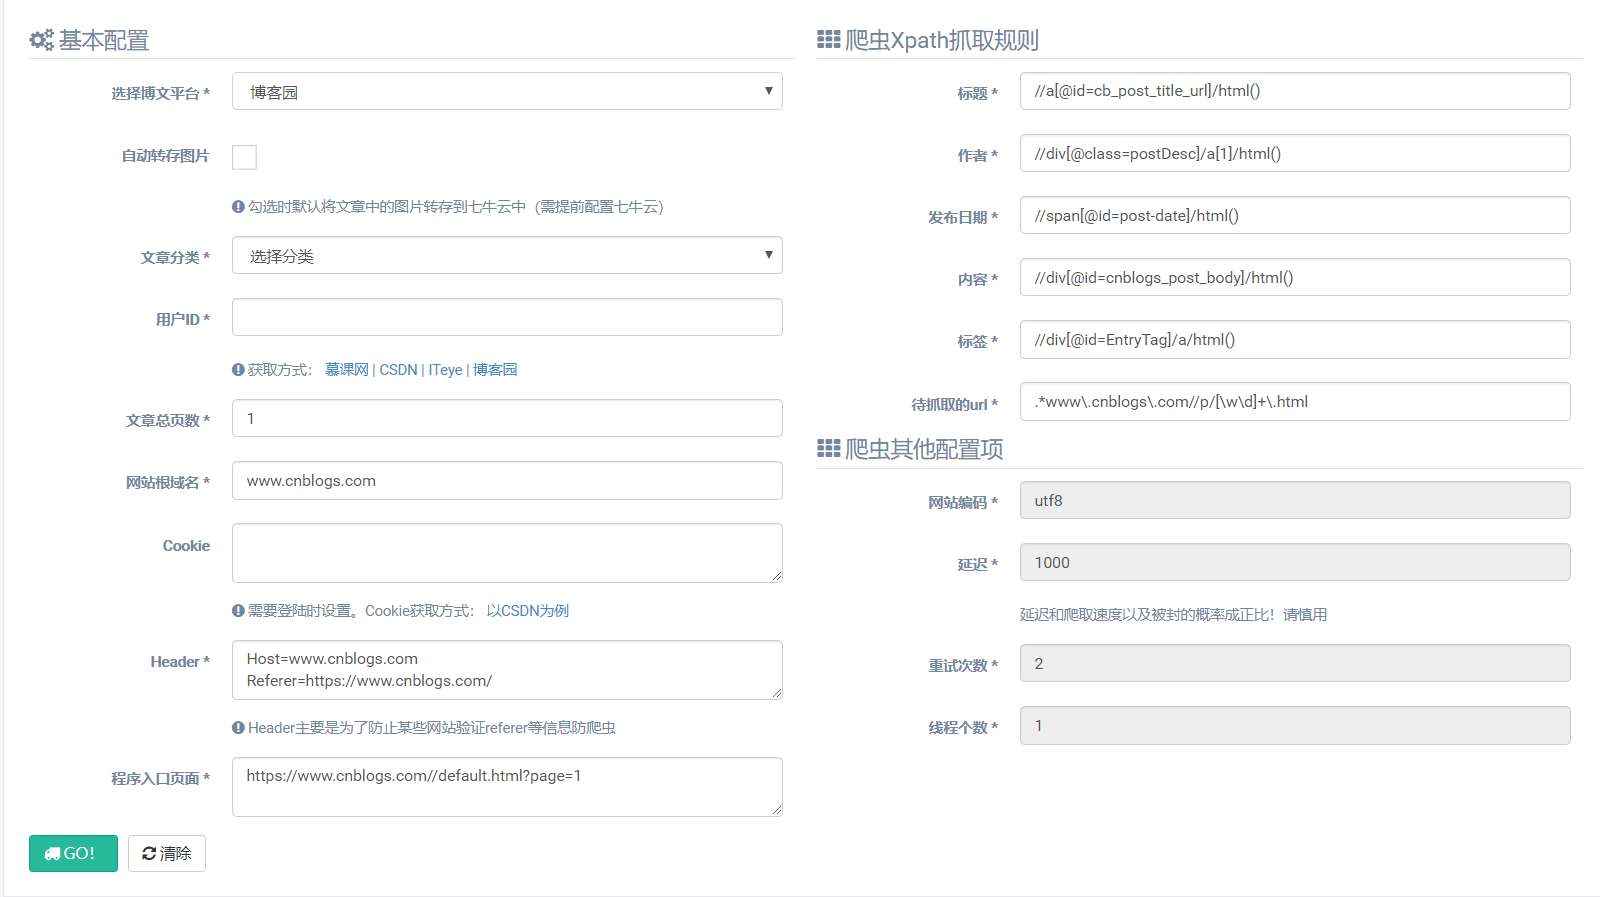
其他信息在选择完博文平台后,程序会自动补充完整。圈中必填的几项配置如下:
选择博文平台:选择待操作的博文平台(程序会自动生成对应平台的抓取规则)
自动转存图片:勾选时默认将文章中的图片转存到七牛云中(需提前配置七牛云)
文章分类:是指抓取的文章保存到本地数据库中的文章分类
用户ID:是指各平台中,登陆完成后的用户ID,程序中已给出了对应获取的方法
文章总页数:是指待抓取的用户所有文章的页数
Cookie(非必填):只在必须需要登陆才能获取数据时指定,获取方式如程序中所示
在指定完博文平台、用户ID和文章总页数后,爬虫的其他配置项就会自动补充完整,最后直接执行该程序即可。 注意:默认同步过来的文章为“草稿”状态,主要是为了防止抓取的内容错误,而直接显示到网站前台,造成不必要的麻烦。所以,需要手动确认无误后修改发布状态。另外,针对一些做了防盗链的网站,我们在使用“文章搬运工”时,还要勾选上“自动转存图片”,至于为何要这么做,在下面会有解释。
关于“文章搬运工”功能的实现
“文章搬运工”功能听起来觉得高大上,类似的比如CSDN和cnblogs里的“博客搬家”功能,其实实现起来很简单。下面听我道一道,你也可以轻松做出一个“博客搬家”功能!
“博客搬家”首先需要克服的问题无非就是:怎么从别人的页面中提取出相关的文章信息后保存到自己的服务器中。说到页面提取,可能很多同学不约而同的就想到了:爬虫!没错,就是通过最基础的网络爬虫就可实现,而OneBlog的文章搬运工功能就是基于爬虫实现的。
OneBlog中选用了国产的优秀的开源爬虫框架:webMagic。
WebMagic是一个简单灵活的Java爬虫框架。之所以选择该框架,完全依赖于它的优秀特性:
- 完全模块化的设计,强大的可扩展性。
- 核心简单但是涵盖爬虫的全部流程,灵活而强大,也是学习爬虫入门的好材料。
- 提供丰富的抽取页面API。
- 无配置,但是可通过POJO+注解形式实现一个爬虫。
- 支持多线程。
- 支持分布式。
- 支持爬取js动态渲染的页面。
- 无框架依赖,可以灵活的嵌入到项目中去
关于webMagic的其他详细介绍,请去webMagic的官网查阅,本文不做赘述。
下面针对OneBlog中的“文章搬运工”功能做一下简单的分析。
第一步,添加依赖包
 1 <dependency>

 2     <groupId>us.codecraft</groupId>

 3     <artifactId>webmagic-core</artifactId>

 4     <version>0.7.3</version>

 5     <exclusions>

 6         <exclusion>

 7             <groupId>org.slf4j</groupId>

 8             <artifactId>slf4j-log4j12</artifactId>

 9         </exclusion>

10     </exclusions>

11 </dependency>

12 <dependency>

13     <groupId>us.codecraft</groupId>

14     <artifactId>webmagic-extension</artifactId>

15     <version>0.7.3</version>

16     <exclusions>

17         <exclusion>

18             <groupId>org.slf4j</groupId>

19             <artifactId>slf4j-log4j12</artifactId>

20         </exclusion>

21     </exclusions>

22 </dependency>
第二步,抽取爬虫规则
为了方便扩展,我们要抽象出webMagic爬虫运行时需要的基本属性到BaseModel.java
  1 /**

  2  * @author yadong.zhang (yadong.zhang0415(a)gmail.com)

  3  * @website https://www.zhyd.me

  4  * @version 1.0

  5  * @date 2018/7/23 13:33

  6  */

  7 @Data

  8 public class BaseModel {

  9     @NotEmpty(message = "必须指定标题抓取规则(xpath)")

 10     private String titleRegex;

 11     @NotEmpty(message = "必须指定内容抓取规则(xpath)")

 12     private String contentRegex;

 13     @NotEmpty(message = "必须指定发布日期抓取规则(xpath)")

 14     private String releaseDateRegex;

 15     @NotEmpty(message = "必须指定作者抓取规则(xpath)")

 16     private String authorRegex;

 17     @NotEmpty(message = "必须指定待抓取的url抓取规则(xpath)")

 18     private String targetLinksRegex;

 19     private String tagRegex;

 20     private String keywordsRegex = "//meta [@name=keywords]/@content";

 21     private String descriptionRegex = "//meta [@name=description]/@content";

 22     @NotEmpty(message = "必须指定网站根域名")

 23     private String domain;

 24     private String charset = "utf8";

 25

 26     /**

 27      * 每次爬取页面时的等待时间

 28      */

 29     @Max(value = 5000, message = "线程间隔时间最大只能指定为5000毫秒")

 30     @Min(value = 1000, message = "线程间隔时间最小只能指定为1000毫秒")

 31     private int sleepTime = 1000;

 32

 33     /**

 34      * 抓取失败时重试的次数

 35      */

 36     @Max(value = 5, message = "抓取失败时最多只能重试5次")

 37     @Min(value = 1, message = "抓取失败时最少只能重试1次")

 38     private int retryTimes = 2;

 39

 40     /**

 41      * 线程个数

 42      */

 43     @Max(value = 5, message = "最多只能开启5个线程(线程数量越多越耗性能)")

 44     @Min(value = 1, message = "至少要开启1个线程")

 45     private int threadCount = 1;

 46

 47     /**

 48      * 抓取入口地址

 49      */

 50 //    @NotEmpty(message = "必须指定待抓取的网址")

 51     private String[] entryUrls;

 52

 53     /**

 54      * 退出方式{1:等待时间(waitTime必填),2:抓取到的url数量(urlCount必填)}

 55      */

 56     private int exitWay = 1;

 57     /**

 58      * 单位:秒

 59      */

 60     private int waitTime = 60;

 61     private int urlCount = 100;

 62

 63     private List<Cookie> cookies = new ArrayList<>();

 64     private Map<String, String> headers = new HashMap<>();

 65     private String ua = "Mozilla/5.0 (ozilla/5.0 (Windows NT 10.0; Win64; x64) AppleWebKit/537.36 (KHTML, like Gecko) Chrome/67.0.3396.99 Safari/537.36";

 66

 67     private String uid;

 68     private Integer totalPage;

 69

 70     /* 保留字段,针对ajax渲染的页面 */

 71     private Boolean ajaxRequest = false;

 72     /* 是否转存图片 */

 73     private boolean convertImg = false;

 74

 75     public String getUid() {

 76         return uid;

 77     }

 78

 79     public BaseModel setUid(String uid) {

 80         this.uid = uid;

 81         return this;

 82     }

 83

 84     public Integer getTotalPage() {

 85         return totalPage;

 86     }

 87

 88     public BaseModel setTotalPage(Integer totalPage) {

 89         this.totalPage = totalPage;

 90         return this;

 91     }

 92

 93     public BaseModel setTitleRegex(String titleRegex) {

 94         this.titleRegex = titleRegex;

 95         return this;

 96     }

 97

 98     public BaseModel setContentRegex(String contentRegex) {

 99         this.contentRegex = contentRegex;

100         return this;

101     }

102

103     public BaseModel setReleaseDateRegex(String releaseDateRegex) {

104         this.releaseDateRegex = releaseDateRegex;

105         return this;

106     }

107

108     public BaseModel setAuthorRegex(String authorRegex) {

109         this.authorRegex = authorRegex;

110         return this;

111     }

112

113     public BaseModel setTargetLinksRegex(String targetLinksRegex) {

114         this.targetLinksRegex = targetLinksRegex;

115         return this;

116     }

117

118     public BaseModel setTagRegex(String tagRegex) {

119         this.tagRegex = tagRegex;

120         return this;

121     }

122

123     public BaseModel setKeywordsRegex(String keywordsRegex) {

124         this.keywordsRegex = keywordsRegex;

125         return this;

126     }

127

128     public BaseModel setDescriptionRegex(String descriptionRegex) {

129         this.descriptionRegex = descriptionRegex;

130         return this;

131     }

132

133     public BaseModel setDomain(String domain) {

134         this.domain = domain;

135         return this;

136     }

137

138     public BaseModel setCharset(String charset) {

139         this.charset = charset;

140         return this;

141     }

142

143     public BaseModel setSleepTime(int sleepTime) {

144         this.sleepTime = sleepTime;

145         return this;

146     }

147

148     public BaseModel setRetryTimes(int retryTimes) {

149         this.retryTimes = retryTimes;

150         return this;

151     }

152

153     public BaseModel setThreadCount(int threadCount) {

154         this.threadCount = threadCount;

155         return this;

156     }

157

158     public BaseModel setEntryUrls(String[] entryUrls) {

159         this.entryUrls = entryUrls;

160         return this;

161     }

162

163     public BaseModel setEntryUrls(String entryUrls) {

164         if (StringUtils.isNotEmpty(entryUrls)) {

165             this.entryUrls = entryUrls.split("\r\n");

166         }

167         return this;

168     }

169

170     public BaseModel setExitWay(int exitWay) {

171         this.exitWay = exitWay;

172         return this;

173     }

174

175     public BaseModel setWaitTime(int waitTime) {

176         this.waitTime = waitTime;

177         return this;

178     }

179

180     public BaseModel setHeader(String key, String value) {

181         Map<String, String> headers = this.getHeaders();

182         headers.put(key, value);

183         return this;

184     }

185

186     public BaseModel setHeader(String headersStr) {

187         if (StringUtils.isNotEmpty(headersStr)) {

188             String[] headerArr = headersStr.split("\r\n");

189             for (String s : headerArr) {

190                 String[] header = s.split("=");

191                 setHeader(header[0], header[1]);

192             }

193         }

194         return this;

195     }

196

197     public BaseModel setCookie(String domain, String key, String value) {

198         List<Cookie> cookies = this.getCookies();

199         cookies.add(new Cookie(domain, key, value));

200         return this;

201     }

202

203     public BaseModel setCookie(String cookiesStr) {

204         if (StringUtils.isNotEmpty(cookiesStr)) {

205             List<Cookie> cookies = this.getCookies();

206             String[] cookieArr = cookiesStr.split(";");

207             for (String aCookieArr : cookieArr) {

208                 String[] cookieNode = aCookieArr.split("=");

209                 if (cookieNode.length <= 1) {

210                     continue;

211                 }

212                 cookies.add(new Cookie(cookieNode[0].trim(), cookieNode[1].trim()));

213             }

214         }

215         return this;

216     }

217

218     public BaseModel setAjaxRequest(boolean ajaxRequest) {

219         this.ajaxRequest = ajaxRequest;

220         return this;

221     }

222 }
如上方代码中所示,我们抽取出了基本的抓取规则和针对不同平台设置的网站属性(domain、cookies和headers等)。
第三步,编写解析器
因为“博客迁移功能”目前只涉及到页面的解析、抽取,所以,我们只需要实现webMagic的PageProcessor接口即可。这里有个关键点需要注意:随着网络技术的发展,现在前后端分离的网站越来越多,而前后端分离的网站基本通过ajax渲染页面。这种情况下,httpClient获取到的页面内容只是js渲染前的html,因此按照常规的解析方式,是解析不到这部分内容的,因此我们需要针对普通的html页面和js渲染的页面分别提供解析器。本文主要讲解针对普通html的解析方式,至于针对js渲染的页面的解析,以后会另行写文介绍。
 1 /**

 2  * 统一对页面进行解析处理

 3  *

 4  * @author yadong.zhang (yadong.zhang0415(a)gmail.com)

 5  * @version 1.0

 6  * @website https://www.zhyd.me

 7  * @date 2018/7/31 17:37

 8  */

 9 @Slf4j

10 public class BaseProcessor implements PageProcessor {

11     private static BaseModel model;

12

13     BaseProcessor() {

14     }

15

16     BaseProcessor(BaseModel m) {

17         model = m;

18     }

19

20     @Override

21     public void process(Page page) {

22         Processor processor = new HtmlProcessor();

23         if (model.getAjaxRequest()) {

24             processor = new JsonProcessor();

25         }

26         processor.process(page, model);

27

28     }

29

30     @Override

31     public Site getSite() {

32         Site site = Site.me()

33                 .setCharset(model.getCharset())

34                 .setDomain(model.getDomain())

35                 .setSleepTime(model.getSleepTime())

36                 .setRetryTimes(model.getRetryTimes());

37

38         //添加抓包获取的cookie信息

39         List<Cookie> cookies = model.getCookies();

40         if (CollectionUtils.isNotEmpty(cookies)) {

41             for (Cookie cookie : cookies) {

42                 if (StringUtils.isEmpty(cookie.getDomain())) {

43                     site.addCookie(cookie.getName(), cookie.getValue());

44                     continue;

45                 }

46                 site.addCookie(cookie.getDomain(), cookie.getName(), cookie.getValue());

47             }

48         }

49         //添加请求头,有些网站会根据请求头判断该请求是由浏览器发起还是由爬虫发起的

50         Map<String, String> headers = model.getHeaders();

51         if (MapUtils.isNotEmpty(headers)) {

52             Set<Map.Entry<String, String>> entrySet = headers.entrySet();

53             for (Map.Entry<String, String> entry : entrySet) {

54                 site.addHeader(entry.getKey(), entry.getValue());

55             }

56         }

57         return site;

58     }

59 }
Processor.java接口,只提供一个process方法供实际的解析器实现
 1 /**

 2  * 页面解析接口

 3  *

 4  * @author yadong.zhang (yadong.zhang0415(a)gmail.com)

 5  * @version 1.0

 6  * @website https://www.zhyd.me

 7  * @date 2018/7/31 17:37

 8  */

 9 public interface Processor {

10     void process(Page page, BaseModel model);

11 }
HtmlProcessor.java
 1 /**

 2  * 解析处理普通的Html网页

 3  *

 4  * @author yadong.zhang (yadong.zhang0415(a)gmail.com)

 5  * @version 1.0

 6  * @website https://www.zhyd.me

 7  * @date 2018/7/31 17:37

 8  */

 9 public class HtmlProcessor implements Processor {

10

11     @Override

12     public void process(Page page, BaseModel model) {

13         Html pageHtml = page.getHtml();

14         String title = pageHtml.xpath(model.getTitleRegex()).get();

15         String source = page.getRequest().getUrl();

16         if (!StringUtils.isEmpty(title) && !"null".equals(title) && !Arrays.asList(model.getEntryUrls()).contains(source)) {

17             page.putField("title", title);

18             page.putField("source", source);

19             page.putField("releaseDate", pageHtml.xpath(model.getReleaseDateRegex()).get());

20             page.putField("author", pageHtml.xpath(model.getAuthorRegex()).get());

21             page.putField("content", pageHtml.xpath(model.getContentRegex()).get());

22             page.putField("tags", pageHtml.xpath(model.getTagRegex()).all());

23             page.putField("description", pageHtml.xpath(model.getDescriptionRegex()).get());

24             page.putField("keywords", pageHtml.xpath(model.getKeywordsRegex()).get());

25         }

26         page.addTargetRequests(page.getHtml().links().regex(model.getTargetLinksRegex()).all());

27     }

28 }
JsonProcessor.java
 1 /**

 2  * 解析处理Ajax渲染的页面(待完善)

 3  *

 4  * @author yadong.zhang (yadong.zhang0415(a)gmail.com)

 5  * @version 1.0

 6  * @website https://www.zhyd.me

 7  * @date 2018/7/31 17:37

 8  */

 9 public class JsonProcessor implements Processor {

10     @Override

11     public void process(Page page, BaseModel model) {

12         String rawText = page.getRawText();

13         String title = new JsonPathSelector(model.getTitleRegex()).select(rawText);

14         if (!StringUtils.isEmpty(title) && !"null".equals(title)) {

15             page.putField("title", title);

16             page.putField("releaseDate", new JsonPathSelector(model.getReleaseDateRegex()).select(rawText));

17             page.putField("author", new JsonPathSelector(model.getAuthorRegex()).select(rawText));

18             page.putField("content", new JsonPathSelector(model.getContentRegex()).select(rawText));

19             page.putField("source", page.getRequest().getUrl());

20         }

21         page.addTargetRequests(page.getHtml().links().regex(model.getTargetLinksRegex()).all());

22     }

23 }
第四步,定义爬虫的入口类
此步不多做解释,就是最基本启动爬虫,然后通过自定义Pipeline对数据进行组装
 1 /**

 2  * 爬虫入口

 3  *

 4  * @author yadong.zhang (yadong.zhang0415(a)gmail.com)

 5  * @version 1.0

 6  * @website https://www.zhyd.me

 7  * @date 2018/7/23 10:38

 8  */

 9 @Slf4j

10 public class ArticleSpiderProcessor extends BaseProcessor implements BaseSpider<Article> {

11

12     private BaseModel model;

13     private PrintWriter writer;

14     private ValidatorFactory factory = Validation.buildDefaultValidatorFactory();

15

16     private ArticleSpiderProcessor() {

17     }

18

19     public ArticleSpiderProcessor(BaseModel model, PrintWriter writer) {

20         super(model);

21         this.model = model;

22         this.writer = writer;

23     }

24

25     public ArticleSpiderProcessor(BaseModel model) {

26         super(model);

27         this.model = model;

28     }

29

30     /**

31      * 运行爬虫并返回结果

32      *

33      * @return

34      */

35     @Override

36     public List<Article> run() {

37         List<String> errors = validateModel(model);

38         if (CollectionUtils.isNotEmpty(errors)) {

39             WriterUtil.writer2Html(writer, "校验不通过!请依据下方提示,检查输入参数是否正确......");

40             for (String error : errors) {

41                 WriterUtil.writer2Html(writer, ">> " + error);

42             }

43             return null;

44         }

45

46         List<Article> articles = new LinkedList<>();

47

48         WriterUtil.writer2Html(writer, ">> 爬虫初始化完成,共需抓取 " + model.getTotalPage() + " 页数据...");

49

50         Spider spider = Spider.create(new ArticleSpiderProcessor())

51                 .addUrl(model.getEntryUrls())

52                 .addPipeline((resultItems, task) -> {

53                     Map<String, Object> map = resultItems.getAll();

54                     String title = String.valueOf(map.get("title"));

55                     if (StringUtils.isEmpty(title) || "null".equals(title)) {

56                         return;

57                     }

58                     String content = String.valueOf(map.get("content"));

59                     String source = String.valueOf(map.get("source"));

60                     String releaseDate = String.valueOf(map.get("releaseDate"));

61                     String author = String.valueOf(map.get("author"));

62                     String description = String.valueOf(map.get("description"));

63                     description = StringUtils.isNotEmpty(description) ? description.replaceAll("\r\n| ", "")

64                             : content.length() > 100 ? content.substring(0, 100) : content;

65                     String keywords = String.valueOf(map.get("keywords"));

66                     keywords = StringUtils.isNotEmpty(keywords) && !"null".equals(keywords) ? keywords.replaceAll(" +|,", ",").replaceAll(",,", ",") : null;

67                     List<String> tags = (List<String>) map.get("tags");

68                     log.info(String.format(">> 正在抓取 -- %s -- %s -- %s -- %s", source, title, releaseDate, author));

69                     WriterUtil.writer2Html(writer, String.format(">> 正在抓取 -- <a href=\"%s\" target=\"_blank\">%s</a> -- %s -- %s", source, title, releaseDate, author));

70                     articles.add(new Article(title, content, author, releaseDate, source, description, keywords, tags));

71                 })

72                 .thread(model.getThreadCount());

73         // 启动爬虫

74         spider.run();

75         return articles;

76     }

77

78     private <T> List<String> validateModel(T t) {

79         Validator validator = factory.getValidator();

80         Set<ConstraintViolation<T>> constraintViolations = validator.validate(t);

81

82         List<String> messageList = new ArrayList<>();

83         for (ConstraintViolation<T> constraintViolation : constraintViolations) {

84             messageList.add(constraintViolation.getMessage());

85         }

86         return messageList;

87     }

88 }
第五步,提取html规则,运行测试。
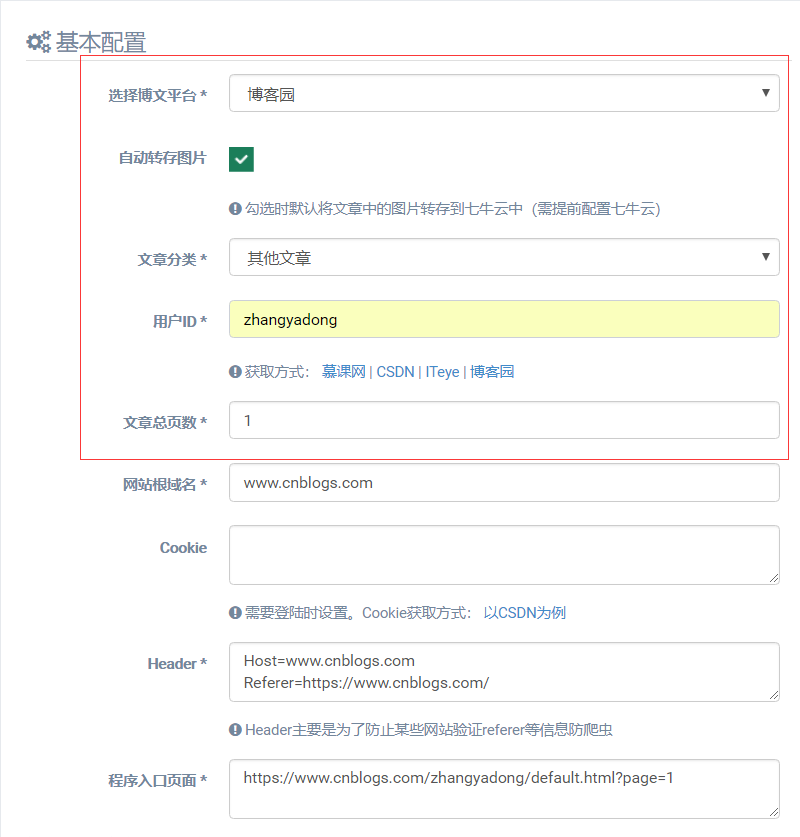
以我的博客园为例,爬虫的一般以文章列表页作为入口页面,本文示例为:https://www.cnblogs.com/zhangyadong/,然后我们需要手动提取文章相关内容的抓取规则(OneBlog中主要使用Xsoup-XPath解析器,使用方式参考链接)。以推荐一款自研的Java版开源博客系统OneBlog一文为例

如图所示,需要抽取的一共为六部分:
- 文章标题
- 文章正文内容
- 文章标签
- 文章发布日期
- 文章作者
- 待抽取的其他文章列表
通过f12查看页面结构,如下
整理相关规则如下:
- 标题:"//a[@id=cb_post_title_url]/html()"
- 文章正文:"//div[@id=cnblogs_post_body]/html()"
- 标签:"//div[@id=EntryTag]/a/html()"
- 发布日期:"//span[@id=post-date]/html()"
- 作者:"//div[@class=postDesc]/a[1]/html()"
- 待抽取的其他文章链接:".*www\\.cnblogs\\.com/zhangyadong/p/[\\w\\d]+\\.html"
注:“待抽取的其他文章链接”就是根据这篇文章的链接抽取出的规则

到这一步为止,基本的文章信息抽取规则就以获取完毕,接下来就跑一下测试
 1 @Test

 2 public void cnblogSpiderTest() {

 3     BaseSpider<Article> spider = new ArticleSpiderProcessor(new CnblogModel().setUid("zhangyadong")

 4             .setTotalPage(1)

 5             .setDomain("www.cnblogs.com")

 6             .setTitleRegex("//a[@id=cb_post_title_url]/html()")

 7             .setAuthorRegex("//div[@class=postDesc]/a[1]/html()")

 8             .setReleaseDateRegex("//span[@id=post-date]/html()")

 9             .setContentRegex("//div[@id=cnblogs_post_body]/html()")

10             .setTagRegex("//div[@id=EntryTag]/a/html()")

11             .setTargetLinksRegex(".*www\\.cnblogs\\.com/zhangyadong/p/[\\w\\d]+\\.html")

12             .setHeader("Host", "www.cnblogs.com")

13             .setHeader("Referer", "https://www.cnblogs.com/"));

14     spider.run();

15 }
Console控制台打印数据
2018-09-12 11:50:49 [us.codecraft.webmagic.Spider:306] INFO  - Spider www.cnblogs.com started!

2018-09-12 11:50:51 [com.zyd.blog.spider.processor.ArticleSpiderProcessor:89] INFO  - >> 正在抓取 -- https://www.cnblogs.com/zhangyadong/p/oneblog.html -- 推荐一款自研的Java版开源博客系统OneBlog -- 2018-09-11 09:53 -- HandsomeBoy丶

2018-09-12 11:50:52 [us.codecraft.webmagic.Spider:338] INFO  - Spider www.cnblogs.com closed! 2 pages downloaded.
如图,文章已成功被抓取,剩下的,无非就是要么保存到文件中,要么持久化到数据库里。OneBlog中是直接保存到了数据库里。
关于文章图片转存
为什么要添加“文章转存”功能?那是因为一些网站对本站内的静态资源做了“防盗链”,而所谓的“防盗链”说简单点就是:我的东西别人不能用,得需要我授权才可。这样做的好处就是,不会让自己的劳动成果白白给别人做了嫁衣。那么,针对这一特性,如果在“文章搬运”时,原文图片未经处理就原封不动的保存下来,以开源博客这篇文章为例,可能就会碰到如下情况:
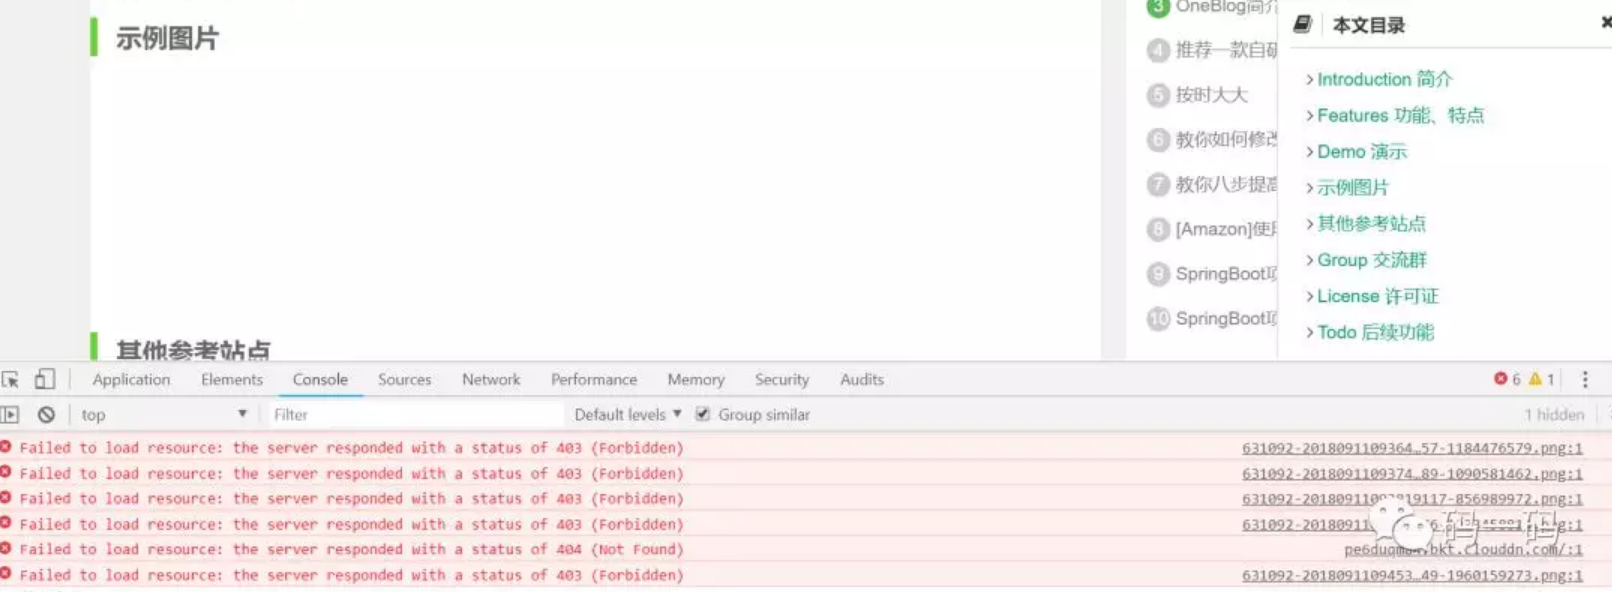
如上图,有一些图片无法显示,在控制台中可以看到这些图片全是报错403,也就是未授权,也就是所谓的被原站做了“防盗链”!这个时候,我们在抓取文章时就需要将原文的图片全部转存到自己服务器上,如此一来就解决了“被防盗链”的问题。
针对这一问题,OneBlog中则是通过正则表达式,将所有img标签的src里的网络文件下载下来后转存到七牛云中。简单代码如下:
 1 private static final Pattern PATTERN = Pattern.compile("<img[^>]+src\\s*=\\s*['\"]([^'\"]+)['\"][^>]*>");

 2 private String parseImgForHtml(String html, String qiniuBasePath, PrintWriter writer) {

 3     if (StringUtils.isEmpty(html)) {

 4         return null;

 5     }

 6     Matcher m = PATTERN.matcher(html);

 7     Set<String> imgUrlSet = new HashSet<>();

 8     while (m.find()) {

 9         String imgUrl = m.group(1);

10         imgUrlSet.add(imgUrl);

11     }

12     if (!CollectionUtils.isEmpty(imgUrlSet)) {

13         WriterUtil.writer2Html(writer, "  > 开始转存图片到七牛云...");

14         for (String imgUrl : imgUrlSet) {

15             String qiniuImgPath = ImageDownloadUtil.convertToQiniu(imgUrl);

16             if (StringUtils.isEmpty(qiniuImgPath)) {

17                 WriterUtil.writer2Html(writer, "  >> 图片转存失败,请确保七牛云以配置完毕!请查看控制台详细错误信息...");

18                 continue;

19             }

20             html = html.replaceAll(imgUrl, qiniuBasePath + qiniuImgPath);

21             WriterUtil.writer2Html(writer, String.format("  >> <a href=\"%s\" target=\"_blank\">原图片</a> convert to <a href=\"%s\" target=\"_blank\">七牛云</a>...", imgUrl, qiniuImgPath));

22         }

23     }

24     return html;

25 }
ImageDownloadUtil.convertToQiniu方法如下
 1 /**

 2  * 将网络图片转存到七牛云

 3  *

 4  * @param imgUrl 网络图片地址

 5  */

 6 public static String convertToQiniu(String imgUrl) {

 7     log.debug("download img >> %s", imgUrl);

 8     String qiniuImgPath = null;

 9     try (InputStream is = getInputStreamByUrl(checkUrl(imgUrl));

10          ByteArrayOutputStream outStream = new ByteArrayOutputStream();) {

11         byte[] buffer = new byte[1024];

12         int len = 0;

13         while ((len = is.read(buffer)) != -1) {

14             outStream.write(buffer, 0, len);

15         }

16         qiniuImgPath = QiniuApi.getInstance()

17                 .withFileName("temp." + getSuffixByUrl(imgUrl), QiniuUploadType.SIMPLE)

18                 .upload(outStream.toByteArray());

19     } catch (Exception e) {

20         log.error("Error.", e);

21     }

22     return qiniuImgPath;

23 }
(注:以上代码只是简单示例了一下核心代码,具体代码请参考我的开源博客:OneBlog)
总结
看完了我上面的介绍,你应该可以发现,其实技术实现起来,并没有太大的难点。主要重难点无非就一个:如何编写提取html内容的规则。规则一旦确定了,剩下的无非就是粘贴复制就能完成的代码而已。
最后声明
- 本工具开发初衷只是用来迁移 自己的文章 所用,因此不可用该工具恶意窃取他人劳动成果!
- 因不听劝阻,使用该工具恶意窃取他们劳动成果而造成的一切不良后果,本人表示:坚决不背锅!
- 如果该工具不好用,你们绝对不能打我!
- 有问题、建议,请留言,或者去gitee上提Issues!
最后打个广告,如果你觉得这篇文章对你有用,可以关注我的技术公众号:码一码,你的关注和转发是对我最大的支持,O(∩_∩)O

详细介绍如何自研一款"博客搬家"功能的更多相关文章
- Lucene5.5.4入门以及基于Lucene实现博客搜索功能
前言 一直以来个人博客的搜索功能很蹩脚,只是自己简单用数据库的like %keyword%来实现的,所以导致经常搜不到想要找的内容,而且高亮显示.摘要截取等也不好实现,所以决定采用Lucene改写博客 ...
- CentOS经常使用文件操作命令[百度博客搬家]
路径操作的CentOS经常使用命令 如今整理例如以下(百度博客搬家) cd pwd NO1. 显示当前路径 [root@rehat root]# pwd NO2. 返回用户主文件夹 [ro ...
- 博客搬家了,欢迎访问 http://blog.csdn.net/yinpengxiang/
博客搬家了,欢迎访问 http://blog.csdn.net/yinpengxiang/
- 使用Office-Word的博客发布功能(测试博文)
本人打算在博客园开博,但平时收集和整理资料都在OneNote中,又不想在写博客时还要进行复制粘贴操作,于是就想到了Microsoft Office自带的博客发布功能.在此做了一下测试,发布了此博文. ...
- 博客搬家啦。请访问我的新底盘www.boyipark.com
博客搬家啦.请访问我的新底盘 www.boyipark.com
- 博客搬家到CSDN:http://blog.csdn.net/yeweiouyang
博客搬家到CSDN:http://blog.csdn.net/yeweiouyang
- 博客搬家 https://hanwang945.github.io/
博客搬家 https://hanwang945.github.io/
- 博客搬家一下到CSDN
博客搬家一下到CSDN:http://blog.csdn.net/weixin_33409246
- 博客搬家了,新域名dinphy.wang
博客搬家了,新域名 dinphy.wang 博客搬家了,新域名 www.dinphy.wang 博客搬家了,新域名 dinphy.wang 博客搬家了,新域名 w ...
随机推荐
- RocketMQ开发者指南
1. 概念和特性 概念:介绍RocketMQ的基本概念模型 1 消息模型(Message Model) RocketMQ主要由 Producer.Broker.Consumer 三部分组成,其中Pro ...
- 公司只提供签名服务,不提供证书文件,如何打包Electron应用
需求 稍微正规点的公司,都要为自己开发的软件做代码签名,如下图所示 代码签名的主要目的是为了确保软件的来源(这个软件是由谁生产的)和软件的内容不被篡改 一个软件公司可能有很多团队,很多开发者,开发不同 ...
- 团队作业4-Day3
团队作业4-Day3 项目git地址 1. 站立式会议 2. 项目燃尽图 3. 适当的项目截图 今日暂无较大代码更新 4. 代码/文档签入记录(部分) 5. 每人每日总结 吴梓华:今天未进行开发,学习 ...
- python web的一些常见技术面试笔试题
1. 三次握手四次挥手 tcp建立连接的过程是三次挥手,断开连接是4次挥手. 三次握手:建立连接时 a. 客户端发送syn=1 seq=k给服务器 b. 服务器接收到之后知道有客户端想建立连接, ...
- Codeforces Edu Round 50 A-D
A. Function Height 由于只能提升\(x\)为奇数的点,每个三角形的底一定为\(2\), 则要求我们求: \(2 * (h_1 + h_2 + - + h_n) / 2 = k\),使 ...
- Java PDF全套笔记
java 知识pdf文档,基本涵盖了java知识点 java基础部分:https://github.com/HOSystemH/JavaFile/tree/master/JavaPDF java高级部 ...
- 使用pip安装pymysql出错;Could not find a version that satisfies the requirement cryptography (from pymysql) (from versions: ) No matching distribution found for cryptography (from pymysql)
今天使用pip安装pymysql时出现如下错误: Could not find a version that satisfies the requirement cryptography (from ...
- Hadoop框架:Yarn基本结构和运行原理
本文源码:GitHub·点这里 || GitEE·点这里 一.Yarn基本结构 Hadoop三大核心组件:分布式文件系统HDFS.分布式计算框架MapReduce,分布式集群资源调度框架Yarn.Ya ...
- 一个实现浏览器网页与本地程序之间进行双向调用的轻量级、强兼容、可扩展的插件开发平台—PluginOK中间件
通过PluginOK中间件插件平台(原名本网通WebRunLocal)可实现在网页中的JavaScript脚本无障碍访问本地电脑的硬件.调用本地系统的API及相关组件,同时可彻底解决ActiveX组件 ...
- Jmeter对数据库做压力测试
一.环境:apache-jmeter-5.0,Oracle11g.windows7.jdk1.8.ojdbc14-10.2.0.2.0.jar二.操作配置:2.1.启动Jmeter Jmeter初始化 ...