JPG学习笔记2(附完整代码)
#topics h2 { background: rgba(43, 102, 149, 1); border-radius: 6px; box-shadow: 0 0 1px rgba(95, 90, 75, 1), 1px 1px 6px 1px rgba(10, 10, 0, 0.5); color: rgba(255, 255, 255, 1); font-family: "微软雅黑", "宋体", "黑体", Arial; font-size: 15px; font-weight: bold; height: 24px; line-height: 23px; margin: 12px 0 !important; padding: 5px 0 5px 10px; text-shadow: 2px 2px 3px rgba(34, 34, 34, 1) }
#topics h1 span { font-weight: bold; line-height: 1.5; font-family: "Helvetica Neue", Helvetica, Verdana, Arial, sans-serif; text-decoration: underline; color: rgba(201, 27, 67, 1); text-shadow: 2px 2px 3px rgba(34, 34, 34, 1) }
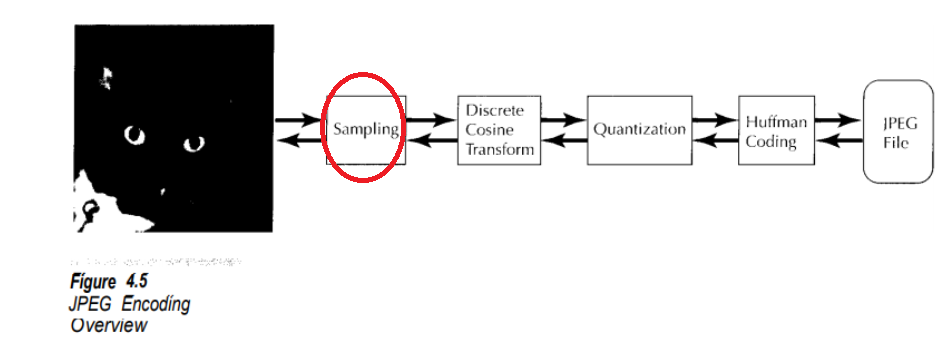
我们已经从BMP图中拿到了需要压缩RGB的数据,我们需要对原数据从RGB域转变YCbCr域,之后对YCbCr数据进行下采样(down sampling)。对于不需要看文章的同学,这边直接给出源代码。https://github.com/Cheemion/JPEG_COMPRESS
1.RGB域和YCbCr域
RGB代表红绿蓝,通过3种颜色的叠加来得到我们看到的颜色。0-到255分别代表颜色从浅到深。
Y是RGB的加权平均值,称之为亮度(luminance)
Cb是B分量和亮度的差值, 称为Chrominance(Cb)
Cr是R分量和亮度的差值,称为Chrominance(Cr)
以下代码将RGB转为YCbCr。为什么将RGB转为YCbCr? 因为人眼对亮度(Y)的变化更敏感,所以我可以对Cr和Cb进行下采样(压缩,比如本来1个字节代表一个pixel的数据,压缩后用1个字节代表4个pixels的数据),尽可能保留完整的Y分量。通过这样子我们可以进一步的压缩数据。
void JPG::convertToYCbCr() {

    for(uint i = 0; i < height; i++) {

        for(uint j = 0; j < width; j++) {

            YCbCr temp = BMPData[i * width + j];

            BMPData[i * width + j].Y  =  0.299  * temp.red + 0.587 * temp.green  + 0.114  * temp.blue;

            BMPData[i * width + j].Cb = -0.1687 * temp.red - 0.3313 * temp.green + 0.5    * temp.blue + 128;

            BMPData[i * width + j].Cr =  0.5    * temp.red - 0.4187 * temp.green - 0.0813 * temp.blue + 128;

        }

    }

}
2.sampling(采样)
采样通常是对连续信号进行采样,比如下图蓝色是连续信号x(t),红色是对信号进行采样后得到的信号x[n]=x(T*n), T是采样间隔,1/T是采样频率。

而在JPEG中,我们是对已经离散的数据进行采样,并且JPEG中的采样数值是相对采样数值。相对于最高采样频率的采样数值。
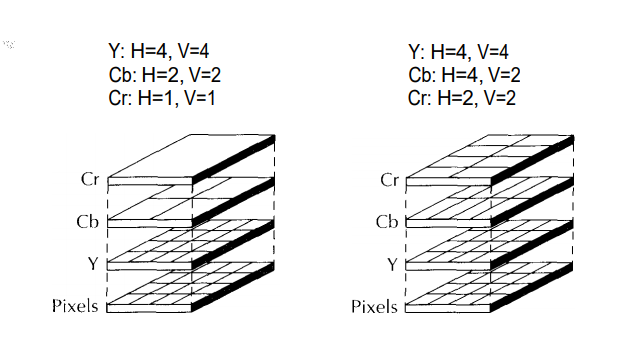
如下左图,Y(luminance)分量的水平采样频率和垂直采样频率都是4,是最高的采样频率。最高的采样频率就相当于保留原图的Y分量,不进行下采样。
Cb分量的水平和垂直的采样频率都是2,等于最高采样频率的一半。所以水平每2个点采样一次,垂直每2个点采样一次。
Cr分量的水平和垂直采样频率都是1,等于最高采样频率的1/4。所以水平和垂直每4个点采样一个点。
3个分量的量叠加就得到了我们的像素的值。
2.YCbCr数据在JPEG中的存储
JPEG规定所有的数据都是以8*8的一个block(data unit)的形式进行离散余弦变化和存储的.可以把这8*8的block看成是最小存储单元。
MCU是Y,Cb,Cr的完整的block组成的能够完整还原一个范围的色彩的最小单元。啥意思?
假设我们的图片是10*10的大小 .
.
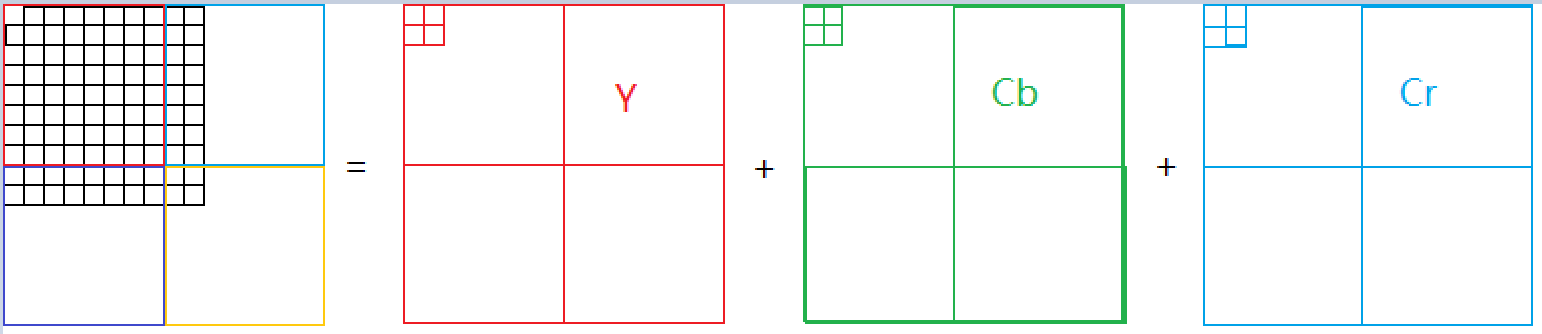
若Y,Cb,Cr的水平和垂直的采样频率都为1,则原图由4个mcu(4种颜色分别代表一个MCU)组成(每个mcu包含1个y的block,一个cb的block,一个cr的block, 每个mcu的大小为8*8),边缘空白的地方可用0替代,也可以重复边缘的值。
左上角那块4*4的小block的值分别
pixel[0,0] = y[0,0] + cb[0,0] + cr[0,0]
pixel[0,1] = y[0,1] + cb[0,1] + cr[0,1]
pixel[1,0] = y[1,0] + cb[1,0] + cr[1,0]
pixel[1,1] = y[1,1] + cb[1,1] + cr[1,1]
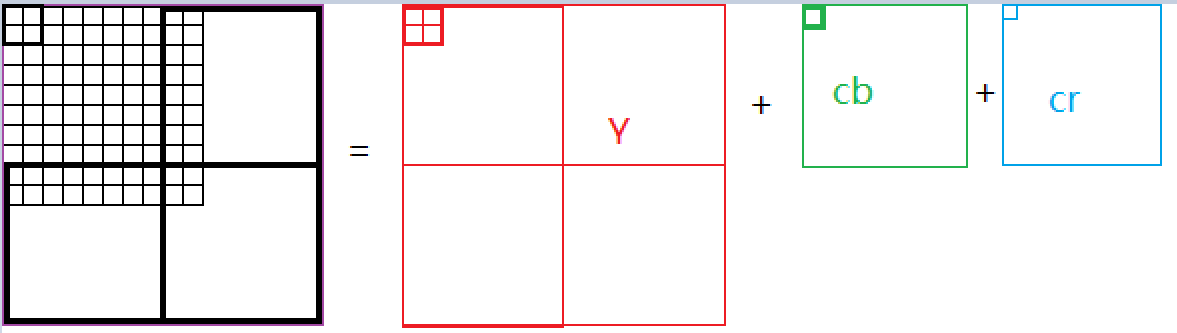
若Y的水平和垂直采样频率为2, cb和cr的采样频率为1, 则原图由1个mcu组成(大小为16*16)。mcu中包含4个y的block(2*2),一个cb,一个cr。总共6个block,大小只占原来block的一半。
左上角那块4*4的小block的值分别
pixel[0,0] = y[0,0] + cb[0,0] + cr[0,0]
pixel[0,1] = y[0,1] + cb[0,0] + cr[0,0]
pixel[1,0] = y[1,0] + cb[0,0] + cr[0,0]
pixel[1,1] = y[1,1] + cb[0,0] + cr[0,0]
总结:mcu大小= 垂直最大采样值 * 水平最大采样值, 一个mcu包含y的水平采样值*y的垂直采样值个的y个block(y的水平采样为2,垂直为2,则一个muc有4个yblock)。其他分量同理
1.3定义JPG class代码
//定义Block
using Block = int[64];
//定义YCbCr,同时这个结构用来展示存放rgb数据

struct YCbCr {

    union

    {

        double Y;

        double red;

    };

    union

    {

        double Cb;

        double green;

    };

    union {

        double Cr;

        double blue;

    };

};
struct MCU {

    Block* y;

    Block* cb;

    Block* cr;

};


//大于JPG类,用于压缩图片

class JPG

{

public:
    //rgb转到YCbCr

    void convertToYCbCr();
   //下采样

    void subsampling();
    //变化

    void discreteCosineTransform();
    //量化

    void quantization();
    //哈夫曼

    void huffmanCoding();
    //输出

    void output(std::string path);

public:
    MCU* data;
    Block* blocks;
    //BMPData存放的是bmp图片的RGB数据

    YCbCr* BMPData;

    uint blockNum;

    //原图的像素

    uint width;

    uint height;

    //mcu 有多少个 长度是多少

    uint mcuWidth;

    uint mcuHeight;

    //一个完整的muc的水平和垂直像素个数

    uint mcuVerticalPixelNum;

    uint mcuHorizontalPixelNum;

    //用于subsampling

    // only support 1 or 2

    byte YVerticalSamplingFrequency;

    byte YHorizontalSamplingFrequency;

    byte CbVerticalSamplingFrequency;

    byte CbHorizontalSamplingFrequency;

    byte CrVerticalSamplingFrequency;

    byte CrHorizontalSamplingFrequency;

    byte maxVerticalSamplingFrequency;

    byte maxHorizontalSamplingFrequency;

public:


    JPG(uint width, uint height,const RGB* const rgbs,

        byte YVerticalSamplingFrequency, byte YHorizontalSamplingFrequency,

        byte CbVerticalSamplingFrequency, byte CbHorizontalSamplingFrequency,

        byte CrVerticalSamplingFrequency, byte CrHorizontalSamplingFrequency

       )

        :width(width), height(height),

         YVerticalSamplingFrequency(YVerticalSamplingFrequency), YHorizontalSamplingFrequency(YHorizontalSamplingFrequency),

         CbVerticalSamplingFrequency(CbVerticalSamplingFrequency), CbHorizontalSamplingFrequency(CbHorizontalSamplingFrequency),

         CrVerticalSamplingFrequency(CrVerticalSamplingFrequency), CrHorizontalSamplingFrequency(CrHorizontalSamplingFrequency)

        {

            maxHorizontalSamplingFrequency = std::max({YHorizontalSamplingFrequency, CbHorizontalSamplingFrequency, CrHorizontalSamplingFrequency});

            maxVerticalSamplingFrequency = std::max({YVerticalSamplingFrequency, CbVerticalSamplingFrequency, CrVerticalSamplingFrequency});

            //mcu的个数

            mcuWidth = (width + (maxHorizontalSamplingFrequency * 8 - 1)) / (maxHorizontalSamplingFrequency * 8);

            mcuHeight = (height + (maxVerticalSamplingFrequency * 8 - 1)) / (maxVerticalSamplingFrequency * 8);

            mcuVerticalPixelNum = maxVerticalSamplingFrequency * 8;

            mcuHorizontalPixelNum = maxHorizontalSamplingFrequency * 8;

            //总共多少个MCU

            data = new MCU[mcuWidth * mcuHeight];

            //一个MCU有多少个Block

            blockNum = (YVerticalSamplingFrequency * YHorizontalSamplingFrequency + CbVerticalSamplingFrequency * CbHorizontalSamplingFrequency + CrHorizontalSamplingFrequency * CrVerticalSamplingFrequency);

            //分配block内存空间

            blocks = new Block[mcuHeight * mcuHeight * blockNum];

            //把内存映射到对于的结构中

            for (uint i = 0; i < mcuHeight; i++) {

                for (uint j = 0; j < mcuWidth; j++) {


                    data[i * mcuWidth + j].y = &blocks[(i * mcuWidth + j) * blockNum];

                    data[i * mcuWidth + j].cb = data[i * mcuWidth + j].y + YVerticalSamplingFrequency * YHorizontalSamplingFrequency;

                    data[i * mcuWidth + j].cr = data[i * mcuWidth + j].cb + CbVerticalSamplingFrequency * CbHorizontalSamplingFrequency;

                }

            }

            //BMP数据用于存放,bmp的原图的数据

            BMPData = new YCbCr[width * height];
            //把bmp数据暂时存放在BMPdata中

            for(uint i = 0; i < height; i++) {

                for(uint j = 0; j < width; j++) {

                    BMPData[i * width + j].red = static_cast<double>(rgbs[i * width + j].red);

                    BMPData[i * width + j].blue = static_cast<double>(rgbs[i * width + j].blue);

                    BMPData[i * width + j].green = static_cast<double>(rgbs[i * width + j].green);

                }

            }

        }

    ~JPG() {

        delete[] data;

        delete[] blocks;

        delete[] BMPData;

    }

};
1.6下采样代码
//这里直接把左上的点 当作subsampling的点了

//也可以取平均值

void JPG::subsampling() {

    //遍历mcu

    for (uint i = 0; i < mcuHeight; i++) {

        for (uint j = 0; j < mcuWidth; j++) {
            //拿到mcu

            MCU& currentMCU = data[i * mcuWidth + j];
            //每个mcu起始的坐标点

            uint heightOffset = i * maxVerticalSamplingFrequency * 8;

            uint widthOffset = j * maxHorizontalSamplingFrequency * 8;

            //iterate over 每一个component Y, cb cr

            for (uint componentID = 1; componentID <= 3; componentID++) {

                //遍历block, 从muc中拿block

                for(uint ii = 0, yOffSet = heightOffset; ii < getVerticalSamplingFrequency(componentID); ii++, yOffSet = yOffSet + 8) {

                    for(uint jj = 0, xOffset = widthOffset; jj < getHorizontalSamplingFrequency(componentID); jj++, xOffset = xOffset + 8) {
                        //拿到具体的block对象

                        Block& currentBlock = currentMCU[componentID][ii * getHorizontalSamplingFrequency(componentID) + jj];

                        //遍历Block every pixels 像素, 并且采样赋值

                        for(uint y = 0; y < 8; y++) {

                            for(uint x = 0; x < 8; x++) {
                                //得到被采样的那个点的坐标

                                uint sampledY = yOffSet + y *  maxVerticalSamplingFrequency / getVerticalSamplingFrequency(componentID);

                                uint sampledX = xOffset + x * maxHorizontalSamplingFrequency / getHorizontalSamplingFrequency(componentID);

                                //cannot find in original pictures;

                                if(sampledX >= width || sampledY >= height) {

                                    currentBlock[y * 8 + x] = 0;

                                } else {

                                    currentBlock[y * 8 + x] = BMPData[sampledY * width + sampledX][componentID];

                                }

                            }

                        }

                    }

                }

            }

        }

    }

}
完整代码 https://github.com/Cheemion/JPEG_COMPRESS/tree/main/Day2
完结
祝你开心每一天。
JPG学习笔记2(附完整代码)的更多相关文章
- JPG学习笔记3(附完整代码)
#topics h2 { background: rgba(43, 102, 149, 1); border-radius: 6px; box-shadow: 0 0 1px rgba(95, 90, ...
- Android 监听双卡信号强度(附完整代码)
Android 监听双卡信号强度 监听单卡信号强度 监听单卡的信号强度非常简单直接用TelephonyManager.listen()去监听sim卡的信号强度. TelephonyManager = ...
- JPG学习笔记4(附完整代码)
#topics h2 { background: rgba(43, 102, 149, 1); border-radius: 6px; box-shadow: 0 0 1px rgba(95, 90, ...
- WebGL three.js学习笔记 创建three.js代码的基本框架
WebGL学习----Three.js学习笔记(1) webgl介绍 WebGL是一种3D绘图协议,它把JavaScript和OpenGL ES 2.0结合在一起,通过增加OpenGL ES 2.0的 ...
- 学习笔记:python3,代码。小例子习作(2017)
http://www.cnblogs.com/qq21270/p/7634025.html 学习笔记:python3,一些基本语句(一些基础语法的代码,被挪到这里了) 日期和时间操作 http://b ...
- 学习笔记:python3,代码。小例子习作
http://www.cnblogs.com/qq21270/p/7634025.html 学习笔记:python3,一些基本语句(一些基础语法的代码,被挪到这里了) 日期和时间操作 http://b ...
- 雨痕 的《Python学习笔记》--附脑图(转)
原文:http://www.pythoner.com/148.html 近日,在某微博上看到有人推荐了 雨痕 的<Python学习笔记>,从github上下载下来看了下,确实很不错. 注意 ...
- Linux Shell输出颜色字符学习笔记(附Python脚本实现自动化定制生成)
齿轮发出咔嚓一声,向前进了一格.而一旦向前迈进,齿轮就不能倒退了.这就是世界的规则. 0x01背景 造了个轮子:御剑师傅的ipintervalmerge的Python版本.觉得打印的提示信息如果是普通 ...
- 基于C#的内网穿透学习笔记(附源码)
如何让两台处在不同内网的主机直接互连?你需要内网穿透! 上图是一个非完整版内外网通讯图由内网端先发起,内网设备192.168.1.2:6677发送数据到外网时候必须经过nat会转换成 ...
随机推荐
- 前端面试之CSS常用的选择器!
前端面试之CSS常用的选择器! 标签选择器 <style> /* <!-- 标签选择器 :写上标签名 -->*/ p { color: green; } div { color ...
- GStreamer各个包构建
GStreamer按功能.维护的标准化程度.依赖库的版权差异等分了若干个包(package),如 gstreamer, gst-plugins-base, gst-plugins-good, gst- ...
- Page not found (404) 不被Django的exception中间件捕捉 中间件
Using the URLconf defined in config.urls, Django tried these URL patterns, in this order:
- memory ordering 内存排序
Memory ordering - Wikipedia https://en.wikipedia.org/wiki/Memory_ordering https://zh.wikipedia.org/w ...
- 【Source Insight】查找功能 Lookup References 详解
1.Options Case Sensitive //区分大小写 Whole Words Only //全字匹配查找 Skip Inactive Code //跳过无效代码查找 Skip Commen ...
- 外观模式(Facade) Adapter及Proxy 设计模式之间的关系 flume 云服务商多个sdk的操作 face
小结: 1. 外观模式/门面模式 Facade 往是多个类或其它程序单元,通过重新组合各类及程序单元,对外提供统一的接口/界面. Proxy(代理)注重在为Client-Subject提供一个访问的 ...
- Java进阶专题(二十二) 从零开始搭建一个微服务架构系统 (上)
前言 "微服务"一词源于 Martin Fowler的名为 Microservices的,博文,可以在他的官方博客上找到http:/ /martinfowler . com/art ...
- 2021年,python的入门基础-----基础一
先记录下pycharm编译器相关的信息 1.某些常用快捷键: Ctrl+/ 注释: Tab缩进,shift+Tab; Ctrl+Z 撤销 2.设置界面编辑风格: File>Settings> ...
- Phoenix的shell操作
Phoenix的shell操作 一.Phoenix的Shell操作 1.进入(hbase01是主机名,2181是zookeeper的端口) 2.退出(注意结尾不加分号) 3.查询所有表(注意结尾不加分 ...
- javascript脚本何时会被执行
javascript脚本可以嵌入在html内的任意地方,但它何时被调用呢?当浏览器打开HTML文件后,会直接运行不是声明函数的脚本或通过事件调用脚本函数,下面分析这几种情况. 1.浏览器在打开页面时执 ...