nginx+uwsgi+django+virtualenv+supervisor部署web服务器
wsgi    全称web server gateway interface,wsgi不是服务器,也不是python模块,只是一种协议,描述web server如何和web application通信的规则。
运行在wsgi上的web框架有bottle,flask,django
uwsgi 和wsgi一样是通信协议,是uWSGI服务器的单独协议,用于定义传输信息的类型
uWSGI 是一个web服务器,实现了WSGI协议,uwsgi协议。a
nginx web服务器,更加安全,更好的处理处理静态资源,缓存功能,负载均衡,因此nginx的强劲性能,配合uWSGI服务器会更加安全,性能有保障。
django 高级的python web框架,用于快速开发,解决web开发的大部分麻烦,程序员可以更专注业务逻辑,无须重新造轮子
逻辑图

web服务器
传统的c/s架构,请求的过程是

客户端 > 服务器

服务器 > 客户端

服务器就是:1.接收请求 2.处理请求 3.返回响应
web框架层
HTTP的动态数据交给web框架,例如django遵循MTV模式处理请求。

HTTp协议使用url定位资源,urls.py将路由请求交给views视图处理,然后返回一个结果,完成一次请求。

web框架使用者只需要处理业务的逻辑即可。
Django Nginx+uwsgi 安装配置
在前面的章节中我们使用 python manage.py runserver 来运行服务器。这只适用测试环境中使用。
正式发布的服务,需要一个可以稳定而持续的服务器。
准备工作
基础开发环境配置
yum install zlib-devel bzip2-devel pcre-devel openssl-devel ncurses-devel sqlite-devel readline-devel tk-devel
提前安装好python3环境
https://www.cnblogs.com/zhaopanpan/articles/9503081.html
virtualenv
请确保你的虚拟环境正常工作
https://www.cnblogs.com/zhaopanpan/articles/9160760.html
安装django1.11
pip3 install django==1.11
#创建django项目mysite
django-admin startproject mysite
#创建app01
python3 manage.py startapp app01
mysite/settings.py
#settings.py设置

ALLOWED_HOSTS = ['*']

install app01
mysite/urls.py
from app01 import views

urlpatterns = [

    url(r'^admin/', admin.site.urls),

    url(r'^hello_django/', views.hello),

]
app01/views.py

from django.shortcuts import render,HttpResponse

# Create your views here.

def hello(request):

    print('request is :',request)

    return HttpResponse('django is ok ')

安装uWSGI

进入虚拟环境venv,安装uwsgi

(venv) [root@slave 192.168.11.64 /opt]$pip3 install uwsgi
检查uwsgi版本
(venv) [root@slave 192.168.11.64 /opt]$uwsgi --version
2.0.17.1
#检查uwsgi python版本
uwsgi --python-version

运行简单的uWSGI

#启动一个python

uwsgi --http :8000 --wsgi-file test.py
http :8000: 使用http协议,端口8000wsgi-file test.py: 加载指定的文件,test.py
#test.py

def application(env, start_response):

    start_response('200 OK', [('Content-Type','text/html')])

    return [b"Hello World"] # python3

uWsgi热加载python程序
在启动命令后面加上参数

uwsgi --http :8088 --module mysite.wsgi --py-autoreload=1
#此时修改django代码,uWSGI会自动加载django程序,页面生效
运行django程序
#mysite/wsgi.py  确保找到这个文件
uwsgi --http :8000 --module mysite.wsgi
module mysite.wsgi: 加载指定的wsgi模块
uwsgi配置文件
uwsgi支持ini、xml等多种配置方式,本文以 ini 为例, 在/etc/目录下新建uwsgi_nginx.ini,添加如下配置:

# mysite_uwsgi.ini file

[uwsgi]

# Django-related settings

# the base directory (full path)   项目根目录

chdir           = /opt/mysite

# Django's wsgi file    wsgi文件 格式为   项目名.wsgi

module          = mysite.wsgi

# the virtualenv (full path)   虚拟环境目录

home            = /opt/venv

# process-related settings

# master

master          = true

# maximum number of worker processes   最大开启的进程数

processes       = 1

# the socket (use the full path to be safe    # web服务器启动的端口

socket          = 0.0.0.0:8000

# ... with appropriate permissions - may be needed

# chmod-socket    = 664

# clear environment on exit

vacuum          = true

补充:因为nginx与uwsgi之间的通信是建立在socket的连接,所以 上面的配置文件中倒数第三条为 socket =0.0.0.0:8000,如果不通过nginx,直接使用uwsgi与web服务器通信,则修改为 http =0.0.0.0:8000 ,否则,报错:invalid request block size: 21573 (max 4096)...skip
配置nginx结合uWSGI
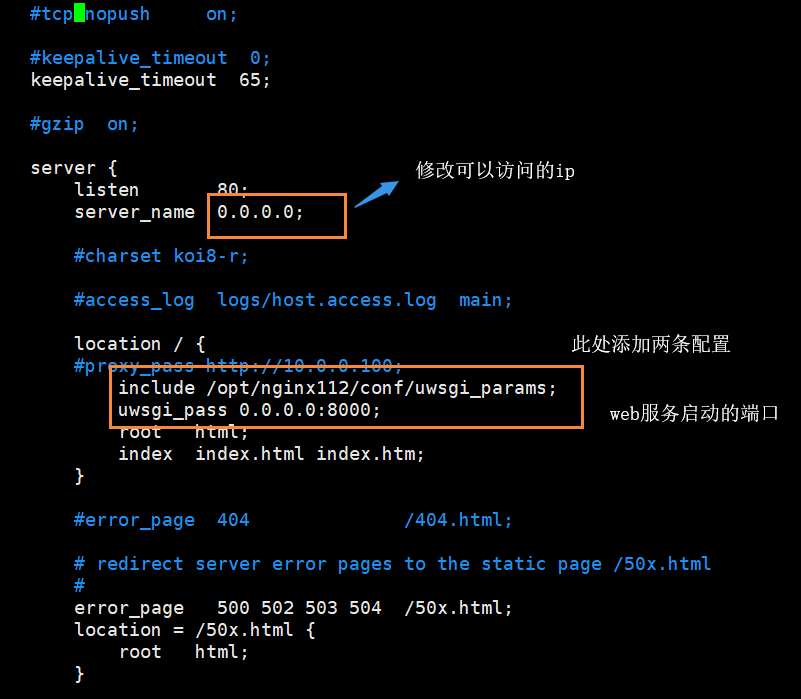
配置nginx.conf


worker_processes  1;

error_log  logs/error.log;

pid        logs/nginx.pid;

events {

    worker_connections  1024;

}

http {

    include       mime.types;

    default_type  application/octet-stream;

    log_format  main  '$remote_addr - $remote_user [$time_local] "$request" '

                      '$status $body_bytes_sent "$http_referer" '

                      '"$http_user_agent" "$http_x_forwarded_for"';

    access_log  logs/access.log  main;

    sendfile        on;

    keepalive_timeout  65;

    server {

        listen       80;

        server_name  192.168.11.64;

        location / {

         include  /opt/nginx1-12/conf/uwsgi_params;

         uwsgi_pass 0.0.0.0:8000;

            root   html;

            index  index.html index.htm;

        }

        error_page   500 502 503 504  /50x.html;

        location = /50x.html {

            root   html;

        }

    }

}

配置完启动nginx
指定配置文件启动命令
uwsgi --ini /etc/uwsgi_nginx.ini
supervisor
Supervisor是一个进程管理工具,只需要将要管理进程的可执行文件的路径添加到supervisor的配置文件中就好了。此时被管理进程被视为supervisor的子进程,若该子进程异常中断,则父进程可以准确的获取子进程异常中断的信息。
supervisor 是基于 python 的任务管理工具,用来自动运行各种后台任务,当然你也能直接利用 nohup 命令使任务自动后台运行,但如果要重启任务,每次都自己手动 kill 掉任务进程,这样很繁琐,而且一旦程序错误导致进程退出的话,系统也无法自动重载任务。
这里要配置基于virtualenv的supervisor
由于supervisor在python3下无法使用,因此只能用python2去下载!!!!!!
#注意此时已经退出虚拟环境了!!!!!
yum install python-setuptools
easy_install supervisor
通过命令生成supervisor的配值文件
echo_supervisord_conf > /etc/supervisord.conf
然后再/etc/supervisord.conf末尾添加上如下代码!!!!!!

[program:my]
# 要管理进程的文件路径

#command=/opt/venv/bin/uwsgi --ini  /etc/uwsgi_nginx.ini  #这里是结合virtualenv的命令 和supervisor的精髓!!!!
command= /home/venv/bin/uwsgi --uwsgi 0.0.0.0:8000 --chdir /opt/mysite --home=/home/venv --module mysite.wsgi

directory=/opt/mysite

startsecs=0

stopwaitsecs=0

autostart=true

autorestart=true

最后启动supervisor,完成uWSGI启动django,nginx反向代理
supervisord -c /etc/supervisord.conf
重新加载supervisor

一、添加好配置文件后

二、更新新的配置到supervisord

supervisorctl update

三、重新启动配置中的所有程序

supervisorctl reload

四、启动某个进程(program_name=你配置中写的程序名称)

supervisorctl start program_name

五、查看正在守候的进程

supervisorctl

六、停止某一进程 (program_name=你配置中写的程序名称)

pervisorctl stop program_name

七、重启某一进程 (program_name=你配置中写的程序名称)

supervisorctl restart program_name

八、停止全部进程

supervisorctl stop all

注意:显示用stop停止掉的进程,用reload或者update都不会自动重启。

参考文档:http://uwsgi-docs-zh.readthedocs.io/zh_CN/latest/tutorials/Django_and_nginx.html
uwsgi热加载:https://uwsgi-docs-zh.readthedocs.io/zh_CN/latest/Management.html
nginx+uwsgi+django+virtualenv+supervisor部署web服务器的更多相关文章
- nginx+uWSGI+django+virtualenv+supervisor发布web服务器
nginx+uWSGI+django+virtualenv+supervisor发布web服务器 导论 WSGI是Web服务器网关接口.它是一个规范,描述了Web服务器如何与Web应用程序通信,以 ...
- Linux - nginx+uWSGI+django+virtualenv+supervisor发布web服务器
目录 Linux - nginx+uWSGI+django+virtualenv+supervisor发布web服务器 crm django项目部署流程 使用supervisro启动uwsgi,退出虚 ...
- 12,nginx+uWSGI+django+virtualenv+supervisor发布web服务器
导论 WSGI是Web服务器网关接口.它是一个规范,描述了Web服务器如何与Web应用程序通信,以及Web应用程序如何链接在一起以处理一个请求,(接收请求,处理请求,响应请求) 基于wsgi运行的框架 ...
- nginx+uWSGI+django+virtualenv+supervisor发布web服务器流程
导论 WSGI是Web服务器网关接口.它是一个规范,描述了Web服务器如何与Web应用程序通信,以及Web应用程序如何链接在一起以处理一个请求,(接收请求,处理请求,响应请求)基于wsgi运行的框架有 ...
- 08 nginx+uWSGI+django+virtualenv+supervisor发布web服务器
一.为什么要用nginx,uwsgi? 1 首先nginx 是对外的服务接口,外部浏览器通过url访问nginx, 2nginx 接收到浏览器发送过来的http请求,将包进行解析,分析url,如果是静 ...
- 三 nginx+uWSGI+django+virtualenv+supervisor发布web服务器
https://www.cnblogs.com/pyyu/p/9481344.html?tdsourcetag=s_pcqq_aiomsg 一 uwsgi安装 1.安装uwsgi,进入到一个虚拟机环境 ...
- nginx+uWSGI+django+virtualenv+superviso发布web服务器
1.环境依赖 yum groupinstall "Development tools" -y yum install zlib-devel bzip2-devel pcre-dev ...
- [阿里云部署] Ubuntu+Flask+Nginx+uWSGI+Mysql搭建阿里云Web服务器
部署地址:123.56.7.181 Ubuntu+Flask+Nginx+uWSGI+Mysql搭建阿里云Web服务器 这个标题就比之前的"ECS服务器配置Web环境的全过程及参考资料&qu ...
- [技术博客]ubuntu+nginx+uwsgi+Django+https的部署
ubuntu+nginx+uwsgi+Django+https部署文档 配置机器介绍 操作系统:Ubuntu 18.04.2 LTS 64位 python版本:Python 3.6.7 Django版 ...
随机推荐
- AOJ.866 飞越原野 (三维BFS)
AOJ.866 飞越原野 (三维BFS) 题意分析 点我挑战题目 相比于普通的BFS,要多一维来记录当前剩余的体力.而且还要额外的一层循环来处理,飞过的路程. 代码总览 #include <io ...
- UVA.11464 Even Parity (思维题 开关问题)
UVA.11464 Even Parity (思维题 开关问题) 题目大意 给出一个n*n的01方格,现在要求将其中的一些0转换为1,使得每个方格的上下左右格子的数字和为偶数(如果存在的话),求使得最 ...
- HDOJ(HDU).1284 钱币兑换问题 (DP 完全背包)
HDOJ(HDU).1284 钱币兑换问题 (DP 完全背包) 题意分析 裸的完全背包问题 代码总览 #include <iostream> #include <cstdio> ...
- Shell编程语法
创建shell程序的步骤: 第一步:创建一个脚本文件.sh. 第二步:授予权限使它可以执行chmod u+x .sh 第三步:执行 ./example 或者 sh example 脚本调试: ...
- 使用JavaScript OOP特性搭建Web应用
最近,我面试了一个有五年 Web 应用程序开发经验的软件开发人员.四年半来她一直在从事 JavaScript 相关的工作,她自认为 JavaScript 技能非常好,但在不久之后我就发现实际上她对 J ...
- JavaScript中的函数与栈
Javascript中会经常用到setTimeout来推迟一个函数的执行,如: setTimeout(function(){ alert("Hello World"); },100 ...
- [10.12模拟赛] 老大 (二分/树的直径/树形dp)
[10.12模拟赛] 老大 题目描述 因为 OB 今年拿下 4 块金牌,学校赞助扩建劳模办公室为劳模办公室群,为了体现 OI 的特色,办公室群被设计成了树形(n 个点 n − 1 条边的无向连通图), ...
- 如何根据域名来得到对应的IP
如何根据域名来得到对应的IP呢? windows下打开cmd窗口,然后ping.如下图: 这样就可以看到IP了. 如何查看自己电脑对应的IP? 当通过代理上网时,可能无法通过网络连接信息查看自己电脑的 ...
- redis linux下的环境搭建
系统 CentOS7 Redis 官网下载 https://redis.io/download 1.下载解压 [root@TestServer-DFJR programs]# /usr/loca ...
- 【51NOD-0】1008 N的阶乘 mod P
[算法]简单数学 [题解]多项式展开:(a*b)%p=(a%p*b%p)%p #include<cstdio> #include<algorithm> #define rep( ...
