第四节:Vuejs组件及组件之间的交互
一. 组件及其交互
1.组件的注册
(1).全局注册
Vue.component('组件名称', { }) 第1个参数是标签名称,第2个参数是一个选项对象。
选项参数包括
data:必须是一个function,然后要return,在return里面声明变量。
template: 用``符号包裹
methods: 声明方法
注意事项:
A. 模板必须是单个根元素
B. 如果使用驼峰式命名组件,那么在使用组件的时候,只能在另一个组件字符串模板中用驼峰的方式使用组件,在普通标签中直接使用的话,必须加短横线。如: HelloWord模板,在body里用的时候必须<hello-word>,而在btn-counter组件中,则可以直接使用<HelloWord>
总之:不推荐使用驼峰命名,建议小写+短横线。
       Vue.component('HelloWord', {

                template: `<div>我是HelloWord组件</div>`

            });

            Vue.component('btn-counter', {

                data: function() {

                    return {

                        count: 0

                    }

                },

                template: `

                    <div>

                      <div>{{count}}</div>

                      <button @click="handle">点击了{{count}}次</button>

                      <HelloWord></HelloWord>

                    </div>

                `,

                methods: {

                    handle: function() {

                        this.count += 3;

                    }

                }

            });
<p>1.全局组件</p>

<btn-counter></btn-counter>

<hello-word></hello-word>
(2).局部组件
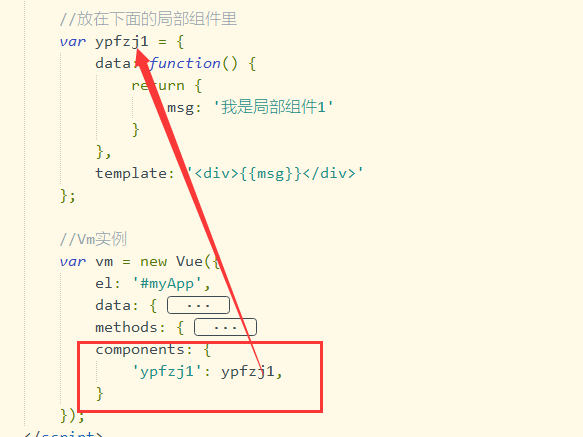
在Vue实例中components进行声明局部组件,仅供该实例使用。

2.父组件向子组件传值
父组件发送形式是以属性的形式绑定在子组件上,可以直接往里传值,也可以用:符号进行绑定变量。然后子组件用属性props接收,props是一个数组。
注意事项:
A.在props使用驼峰形式,在页面中需要使用短横线的形式字符串, 而在字符串模板中则没有这个限制。
PS:这里面不演示了,总之在vue中不建议使用驼峰命名。
B.比如p3是props里声明的一个属性,在使用的时候 p3:'true' 这种情况p3是string类型; 而 :p3:'true',这种情况p3是布尔类型。
3.子组件向父组件传值
子组件用 $emit() 触发事件,第一个参数为 自定义的事件名称 第二个参数为需要传递的数据(这里最多只能传递一个参数,但他可以是一个对象哦,对象里面包括很多属性,如下:),父组件用v-on(或者@) 监听子组件的事件,这里用固定命名 $event 来获取子组件传递过来的参数。
 this.$emit('change-num', {

     id: id,

     type: 'change',

     num: 10

   });
4.兄弟组件之间的交互
兄弟之间传递数据需要借助于事件中心,通过事件中心传递数据,提供事件中心 var hub = new Vue()。
(1).传递数据方,通过一个事件触发hub.$emit(方法名,传递的数据),这里可以传递多个数据哦
(2).接收数据方,通过mounted(){} 钩子中 触发hub.$on()方法名,这里可以接收多个数据哦
(3).销毁事件 通过hub.$off()方法名销毁之后无法进行传递数据
5.插槽
组件的最大特性就是复用性,而用好插槽能大大提高组件的可复用能力,在template中使用<slot>标签
(1).匿名插槽
使用时,组件标签中嵌套的内容(包含html)会替换掉slot; 如果不传值 ,则使用 slot 中的默认值。
(2).具名插槽
使用时,通过slot属性来指定, 这个slot的值必须和下面slot组件得name值对应上 如果没有匹配到 则放到匿名的插槽中
特别注意:具名插槽的渲染顺序,完全取决于模板中的顺序,而不是取决于父组件中元素的顺序!
(3).作用域插槽
A. 作用域插槽使用场景
a.父组件对子组件加工处理
b.既可以复用子组件的slot,又可以使slot内容不一致
B.作用域插槽的使用
a.子组件模板中,<slot>元素上有一个类似props传递数据给组件的写法msg="xxx
b.插槽可以提供一个默认内容,如果如果父组件没有为这个插槽提供了内容,会显示默认的内容。 如果父组件为这个插槽提供了内容,则默认的内容会被替换掉
完整代码如下:
 <!DOCTYPE html>

 <html>

     <head>

         <meta charset="utf-8">

         <title>06-组件及交互</title>

         <style type="text/css">

             p {

                 font-size: 20px;

                 color: #0000FF;

                 font-weight: bold;

             }

             .current {

               color: orange;

             }

         </style>

     </head>

     <body>

         <div id="myApp">

             <p>1.全局组件</p>

             <btn-counter></btn-counter>

             <hello-word></hello-word>

             <p>2.局部组件</p>

             <ypfzj1></ypfzj1>

             <p>3.父组件向子组件传值</p>

             <father-child p1="ypf1" :p2="p2" p3="true"></father-child>

             <father-child p1="ypf1" :p2="p2" :p3="true"></father-child>

             <p>4.子组件向父组件传值</p>

             <div :style="{fontSize:myFontSize+'px'}">我是内容,等着被控制</div>

             <child-father @exchangebig='handle1($event)'></child-father>

             <p>5.兄弟组件相互交互</p>

             <brother-one></brother-one>

             <brother-two></brother-two>

             <button @click="destoryHandle">销毁事件</button>

             <p>6.1 匿名插槽</p>

             <my-tips1>您超标了</my-tips1>

             <my-tips1>用户名不正确</my-tips1>

             <my-tips1></my-tips1>

             <p>6.2 具名插槽</p>

             <my-tips2>

                 <div slot='header'>我是header</div>

                 <div>我是内容1</div>

                 <div>我是内容2</div>

                 <div slot='footer'>我是footer</div>

             </my-tips2>

             <my-tips2>

                 <div slot='footer'>我是footer</div>

                 <div>我是内容1</div>

                 <div slot='header'>我是header</div>

                 <div>我是内容2</div>

             </my-tips2>

             <p>6.3 作用域插槽</p>

             <my-tips3 :list='list'>

              <template slot-scope='slotProps'>

                 <strong v-if='slotProps.info.id==3' class="current">{{slotProps.info.name}}</strong>

                 <span v-else>{{slotProps.info.name}}</span>

               </template>

             </my-tips3>

         </div>

         <script src="js/vue.min.js" type="text/javascript" charset="utf-8"></script>

         <script type="text/javascript">

             //全局组件

             Vue.component('HelloWord', {

                 template: `<div>我是HelloWord组件</div>`

             });

             Vue.component('btn-counter', {

                 data: function() {

                     return {

                         count: 0

                     }

                 },

                 template: `

                     <div>

                       <div>{{count}}</div>

                       <button @click="handle">点击了{{count}}次</button>

                       <HelloWord></HelloWord>

                     </div>

                 `,

                 methods: {

                     handle: function() {

                         this.count += 3;

                     }

                 }

             });

             //父组件向子组件中传值

             Vue.component('father-child', {

                 props: ['p1', 'p2', 'p3'],

                 data: function() {

                     return {

                         msg: '我是用来看父组件向子组件中传值的'

                     }

                 },

                 template: `

                     <div>

                         <div>{{msg+"--"+p1+"--"+p2+"--"+p3}}</div>

                         <div>p3的类型为:{{typeof p3}}</div>

                     </div>                `

             });

             //子组件向父组件传值

             Vue.component('child-father', {

                 props: [],

                 data: function() {

                     return {

                         msg: '我是用来看父组件向子组件中传值的'

                     }

                 },

                 template: `

                     <div>

                         <button @click='$emit("exchangebig",5)'>增大测试1</button>

                         <button @click='$emit("exchangebig",10)'>增大测试2</button>

                     </div>                `

             });

             //两个兄弟组件

             //事件中心

             var hub = new Vue();

             Vue.component('brother-one', {

                 data: function() {

                     return {

                         num: 0

                     }

                 },

                 template: `

                     <div>

                         <div>borther1:{{num}}</div>

                         <div>

                             <button @click='handle'>控制兄弟brother2</button>

                         </div>

                     </div>

                 `,

                 methods: {

                     handle: function() {

                         //传递数据方,通过一个事件触发hub.$emit(方法名,传递的数据) 触发兄弟组件的事件

                         hub.$emit('yChild2Event', 2, 1);

                     }

                 },

                 //Dom创建后

                 mounted: function() {

                     //接收数据方,通过mounted(){} 钩子中 触发hub.$on(方法名)

                     hub.$on('yChild1Event', (val1, val2) => {

                         this.num += val1 + val2;

                     });

                 }

             })

             Vue.component('brother-two', {

                 data: function() {

                     return {

                         num: 0

                     }

                 },

                 template: `

                     <div>

                         <div>borther2:{{num}}</div>

                         <div>

                             <button @click='handle'>控制兄弟brother1</button>

                         </div>

                     </div>

                 `,

                 methods: {

                     handle: function() {

                         //传递数据方,通过一个事件触发hub.$emit(方法名,传递的数据) 触发兄弟组件的事件

                         hub.$emit('yChild1Event', 4, 3);

                     }

                 },

                 //Dom创建后

                 mounted: function() {

                     //接收数据方,通过mounted(){} 钩子中 触发hub.$on(方法名)

                     hub.$on('yChild2Event', (val1, val2) => {

                         this.num += val1 + val2;

                     });

                 }

             })

             //匿名插槽

             Vue.component('my-tips1',{

                 template:`

                     <div>

                       <strong>提醒:</strong>

                       <slot>默认内容</slot>

                       <slot>默认内容1</slot>

                     </div>

                 `,

             })

             //具名插槽

             Vue.component('my-tips2', {

               template: `

                 <div>

                     <div>我是具名插槽</div>

                     <slot name='header'></slot>

                     <slot></slot>

                     <slot name='footer'></slot>

                 </div>

               `

             });

             //作用域插槽

             Vue.component('my-tips3', {

               props: ['list'],

               template: `

                 <div>

                   <li :key='item.id' v-for='item in list'>

                     <slot :info='item'>{{item.name}}</slot>

                   </li>

                 </div>

               `

             });

             //放在下面的局部组件里

             var ypfzj1 = {

                 data: function() {

                     return {

                         msg: '我是局部组件1'

                     }

                 },

                 template: '<div>{{msg}}</div>'

             };

             //Vm实例

             var vm = new Vue({

                 el: '#myApp',

                 data: {

                     p2: 'ypf2',

                     myFontSize: 12,

                     list: [{

                       id: 1,

                       name: 'apple'

                     },{

                       id: 2,

                       name: 'orange'

                     },{

                       id: 3,

                       name: 'banana'

                     }]

                 },

                 methods: {

                     handle1: function(val) {

                         this.myFontSize += val;

                     },

                     //销毁事件

                     destoryHandle: function() {

                         hub.$off('yChild1Event');

                         hub.$off('yChild2Event');

                     }

                 },

                 components: {

                     'ypfzj1': ypfzj1,

                 }

             });

         </script>

     </body>

 </html>
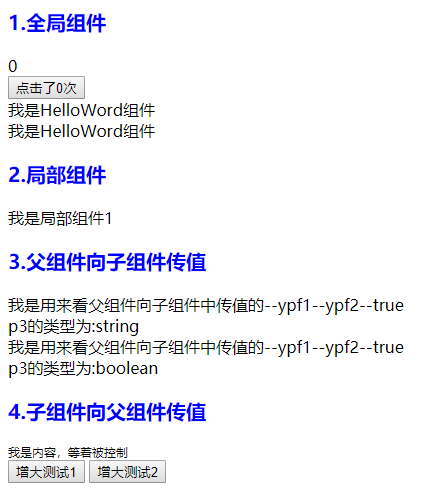
运行效果:


二. 购物车案例
1.需求分析
实现购物车商品列表的加载,数量的增加和减少、物品的删除、及其对应总价的变化。
效果图如下:

2. 实战演练
 <!DOCTYPE html>

 <html lang="en">

 <head>

   <meta charset="UTF-8">

   <title>组件之购物车案例</title>

   <style type="text/css">

     .container {

     }

     .container .cart {

       width: 300px;

       margin: auto;

     }

     .container .title {

       background-color: lightblue;

       height: 40px;

       line-height: 40px;

       text-align: center;

       /*color: #fff;*/

     }

     .container .total {

       background-color: #FFCE46;

       height: 50px;

       line-height: 50px;

       text-align: right;

     }

     .container .total button {

       margin: 0 10px;

       background-color: #DC4C40;

       height: 35px;

       width: 80px;

       border: 0;

     }

     .container .total span {

       color: red;

       font-weight: bold;

     }

     .container .item {

       height: 55px;

       line-height: 55px;

       position: relative;

       border-top: 1px solid #ADD8E6;

     }

     .container .item img {

       width: 45px;

       height: 45px;

       margin: 5px;

     }

     .container .item .name {

       position: absolute;

       width: 90px;

       top: 0;left: 55px;

       font-size: 16px;

     }

     .container .item .change {

       width: 100px;

       position: absolute;

       top: 0;

       right: 50px;

     }

     .container .item .change a {

       font-size: 20px;

       width: 30px;

       text-decoration:none;

       background-color: lightgray;

       vertical-align: middle;

     }

     .container .item .change .num {

       width: 40px;

       height: 25px;

     }

     .container .item .del {

       position: absolute;

       top: 0;

       right: 0px;

       width: 40px;

       text-align: center;

       font-size: 40px;

       cursor: pointer;

       color: red;

     }

     .container .item .del:hover {

       background-color: orange;

     }

   </style>

 </head>

 <body>

   <div id="app">

     <div class="container">

       <my-cart></my-cart>

     </div>

   </div>

   <script type="text/javascript" src="js/vue.js"></script>

   <script type="text/javascript">

     var CartTitle = {

       props: ['uname'],

       template: `

         <div class="title">{{uname}}的商品</div>

       `

     }

     var CartList = {

       props: ['list'],

       template: `

         <div>

           <div :key='item.id' v-for='item in list' class="item">

             <img :src="item.img"/>

             <div class="name">{{item.name}}</div>

             <div class="change">

               <a href="" @click.prevent='sub(item.id)'>-</a>

               <input type="text" class="num" :value='item.num' @blur='changeNum(item.id, $event)'/>

               <a href="" @click.prevent='add(item.id)'>+</a>

             </div>

             <div class="del" @click='del(item.id)'>×</div>

           </div>

         </div>

       `,

       methods: {

         changeNum: function(id, event){

             //向父组件传值

           this.$emit('change-num', {

             id: id,

             type: 'change',

             num: event.target.value

           });

         },

         sub: function(id){

             //向父组件传值

           this.$emit('change-num', {

             id: id,

             type: 'sub'

           });

         },

         add: function(id){

             //向父组件传值

           this.$emit('change-num', {

             id: id,

             type: 'add'

           });

         },

         del: function(id){

           // 把id传递给父组件

           this.$emit('cart-del', id);

         }

       }

     }

     var CartTotal = {

       props: ['list'],

       template: `

         <div class="total">

           <span>总价:{{total}}</span>

           <button>结算</button>

         </div>

       `,

       computed: {

         total: function() {

           // 计算商品的总价

           var t = 0;

           this.list.forEach(item => {

             t += item.price * item.num;

           });

           return t;

         }

       }

     }

     Vue.component('my-cart',{

       data: function() {

         return {

           uname: '张三',

           list: [{

             id: 1,

             name: 'TCL彩电',

             price: 1000,

             num: 1,

             img: 'img/a.jpg'

           },{

             id: 2,

             name: '机顶盒',

             price: 1000,

             num: 1,

             img: 'img/b.jpg'

           },{

             id: 3,

             name: '海尔冰箱',

             price: 1000,

             num: 1,

             img: 'img/c.jpg'

           },{

             id: 4,

             name: '小米手机',

             price: 1000,

             num: 1,

             img: 'img/d.jpg'

           },{

             id: 5,

             name: 'PPTV电视',

             price: 1000,

             num: 2,

             img: 'img/e.jpg'

           }]

         }

       },

       template: `

         <div class='cart'>

           <cart-title :uname='uname'></cart-title>

           <cart-list :list='list' @change-num='changeNum($event)' @cart-del='delCart($event)'></cart-list>

           <cart-total :list='list'></cart-total>

         </div>

       `,

       components: {

         'cart-title': CartTitle,

         'cart-list': CartList,

         'cart-total': CartTotal

       },

       methods: {

         changeNum: function(val) {

           // 分为三种情况:输入域变更、加号变更、减号变更

           if(val.type=='change') {

             // 根据子组件传递过来的数据,跟新list中对应的数据

             this.list.some(item=>{

               if(item.id == val.id) {

                 item.num = val.num;

                 // 终止遍历

                 return true;

               }

             });

           }else if(val.type=='sub'){

             // 减一操作

             this.list.some(item=>{

               if(item.id == val.id) {

                 item.num -= 1;

                 // 终止遍历

                 return true;

               }

             });

           }else if(val.type=='add'){

             // 加一操作

             this.list.some(item=>{

               if(item.id == val.id) {

                 item.num += 1;

                 // 终止遍历

                 return true;

               }

             });

           }

         },

         delCart: function(id) {

           // 根据id删除list中对应的数据

           // 1、找到id所对应数据的索引

           var index = this.list.findIndex(item=>{

             return item.id == id;

           });

           // 2、根据索引删除对应数据

           this.list.splice(index, 1);

         }

       }

     });

     var vm = new Vue({

       el: '#app',

       data: {

       }

     });

   </script>

 </body>

 </html>
!
- 作 者 : Yaopengfei(姚鹏飞)
- 博客地址 : http://www.cnblogs.com/yaopengfei/
- 声 明1 : 如有错误,欢迎讨论,请勿谩骂^_^。
- 声 明2 : 原创博客请在转载时保留原文链接或在文章开头加上本人博客地址,否则保留追究法律责任的权利。
第四节:Vuejs组件及组件之间的交互的更多相关文章
- 2017-12-15python全栈9期第二天第四节之格式化输出%s和用户交互个人简历模板
#!/user/bin/python# -*- coding:utf-8 -*-name = input('姓名:')age = input('年龄:')job = input('工作:')hobbi ...
- Angular开发实践(四):组件之间的交互
在Angular应用开发中,组件可以说是随处可见的.本篇文章将介绍几种常见的组件通讯场景,也就是让两个或多个组件之间交互的方法. 根据数据的传递方向,分为父组件向子组件传递.子组件向父组件传递及通过服 ...
- vuejs 单文件组件.vue 文件
vuejs 自定义了一种.vue文件,可以把html, css, js 写到一个文件中,从而实现了对一个组件的封装, 一个.vue 文件就是一个单独的组件.由于.vue文件是自定义的,浏览器不认识,所 ...
- Vuejs——(12)组件——动态组件
版权声明:出处http://blog.csdn.net/qq20004604 目录(?)[+] 本篇资料来于官方文档: http://cn.vuejs.org/guide/components ...
- vue02—— 动画、组件、组件之间的数据通信
一.vue中使用动画 文档:https://cn.vuejs.org/v2/guide/transitions.html 1. Vue 中的过渡动画 <!DOCTYPE html> < ...
- [Vue]子组件与父组件之间传值
1.父组件与子组件传值props 1.1定义父组件,父组件传递 inputText这个数值给子组件: //父组件 //引入的add-widget组件 //使用 v-bind 的缩写语法通常更简单: & ...
- 实验四 CC2530平台上UART组件的TinyOS编程
实验四 CC2530平台上UART组件的TinyOS编程 实验目的: 加深和巩固学生对于TinyOS编程方法的理解和掌握 让学生初步掌握CC2530的UART.及其TinyOS编程方法 学生通过本实验 ...
- Vue组件之间数据交互与通信
Vue 的组件作用域都是孤立的,不允许在子组件的模板内直接引用父组件的数据.必须使用特定的方法才能实现组件之间的数据传递. 一.父组件向子组件传递数据 在 Vue 中,可以使用 props 向子组件传 ...
- Vuejs - 单文件组件
为什么需要单文件组件 在之前的实例中,我们都是通过 Vue.component 或者 components 属性的方式来定义组件,这种方式在很多中小规模的项目中还好,但在复杂的项目中,下面这些缺点就非 ...
随机推荐
- codeforces div2 603 D. Secret Passwords(并查集)
题目链接:https://codeforces.com/contest/1263/problem/D 题意:有n个小写字符串代表n个密码,加入存在两个密码有共同的字母,那么说这两个密码可以认为是同一个 ...
- Advanced Architecture for ASP.NET Core Web API
转自: https://www.infoq.com/articles/advanced-architecture-aspnet-core ASP.NET Core's new architecture ...
- 解决fences2.01在win8.1的状态下无法移动桌面图标问题
Fences 2.01破解版 链接:http://pan.baidu.com/s/1eSH2tGI 密码:o7oe Fences 2.01 win8.1修复补丁(stardock2.11) ...
- Spring Boot框架 - 数据访问 - 整合Mybatis
一.新建Spring Boot项目 注意:创建的时候勾选Mybatis依赖,pom文件如下 <dependency> <groupId>org.mybatis.spring.b ...
- JQuery/JS插件 jsTree加载树,预先加载,初始化时加载前三级节点,当展开第三级节点时 就加载该节点下的所有子节点
jsTree加载树, 初始化时 加载前三级节点, 当展开第三级节点时 就加载该节点下的所有子节点 html: <!DOCTYPE html> <html> <head&g ...
- maven私服搭建&使用
Maven私服搭建教程 一.nexus安装 1,解压安装包 安装包下载地址 2,以管理员身份打开cmd 3,进入到nexus的bin目录 (1) 安装:nexus install (2) 启动:nex ...
- 【PAT甲级】1112 Stucked Keyboard (20分)(字符串)
题意: 输入一个正整数K(1<K<=100),接着输入一行字符串由小写字母,数字和下划线组成.如果一个字符它每次出现必定连续出现K个,它可能是坏键,找到坏键按照它们出现的顺序输出(相同坏键 ...
- java双亲委派模型
Java类加载器(ClassLoader) 双亲委派模式要求除了顶层的启动类加载器外,其余的类加载器都应当有自己的父类加载器,请注意双亲委派模式中的父子关系并非通常所说的类继承关系,而是采用组合关系来 ...
- C#中的循环:while do...while for
循环:重复将相同或类似规律的代码进行反复执行 减少代码冗余 可维护 可扩展 while(bool) { ...; } 代码块中可以使用break或者continue中断 break:中断整个循环 ...
- 占位符 css
== 普通的英文半角空格 == == == no-break space (普通的英文半角空格但不换行) == 中文全角空格 (一个中文宽度) == == en空格 (半个中文 ...
