[RH134] 8-磁盘管理
一、磁盘结构
我们以但磁盘的硬盘为例,如图所示:
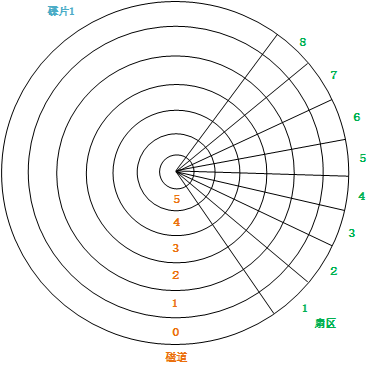
从内向往有很多的磁道(这里我们只画了5条,实际上非常多),这个磁盘被划分为很多扇区。每个扇区有一个固定的大小,例如512Bytes。
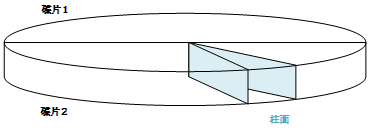
对于多磁盘的硬盘,同一个扇区,上下多个磁盘,可以组成柱面,如图:
二、分区(MBR结构)
如下图所示,我们将磁盘分成多个分区:

可以看到,C盘空间从2048扇区---4000扇区,D盘空间从4001扇区---8000扇区,E盘空间从8001扇区---10000扇区。
第一个扇区的512Byte用于记录磁盘的一些基本数据(MBR),例如bootloader(启动加载器)、分区表(记录主分区和扩展分区的信息)、结束符。
以上这种结构的磁盘叫做MBR结构磁盘。除了这种磁盘,还有另外一种叫做gpt结构磁盘(gpt结构磁盘可以支持更多的主分区,128个)。
三、分区表
分区表只记录主分区和扩展分区的信息(例如起始结束扇区等)。
分区的类别:
- 主分区:直接从硬盘划分,格式化后直接使用的分区叫主分区。
- 扩展分区:直接从硬盘划分,但不格式化直接使用,而是再将其分能更小的分区(逻辑分区)来使用。
- 逻辑分区:在扩展分区中逻辑划分的小分区。分区表不记录逻辑分区的信息。
注意:
在分区表中,每记录一个分区,需要消耗16Btye空间,所以以64Byte的总空间来算,主分区和扩展分区的总数不能超过4个(P+E<=4),而且规定扩展分区最多只能有一个(E<=1)。
所以,当我们需要划分超过4个分区的时候,我们就需要先划分一个扩展分区,然后在扩展分区上去划分逻辑分区。
四、磁盘管理
1.图形界面管理硬盘
1)添加一块硬盘
我们为虚拟机添加一个新的虚拟硬盘,相当于给物理机新添加一块硬盘。
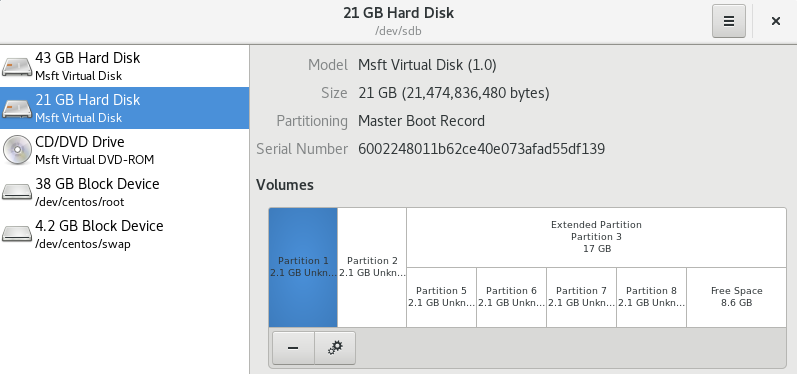
2)打开图形化磁盘管理

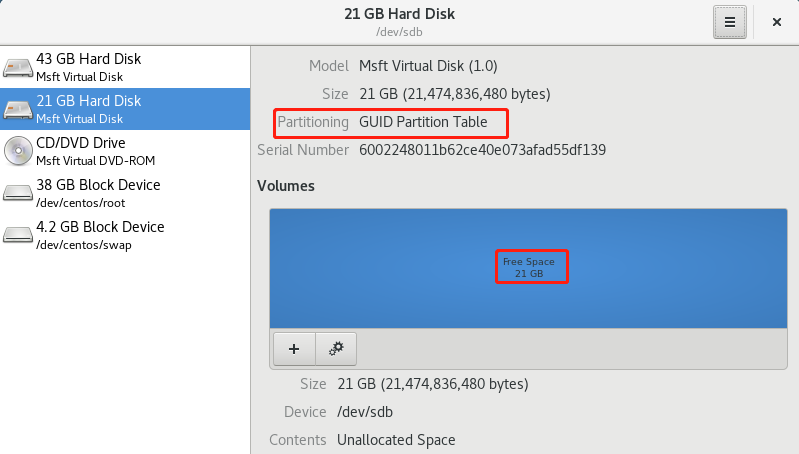
如下图,可以看到,我们新添加的硬盘,大小为20G(这里显示21G,是因为Linux下计算的磁盘大小不是1024,而是1000)。

3)格式化硬盘
点击右上角的菜单,选择格式化磁盘:

第一项Erase,我们默认即可(速度更快,没必要初始化为0)。
第二项,就是让我们选择磁盘格式化的类别,MBR或GPT结构:
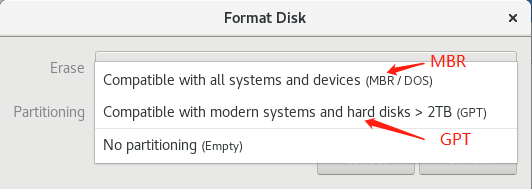
MBR的兼容性更好,GPT对大硬盘支持比较好。这里我们选择GPT结构。
格式化后,我们可以看到分区表为GUID分区表:
如果想将其变为MBR结构磁盘, 则再次格式化即可。
注意:
这个选择格式化磁盘类型的过程叫做"初始化磁盘标签"。
2.命令行磁盘管理
有以下三个命令可以用于磁盘管理:
- fdisk:用于管理MBR结构磁盘
- gdisk:用于管理GPT结构磁盘
- parted:兼而有之
1)parted命令修改磁盘标签
首先,我们要明确我们新添加的磁盘为 /dev/sdb
[root@centos7 ~]# parted -s /dev/sdb mklabel msdos
"-s"表示忽略确认提示,/dev/sdb是我们要修改标签的磁盘,mklabel表示修改标签, msdos 表示MBR结构。
[root@centos7 ~]# parted -s /dev/sdb mklabel gpt
从MBR修改回GPT结构。
如果想将磁盘恢复到既不是MBR也不是GPT结构:
[root@centos7 ~]# parted -s /dev/sdb mklabel loop
2)fdisk查看所有磁盘信息
[root@centos7 ~]# fdisk -l

WARNING: fdisk GPT support is currently new, and therefore in an experimental phase. Use at your own discretion.

Disk /dev/sda: 42.9 GB,  bytes,  sectors

Units = sectors of  *  =  bytes

Sector size (logical/physical):  bytes /  bytes

I/O size (minimum/optimal):  bytes /  bytes

Disk label type: gpt

Disk identifier: 6517A95B-8EB4--9FF6-9962100D1695

#         Start          End    Size  Type            Name

                     200M  EFI System      EFI System Partition

                  500M  Microsoft basic

               .3G  Linux LVM

Disk /dev/sdb: 21.5 GB,  bytes,  sectors

Units = sectors of  *  =  bytes

Sector size (logical/physical):  bytes /  bytes

I/O size (minimum/optimal):  bytes /  bytes

Disk label type: dos

Disk identifier: 0x000b2546

   Device Boot      Start         End      Blocks   Id  System

Disk /dev/mapper/centos-root: 38.0 GB,  bytes,  sectors

Units = sectors of  *  =  bytes

Sector size (logical/physical):  bytes /  bytes

I/O size (minimum/optimal):  bytes /  bytes

Disk /dev/mapper/centos-swap:  MB,  bytes,  sectors

Units = sectors of  *  =  bytes

Sector size (logical/physical):  bytes /  bytes

I/O size (minimum/optimal):  bytes /  bytes
可以看到,sda和sdb磁盘。
3)只查看某个磁盘的信息
[root@centos7 ~]# fdisk -l /dev/sdb

Disk /dev/sdb: 21.5 GB,  bytes,  sectors

Units = sectors of  *  =  bytes

Sector size (logical/physical):  bytes /  bytes

I/O size (minimum/optimal):  bytes /  bytes

Disk label type: dos

Disk identifier: 0x000b2546

   Device Boot      Start         End      Blocks   Id  System
3.使用fdisk对sdb进行分区
注意,这是是对sdb磁盘进行分区,分区后每个分区叫sdb1、sdb2等等。
1)查看所有actions
[root@centos7 ~]# fdisk /dev/sdb

The device presents a logical sector size that is smaller than

the physical sector size. Aligning to a physical sector (or optimal

I/O) size boundary is recommended, or performance may be impacted.

Welcome to fdisk (util-linux 2.23.).

Changes will remain in memory only, until you decide to write them.

Be careful before using the write command.

Command (m for help): m   # 查看所有action

Command action

   a   toggle a bootable flag

   b   edit bsd disklabel

   c   toggle the dos compatibility flag

   d   delete a partition  # 删除一个分区

   g   create a new empty GPT partition table

   G   create an IRIX (SGI) partition table

   l   list known partition types  # 查看分区类型

   m   print this menu  # 查看当前菜单

   n   add a new partition  # 创建一个新分区

   o   create a new empty DOS partition table

   p   print the partition table  # 查看分区表

   q   quit without saving changes  # 相当于q!,不保存退出

   s   create a new empty Sun disklabel

   t   change a partition's system id

   u   change display/entry units

   v   verify the partition table

   w   write table to disk and exit  # 相当于wq,保存并退出

   x   extra functionality (experts only)

Command (m for help):
2)使用操作"p",查看分区表
# 查看sda磁盘的分区信息

Command (m for help): p

Disk /dev/sda: 42.9 GB,  bytes,  sectors

Units = sectors of  *  =  bytes

Sector size (logical/physical):  bytes /  bytes

I/O size (minimum/optimal):  bytes /  bytes

Disk label type: gpt

Disk identifier: 6517A95B-8EB4--9FF6-9962100D1695

#         Start          End    Size  Type            Name

                     200M  EFI System      EFI System Partition

                  500M  Microsoft basic

               .3G  Linux LVM
可以看到在sda中,存在分区信息。
# 查看sdb磁盘的分区信息

Command (m for help): p

Disk /dev/sdb: 21.5 GB,  bytes,  sectors

Units = sectors of  *  =  bytes

Sector size (logical/physical):  bytes /  bytes

I/O size (minimum/optimal):  bytes /  bytes

Disk label type: dos

Disk identifier: 0x000b2546

   Device Boot      Start         End      Blocks   Id  System
sdb暂时没有分区。
3)使用"n"新建分区
Command (m for help): n

Partition type:

   p   primary ( primary,  extended,  free)

   e   extended

Select (default p):
可以看到,可以创建的分区有两种类型,primary主分区,和extended扩展分区(扩展分区可以创建逻辑分区)。
我们创建一个主分区:
Command (m for help): n

Partition type:

   p   primary ( primary,  extended,  free)

   e   extended

Select (default p): p  # 选择创建主分区

Partition number (-, default ): 1   # 默认编号为1,即sdb1

First sector (-, default ): 2048  # 开始扇区为2048

Last sector, +sectors or +size{K,M,G} (-, default ): 4196351  # 结束扇区为4196351,即从2048开始一共2G空间

Partition  of type Linux and of size  GiB is set

Command (m for help):
结束扇区的计算:2*1024*1024*2-1 + 2048 = 4196351,即2G = 2*1024M = 2*1024*1024K = 2*1024*1024*2扇区。
这样划分我们发现计算扇区很复杂,我们也可以直接使用+2G来实现:
Command (m for help): n

Partition type:

   p   primary ( primary,  extended,  free)

   e   extended

Select (default p): p

Partition number (-, default ):

First sector (-, default ):

Using default value

Last sector, +sectors or +size{K,M,G} (-, default ): +2G

Partition  of type Linux and of size  GiB is set
当我们创建了4个分区后,则无法再创建了,因为前面说了,MBR分区表中只能保存最多4个分区的信息。
4)创建逻辑分区
假设我们已经创建了2个主分区:
Command (m for help): p

Disk /dev/sdb: 21.5 GB,  bytes,  sectors

Units = sectors of  *  =  bytes

Sector size (logical/physical):  bytes /  bytes

I/O size (minimum/optimal):  bytes /  bytes

Disk label type: dos

Disk identifier: 0x000b2546

   Device Boot      Start         End      Blocks   Id  System

/dev/sdb1                           Linux

/dev/sdb2                        Linux
我们将剩余的未分配空间创建为一个扩展分区:
Command (m for help): n

Partition type:

   p   primary ( primary,  extended,  free)

   e   extended

Select (default p): e

Partition number (,, default ):

First sector (-, default ):

Using default value

Last sector, +sectors or +size{K,M,G} (-, default ):

Using default value

Partition  of type Extended and of size  GiB is set

Command (m for help): p

Disk /dev/sdb: 21.5 GB,  bytes,  sectors

Units = sectors of  *  =  bytes

Sector size (logical/physical):  bytes /  bytes

I/O size (minimum/optimal):  bytes /  bytes

Disk label type: dos

Disk identifier: 0x000b2546

   Device Boot      Start         End      Blocks   Id  System

/dev/sdb1                           Linux

/dev/sdb2                        Linux

/dev/sdb3                       Extended
此时我们再次使用"n"创建分区:
Command (m for help): n

Partition type:

   p   primary ( primary,  extended,  free)

   l   logical (numbered from )

Select (default p): p

Selected partition

No free sectors available
因为目前只有3个分区,而分区表可以支持4个分区,所以还可以让我们选择创建主分区,但是空间已经被三个分区占用完了,所以选择p的话,会提示没有剩余的扇区可用。
我们选择"l"来在sdb3上创建逻辑分区:
Command (m for help): n

Partition type:

   p   primary ( primary,  extended,  free)

   l   logical (numbered from )

Select (default p): l

Adding logical partition 5

First sector (-, default ):

Using default value

Last sector, +sectors or +size{K,M,G} (-, default ): +2G

Partition  of type Linux and of size  GiB is set
这里注意,虽然我们只有2个主分区+1个扩展分区,但是逻辑分区的编号始终是从5开始的。也就是说我们的分区中不会存在sdb4这个分区。
我们多创建几个分区,并查看分区信息:
Command (m for help): p

Disk /dev/sdb: 21.5 GB,  bytes,  sectors

Units = sectors of  *  =  bytes

Sector size (logical/physical):  bytes /  bytes

I/O size (minimum/optimal):  bytes /  bytes

Disk label type: dos

Disk identifier: 0x000b2546

   Device Boot      Start         End      Blocks   Id  System

/dev/sdb1                           Linux  # 主分区

/dev/sdb2                        Linux  # 主分区

/dev/sdb3                       Extended  # 扩展分区

/dev/sdb5                       Linux  # 逻辑分区

/dev/sdb6                      Linux  # 逻辑分区

/dev/sdb7                      Linux  # 逻辑分区

/dev/sdb8                      Linux  # 逻辑分区
上述信息中,分区除了分为主分区、扩展分区和逻辑分区,还有其他的分类方式,上述的ID就表示分类ID,System中的Linux类型表示可以直接格式化使用的分区(包含主分区和逻辑分区),Extended分区表示逻辑分区(不能直接格式化使用)。
5)分区类型与转换
那么这些类型有哪些呢?我们可以通过"l"来查看:
Command (m for help): l

   Empty             NEC DOS           Minix / old Lin bf  Solaris

   FAT12             Hidden NTFS Win   Linux swap / So c1  DRDOS/sec (FAT-

   XENIX root        Plan             Linux           c4  DRDOS/sec (FAT-

   XENIX usr       3c  PartitionMagic    OS/ hidden C:  c6  DRDOS/sec (FAT-

   FAT16 <32M        Venix        Linux extended  c7  Syrinx

   Extended          PPC PReP Boot     NTFS volume set da  Non-FS data

   FAT16             SFS               NTFS volume set db  CP/M / CTOS / .

   HPFS/NTFS/exFAT 4d  QNX4.x            Linux plaintext de  Dell Utility

   AIX             4e  QNX4.x 2nd part 8e  Linux LVM       df  BootIt

   AIX bootable    4f  QNX4.x 3rd part   Amoeba          e1  DOS access

 a  OS/ Boot Manag   OnTrack DM        Amoeba BBT      e3  DOS R/O

 b  W95 FAT32         OnTrack DM6 Aux 9f  BSD/OS          e4  SpeedStor

 c  W95 FAT32 (LBA)   CP/M            a0  IBM Thinkpad hi eb  BeOS fs

 e  W95 FAT16 (LBA)   OnTrack DM6 Aux a5  FreeBSD         ee  GPT

 f  W95 Ext'd (LBA) 54  OnTrackDM6      a6  OpenBSD         ef  EFI (FAT-12/16/

  OPUS              EZ-Drive        a7  NeXTSTEP        f0  Linux/PA-RISC b

  Hidden FAT12      Golden Bow      a8  Darwin UFS      f1  SpeedStor

  Compaq diagnost 5c  Priam Edisk     a9  NetBSD          f4  SpeedStor

  Hidden FAT16 <   SpeedStor       ab  Darwin boot     f2  DOS secondary

  Hidden FAT16      GNU HURD or Sys af  HFS / HFS+      fb  VMware VMFS

  Hidden HPFS/NTF   Novell Netware  b7  BSDI fs         fc  VMware VMKCORE

  AST SmartSleep    Novell Netware  b8  BSDI swap       fd  Linux raid auto

1b  Hidden W95 FAT3   DiskSecure Mult bb  Boot Wizard hid fe  LANstep

1c  Hidden W95 FAT3   PC/IX           be  Solaris boot    ff  BBT

1e  Hidden W95 FAT1   Old Minix
可以看到,这里有非常多的分区类别,我们还可以将分区的类型进行转化,例如将sdb5-sdb8的分区类型全部转化为Linux LVM逻辑卷类型(编号为8e):
Command (m for help): t

Partition number (-,-, default ):

Hex code (type L to list all codes): 8e

Changed type of partition 'Linux' to 'Linux LVM'

Command (m for help): t

Partition number (-,-, default ):

Hex code (type L to list all codes): 8e

Changed type of partition 'Linux' to 'Linux LVM'

Command (m for help): t

Partition number (-,-, default ):

Hex code (type L to list all codes): 8e

Changed type of partition 'Linux' to 'Linux LVM'

Command (m for help): t

Partition number (-,-, default ):

Hex code (type L to list all codes): 8e

Changed type of partition 'Linux' to 'Linux LVM'

Command (m for help): p

Disk /dev/sdb: 21.5 GB,  bytes,  sectors

Units = sectors of  *  =  bytes

Sector size (logical/physical):  bytes /  bytes

I/O size (minimum/optimal):  bytes /  bytes

Disk label type: dos

Disk identifier: 0x000b2546

   Device Boot      Start         End      Blocks   Id  System

/dev/sdb1                           Linux

/dev/sdb2                        Linux

/dev/sdb3                       Extended

/dev/sdb5                     8e  Linux LVM

/dev/sdb6                    8e  Linux LVM

/dev/sdb7                    8e  Linux LVM

/dev/sdb8                    8e  Linux LVM
6)保存分区配置
在我们划分好分区后,要进行保存:
Command (m for help): w

The partition table has been altered!

Calling ioctl() to re-read partition table.

Syncing disks.

[root@centos7 ~]# partprobe /dev/sdb
使用"w"进行保存并退出,然后使用 partprobe /dev/sdb 刷新一个磁盘的分区表(应该是可选操作)。
4.格式化分区
1)在图形界面中查看分区后的磁盘
可以看到,我们做好分区后,所有的分区都是unknown状态的,也就是说未格式化。我们要使用的话,必须先格式化。
2)使用图形化界面格式化分区
当然,我们可以在图形界面中进行格式化,并选择格式化的文件系统类型,例如ext4、ntfs、xfs等:

3)使用命令行格式化分区
将sdb1格式化为xfs格式的文件系统:
[root@centos7 ~]# mkfs -t xfs /dev/sdb1

meta-data=/dev/sdb1              isize=    agcount=, agsize= blks

         =                       sectsz=  attr=, projid32bit=

         =                       crc=        finobt=, sparse=

data     =                       bsize=   blocks=, imaxpct=

         =                       sunit=      swidth= blks

naming   =version               bsize=   ascii-ci= ftype=

log      =internal log           bsize=   blocks=, version=

         =                       sectsz=  sunit= blks, lazy-count=

realtime =none                   extsz=   blocks=, rtextents=
注意在RHEL7或centos7中,默认使用的就是xfs文件系统。
如果我们再次格式化sdb1的话,会提示已经存在一个文件系统:
[root@centos7 ~]# mkfs -t xfs /dev/sdb1

mkfs.xfs: /dev/sdb1 appears to contain an existing filesystem (xfs).

mkfs.xfs: Use the -f option to force overwrite.
这是使用"-f"选项来强制覆盖:
[root@centos7 ~]# mkfs -t xfs -f /dev/sdb1

meta-data=/dev/sdb1              isize=    agcount=, agsize= blks

         =                       sectsz=  attr=, projid32bit=

         =                       crc=        finobt=, sparse=

data     =                       bsize=   blocks=, imaxpct=

         =                       sunit=      swidth= blks

naming   =version               bsize=   ascii-ci= ftype=

log      =internal log           bsize=   blocks=, version=

         =                       sectsz=  sunit= blks, lazy-count=

realtime =none                   extsz=   blocks=, rtextents=
在格式化时指定文件系统的块大小(block size):
[root@centos7 ~]# mkfs -t xfs -f -b size= /dev/sdb1

specified blocksize  is less than device physical sector size

switching to logical sector size

meta-data=/dev/sdb1              isize=    agcount=, agsize= blks

         =                       sectsz=   attr=, projid32bit=

         =                       crc=        finobt=, sparse=

data     =                       bsize=   blocks=, imaxpct=

         =                       sunit=      swidth= blks

naming   =version               bsize=   ascii-ci= ftype=

log      =internal log           bsize=   blocks=, version=

         =                       sectsz=   sunit= blks, lazy-count=

realtime =none                   extsz=   blocks=, rtextents=
可以看到,默认bsize为4096,即4k/block。我们将其修改为了1k/block。
当然,我们也可以使用其他类型的文件系统来格式化分区(例如ext4),操作是类似的(只是重复格式化不需要-f选项,设置block size直接使用-b 1024即可):
[root@centos7 ~]# mkfs -t ext4 /dev/sdb1

mke2fs 1.42. (-Dec-)

Discarding device blocks: done

Filesystem label=

OS type: Linux

Block size= (log=)

Fragment size= (log=)

Stride= blocks, Stripe width= blocks

 inodes,  blocks

 blocks (5.00%) reserved for the super user

First data block=

Maximum filesystem blocks=

 block groups

 blocks per group,  fragments per group

 inodes per group

Superblock backups stored on blocks:

        , , , ,

Allocating group tables: done

Writing inode tables: done

Creating journal ( blocks): done

Writing superblocks and filesystem accounting information: done

[root@centos7 ~]# mkfs -t ext4 -b  /dev/sdb1

mke2fs 1.42. (-Dec-)

Warning: specified blocksize  is less than device physical sectorsize

Discarding device blocks: done

Filesystem label=

OS type: Linux

Block size= (log=)

Fragment size= (log=)

Stride= blocks, Stripe width= blocks

 inodes,  blocks

 blocks (5.00%) reserved for the super user

First data block=

Maximum filesystem blocks=

 block groups

 blocks per group,  fragments per group

 inodes per group

Superblock backups stored on blocks:

        , , , , , , , , ,

        ,

Allocating group tables: done

Writing inode tables: done

Creating journal ( blocks): done

Writing superblocks and filesystem accounting information: done
如果我们不记得文件系统的种类,则可以使用以下方式:
[root@centos7 ~]# mkfs.

mkfs.btrfs   mkfs.cramfs  mkfs.ext2    mkfs.ext3    mkfs.ext4    mkfs.fat     mkfs.minix   mkfs.msdos   mkfs.vfat    mkfs.xfs

[root@centos7 ~]# mkfs.xfs -b size= -f /dev/sdb1

specified blocksize  is less than device physical sector size

switching to logical sector size

meta-data=/dev/sdb1              isize=    agcount=, agsize= blks

         =                       sectsz=   attr=, projid32bit=

         =                       crc=        finobt=, sparse=

data     =                       bsize=   blocks=, imaxpct=

         =                       sunit=      swidth= blks

naming   =version               bsize=   ascii-ci= ftype=

log      =internal log           bsize=   blocks=, version=

         =                       sectsz=   sunit= blks, lazy-count=

realtime =none                   extsz=   blocks=, rtextents=
使用 mkfs. 按tab,可以看到区分文件系统种类的命令,我们直接使用对应的命令即可。其中mkfs.vfat主要用于U盘,
4)自动挂载分区时要注意文件系统类型
例如,我们要在开机时将sdb1自动挂载到/zz目录,需要修改 /etc/fstab 文件:
#

# /etc/fstab

# Created by anaconda on Sun Mar   ::

#

# Accessible filesystems, by reference, are maintained under '/dev/disk'

# See man pages fstab(), findfs(), mount() and/or blkid() for more info

#

/dev/mapper/centos-root /                       xfs     defaults

UUID=01923e22---be98-c22b7ea968fb /boot                   xfs     defaults

UUID=7AB0-876A          /boot/efi               vfat    umask=,shortname=winnt

/dev/mapper/centos-swap swap                    swap    defaults

/dev/sdb1       /zz     xfs     defaults
可以看到,我们填写了一个xfs文件系统,这个文件系统类型一定要和我们挂载的分区真正的类型对应起来,不能乱写,否则可能启动不起来。
那么,如何来查看这个分区是什么文件系统类型呢?我们可以先手动挂载一下:
[root@centos7 ~]# mount /dev/sdb1 /zz

[root@centos7 ~]# df -hT

Filesystem              Type      Size  Used Avail Use% Mounted on

devtmpfs                devtmpfs  .9G       .9G   % /dev

tmpfs                   tmpfs     .9G       .9G   % /dev/shm

tmpfs                   tmpfs     .9G   11M  .9G   % /run

tmpfs                   tmpfs     .9G       .9G   % /sys/fs/cgroup

/dev/mapper/centos-root xfs        36G  .1G   30G  % /

/dev/sda2               xfs       494M  165M  330M  % /boot

/dev/sda1               vfat      200M   12M  189M   % /boot/efi

tmpfs                   tmpfs     376M   40K  376M   % /run/user/

/dev/sr0                iso9660   603M  603M      % /run/media/root/CentOS  x86_64

/dev/sdb1               xfs       .0G  8.1M  .0G   % /zz
然后使用df -hT就能看到/dev/sdb1的文件系统类型,这时,我们就可以确认在/etc/fstab中的文件系统类型应该写什么了。
或者使用另外一个命令来直接查看某分区的文件系统类型:
[root@centos7 ~]# blkid

/dev/sr0: UUID="2015-12-09-23-03-16-00" LABEL="CentOS 7 x86_64" TYPE="iso9660" PTTYPE="dos"

/dev/sda1: SEC_TYPE="msdos" UUID="7AB0-876A" TYPE="vfat" PARTLABEL="EFI System Partition" PARTUUID="fda2bd89-9fac-4cee-b8b5-780a6466315c"

/dev/sda2: UUID="01923e22-2135-4842-be98-c22b7ea968fb" TYPE="xfs" PARTUUID="7c29241e-5889-4230-a40e-cffcc9197fd8"

/dev/sda3: UUID="tsFdS0-5pvC-QqsQ-BwwB-3IAq-xhR8-bjVpiM" TYPE="LVM2_member" PARTUUID="6fe109b5-9b12-4ddf-828d-7b9cf63adbb1"

/dev/sdb1: UUID="62ff7ea9-5d3d-4bfd-bedb-bcddf6e408f0" TYPE="xfs"

/dev/sdb5: LABEL="my lvm 1" UUID="55aadc7b-b3ab-4f65-9efb-2d80f07721b2" TYPE="ext4"

/dev/sdb6: LABEL="my lvm 2" UUID="9a231e33-0304-4009-b4e6-7bdd31b80fb6" TYPE="xfs"

/dev/mapper/centos-root: UUID="5fed2a74-322a-4526-a222-8ae21f501cfb" TYPE="xfs"

/dev/mapper/centos-swap: UUID="900351e0-6257-4ea6-a614-c9a30bead9f4" TYPE="swap"
5)如何查看分区文件系统信息(例如查看block size)
[root@centos7 ~]# xfs  # 按tab

xfs_admin      xfs_copy       xfsdump        xfs_freeze     xfs_growfs     xfsinvutil     xfs_logprint   xfs_metadump   xfs_ncheck     xfs_repair     xfs_rtcp

xfs_bmap       xfs_db         xfs_estimate   xfs_fsr        xfs_info       xfs_io         xfs_mdrestore  xfs_mkfile     xfs_quota      xfsrestore

[root@centos7 ~]# xfs_info /dev/sdb1  # 这里只用挂载点也可以查看

meta-data=/dev/sdb1              isize=    agcount=, agsize= blks

         =                       sectsz=   attr=, projid32bit=

         =                       crc=        finobt= spinodes=

data     =                       bsize=   blocks=, imaxpct=

         =                       sunit=      swidth= blks

naming   =version               bsize=   ascii-ci= ftype=

log      =internal               bsize=   blocks=, version=

         =                       sectsz=   sunit= blks, lazy-count=

realtime =none                   extsz=   blocks=, rtextents=
当我们确定该分区的文件系统是xfs类型的,就可以使用xfs_*命令来进行相应的操作。
6)分区的UUID
每个分区格式化后都有一个UUID,我们可以通过blkid来查看:
[root@centos7 ~]# blkid

/dev/sr0: UUID="2015-12-09-23-03-16-00" LABEL="CentOS 7 x86_64" TYPE="iso9660" PTTYPE="dos"

/dev/sda1: SEC_TYPE="msdos" UUID="7AB0-876A" TYPE="vfat" PARTLABEL="EFI System Partition" PARTUUID="fda2bd89-9fac-4cee-b8b5-780a6466315c"

/dev/sda2: UUID="01923e22-2135-4842-be98-c22b7ea968fb" TYPE="xfs" PARTUUID="7c29241e-5889-4230-a40e-cffcc9197fd8"

/dev/sda3: UUID="tsFdS0-5pvC-QqsQ-BwwB-3IAq-xhR8-bjVpiM" TYPE="LVM2_member" PARTUUID="6fe109b5-9b12-4ddf-828d-7b9cf63adbb1"

/dev/sdb1: UUID="62ff7ea9-5d3d-4bfd-bedb-bcddf6e408f0" TYPE="xfs"

/dev/sdb5: LABEL="my lvm 1" UUID="55aadc7b-b3ab-4f65-9efb-2d80f07721b2" TYPE="ext4"

/dev/sdb6: LABEL="my lvm 2" UUID="9a231e33-0304-4009-b4e6-7bdd31b80fb6" TYPE="xfs"

/dev/mapper/centos-root: UUID="5fed2a74-322a-4526-a222-8ae21f501cfb" TYPE="xfs"

/dev/mapper/centos-swap: UUID="900351e0-6257-4ea6-a614-c9a30bead9f4" TYPE="swap"
也可以通过以下命令来查看:
[root@centos7 ~]# xfs_admin -u /dev/sdb1

UUID = 62ff7ea9-5d3d-4bfd-bedb-bcddf6e408f0
我们在进行自动挂载配置/etc/fstab时,也可以直接使用UUID进行配置:
/dev/mapper/centos-root /                       xfs     defaults

UUID=01923e22---be98-c22b7ea968fb /boot                   xfs     defaults

UUID=7AB0-876A          /boot/efi               vfat    umask=,shortname=winnt

/dev/mapper/centos-swap swap                    swap    defaults

UUID=62ff7ea9-5d3d-4bfd-bedb-bcddf6e408f0 /zz   xfs     defaults
这样也可以将/dev/sdb1成功挂载到/zz下。
UUID也是可以被修改的:
[root@centos7 ~]# uuidgen  # 生成一个新的UUID

37f9713b-fb33-41da-9c9f-599d722523d2

[root@centos7 ~]# umount /zz  # 首先要卸载,才能修改UUID

[root@centos7 ~]# xfs_admin -U 37f9713b-fb33-41da-9c9f-599d722523d2 /dev/sdb1  # 修改/dev/sdb1的UUID为新的UUID

Clearing log and setting UUID

writing all SBs

new UUID = 37f9713b-fb33-41da-9c9f-599d722523d2
再次查看/dev/sdb1的UUID:
[root@centos7 ~]# xfs_admin -u /dev/sdb1

UUID = 37f9713b-fb33-41da-9c9f-599d722523d2
可以看到,UUID修改成功。
UUID一般什么使用?
·在我们使用网络设备的时候,例如iSCSI,磁盘有可能窜位,例如不同时间同一个设备的名字不一样,这是就要使用唯一的UUID来挂载这个设备。
5.什么是swap分区
swap叫交换分区,相当于windows中的虚拟内存。是一个比较老的技术,主要用于解决内存多小的问题。
什么使用使用swap:
虽然swap分区模拟内存,帮助内存存放一些不那么重要的实时数据,但并不是在内存完全使用完后才启用swap的,何时使用swap分区,是由一定策略的(例如物理内存使用比例,可以配置的)。
1)关于内存配置文件
[root@centos7 ~]# ls /proc/sys/vm/

admin_reserve_kbytes    dirty_bytes                extfrag_threshold           lowmem_reserve_ratio       min_slab_ratio        nr_hugepages             oom_dump_tasks            page-cluster              user_reserve_kbytes

block_dump              dirty_expire_centisecs     hugepages_treat_as_movable  max_map_count              min_unmapped_ratio    nr_hugepages_mempolicy   oom_kill_allocating_task  panic_on_oom              vfs_cache_pressure

compact_memory          dirty_ratio                hugetlb_shm_group           memory_failure_early_kill  mmap_min_addr         nr_overcommit_hugepages  overcommit_kbytes         percpu_pagelist_fraction  zone_reclaim_mode

dirty_background_bytes  dirty_writeback_centisecs  laptop_mode                 memory_failure_recovery    mmap_rnd_bits         nr_pdflush_threads       overcommit_memory         stat_interval

dirty_background_ratio  drop_caches                legacy_va_layout            min_free_kbytes            mmap_rnd_compat_bits  numa_zonelist_order      overcommit_ratio          swappiness
这个目录中的文件都是关于内存的系统文件。
2)设置启用swap内存的时机
查看swap在内存使用多少比例的时候启用:
[root@centos7 vm]# cat /proc/sys/vm/swappiness
当物理内存使用比例达到100-swappiness的值时,则启用swap,默认即70%。
3)是否可以不创建swap
我们应该要创建swap分区,因为系统能够分配的虚拟内存总大小,其中包含了swap分区的大小。
查看当前内存可分配总大小和已分配总大小:
[root@centos7 vm]# watch -n . 'grep -i commit' /proc/meminfo

Every .5s: grep -i commit /proc/meminfo                                                                                                                                                                            Mon Mar  ::

CommitLimit:      kB

Committed_AS:     kB
每0.5秒刷新一下数据,可以看到CommitLimit是当前内存可分配的总大小(我们实际物理内存是4G,swap分区是4G),但这里是6G。
已经分配出去的内存为Commited_AS,大小为3G+。
查看默认可分配物理内存比例:
[root@centos7 vm]# cat overcommit_ratio
可分配内存总大小计算公式:
CommitLimit = 物理内存总大小 * overcommit_ratio% + swap大小
这里计算出来就是:
CommitLimit = 4G * % + 4G = 6G
当然我们可以对overcommit_ratio等内核参数进行调整,从而优化内存。如果要想使用全量的物理内存,则可以将overcommit_memory修改为1。
4)swap设置为多大比较合适
在企业中,一般都将swap设置得和物理内存一样大(硬盘成本比较低)。
当然我们应该根据具体的需求来设置swap的大小,如果大小不够,后期还可以调整(例如再添加一个swap分区)。
5)查看当前swap分区信息
查看当前swap分区:
[root@centos7 vm]# swapon -s

Filename                                Type            Size    Used    Priority

/dev/dm-                               partition               -

[root@centos7 vm]# cat /proc/swaps

Filename                                Type            Size    Used    Priority

/dev/dm-                               partition               -
这两种方式都可以查看当前swap分区的信息。我们看到当前swap分区的大小为4G。
6)添加一个swap分区
查看当前sdb磁盘上的分区:
[root@centos7 vm]# fdisk -l

WARNING: fdisk GPT support is currently new, and therefore in an experimental phase. Use at your own discretion.

Disk /dev/sda: 42.9 GB,  bytes,  sectors

Units = sectors of  *  =  bytes

Sector size (logical/physical):  bytes /  bytes

I/O size (minimum/optimal):  bytes /  bytes

Disk label type: gpt

Disk identifier: 6517A95B-8EB4--9FF6-9962100D1695

#         Start          End    Size  Type            Name

                     200M  EFI System      EFI System Partition

                  500M  Microsoft basic

               .3G  Linux LVM

Disk /dev/sdb: 21.5 GB,  bytes,  sectors

Units = sectors of  *  =  bytes

Sector size (logical/physical):  bytes /  bytes

I/O size (minimum/optimal):  bytes /  bytes

Disk label type: dos

Disk identifier: 0x000b2546

   Device Boot      Start         End      Blocks   Id  System

/dev/sdb1                           Linux

/dev/sdb2                        Linux swap / Solaris

/dev/sdb3                       Extended

/dev/sdb5                       Linux

/dev/sdb6                      Linux

/dev/sdb7                    8e  Linux LVM

/dev/sdb8                    8e  Linux LVM

Disk /dev/mapper/centos-root: 38.0 GB,  bytes,  sectors

Units = sectors of  *  =  bytes

Sector size (logical/physical):  bytes /  bytes

I/O size (minimum/optimal):  bytes /  bytes

Disk /dev/mapper/centos-swap:  MB,  bytes,  sectors

Units = sectors of  *  =  bytes

Sector size (logical/physical):  bytes /  bytes

I/O size (minimum/optimal):  bytes /  bytes
我们将sdb2分区的类型修改为Linux swap类型。然后将其启用为swap分区:
[root@centos7 vm]# mkswap /dev/sdb2

Setting up swapspace version , size =  KiB

no label, UUID=d8a1c50b-ff7d-435b--5906513a1300
mkswap相当于格式化,将其作为swap分区。
启用该swap分区:
[root@centos7 vm]# swapon /dev/sdb2
查看当前swap分区:
[root@centos7 vm]# swapon -s

Filename                                Type            Size    Used    Priority

/dev/dm-                               partition               -

/dev/sdb2                               partition               -
可以看到,/dev/sdb2已经被作为swap分区使用,目前的swap分区总大小为6G。
这里注意这两个swap分区的优先级,分别为-2和-3,值越大的优先被使用,这里-2大于-3,所以/dev/dm-1优先使用。当然我们也可以修改其优先级,自定义哪个先被使用。
7)调整swap分区的使用优先级
首先要关闭需要调整的swap分区:
[root@centos7 vm]# swapoff /dev/sdb2
然后重新启动它时,指定优先级数值:
[root@centos7 vm]# swapon -p /dev/sdb2
再次查看:
[root@centos7 vm]# swapon -s

Filename                                Type            Size    Used    Priority

/dev/dm-                               partition               -

/dev/sdb2                               partition               1
这是/dev/sdb2的优先级大于/dev/dm-1的优先级,所有/dev/sdb2优先被使用。
8)自动挂载swap分区
前面我们使用swapon将/dev/sdb2作为swap分区使用,但这个配置是临时生效的,当重启后就失效了。
想要让其自动生效,则还是配置/etc/fstab文件:
/dev/mapper/centos-root /                       xfs     defaults

UUID=01923e22---be98-c22b7ea968fb /boot                   xfs     defaults

UUID=7AB0-876A          /boot/efi               vfat    umask=,shortname=winnt

/dev/mapper/centos-swap swap                    swap    defaults

UUID=62ff7ea9-5d3d-4bfd-bedb-bcddf6e408f0 /zz   xfs     defaults

/dev/sdb2       swap    swap    defaults,pri=1
参考前面系统默认配置的swap分区,我们添加一条在最后即可。这里使用 pri= 来指定优先级。
手工触发以下自动挂载:
# mount -a  自动挂载普通分区

swapon -a  # 自动挂载swap分区
9)将一个文件作为swap分区
当我们swap不够用的时候,但是又没有新的分区可以用来扩展。此时就可以创建一个文件来充当swap分区。
首先创建一个文件:
[root@centos7 /]# dd if=/dev/zero of=/swpfile bs=1M count=

+ records in

+ records out

 bytes ( MB) copied, 0.0591268 s, 3.5 GB/s
创建了一个200M的文件空间。
修改权限为600:
[root@centos7 /]# chmod /swpfile
初始化并使用:
[root@centos7 /]# mkswap /swpfile

Setting up swapspace version , size =  KiB

no label, UUID=e60b4a09-5c5a--abdf-b336addaab96

[root@centos7 /]# swapon /swpfile
这样就将一个文件作为swap分区使用了。注意这个文件是位于根目录下的,也就是说这部分空间位于逻辑卷 /dev/mapper/centos-root (该逻辑卷挂载到根目录"/"下的)。
其实,在windows下就是以这种方式使用的虚拟内存。在windows下有一个文件叫 pagefile.sys ,这个文件就是充当swap交换分区(虚拟内存)的效果。
windows移动该文件参考:https://jingyan.baidu.com/article/5d368d1e8d4b0c3f61c05764.html
====
[RH134] 8-磁盘管理的更多相关文章
- liunx 磁盘管理命令记录
Linux磁盘管理好坏管理直接关系到整个系统的性能问题. Linux磁盘管理常用三个命令为df.du和fdisk. df:列出文件系统的整体磁盘使用量 du:检查磁盘空间使用量 fdisk:用于磁盘分 ...
- Windows Server 2012 磁盘管理之 简单卷、跨区卷、带区卷、镜像卷和RAID-5卷
今天给客户配置故障转移群集,在Windows Server 2012 R2的系统上,通过iSCSI连接上DELL的SAN存储后,在磁盘管理里面发现可以新建 简单卷.跨区卷.带区卷.镜像卷.RAID-5 ...
- Linux常用命令学习7---(磁盘管理df du、磁盘的分区和格式化fdisk parted)
1.磁盘管理 在服务器的维护中,我们需要关心服务器的磁盘使用了多少.还有多少的剩余空间.某个文件有多大.某个文件夹内的所有文件在一起一共占用的多少空间……问题.以便我们在合适的时机为服务器添加硬 ...
- LINUX的磁盘管理du命令详解
LINUX的磁盘管理du命令详解 du(disk usage)命令可以计算文件或目录所占的磁盘空间.没有指定任何选项时, 它会测量当前工作目录与其所有子目录,分别显示各个目录所占的快数,最后才显示工作 ...
- 用Win7自带的磁盘管理工具给硬盘分区
最近新买了一台笔记本,要给硬盘分几个区,心想还是用个工具方便点,于是就上网准备下个“硬盘分区魔术师”,但是看到有一篇文章介绍Win7系统也自带了硬盘分区工具,这我以前倒没听说过,试了一下,还挺方便好用 ...
- Linux_磁盘管理
一.linux磁盘管理 命令:fdisk -l brwx-rw--- 其中b(占位符)代表block,块设备文件 sda,sdb... --> 硬盘 其中sda1,sda2..sdb1,sdb2 ...
- Linux 磁盘管理
Linux磁盘管理好坏管理直接关系到整个系统的性能问题. Linux磁盘管理常用三个命令为df.du和fdisk. df:列出文件系统的整体磁盘使用量 du:检查磁盘空间使用量 fdisk:用于磁盘分 ...
- Linux_06------Linux的磁盘管理
进制编码 * 3.格式化交换分区 * 4.启用交换分区 * * 1.2. * fdisk /dev/sdb * p * t * 6(分区编号) * L(查看编码列表),找到SWAP交换分区标号 * 8 ...
- Linux 系统常用命令汇总(五) 磁盘管理
磁盘管理 命令 选项 注解 示例 df [选项] 显示磁盘空间使用情况 显示磁盘空间是员工情况,以M显示: df -m -i 使用inodes显示结果 -k(m) 使用KB(MB)显示结果 du ...
- Linux命令工具基础04 磁盘管理
Linux命令工具基础04 磁盘管理 日程磁盘管理中,我们最常用的有查看当前磁盘使用情况,查看当前目录所占大小,以及打包压缩与解压缩: 查看磁盘空间 查看磁盘空间利用大小 df -h -h: huma ...
随机推荐
- PAT 1010 Radix (25分) radix取值无限制,二分法提高效率
题目 Given a pair of positive integers, for example, 6 and 110, can this equation 6 = 110 be true? The ...
- docker 部署jenkins
1.拉取镜像 docker pull jenkins/jenkins 2.运行jenkins镜像作为容器 运行命令如下: docker run -d -p 9086:8080 -p 50000:500 ...
- Docker搭建代码检测平台SonarQube并检测maven项目
1 前言 良好的代码习惯是一个优秀程序员应该具备的品质,但靠人的习惯与记忆来保证代码质量,始终不是一件靠谱的事.在计算机行业应该深知,只要是人为的,都会有操作风险.本文讲解如何通过Docker搭建代码 ...
- React学习随笔
一.在非create-react-app创建的项目,使用JSX需要注意的问题 1.1 入门的时候,要引入Babel,并将<script>标签加上type='text/babel'的属性. ...
- wepy 小程序开发(Mixin混合)
默认式混合 对于组件data数据,components组件,events事件以及其它自定义方法采用默认式混合,即如果组件未声明该数据,组件,事件,自定义方法等,那么将混合对象中的选项将注入组件之中.对 ...
- fastDFS多线程并发执行出现的问题
--------------------- 原作者:Java高级开发 来源:CSDN 原文:https://blog.csdn.net/hang1995/article/details/7924 ...
- UVALive 3295
题目大意:见刘汝佳<算法竞赛入门经典——训练指南>P173 解题思路: 每一个合法的三角形的三个顶点都不在同一直线上,那么问题其实就是在求所有不全在同一直线上的三点的组合数. 我们可以利用 ...
- Java——日期获取和日期格式化
import java.text.ParseException; import java.text.SimpleDateFormat; import java.util.Calendar; impor ...
- windows 10 2016 企业版 长期服务 激活方式
试了很多,失败. 使用这个ok———————————————————————————————— 使用方式: 2.1.下载AAct.exe https://www.baidu.com/link?url ...
- vue 下拉列表动画
点击可以收起,这里注意先给需要收起展开的的容器设置高度,通过样式v-enter和v-leave-to设置结束和开始前的就可以了