进度1_家庭记账本App
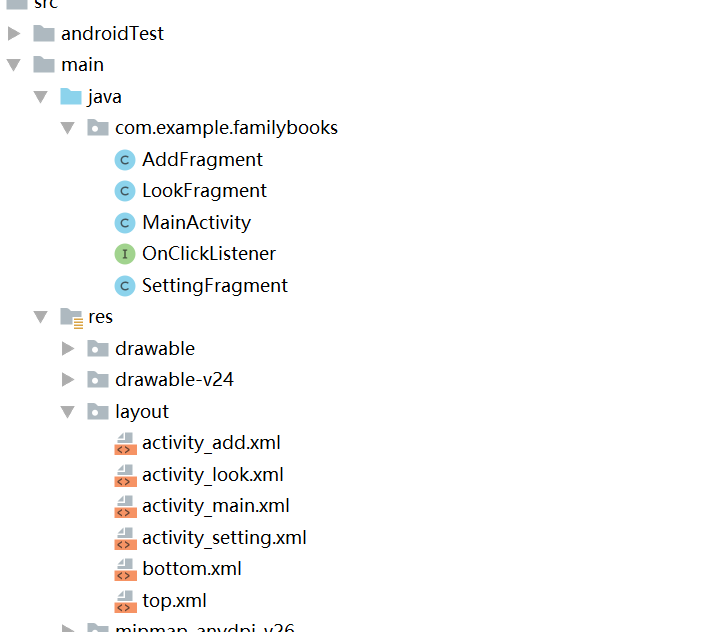
今天完成了昨天的初步构想,详细介绍见上一篇博客,具体项目结构和案例如下:
MainActivity.java:
package com.example.familybooks;

import android.os.Bundle;

import android.provider.ContactsContract;

import android.view.LayoutInflater;

import android.view.View;

import android.view.ViewGroup;

import android.view.Window;

import android.widget.ImageButton;

import android.widget.LinearLayout;

import androidx.annotation.Nullable;

import androidx.fragment.app.Fragment;

import androidx.fragment.app.FragmentActivity;

import androidx.fragment.app.FragmentManager;

import androidx.fragment.app.FragmentTransaction;

import android.view.View.OnClickListener;

import android.view.Window;

import android.widget.ImageButton;

import android.widget.LinearLayout;

public class MainActivity extends FragmentActivity implements OnClickListener {

    //三个Tab对应的布局

    private LinearLayout mTableAdd;

    private LinearLayout mTabLook;

    private LinearLayout mTabSetting;

    //三个Tab对应的ImageButton

    private ImageButton mlmgAdd;

    private ImageButton mlmgLook;

    private ImageButton mlmgSetting;

    private Fragment mTab01;

    private Fragment mTab02;

    private Fragment mTab03;

    @Override

    protected void onCreate(Bundle savedInstanceState) {

        super.onCreate(savedInstanceState);

        requestWindowFeature(Window.FEATURE_NO_TITLE);

        setContentView(R.layout.activity_main);

        initView();

        initEvent();//初始化布局

        setSelect(0);//初始化点击事件

    }

    private void initEvent() {

        //这是对于几个LinearLayout布局的事件监听

        mTableAdd.setOnClickListener(this);

        mTabLook.setOnClickListener(this);

        mTabSetting.setOnClickListener(this);

    }

    private void initView() {

        //控件初始化

        mTableAdd = (LinearLayout) findViewById(R.id.id_tab_add);

        mTabLook = (LinearLayout) findViewById(R.id.id_tab_look);

        mTabSetting = (LinearLayout) findViewById(R.id.id_tab_setting);

        mlmgAdd = (ImageButton) findViewById(R.id.id_tab_add_img);

        mlmgLook = (ImageButton) findViewById(R.id.id_tab_look_img);

        mlmgSetting = (ImageButton) findViewById(R.id.id_tab_setting_img);

    }

    private void setSelect(int i) {

        //此方法主要是改变图标和添加碎片

        FragmentManager fm = getSupportFragmentManager();

        FragmentTransaction transaction = fm.beginTransaction();//把图片设置为亮的

        hideFragment(transaction);//设置内容区域

        switch (i) {

            case 0:

                if (mTab01 == null) {

                    mTab01 = new AddFragment();

                    transaction.add(R.id.content, mTab01);

                } else {

                    transaction.show(mTab01);

                }

                mlmgAdd.setImageResource(R.mipmap.tab_add_pressed);

                break;

            case 1:

                if (mTab02 == null) {

                    mTab02 = new LookFragment();

                    transaction.add(R.id.content, mTab02);

                } else {

                    transaction.show(mTab02);

                }

                mlmgLook.setImageResource(R.mipmap.tab_look_pressed);

                break;

            case 2:

                if (mTab03 == null) {

                    mTab03 = new SettingFragment();

                    transaction.add(R.id.content, mTab03);

                } else {

                    transaction.show(mTab03);

                }

                mlmgSetting.setImageResource(R.mipmap.tab_setting_pressed);

                break;

            default:

                break;

        }

        transaction.commit();//事务提交,一定要有

    }

    //隐藏所有的碎片,在使用时候调用show()显示

    private void hideFragment(FragmentTransaction transaction) {

        if (mTab01 != null) {

            transaction.hide(mTab01);

        }

        if (mTab02 != null) {

            transaction.hide(mTab02);

        }

        if (mTab03 != null) {

            transaction.hide(mTab03);

        }

    }

    public void onClick(View v) {

        resetImgs(); // 将所有的图标设置成暗色,在后面点击或者滑动处理时候在调为亮色

        switch (v.getId()) {

            case R.id.id_tab_add:

                setSelect(0);

                break;

            case R.id.id_tab_look:

                setSelect(1);

                break;

            case R.id.id_tab_setting:

                setSelect(2);

                break;

            default:

                break;

        }

    }

    //切换图片至暗色

    private void resetImgs() {

        mlmgAdd.setImageResource(R.mipmap.tab_add_normal);

        mlmgLook.setImageResource(R.mipmap.tab_look_normal);

        mlmgSetting.setImageResource(R.mipmap.tab_setting_normal);

    }

}
AddFragment.java:(其余两个的Fragment文件代码类似)
package com.example.familybooks;

import android.content.Context;

import android.net.Uri;

import android.os.Bundle;

import androidx.annotation.Nullable;

import androidx.fragment.app.Fragment;

import android.view.LayoutInflater;

import android.view.View;

import android.view.ViewGroup;

public class AddFragment extends Fragment {

    @Nullable

    @Override

    public View onCreateView(LayoutInflater inflater,ViewGroup container,Bundle savedInstanceState){

        return inflater.inflate(R.layout.activity_add,container,false);

    }

}
activity_main.xml:
<?xml version="1.0" encoding="utf-8"?>

<LinearLayout xmlns:android="http://schemas.android.com/apk/res/android"

    xmlns:app="http://schemas.android.com/apk/res-auto"

    xmlns:tools="http://schemas.android.com/tools"

    android:layout_width="match_parent"

    android:layout_height="match_parent"

    android:orientation="vertical"

    tools:context=".MainActivity">

    <include layout="@layout/top"/>

    <FrameLayout

        android:id="@+id/content"

        android:layout_width="fill_parent"

        android:layout_height="0dp"

        android:layout_weight="1">

    </FrameLayout>

    <include layout="@layout/bottom"/>

</LinearLayout>
top.xml:
<?xml version="1.0" encoding="utf-8"?>

<LinearLayout xmlns:android="http://schemas.android.com/apk/res/android"

    android:orientation="vertical"

    android:gravity="center"

    android:background="#899990"

    android:layout_width="match_parent"

    android:layout_height="50dp">

    <TextView

        android:layout_width="wrap_content"

        android:layout_height="wrap_content"

        android:textColor="#ffffff"

        android:text="家庭记账本"

        android:textSize="30sp"

        android:textStyle="bold"/>

</LinearLayout>
bottom.xml:
<?xml version="1.0" encoding="utf-8"?>

<LinearLayout xmlns:android="http://schemas.android.com/apk/res/android"

    android:orientation="horizontal"

    android:layout_width="match_parent"

    android:layout_height="50dp"

    android:background="#262626">

    <LinearLayout

        android:id="@+id/id_tab_add"

        android:layout_width="0dp"

        android:layout_height="fill_parent"

        android:layout_weight="1"

        android:gravity="center"

        android:orientation="vertical">

        <ImageButton

            android:id="@+id/id_tab_add_img"

            android:layout_width="wrap_content"

            android:layout_height="wrap_content"

            android:clickable="false"

            android:src="@mipmap/tab_add_pressed"

            android:background="#00000000"/>

        <TextView

            android:layout_width="wrap_content"

            android:layout_height="wrap_content"

            android:textColor="#ffffff"

            android:text="添加"/>

    </LinearLayout>

    <LinearLayout

        android:id="@+id/id_tab_look"

        android:layout_width="0dp"

        android:layout_height="fill_parent"

        android:layout_weight="1"

        android:gravity="center"

        android:orientation="vertical">

        <ImageButton

            android:id="@+id/id_tab_look_img"

            android:layout_width="wrap_content"

            android:layout_height="wrap_content"

            android:clickable="false"

            android:src="@mipmap/tab_look_normal"

            android:background="#00000000"/>

        <TextView

            android:layout_width="wrap_content"

            android:layout_height="wrap_content"

            android:textColor="#ffffff"

            android:text="查看"/>

    </LinearLayout>

    <LinearLayout

        android:id="@+id/id_tab_setting"

        android:layout_width="0dp"

        android:layout_height="fill_parent"

        android:layout_weight="1"

        android:gravity="center"

        android:orientation="vertical">

        <ImageButton

            android:id="@+id/id_tab_setting_img"

            android:layout_width="wrap_content"

            android:layout_height="wrap_content"

            android:clickable="false"

            android:src="@mipmap/tab_setting_normal"

            android:background="#00000000"/>

        <TextView

            android:layout_width="wrap_content"

            android:layout_height="wrap_content"

            android:textColor="#ffffff"

            android:text="设置"/>

    </LinearLayout>

</LinearLayout>
而针对于各个界面的详细内容,继续更新中,这里只是完成了导航栏的更替交换,其余页面的xml文件也类似
activity_add.xml:
<?xml version="1.0" encoding="utf-8"?>

<LinearLayout xmlns:android="http://schemas.android.com/apk/res/android"

    xmlns:app="http://schemas.android.com/apk/res-auto"

    xmlns:tools="http://schemas.android.com/tools"

    android:layout_width="match_parent"

    android:layout_height="match_parent"

    android:orientation="vertical">

    <TextView

        android:layout_width="fill_parent"

        android:layout_height="fill_parent"

        android:gravity="center"

        android:text="这是添加界面"

        android:textSize="30sp"

        android:textStyle="bold"/>

</LinearLayout>
运行结果:
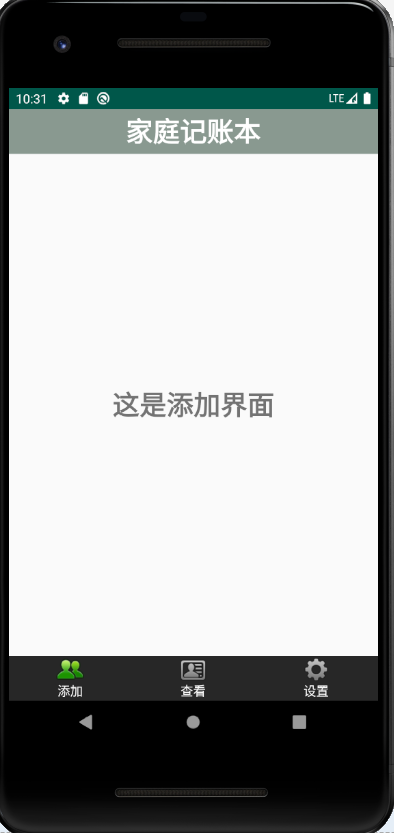


这个activity_main包括了头部,尾部导航栏和一个展示Fragment的布局位置
中途遇到的问题:
1.在尾部导航栏的部分,出现点击图片没有变换页面
解决方法:在设置图片的时候加上语句android:clickable="false"
2.在运行的时候出现了INSTALL_PARSE_FAILED_MANIFEST_MALFORMED的错误
原因:在自己项目的AndroidManifest.xml中,没有添加

总结:若发现类似于以上运行失败,在左下角出现红框弹出错误,一般就是自己的AndroidManifest.xml里面格式的问题,或者有缺少或多余的东西
3.在运行成功后只显示头部导航栏,不显示尾部导航栏
原因:在头部导航栏的部分

写的是match_parent,将其改成对应高度即可
总结:在出现类似的不显示问题部分,可以查看单个xml的Design来寻找问题
进度1_家庭记账本App的更多相关文章
- 进度4_家庭记账本App
在上一个博客中,我学习了用Fragment进行数据的传值,但是出现了好多问题,我通过百度查阅资料发现fregment在进行数值传输的时候有的语法不能使用,并且不方便的进行数据库的使用,所以我在原来的家 ...
- 进度2_家庭记账本App
今天在昨天的基础上,相继完成了三个页面的布局和显示情况: 新增加的xml文件如下: activity_add.xml: <?xml version="1.0" encodin ...
- 进度5_家庭记账本App_数据库的添加和查看
今天继续在昨天的基础上完成了家庭记账单的在数据库中的添加和查看功能 在之前的基础上舍弃了Fragment,重新在百度上找到了学习资料,并且自我完成了实践 首先在之前的基础上创建CostListAdap ...
- 家庭记账本app进度之android中AlertDialog的相关应用以及对日期时间的相关操作(应用alertdialog使用的谈话框)
对于AlertDialog的相关知识: 1.创建构造器AlertDialog.Builder的对象: 2.通过构造器对象调用setTitle.setMessage.setIcon等方法构造对话框 ...
- 家庭记账本app进度之对于登录和注册两个界面点击按钮的相互跳转
这次主要完成了两个两个android页面之间的跳转.从登录页面点击注册就会跳转到注册页面.在注册页面点击返回登录,这样就可以返回到登录界面.主要是这样的操作.其中遇到了一个困难主要是当点击按钮的时候, ...
- 家庭记账本app进度之下拉框和数字转轮的相关应用
这次主要是悬系的下拉框Spinner和数字转轮NumberPicker的使用.先分析相关的用到的知识点. 在Android中,用string-array是一种简单的提取XML资源文件数据的方法. 例子 ...
- 家庭记账本app进度之复选框以及相应滚动条的应用
这次主要是对于android中复选框的相应的操作.以及其中可能应用到的滚动条的相关应用.每一个复选框按钮都要有一个checkBox与之相对应. 推荐使用XML配置,基本语法如下:<CheckBo ...
- 家庭记账本app进度之关于单选按钮的相关操作(添加点击按钮事件以及点击单选更改事件)
这次主要是通过代码实现了android中的相关单选按钮的相关操作,之后再最下面有一个按钮,当点击这个按钮的时候,会获取当上面的相关信息,之后再下方会进行相应的文字显示,获取的信息不同显示的信息也不会一 ...
- 家庭记账本app进度之关于tap的相关操作1
今天还主要学习关于怎样制作微信的先关的tap. 今天的主要成果是已经了解了相关的技术,以及相关的思路.代码经过一个下午的编写,基本接近尾声. 更详细的实验代码,以及相关的知识点将在明天完善后进行发表. ...
随机推荐
- php+ajax 实现无限树列表
首先介绍我实现的是xhprof插件的日志转为无限树状图,先看效果图: 废话不多说,直接看代码:(辛辛苦苦敲了好久才搞定,逻辑比较多,新手多揣摩) 控制器: 1 <?php 2 3 namespa ...
- Day 4 -E - Catenyms POJ - 2337
A catenym is a pair of words separated by a period such that the last letter of the first word is th ...
- 005.Delphi插件之QPlugins,IQNotify通知
演示的界面如下,拖动滚动条,百分比圆和进度条也是会跟着动的 主程序的代码如下 unit Frm_Main; interface uses Winapi.Windows, Winapi.Messages ...
- https://blog.csdn.net/yyoinge/article/details/81557604
https://blog.csdn.net/yyoinge/article/details/81557604 http://www.mamicode.com/info-detail-2346464.h ...
- SpringMVC之ModelAndView的用法
https://blog.csdn.net/qq30211478/article/details/78016155
- 关于如何实现一个Saga分布式事务框架的思考
关于Saga模式的介绍,已经有一篇文章介绍的很清楚了,链接在这里:分布式事务:Saga模式. 关于TCC模式的介绍,也已经有一篇文章介绍的很清楚了,链接在这里:关于如何实现一个TCC分布式事务框架的一 ...
- uniapp 小程序实现自定义底部导航栏(tarbar)
在小程序开发中,默认底部导航栏很难满足实际需求,好在官方给出了自定义形式,效果如下: 话不多说,直接上代码 1.组件 custom-tarbar.vue文件 <template> < ...
- Exchange 2003 限制用户向外网发送邮件
在企业系统中,邮件系统起着举足轻重的作用.同时为了符合企业的安全性策略,在Exchange 2003 中,常常需要限制某个用户或组向外网发送邮件,只允许此邮件在内部收发.下面我们以实验的方式来分析在E ...
- ROS常见问题(三) 报错are you sure it is properly registered and that the containing library is built?
报错: [FATAL] [1576042404.913706482]: Failed to create the global_planner/GlobalPlanner planner, are y ...
- Vulkan 之 Synchronization
1.2之前定的版本采用 vkSemaphore和vkFence来进行同步, VkSemaphore allowed applications to synchronize operations acr ...