Shell编译安装nginx
环境及规划
[root@nginx-node01 ~]# cat /etc/redhat-releaseCentOS Linux release 7.6.1810 (Core)
| ID | 主机名 | ip | 系统配置 | 软件版本 | 操作系统 |
|---|---|---|---|---|---|
| 01 | nginx-node01 | 192.168.56.104 | 1C 1G | 1.16.0稳定版 | CentOS 7.6.1810 |
编译依赖检查
gcc编译环境
pcre & pcre-dev
zlib & zlib-dev
openssl & openssl-dev
[root@nginx-node01 nginx]# cat ifinstall.sh#!/bin/bash#auto install nginx v0.1#check if package was installedfunction checkInstall(){echo "Checking $1 installed or not"#rpm -q $1 >/dev/null 2>&1rpm -q $1if [ $? -eq 0 ]; thenecho "$1 installed "elseecho "$1 not installed, will install $1 "yum -y install $1if [ $? -ne 0 ];thenecho "Install $1" /bin/falseexit 1fifi}##环境及依赖检查#gcccheckInstall gcc-c++#pcre & pcre-develcheckInstall pcre && checkInstall pcre-devel#zlib & zlib-develcheckInstall zlib && checkInstall zlib-devel#openssl & openssl-develcheckInstall openssl && checkInstall openssl-devel
安装步骤
检查并添加nginx用户和组
解压软件包、创建相关目录
执行预编译配置
执行编译、执行安装
[root@nginx-node01 ~]# useradd -g nginx nginx[root@nginx-node01 ~]# id nginxuid=1000(nginx) gid=1000(nginx) groups=1000(nginx)
[root@nginx-node01 nginx]# cat nginx_install.sh#!/bin/bash#check if a user exists and add it#set -nset -v#用户及组NX_GROUP='nginx'NX_USER='nginx'#源码包位置NX_TMP_DIR='/tmp/nginx/'#源码版本NX_VER=1.16.0NX_FILE="nginx-$NX_VER.tar.gz"NX_FILE_ABS=$NX_TMP_DIR$NX_FILE#解压后源码位置NX_DIR=`echo $NX_FILE |sed 's/\.tar.*//g'`NX_SRC_ABS=${NX_TMP_DIR}${NX_DIR}#Nginx home 目录NX_HOME='/home/nginx'NX_LOG=$NX_HOME/logNX_TARGET=${NX_HOME}/${NX_VER}#解压源码if [ -d $NX_SRC_ABS ];thenecho "$NX_SRC_ABS already exists"elsetar -xvzf $NX_FILEfi##配置相关目录、预编译cd $NX_SRC_ABS##设置安装目录#添加log目录if [ ! -d $NX_LOG ]; thenmkdir -p $NX_LOGfi#Nginx 安装目录if [ ! -d ${NX_TARGET} ]; thenmkdir -p ${NX_TARGET}fi#预编译配置./configure \--user=$NX_USER \--group=$NX_GROUP \--prefix=${NX_TARGET} \--sbin-path=${NX_TARGET}/nginx \--conf-path=${NX_TARGET}/nginx.conf \--pid-path=${NX_LOG}/nginx.pid \--error-log-path=${NX_LOG}/error.log \--http-log-path=${NX_LOG}/access.log \--with-http_ssl_module \--with-http_stub_status_module \--with-http_gzip_static_module#编译 && 安装make && make install
安装验证
[root@nginx-node01 ~]# /home/nginx/1.16.0/nginx -Vnginx version: nginx/1.16.0built by gcc 4.8.5 20150623 (Red Hat 4.8.5-39) (GCC)built with OpenSSL 1.0.2k-fips 26 Jan 2017TLS SNI support enabledconfigure arguments: --user=nginx --group=nginx --prefix=/home/nginx/1.16.0 --sbin-path=/home/nginx/1.16.0/nginx --conf-path=/home/nginx/1.16.0/nginx.conf --pid-path=/home/nginx/log/nginx.pid --error-log-path=/home/nginx/log/error.log --http-log-path=/home/nginx/log/access.log --with-http_ssl_module --with-http_stub_status_module --with-http_gzip_static_module
启动验证
[root@nginx-node01 ~]# netstat -ntlp |grep -aiw 80tcp 0 0 0.0.0.0:80 0.0.0.0:* LISTEN 21949/nginx: master[root@nginx-node01 ~]# ps -ef |grep nginxroot 21949 1 0 11:58 ? 00:00:00 nginx: master process ./nginxnginx 21950 21949 0 11:58 ? 00:00:00 nginx: worker process
服务验证
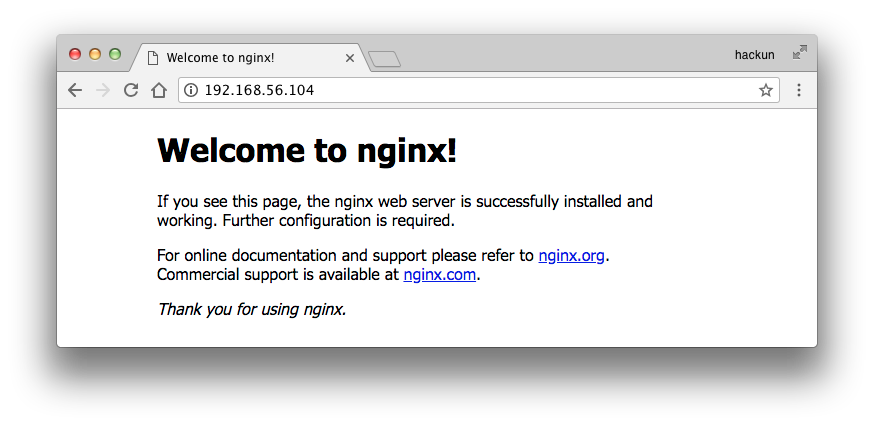
[root@nginx-node01 ~]# curl localhost:80<!DOCTYPE html><html><head><title>Welcome to nginx!</title><style>body {width: 35em;margin: 0 auto;font-family: Tahoma, Verdana, Arial, sans-serif;}</style></head><body><h1>Welcome to nginx!</h1><p>If you see this page, the nginx web server is successfully installed andworking. Further configuration is required.</p><p>For online documentation and support please refer to<a href="http://nginx.org/">nginx.org</a>.<br/>Commercial support is available at<a href="http://nginx.com/">nginx.com</a>.</p><p><em>Thank you for using nginx.</em></p></body></html>
对外服务验证
#关闭防火墙systemctl stop firewalld.service

Shell编译安装nginx的更多相关文章
- linux软件管理之------编译安装nginx服务器并手动编写自动化运行脚本
红帽系列的 linux软件管理分为三类:1. rpm 安装软件.2. yum 安装软件.3. 源码包编译安装.前面两种会在相关专题给出详细讲解.源码包的编译安装是非常关键的,我们知道linux的相关版 ...
- 初识Nginx及编译安装Nginx
初识Nginx及编译安装Nginx 环境说明: 系统版本 CentOS 6.9 x86_64 软件版本 nginx-1.12.2 1.什么是Nginx? 如果你听说或使用过Apache软件 ...
- Windows 编译安装 nginx 服务器 + rtmp 模块
有关博客: <Windows 编译安装 nginx 服务器 + rtmp 模块>.<Ubuntu 编译安装 nginx>.<Arm-Linux 移植 Nginx> ...
- centos系统编译安装nginx+php环境另加独立mysql教程
以前看过的安装nginx+php环境都带了mysql数据库了,这个是因为很多站长都是nginx+php+mysql都在同一台服务器了,那么今天我们是单独处理了,一个是nginx+php环境,然后mys ...
- Centos7 编译安装 Nginx PHP Mariadb Memcached 扩展 ZendOpcache扩展 (实测 笔记 Centos 7.3 + Mariadb 10.1.20 + Nginx 1.10.2 + PHP 7.1.0 + Laravel 5.3 )
环境: 系统硬件:vmware vsphere (CPU:2*4核,内存2G,双网卡) 系统版本:CentOS-7-x86_64-Minimal-1611.iso 安装步骤: 1.准备 1.0 查看硬 ...
- CentOS7 编译安装 Nginx (实测 笔记 Centos 7.0 + nginx 1.6.2)
环境: 系统硬件:vmware vsphere (CPU:2*4核,内存2G,双网卡) 系统版本:CentOS-7.0-1406-x86_64-DVD.iso 安装步骤: 1.准备 1.1 显示系统版 ...
- Mac Pro 编译安装 Nginx 1.8.1
#下载相关源码包,统一放到 /usr/local/src 目录下: http://nginx.org/download/nginx-1.8.1.tar.gz http://zlib.net/zlib- ...
- 【转】linux 编译安装nginx,配置自启动脚本
linux 编译安装nginx,配置自启动脚本 本文章来给各位同学介绍一篇关于linux 编译安装nginx,配置自启动脚本教程,希望有需要了解的朋友可一起来学习学习哦. 在公司的suse服务器装ng ...
- linux 编译安装nginx,配置自启动脚本
本文章来给各位同学介绍一篇关于linux 编译安装nginx,配置自启动脚本教程,希望有需要了解的朋友可一起来学习学习哦. 在公司的suse服务器装nginx,记录下安装过程: 参照这篇文章:Linu ...
随机推荐
- BZOJ1010单调性DP优化
1010: [HNOI2008]玩具装箱toy Time Limit: 1 Sec Memory Limit: 162 MBSubmit: 10707 Solved: 4445[Submit][S ...
- 基于java的雷电游戏
基于java的雷电游戏基本功能包括:敌方飞机随机飞行.我方飞机手动控制飞行,射击比拼,游戏闯关等.本系统结构如下: (1)雷电游戏状态调整功能: 在游戏启动时,游戏会自动进行初始化的验证. 若初始化成 ...
- 重学 Java 设计模式:实战抽象工厂模式
作者:小傅哥 博客:https://bugstack.cn 沉淀.分享.成长,让自己和他人都能有所收获!
- MongoDB -MSC集群的部署
一.Shard节点配置过程 1. 目录创建:mkdir -p /mongodb/38021/conf /mongodb/38021/log /mongodb/38021/datamkdir -p ...
- ES[7.6.x]学习笔记(十)聚合查询
聚合查询,它是在搜索的结果上,提供的一些聚合数据信息的方法.比如:求和.最大值.平均数等.聚合查询的类型有很多种,每一种类型都有它自己的目的和输出.在ES中,也有很多种聚合查询,下面我们看看聚合查询的 ...
- 【半译】扩展shutdown超时设置以保证IHostedService正常关闭
我最近发现一个问题,当应用程序关闭时,我们的应用程序没有正确执行在IHostedService中的StopAsync方法.经过反复验证发现,这是由于某些服务对关闭信号做出响应所需的时间太长导致的.在这 ...
- [PHP插件教程]002.代码包PHP Beautifier的使用
This program reformat and beautify PHP source code files automatically. The program is Open Source a ...
- [JavaWeb基础] 007.Struts2的配置和简单使用
1.框架简介 采用Struts能开发出基于MVC(Model-View-Controller)设计模式的应用构架,用于快速开发Java Web应用.Struts实现的重点在C(Controller), ...
- Linux(二):VMware虚拟机中Ubuntu安装详细过程
Linux(二):VMware虚拟机中Ubuntu安装详细过程 目录 1 准备 2 安装 2.1 虚拟机的建立 2.2 虚拟机安装Ubuntu系统 2.3 虚拟机设置 3 完成 1 准备 1.操作系统 ...
- DataFrame-选择与切片
取得DataFrame对象reviews的description列的前10个值(或者说reviews前10行的description列): reviews.iloc[:10].loc[:,'descr ...
