IIS日志如何记录X-Forwarded-For
起因
最近因为某个站点的流量异常,需要统计一下服务器的来源IP,本来开一下IIS日志就能搞定的事儿,但不幸的是生产服务器使用F5做了负载均衡,IIS日志无法记录到真实IP,真实的IP在“x-forwarded-for”中,baidu了一堆,没几个靠谱的,还好有个bing能用,很快找到了下这篇文章,文章写的条理清晰,浅显易懂,立马转了过来,省的什么时候又给墙了,大家看原文吧,我懒得翻译了。
原文:http://www.loadbalancer.org/blog/iis-and-x-forwarded-for-header/
What's the issue?
When you load balance your website at layer 7, it will become non-transparent. This means that the actual client source IP address is replaced by the load balancer's own IP address - and only this address will be recorded in the IIS logs.
One way around this is to insert XFF headers on the load balancer to track the actual client source IP address. IIS can then be reconfigured to make this data available in the logs.
NB. The other options to gain source IP transparency are to configure the load balancer in layer 4 NAT mode, layer 4 DSR mode or Layer 7 with TPROXY enabled.
The solution - how to modify logging behaviour
The steps required depend on your version of IIS.
IIS 8.5 & later
A custom logging field can be added to record XFF headers.
To enable this feature:
- Start IIS Manager, then on the Connections pane on the left, click the appropriate website where you want to enable XFF logging. The Home page is then displayed in the main panel.
- From the Home page, double-click Logging.

- From the Log File section, click Select Fields.

- From the bottom left corner, click Add Field.
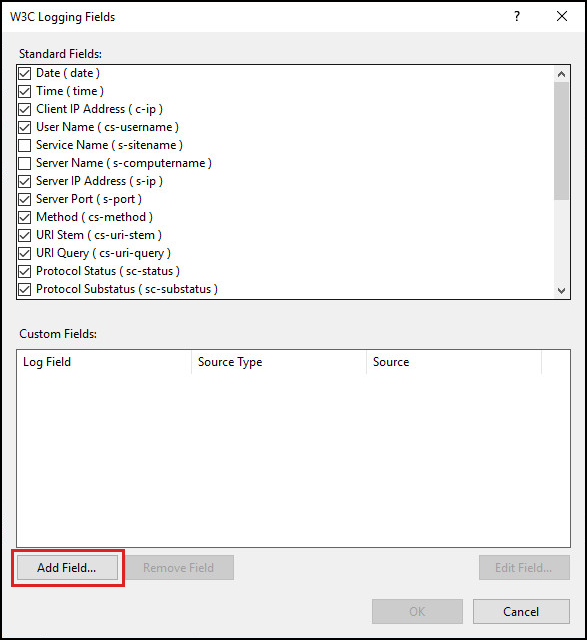
- In the Add Custom Field window, complete the following:

- in Field Name, type X-Forwarded-For
- in Source, type X-Forwarded-For
- leave Source Type set to ‘Request Header’
- click OK on the Add Custom Field window
- click OK on the W3C Logging Fields window
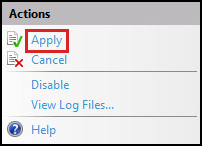
- From the Actions pane on the right, click Apply to implement the change.
- The log files are located by default in the directory %SystemDrive%\inetpub\logs\LogFiles. IIS creates new log files and appends “_x” to the log file names to indicate that they contain custom fields.
UIIS 7 & IIS 7.5
For IIS 7 & 7.5 the Advanced Logging add-on must be installed. This can be downloaded here. Once installed on the IIS server, you'll see an extra option called 'Advanced Logging' in IIS.
To configure and enable Advanced Logging:
- Start IIS Manager, then on the Connections pane on the left, click the server, website or directory where you want to configure Advanced Logging. The related Home page is displayed in the main panel.
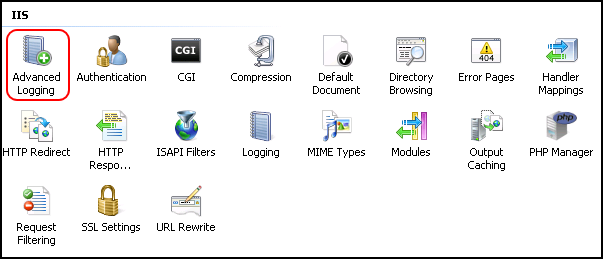
- From the Home page, under IIS, double-click Advanced Logging.
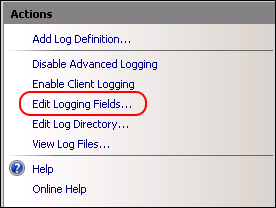
- From the Actions pane on the right, click Enable Advanced Logging.

- From the Actions pane on the right, click Edit Logging Fields.
- On the Edit Logging Fields window click Add Field, and then complete the following:
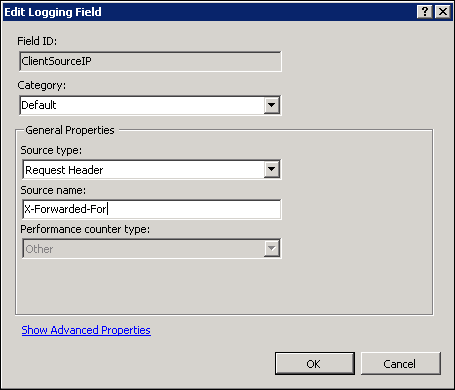
- in Field ID, type ClientSourceIP
- in Category, type Default
- in Source type, select Request Header
- in Source name, type X-Forwarded-For
- click OK on the Add Logging Field form
- click OK on the Edit Logging Fields form
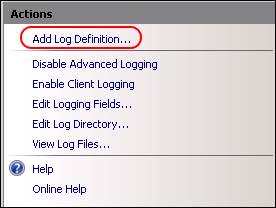
- From the Actions pane on the right, click Add Log Definition.
- Enter Client Source IP in the Base file name field.

- Click Select Fields.
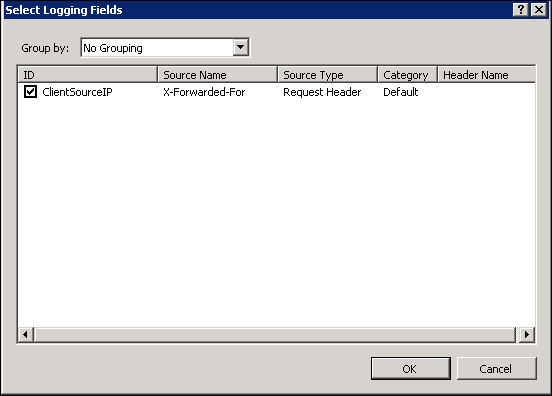
- Check (enable) the ClientSourceIP field created earlier
- Click OK on the Select Logging Fields form, then click Apply in the actions pane.
- Click Return To Advanced Logging in the actions pane.
- Run iisreset /restart to apply the new settings.
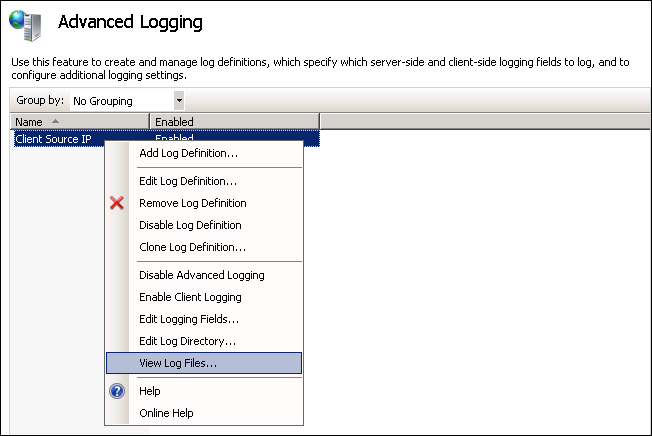
- The advanced log must be viewed rather than the default log. The advanced log is located in %SystemDrive%inetpublogsAdvancedLogs. To view the logs, right-click the Client Source IP log definition and click View Log Files.
IIS 6
Unfortunately, the Microsoft solution mentioned above is not available for IIS 6. Luckily there are a number of other solutions - some costing money and others that have been released as open source. One excellent example that we've tested with our products is F5's X-Forwarded-For ISAPI filter. It's available in both in 32- and 64-bit versions.
- Download the zipped archive from here and extract to an appropriate folder.
- Navigate to the relevant version (32- or 64-bit).
- Copy F5XForwardedFor.dll to a suitable location on your server, e.g. C:ISAPIfilters.
- Make sure you have ISAPI Filters enabled on your IIS server.
- Open IIS Manager, right-click the site and select Properties.
- Select the ISAPI Filters tab.
- Click add, then in the popup enter a suitable name and select the DLL file stored in step 3.
- Restart your website.
后记
关于IIS日志分析,这里再推荐个工具HttpLogBrowser(传送门),基本上大部分的统计需求都可以满足,实在是居家旅行之必备。
补充
其实还有个方法,可以直接在IIS日志里输出,就是使用F5XForwardedFor,注册完成后重启IIS,就会在日志里直接输出(传送门),我试了也是可行的,但不知道是不是官方方案,生产没敢搞。
IIS日志如何记录X-Forwarded-For的更多相关文章
- IIS日志-网站运维的好帮手
对于一个需要长期维护的网站来说,如何让网站长久稳定运行是件很有意义的事情. 有些在开发阶段没有暴露的问题很有可能就在运维阶段出现了,这也是很正常的. 还有些时候,我们希望不断地优化网站,让网站更快速的 ...
- 网站运维工具使用iis日志分析工具分析iis日志(iis日志的配置)
我们只能通过各种系统日志来分析网站的运行状况,对于部署在IIS上的网站来说,IIS日志提供了最有价值的信息,我们可以通过它来分析网站的响应情况,来判断网站是否有性能问题,或者存在哪些需要改进的地方 对 ...
- 【转】IIS日志-网站运维的好帮手
对于一个需要长期维护的网站来说,如何让网站长久稳定运行是件很有意义的事情. 有些在开发阶段没有暴露的问题很有可能就在运维阶段出现了,这也是很正常的. 还有些时候,我们希望不断地优化网站,让网站更快速的 ...
- X-Forwarded-For (IIS日志记录用户真实IP)
参考:http://www.jbxue.com/article/7521.html 当IIS放在反向代理后面时,日志中的客户端ip是反向代理服务器的ip,不是用户的真实IP地址. 本文为大家介绍使用X ...
- [转]IIS 日志记录时间和实际时间 不一样
今天偶然发现 2003 系统IIS 日志记录时间和实际时间总是差了8个小时,也就是慢了8个小时.苦苦找了半天才发现如下办法能解决 ,特发来分享下 解决1:如果 IIS日志记录默认使用的是W3C扩展日志 ...
- Apache/Nginx/IIS日志记录的各个字段内容与含义
一.Apache 1.1 Apache日志文件名称及路径介绍 当我们安装并启动Apache后,Apache会自动生成两个日志文件,这两个日志文件分别是访问日志access_log(在Windows上是 ...
- iis日志查看
IIS日志是每个服务器管理者都必须学会查看的,服务器的一些状况和访问IP的来源都会记录在IIS日志中,所以IIS日志对每个服务器管理者非常的重要,seoer也不例外,这点同时也可方便网站管理人员查看网 ...
- 云计算之路-阿里云上:结合IIS日志分析“黑色30秒”问题
在昨天针对“黑色30秒”问题的分析中,我们猜测Requests Queued上升是由于正在处理的请求出不去(到达不了客户端).今天我们结合IIS日志验证这个猜测. IIS日志中有一个重要的指标——ti ...
- 【一步一图】:详解IIS日志配置
打开网站配置:右键点击属性 弹出设置界面 如上图,日志可选4种格式: [Microsoft IIS 日志文件格式] 存放地址如上图 以in开头 年份后两位+月份+日 命名: 示例: //, ...
随机推荐
- nvm常用命令
安装nvm:curl -o- https://raw.githubusercontent.com/creationix/nvm/v0.33.8/install.sh | bash 查看当前nvm版本: ...
- MySQL新建数据库时utf8_general_ci编码解释
utf8_unicode_ci和utf8_general_ci对中英文来说没有实质的差别.utf8_general_ci: 校对速度快,但准确度稍差.utf8_unicode_ci: 准确度高,但校对 ...
- 阿里云二级域名解析指向服务器另一台主机— —Nginx
这是在一台阿里云服务器没有任何域名,但是配置高,因此想借用另一台阿里云服务器(配置较低)已备案的域名 跳转到这台配置高的服务器,那么使用nginx反向代理 server { listen 80; se ...
- shell 中 比较 diff
diff 可以用来比较文件和文件夹是否相同 比较文件 diff file1 file2 >/dev/null 比较文件夹 diff -rNaq dir1 dir2 >/dev/null - ...
- 洛谷 P1972 [SDOI2009]HH的项链——树状数组
先上一波题目 https://www.luogu.org/problem/P1972 这道题是询问区间内不同数的个数 明显不是正常的数据结构能够维护的 首先考虑 因为对于若干个询问的区间[l,r],如 ...
- javaIO流(一)--File类的基本使用
一.File文件操作类 在java语言中提供有对于文件操作系统的支持,这个支持就在java.io.File类中进行了定义,也就是说在整个java.io包中File类是唯一一个与文件本身操作有关的类(创 ...
- C语言深度剖析自测题8解析
#include <stdio.h> int main(void) { int a[5] = {1, 2, 3, 4, 5}; int* ptr1 = (int*)(&a ...
- Centos7 安装rar,unrar,zip,unzip
1.yum 安装unrar # yum install unrar rar命令 # rar a test.rar test.jpg test.png 这条命令是将test.jpg和test.png压缩 ...
- RbMQ 简介
Broker:简单来说就是消息队列服务器实体. Exchange:消息交换机,它指定消息按什么规则,路由到哪个队列. Queue:消息队列载体,每个消息都会被投入到一个或多个队列. Binding:绑 ...
- Vue.js 3 Step 创建一个组件
Step1:Vue.extend()创建组件 Step2:Vue.component()注册组件,注册的标签一定要用小写 Step3:挂载点使用组件 <!doctype html> < ...