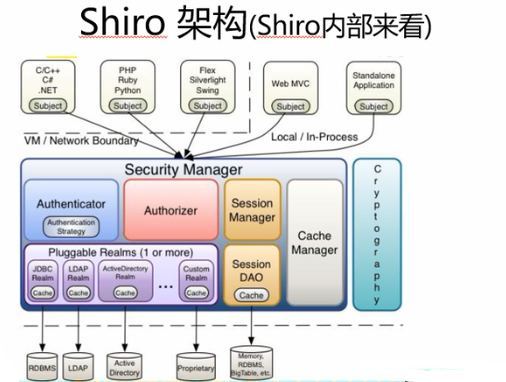
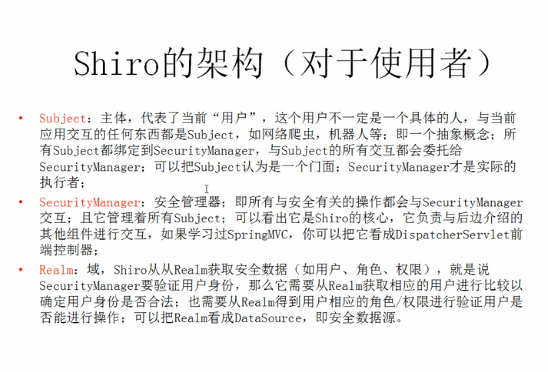
shiro(安全框架)
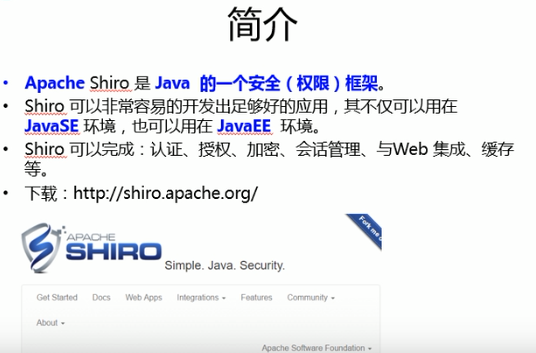
shiro.apache.org
JavaSE环境搭建Shiro框架
1/导入与 shiro相关的Jar包
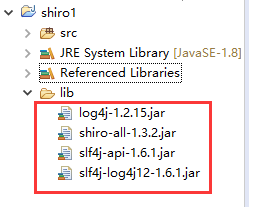
所有集好的环境可以在如下目录查找
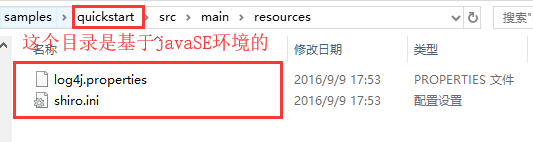
复制如上文件到工程中
2/配置文件:储存临时文件
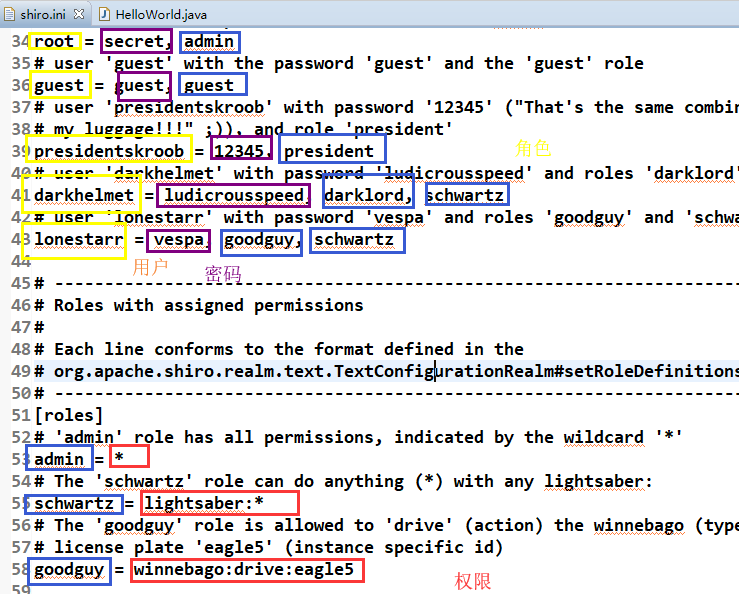
shiro.ini文件:储存数据,用户名,密码,角色,权限
用户名=密码,角色1,角色2.。。。
角色=权限
package com.shiro;

import org.apache.shiro.SecurityUtils;
import org.apache.shiro.authc.AuthenticationException;
import org.apache.shiro.authc.IncorrectCredentialsException;
import org.apache.shiro.authc.LockedAccountException;
import org.apache.shiro.authc.UnknownAccountException;
import org.apache.shiro.authc.UsernamePasswordToken;
import org.apache.shiro.config.IniSecurityManagerFactory;
import org.apache.shiro.mgt.SecurityManager;
import org.apache.shiro.session.Session;
import org.apache.shiro.subject.Subject;
import org.apache.shiro.util.Factory;
import org.slf4j.Logger;
import org.slf4j.LoggerFactory;

public class HelloWorld {

    private static final Logger log =LoggerFactory.getLogger(HelloWorld.class);

    public static void main(String[] args) {
        log.info("测试Log4J");
        //1-获取安全管理器
        //2获取用户
        //3用户登陆验证
        //4权限管理
        //5角色管理
        //6session:用户登陆到用户退出,作用域

        //1获取安全管理器
        Factory<SecurityManager> factory = new IniSecurityManagerFactory("classpath:shiro.ini");
        SecurityManager securityManager = factory.getInstance();
        //2需要设置安全管理器
        SecurityUtils.setSecurityManager(securityManager);

        //3获取Subject对象,即将登陆的用户
        Subject subject = SecurityUtils.getSubject();
        Session session = subject.getSession();

        session.setAttribute("name", "陶泽源");

        String value = (String) session.getAttribute("name");
        if(value != null){
            log.info("Shiro已经帮我们获取到了session会话对象中指定的值:"+value);
        }

        //怎么看用户是否登陆呢
        if(subject.isAuthenticated() == false){
            //UsernamePasswordToken(在ini中找一个)
            UsernamePasswordToken token = new UsernamePasswordToken("root","secret");
            token.setRememberMe(true);
            //登陆
            try {
                subject.login(token);
                log.info("用户名密码正确,登陆成功");
            } catch (UnknownAccountException e) {
                log.info("账户不存在。");
            }catch (IncorrectCredentialsException e) {
                log.info("密码错误。");
            }catch (LockedAccountException e) {
                log.info("用户已经锁死。");
            }catch (AuthenticationException e) {
                log.info("认证异常。");
            }
        }
        //如何判断用户拥有指定的角色呢
        boolean hasRole = subject.hasRole("admin");

        if(hasRole){
            log.info("拥有指定的角色");
        }else{
            log.info("不拥有指定的角色");
        }
        //Subject:isPermitted(String)是否拥有指定的权限
        if(subject.isPermitted("winnebago:drive:eagle5")){
            log.info("拥有指定的权限");
        }else{
            log.info("当前用户没有指定的权限");
        }
        subject.logout();
        System.exit(0);
    }
}
2018-01-07 23:17:43,233 INFO [com.shiro.HelloWorld] - 测试Log4J
2018-01-07 23:17:43,250 DEBUG [org.apache.shiro.io.ResourceUtils] - Opening resource from class path [shiro.ini]
2018-01-07 23:17:43,300 DEBUG [org.apache.shiro.config.Ini] - Parsing [users]
2018-01-07 23:17:43,303 TRACE [org.apache.shiro.config.Ini] - Discovered key/value pair: root = secret, admin
2018-01-07 23:17:43,303 TRACE [org.apache.shiro.config.Ini] - Discovered key/value pair: guest = guest, guest
2018-01-07 23:17:43,303 TRACE [org.apache.shiro.config.Ini] - Discovered key/value pair: presidentskroob = 12345, president
2018-01-07 23:17:43,303 TRACE [org.apache.shiro.config.Ini] - Discovered key/value pair: darkhelmet = ludicrousspeed, darklord, schwartz
2018-01-07 23:17:43,303 TRACE [org.apache.shiro.config.Ini] - Discovered key/value pair: lonestarr = vespa, goodguy, schwartz
2018-01-07 23:17:43,303 DEBUG [org.apache.shiro.config.Ini] - Parsing [roles]
2018-01-07 23:17:43,305 TRACE [org.apache.shiro.config.Ini] - Discovered key/value pair: admin = *
2018-01-07 23:17:43,305 TRACE [org.apache.shiro.config.Ini] - Discovered key/value pair: schwartz = lightsaber:*
2018-01-07 23:17:43,307 TRACE [org.apache.shiro.config.Ini] - Discovered key/value pair: goodguy = winnebago:drive:eagle5
2018-01-07 23:17:43,309 DEBUG [org.apache.shiro.config.IniFactorySupport] - Creating instance from Ini [sections=users,roles]
2018-01-07 23:17:43,309 TRACE [org.apache.shiro.config.Ini] - Specified name was null or empty.  Defaulting to the default section (name = "")
2018-01-07 23:17:43,452 DEBUG [org.apache.shiro.realm.text.IniRealm] - Discovered the [roles] section.  Processing...
2018-01-07 23:17:43,459 DEBUG [org.apache.shiro.realm.text.IniRealm] - Discovered the [users] section.  Processing...
2018-01-07 23:17:43,476 TRACE [org.apache.shiro.mgt.DefaultSecurityManager] - Context already contains a SecurityManager instance.  Returning.
2018-01-07 23:17:43,476 TRACE [org.apache.shiro.mgt.DefaultSecurityManager] - No identity (PrincipalCollection) found in the context.  Looking for a remembered identity.
2018-01-07 23:17:43,476 TRACE [org.apache.shiro.mgt.DefaultSecurityManager] - No remembered identity found.  Returning original context.
2018-01-07 23:17:43,483 TRACE [org.apache.shiro.subject.support.DelegatingSubject] - attempting to get session; create = false; session is null = true; session has id = false
2018-01-07 23:17:43,483 TRACE [org.apache.shiro.subject.support.DelegatingSubject] - attempting to get session; create = false; session is null = true; session has id = false
2018-01-07 23:17:43,483 TRACE [org.apache.shiro.subject.support.DelegatingSubject] - attempting to get session; create = false; session is null = true; session has id = false
2018-01-07 23:17:43,483 TRACE [org.apache.shiro.subject.support.DelegatingSubject] - attempting to get session; create = false; session is null = true; session has id = false
2018-01-07 23:17:43,483 TRACE [org.apache.shiro.subject.support.DelegatingSubject] - attempting to get session; create = false; session is null = true; session has id = false
2018-01-07 23:17:43,483 TRACE [org.apache.shiro.subject.support.DelegatingSubject] - attempting to get session; create = true; session is null = true; session has id = false
2018-01-07 23:17:43,483 TRACE [org.apache.shiro.subject.support.DelegatingSubject] - Starting session for host null
2018-01-07 23:17:43,485 DEBUG [org.apache.shiro.session.mgt.AbstractValidatingSessionManager] - No sessionValidationScheduler set.  Attempting to create default instance.
2018-01-07 23:17:43,486 TRACE [org.apache.shiro.session.mgt.AbstractValidatingSessionManager] - Created default SessionValidationScheduler instance of type [org.apache.shiro.session.mgt.ExecutorServiceSessionValidationScheduler].
2018-01-07 23:17:43,486 INFO [org.apache.shiro.session.mgt.AbstractValidatingSessionManager] - Enabling session validation scheduler...
2018-01-07 23:17:43,514 TRACE [org.apache.shiro.session.mgt.DefaultSessionManager] - Creating session for host null
2018-01-07 23:17:43,514 DEBUG [org.apache.shiro.session.mgt.DefaultSessionManager] - Creating new EIS record for new session instance [org.apache.shiro.session.mgt.SimpleSession,id=null]
2018-01-07 23:17:43,861 TRACE [org.apache.shiro.session.mgt.AbstractValidatingSessionManager] - Attempting to retrieve session with key org.apache.shiro.session.mgt.DefaultSessionKey@5679c6c6
2018-01-07 23:17:43,862 TRACE [org.apache.shiro.session.mgt.AbstractValidatingSessionManager] - Attempting to retrieve session with key org.apache.shiro.session.mgt.DefaultSessionKey@5679c6c6
2018-01-07 23:17:43,862 INFO [com.shiro.HelloWorld] - Shiro已经帮我们获取到了session会话对象中指定的值:陶泽源
2018-01-07 23:17:43,862 TRACE [org.apache.shiro.subject.support.DelegatingSubject] - attempting to get session; create = false; session is null = false; session has id = true
2018-01-07 23:17:43,862 TRACE [org.apache.shiro.session.mgt.AbstractValidatingSessionManager] - Attempting to retrieve session with key org.apache.shiro.session.mgt.DefaultSessionKey@5679c6c6
2018-01-07 23:17:43,863 TRACE [org.apache.shiro.authc.AbstractAuthenticator] - Authentication attempt received for token [org.apache.shiro.authc.UsernamePasswordToken - root, rememberMe=true]
2018-01-07 23:17:43,864 DEBUG [org.apache.shiro.realm.AuthenticatingRealm] - Looked up AuthenticationInfo [root] from doGetAuthenticationInfo
2018-01-07 23:17:43,864 DEBUG [org.apache.shiro.realm.AuthenticatingRealm] - AuthenticationInfo caching is disabled for info [root].  Submitted token: [org.apache.shiro.authc.UsernamePasswordToken - root, rememberMe=true].
2018-01-07 23:17:43,864 DEBUG [org.apache.shiro.authc.credential.SimpleCredentialsMatcher] - Performing credentials equality check for tokenCredentials of type [[C and accountCredentials of type [java.lang.String]
2018-01-07 23:17:43,864 DEBUG [org.apache.shiro.authc.credential.SimpleCredentialsMatcher] - Both credentials arguments can be easily converted to byte arrays.  Performing array equals comparison
2018-01-07 23:17:43,865 DEBUG [org.apache.shiro.authc.AbstractAuthenticator] - Authentication successful for token [org.apache.shiro.authc.UsernamePasswordToken - root, rememberMe=true].  Returned account [root]
2018-01-07 23:17:43,866 DEBUG [org.apache.shiro.subject.support.DefaultSubjectContext] - No SecurityManager available in subject context map.  Falling back to SecurityUtils.getSecurityManager() lookup.
2018-01-07 23:17:43,866 TRACE [org.apache.shiro.mgt.DefaultSecurityManager] - Context already contains a SecurityManager instance.  Returning.
2018-01-07 23:17:43,866 TRACE [org.apache.shiro.subject.support.DelegatingSubject] - attempting to get session; create = false; session is null = false; session has id = true
2018-01-07 23:17:43,866 DEBUG [org.apache.shiro.mgt.DefaultSecurityManager] - Context already contains a session.  Returning.
2018-01-07 23:17:43,866 DEBUG [org.apache.shiro.subject.support.DefaultSubjectContext] - No SecurityManager available in subject context map.  Falling back to SecurityUtils.getSecurityManager() lookup.
2018-01-07 23:17:43,866 TRACE [org.apache.shiro.subject.support.DelegatingSubject] - attempting to get session; create = false; session is null = false; session has id = true
2018-01-07 23:17:43,866 TRACE [org.apache.shiro.subject.support.DelegatingSubject] - attempting to get session; create = false; session is null = false; session has id = true
2018-01-07 23:17:43,866 TRACE [org.apache.shiro.session.mgt.AbstractValidatingSessionManager] - Attempting to retrieve session with key org.apache.shiro.session.mgt.DefaultSessionKey@5679c6c6
2018-01-07 23:17:43,867 TRACE [org.apache.shiro.subject.support.DelegatingSubject] - attempting to get session; create = false; session is null = false; session has id = true
2018-01-07 23:17:43,867 TRACE [org.apache.shiro.subject.support.DelegatingSubject] - attempting to get session; create = false; session is null = false; session has id = true
2018-01-07 23:17:43,867 TRACE [org.apache.shiro.session.mgt.AbstractValidatingSessionManager] - Attempting to retrieve session with key org.apache.shiro.session.mgt.DefaultSessionKey@5679c6c6
2018-01-07 23:17:43,867 TRACE [org.apache.shiro.session.mgt.AbstractValidatingSessionManager] - Attempting to retrieve session with key org.apache.shiro.session.mgt.DefaultSessionKey@5679c6c6
2018-01-07 23:17:43,868 TRACE [org.apache.shiro.mgt.DefaultSecurityManager] - This org.apache.shiro.mgt.DefaultSecurityManager instance does not have a [org.apache.shiro.mgt.RememberMeManager] instance configured.  RememberMe services will not be performed for account [root].
2018-01-07 23:17:43,868 TRACE [org.apache.shiro.subject.support.DelegatingSubject] - attempting to get session; create = false; session is null = false; session has id = true
2018-01-07 23:17:43,869 INFO [com.shiro.HelloWorld] - 用户名密码正确,登陆成功
2018-01-07 23:17:43,869 TRACE [org.apache.shiro.subject.support.DelegatingSubject] - attempting to get session; create = false; session is null = false; session has id = true
2018-01-07 23:17:43,869 TRACE [org.apache.shiro.session.mgt.AbstractValidatingSessionManager] - Attempting to retrieve session with key org.apache.shiro.session.mgt.DefaultSessionKey@5679c6c6
2018-01-07 23:17:43,869 TRACE [org.apache.shiro.realm.AuthorizingRealm] - Retrieving AuthorizationInfo for principals [root]
2018-01-07 23:17:43,870 INFO [com.shiro.HelloWorld] - 拥有指定的角色
2018-01-07 23:17:43,870 TRACE [org.apache.shiro.subject.support.DelegatingSubject] - attempting to get session; create = false; session is null = false; session has id = true
2018-01-07 23:17:43,870 TRACE [org.apache.shiro.session.mgt.AbstractValidatingSessionManager] - Attempting to retrieve session with key org.apache.shiro.session.mgt.DefaultSessionKey@5679c6c6
2018-01-07 23:17:43,871 TRACE [org.apache.shiro.realm.AuthorizingRealm] - Retrieving AuthorizationInfo for principals [root]
2018-01-07 23:17:43,872 INFO [com.shiro.HelloWorld] - 拥有指定的权限
2018-01-07 23:17:43,872 TRACE [org.apache.shiro.subject.support.DelegatingSubject] - attempting to get session; create = false; session is null = false; session has id = true
2018-01-07 23:17:43,872 TRACE [org.apache.shiro.session.mgt.AbstractValidatingSessionManager] - Attempting to retrieve session with key org.apache.shiro.session.mgt.DefaultSessionKey@5679c6c6
2018-01-07 23:17:43,879 TRACE [org.apache.shiro.subject.support.DelegatingSubject] - attempting to get session; create = false; session is null = false; session has id = true
2018-01-07 23:17:43,879 TRACE [org.apache.shiro.session.mgt.AbstractValidatingSessionManager] - Attempting to retrieve session with key org.apache.shiro.session.mgt.DefaultSessionKey@5679c6c6
2018-01-07 23:17:43,879 DEBUG [org.apache.shiro.mgt.DefaultSecurityManager] - Logging out subject with primary principal root
2018-01-07 23:17:43,880 TRACE [org.apache.shiro.realm.CachingRealm] - Cleared cache entries for account with principals [root]
2018-01-07 23:17:43,880 TRACE [org.apache.shiro.subject.support.DelegatingSubject] - attempting to get session; create = false; session is null = false; session has id = true
2018-01-07 23:17:43,880 TRACE [org.apache.shiro.session.mgt.AbstractValidatingSessionManager] - Attempting to retrieve session with key org.apache.shiro.session.mgt.DefaultSessionKey@5679c6c6
2018-01-07 23:17:43,880 TRACE [org.apache.shiro.session.mgt.AbstractValidatingSessionManager] - Attempting to retrieve session with key org.apache.shiro.session.mgt.DefaultSessionKey@5679c6c6
2018-01-07 23:17:43,881 TRACE [org.apache.shiro.subject.support.DelegatingSubject] - attempting to get session; create = false; session is null = false; session has id = true
2018-01-07 23:17:43,881 TRACE [org.apache.shiro.session.mgt.AbstractValidatingSessionManager] - Attempting to retrieve session with key org.apache.shiro.session.mgt.DefaultSessionKey@5679c6c6
2018-01-07 23:17:43,881 DEBUG [org.apache.shiro.session.mgt.AbstractSessionManager] - Stopping session with id [e7eb0893-4817-45dc-9e93-59c078ebe9e1]
结果
修改用户名,密码来测试
Spring整合shiro
-导入与框架相关的JAR
-Spring的配置文件
1、web.xml文件中完成Spring配置文件的声明
2、新建一个Spring的配置
-新建一个spring的配置文件
1、web.xml文件声明一个spring MVC的核心控制器
2、新建一个springmvc的配置

<?xml version="1.0" encoding="UTF-8"?>
<beans xmlns="http://www.springframework.org/schema/beans"
    xmlns:xsi="http://www.w3.org/2001/XMLSchema-instance"
    xmlns:mvc="http://www.springframework.org/schema/mvc"
    xmlns:context="http://www.springframework.org/schema/context"
    xsi:schemaLocation="http://www.springframework.org/schema/mvc http://www.springframework.org/schema/mvc/spring-mvc-4.1.xsd
        http://www.springframework.org/schema/beans http://www.springframework.org/schema/beans/spring-beans.xsd
        http://www.springframework.org/schema/context http://www.springframework.org/schema/context/spring-context-4.1.xsd">
<!-- 视图管理器 -->
    <bean class="org.springframework.web.servlet.view.InternalResourceViewResolver">
        <property name="prefix" value="/"></property>
        <property name="suffix" value=".jsp"></property>
    </bean>

    <context:component-scan base-package="*"></context:component-scan>
    <mvc:annotation-driven></mvc:annotation-driven>
    <mvc:default-servlet-handler/>

</beans>
springmvc.xml
<?xml version="1.0" encoding="UTF-8"?>
<beans xmlns="http://www.springframework.org/schema/beans"
    xmlns:xsi="http://www.w3.org/2001/XMLSchema-instance"
    xsi:schemaLocation="http://www.springframework.org/schema/beans http://www.springframework.org/schema/beans/spring-beans.xsd">

</beans>
applicationContext.xml
<?xml version="1.0" encoding="UTF-8"?>
<web-app xmlns:xsi="http://www.w3.org/2001/XMLSchema-instance" xmlns="http://java.sun.com/xml/ns/javaee" xsi:schemaLocation="http://java.sun.com/xml/ns/javaee http://java.sun.com/xml/ns/javaee/web-app_2_5.xsd" id="WebApp_ID" version="2.5">
  <display-name>shiro2</display-name>
  <welcome-file-list>
    <welcome-file>index.html</welcome-file>
    <welcome-file>index.htm</welcome-file>
    <welcome-file>index.jsp</welcome-file>
    <welcome-file>default.html</welcome-file>
    <welcome-file>default.htm</welcome-file>
    <welcome-file>default.jsp</welcome-file>
  </welcome-file-list>
  <!-- 配置文件路径 -->
  <!-- needed for ContextLoaderListener -->
    <context-param>
        <param-name>contextConfigLocation</param-name>
        <param-value>classpath:applicationContext.xml</param-value>
    </context-param>
    <!-- 配置一个上下文加载的监听器 -->
    <!-- Bootstraps the root web application context before servlet initialization -->
    <listener>
        <listener-class>org.springframework.web.context.ContextLoaderListener</listener-class>
    </listener>

      <!-- The front controller of this Spring Web application, responsible for handling all application requests -->
    <servlet>
        <servlet-name>springDispatcherServlet</servlet-name>
        <servlet-class>org.springframework.web.servlet.DispatcherServlet</servlet-class>
        <init-param>
            <param-name>contextConfigLocation</param-name>
            <param-value>classpath:springmvc.xml</param-value>
        </init-param>
        <load-on-startup>1</load-on-startup>
    </servlet>

    <!-- Map all requests to the DispatcherServlet for handling -->
    <servlet-mapping>
        <servlet-name>springDispatcherServlet</servlet-name>
        <url-pattern>/</url-pattern>
    </servlet-mapping>
</web-app>
web.xml
<%@ page language="java" contentType="text/html; charset=UTF-8"
    pageEncoding="UTF-8"%>
<!DOCTYPE html PUBLIC "-//W3C//DTD HTML 4.01 Transitional//EN" "http://www.w3.org/TR/html4/loose.dtd">
<html>
<head>
<meta http-equiv="Content-Type" content="text/html; charset=UTF-8">
<title>Insert title here</title>
</head>
<body>
    <h1>Logon Page</h1>
</body>
</html>
logon.jsp
第一步完成
-导入shiro架包
-配置web.xml文件(下面)
-配置applicationContext.xml(下面)
<?xml version="1.0" encoding="UTF-8"?>
<!--
~ Licensed to the Apache Software Foundation (ASF) under one
~ or more contributor license agreements. See the NOTICE file
~ distributed with this work for additional information
~ regarding copyright ownership. The ASF licenses this file
~ to you under the Apache License, Version 2.0 (the
~ "License"); you may not use this file except in compliance
~ with the License. You may obtain a copy of the License at
~
~ http://www.apache.org/licenses/LICENSE-2.0
~
~ Unless required by applicable law or agreed to in writing,
~ software distributed under the License is distributed on an
~ "AS IS" BASIS, WITHOUT WARRANTIES OR CONDITIONS OF ANY
~ KIND, either express or implied. See the License for the
~ specific language governing permissions and limitations
~ under the License.
-->
<web-app xmlns="http://java.sun.com/xml/ns/javaee" xmlns:xsi="http://www.w3.org/2001/XMLSchema-instance"
xsi:schemaLocation="http://java.sun.com/xml/ns/javaee http://java.sun.com/xml/ns/javaee/web-app_2_5.xsd"
version="2.5">
<!-- ==================================================================
Context parameters
================================================================== -->
<context-param>
<param-name>contextConfigLocation</param-name>
<param-value>/WEB-INF/applicationContext.xml</param-value>
</context-param>
<!--
- Key of the system property that should specify the root directory of this
- web app. Applied by WebAppRootListener or Log4jConfigListener.
-->
<context-param>
<param-name>webAppRootKey</param-name>
<param-value>spring-sample.webapp.root</param-value>
</context-param>
<!-- ==================================================================
Servlet listeners
================================================================== -->
<listener>
<listener-class>org.springframework.web.util.Log4jConfigListener</listener-class>
</listener>
<listener>
<listener-class>org.springframework.web.context.ContextLoaderListener</listener-class>
</listener>
<!-- ==================================================================
Filters
================================================================== -->
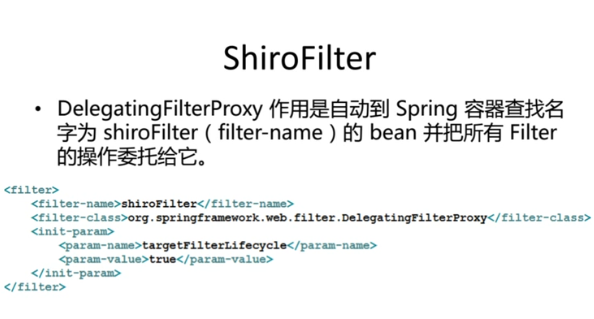
<!-- Shiro Filter is defined in the spring application context: -->
<filter>
<filter-name>shiroFilter</filter-name>
<filter-class>org.springframework.web.filter.DelegatingFilterProxy</filter-class>
<init-param>
<param-name>targetFilterLifecycle</param-name>
<param-value>true</param-value>
</init-param>
</filter>
<filter-mapping>
<filter-name>shiroFilter</filter-name>
<url-pattern>/*</url-pattern>
</filter-mapping>
<!-- ==================================================================
Servlets
================================================================== -->
<servlet>
<servlet-name>sample</servlet-name>
<servlet-class>org.springframework.web.servlet.DispatcherServlet</servlet-class>
<load-on-startup>1</load-on-startup>
</servlet>
<servlet-mapping>
<servlet-name>sample</servlet-name>
<url-pattern>/s/*</url-pattern>
</servlet-mapping>
<servlet>
<servlet-name>remoting</servlet-name>
<servlet-class>org.springframework.web.servlet.DispatcherServlet</servlet-class>
<load-on-startup>1</load-on-startup>
</servlet>
<servlet-mapping>
<servlet-name>remoting</servlet-name>
<url-pattern>/remoting/*</url-pattern>
</servlet-mapping>
<!-- ==================================================================
Welcome file list
================================================================== -->
<welcome-file-list>
<welcome-file>index.jsp</welcome-file>
</welcome-file-list>
</web-app>
参考文件(web.xml)
<?xml version="1.0" encoding="UTF-8"?>
<!--
  ~ Licensed to the Apache Software Foundation (ASF) under one
  ~ or more contributor license agreements.  See the NOTICE file
  ~ distributed with this work for additional information
  ~ regarding copyright ownership.  The ASF licenses this file
  ~ to you under the Apache License, Version 2.0 (the
  ~ "License"); you may not use this file except in compliance
  ~ with the License.  You may obtain a copy of the License at
  ~
  ~     http://www.apache.org/licenses/LICENSE-2.0
  ~
  ~ Unless required by applicable law or agreed to in writing,
  ~ software distributed under the License is distributed on an
  ~ "AS IS" BASIS, WITHOUT WARRANTIES OR CONDITIONS OF ANY
  ~ KIND, either express or implied.  See the License for the
  ~ specific language governing permissions and limitations
  ~ under the License.
  -->
<beans xmlns="http://www.springframework.org/schema/beans"
       xmlns:xsi="http://www.w3.org/2001/XMLSchema-instance"
       xsi:schemaLocation="
       http://www.springframework.org/schema/beans http://www.springframework.org/schema/beans/spring-beans-3.0.xsd">

    <!-- Sample RDBMS data source that would exist in any application - not Shiro related. -->
    <bean id="dataSource" class="org.springframework.jdbc.datasource.DriverManagerDataSource">
        <property name="driverClassName" value="org.hsqldb.jdbcDriver"/>
        <property name="url" value="jdbc:hsqldb:mem:shiro-spring"/>
        <property name="username" value="sa"/>
    </bean>
    <!-- Populates the sample database with sample users and roles. -->
    <bean id="bootstrapDataPopulator" class="org.apache.shiro.samples.spring.BootstrapDataPopulator">
        <property name="dataSource" ref="dataSource"/>
    </bean>

    <!-- Simulated business-tier "Manager", not Shiro related, just an example -->
    <bean id="sampleManager" class="org.apache.shiro.samples.spring.DefaultSampleManager"/>

    <!-- =========================================================
         Shiro Core Components - Not Spring Specific
         ========================================================= -->
    <!-- Shiro's main business-tier object for web-enabled applications
         (use DefaultSecurityManager instead when there is no web environment)-->
    <bean id="securityManager" class="org.apache.shiro.web.mgt.DefaultWebSecurityManager">
        <property name="cacheManager" ref="cacheManager"/>
        <!-- Single realm app.  If you have multiple realms, use the 'realms' property instead. -->
        <property name="sessionMode" value="native"/>
        <property name="realm" ref="jdbcRealm"/>
    </bean>

    <!-- Let's use some enterprise caching support for better performance.  You can replace this with any enterprise
         caching framework implementation that you like (Terracotta+Ehcache, Coherence, GigaSpaces, etc -->
    <bean id="cacheManager" class="org.apache.shiro.cache.ehcache.EhCacheManager">
        <!-- Set a net.sf.ehcache.CacheManager instance here if you already have one.  If not, a new one
             will be creaed with a default config:
             <property name="cacheManager" ref="ehCacheManager"/> -->
        <!-- If you don't have a pre-built net.sf.ehcache.CacheManager instance to inject, but you want
             a specific Ehcache configuration to be used, specify that here.  If you don't, a default
             will be used.:
        <property name="cacheManagerConfigFile" value="classpath:some/path/to/ehcache.xml"/> -->
    </bean>

    <!-- Used by the SecurityManager to access security data (users, roles, etc).
         Many other realm implementations can be used too (PropertiesRealm,
         LdapRealm, etc. -->
    <bean id="jdbcRealm" class="org.apache.shiro.samples.spring.realm.SaltAwareJdbcRealm">
        <property name="name" value="jdbcRealm"/>
        <property name="dataSource" ref="dataSource"/>
        <property name="credentialsMatcher">
            <!-- The 'bootstrapDataPopulator' Sha256 hashes the password
                 (using the username as the salt) then base64 encodes it: -->
            <bean class="org.apache.shiro.authc.credential.HashedCredentialsMatcher">
                <property name="hashAlgorithmName" value="SHA-256"/>
                <!-- true means hex encoded, false means base64 encoded -->
                <property name="storedCredentialsHexEncoded" value="false"/>
            </bean>
        </property>
    </bean>

    <!-- =========================================================
         Shiro Spring-specific integration
         ========================================================= -->
    <!-- Post processor that automatically invokes init() and destroy() methods
         for Spring-configured Shiro objects so you don't have to
         1) specify an init-method and destroy-method attributes for every bean
            definition and
         2) even know which Shiro objects require these methods to be
            called. -->
    <bean id="lifecycleBeanPostProcessor" class="org.apache.shiro.spring.LifecycleBeanPostProcessor"/>

    <!-- Enable Shiro Annotations for Spring-configured beans.  Only run after
         the lifecycleBeanProcessor has run: -->
    <bean class="org.springframework.aop.framework.autoproxy.DefaultAdvisorAutoProxyCreator"
          depends-on="lifecycleBeanPostProcessor"/>
    <bean class="org.apache.shiro.spring.security.interceptor.AuthorizationAttributeSourceAdvisor">
        <property name="securityManager" ref="securityManager"/>
    </bean>

    <!-- Secure Spring remoting:  Ensure any Spring Remoting method invocations can be associated
         with a Subject for security checks. -->
    <bean id="secureRemoteInvocationExecutor" class="org.apache.shiro.spring.remoting.SecureRemoteInvocationExecutor">
        <property name="securityManager" ref="securityManager"/>
    </bean>

    <!-- Define the Shiro Filter here (as a FactoryBean) instead of directly in web.xml -
         web.xml uses the DelegatingFilterProxy to access this bean.  This allows us
         to wire things with more control as well utilize nice Spring things such as
         PropertiesPlaceholderConfigurer and abstract beans or anything else we might need: -->
    <bean id="shiroFilter" class="org.apache.shiro.spring.web.ShiroFilterFactoryBean">
        <property name="securityManager" ref="securityManager"/>
        <property name="loginUrl" value="/s/login"/>
        <property name="successUrl" value="/s/index"/>
        <property name="unauthorizedUrl" value="/s/unauthorized"/>
        <!-- The 'filters' property is not necessary since any declared javax.servlet.Filter bean
             defined will be automatically acquired and available via its beanName in chain
             definitions, but you can perform overrides or parent/child consolidated configuration
             here if you like: -->
        <!-- <property name="filters">
            <util:map>
                <entry key="aName" value-ref="someFilterPojo"/>
            </util:map>
        </property> -->
        <property name="filterChainDefinitions">
            <value>
                /favicon.ico = anon
                /logo.png = anon
                /shiro.css = anon
                /s/login = anon
                # allow WebStart to pull the jars for the swing app:
                /*.jar = anon
                # everything else requires authentication:
                /** = authc
            </value>
        </property>
    </bean>

</beans>
参考文件(applicationContext.xml)
将web.xml里面的filter复制到我们的web.xml里
将applicationContext.xml里的所有bean复制到我们的applicationContext.xml中

还添加了缓存jar包
<?xml version="1.0" encoding="UTF-8"?>
<beans xmlns="http://www.springframework.org/schema/beans"
xmlns:xsi="http://www.w3.org/2001/XMLSchema-instance"
xsi:schemaLocation="http://www.springframework.org/schema/beans http://www.springframework.org/schema/beans/spring-beans.xsd">
<!-- 配置securityManager!!!
安全管理器
1、缓存技术:缓存管理
2、realm:负责获取处理数据的。
-->
<bean id="securityManager" class="org.apache.shiro.web.mgt.DefaultWebSecurityManager">
<property name="cacheManager" ref="cacheManager" />
<!-- Realm,实现类 自己写一个咯-->
<property name="realm" ref="jdbcRealm" />
</bean>
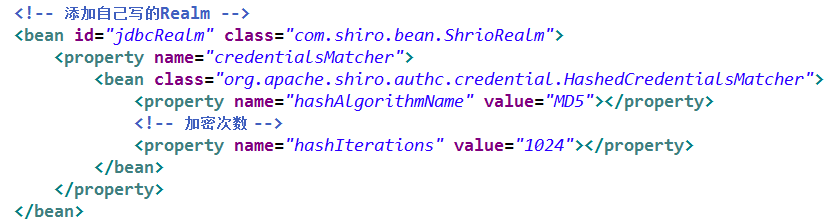
<!-- 添加自己写的Realm -->
<bean id="jdbcRealm" class="com.shiro.bean.ShrioRealm"></bean>
<!-- 配置cacheManager(缓存)
想到eache就想到hibernate里面有
找到hibernate-release-5.2.12.Final\lib\optional\ehcache对应的核心架包ehcache-2.10.3.jar,添加
找到hibernate-release-5.2.12.Final\project\etc下的ehcache.xml
-->
<bean id="cacheManager" class="org.apache.shiro.cache.ehcache.EhCacheManager">
<!-- Set a net.sf.ehcache.CacheManager instance here if you already have
one. If not, a new one will be creaed with a default config:
<property name="cacheManager" ref="ehCacheManager"/> -->
<!-- If you don't have a pre-built net.sf.ehcache.CacheManager instance
to inject, but you want a specific Ehcache configuration to be used, specify
that here. If you don't, a default will be used.: -->
<property name="cacheManagerConfigFile" value="classpath:ehcache.xml"/>
</bean>
<!-- 必须要有这样的实例,用来管理Spring容器中得shiro常见的对象 -->
<bean id="lifecycleBeanPostProcessor" class="org.apache.shiro.spring.LifecycleBeanPostProcessor" />
<!-- 启用shiro注解 -->
<bean
class="org.springframework.aop.framework.autoproxy.DefaultAdvisorAutoProxyCreator"
depends-on="lifecycleBeanPostProcessor" />
<bean
class="org.apache.shiro.spring.security.interceptor.AuthorizationAttributeSourceAdvisor">
<property name="securityManager" ref="securityManager" />
</bean>
<!-- 属于网络的 -->
<bean id="secureRemoteInvocationExecutor"
class="org.apache.shiro.spring.remoting.SecureRemoteInvocationExecutor">
<property name="securityManager" ref="securityManager" />
</bean>
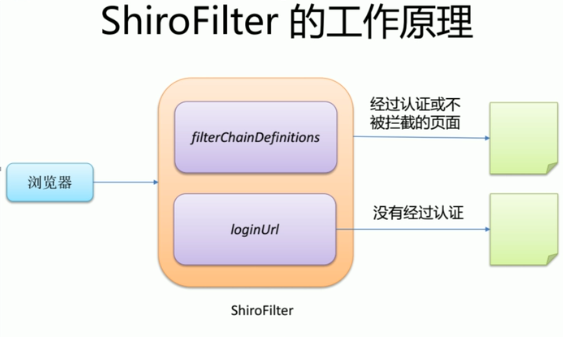
<!-- 配置shiroFilter
1、shiroFilter这个bean的id必须和web.xml文件中得filter-name保持一致
-->
<bean id="shiroFilter" class="org.apache.shiro.spring.web.ShiroFilterFactoryBean">
<property name="securityManager" ref="securityManager" />
<!-- 初始页面 -->
<property name="loginUrl" value="logon.jsp" />
<!-- 认证成功页面 -->
<property name="successUrl" value="success.jsp" />
<!-- 认证失败页面 -->
<property name="unauthorizedUrl" value="abc.jsp" />
<!-- The 'filters' property is not necessary since any declared javax.servlet.Filter
bean defined will be automatically acquired and available via its beanName
in chain definitions, but you can perform overrides or parent/child consolidated
configuration here if you like: -->
<!-- <property name="filters"> <util:map> <entry key="aName" value-ref="someFilterPojo"/>
</util:map> </property> -->
<!-- !!!代表 要完成shiro过滤器的具体配置!!!-->
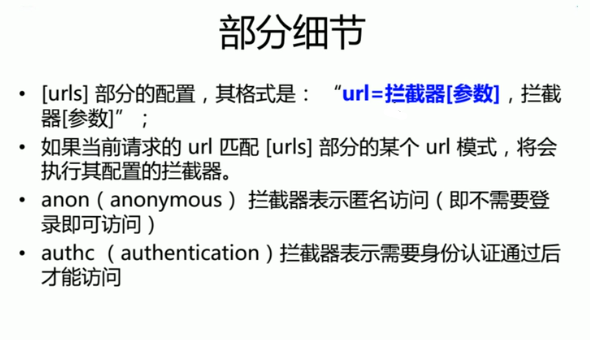
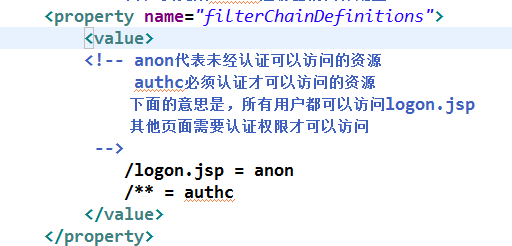
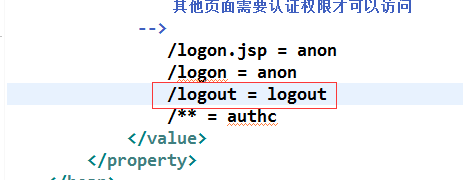
<property name="filterChainDefinitions">
<value>
<!-- anon代表未经认证可以访问的资源
authc必须认证才可以访问的资源
下面的意思是,所有用户都可以访问logon.jsp
其他页面需要认证权限才可以访问
-->
/logon.jsp = anon
/** = authc
</value>
</property>
</bean>
</beans>
applicationContext.xml
<!--
  ~ Hibernate, Relational Persistence for Idiomatic Java
  ~
  ~ License: GNU Lesser General Public License (LGPL), version 2.1 or later.
  ~ See the lgpl.txt file in the root directory or <http://www.gnu.org/licenses/lgpl-2.1.html>.
  -->
<ehcache>

    <!-- Sets the path to the directory where cache .data files are created.

         If the path is a Java System Property it is replaced by
         its value in the running VM.

         The following properties are translated:
         user.home - User's home directory
         user.dir - User's current working directory
         java.io.tmpdir - Default temp file path -->
    <diskStore path="java.io.tmpdir"/>

    <!--Default Cache configuration. These will applied to caches programmatically created through
        the CacheManager.

        The following attributes are required for defaultCache:

        maxInMemory       - Sets the maximum number of objects that will be created in memory
        eternal           - Sets whether elements are eternal. If eternal,  timeouts are ignored and the element
                            is never expired.
        timeToIdleSeconds - Sets the time to idle for an element before it expires. Is only used
                            if the element is not eternal. Idle time is now - last accessed time
        timeToLiveSeconds - Sets the time to live for an element before it expires. Is only used
                            if the element is not eternal. TTL is now - creation time
        overflowToDisk    - Sets whether elements can overflow to disk when the in-memory cache
                            has reached the maxInMemory limit.

        -->
    <defaultCache
        maxElementsInMemory="10000"
        eternal="false"
        timeToIdleSeconds="120"
        timeToLiveSeconds="120"
        overflowToDisk="true"
        />

    <!--Predefined caches.  Add your cache configuration settings here.
        If you do not have a configuration for your cache a WARNING will be issued when the
        CacheManager starts

        The following attributes are required for defaultCache:

        name              - Sets the name of the cache. This is used to identify the cache. It must be unique.
        maxInMemory       - Sets the maximum number of objects that will be created in memory
        eternal           - Sets whether elements are eternal. If eternal,  timeouts are ignored and the element
                            is never expired.
        timeToIdleSeconds - Sets the time to idle for an element before it expires. Is only used
                            if the element is not eternal. Idle time is now - last accessed time
        timeToLiveSeconds - Sets the time to live for an element before it expires. Is only used
                            if the element is not eternal. TTL is now - creation time
        overflowToDisk    - Sets whether elements can overflow to disk when the in-memory cache
                            has reached the maxInMemory limit.

        -->

    <!-- Sample cache named sampleCache1
        This cache contains a maximum in memory of 10000 elements, and will expire
        an element if it is idle for more than 5 minutes and lives for more than
        10 minutes.

        If there are more than 10000 elements it will overflow to the
        disk cache, which in this configuration will go to wherever java.io.tmp is
        defined on your system. On a standard Linux system this will be /tmp"
        -->
    <cache name="sampleCache1"
        maxElementsInMemory="10000"
        eternal="false"
        timeToIdleSeconds="300"
        timeToLiveSeconds="600"
        overflowToDisk="true"
        />

    <!-- Sample cache named sampleCache2
        This cache contains 1000 elements. Elements will always be held in memory.
        They are not expired. -->
    <cache name="sampleCache2"
        maxElementsInMemory="1000"
        eternal="true"
        timeToIdleSeconds="0"
        timeToLiveSeconds="0"
        overflowToDisk="false"
        /> -->

    <!-- Place configuration for your caches following -->

</ehcache>
ehcache.xml
package com.shiro.bean;

import org.apache.shiro.authc.AuthenticationException;
import org.apache.shiro.authc.AuthenticationInfo;
import org.apache.shiro.authc.AuthenticationToken;
import org.apache.shiro.realm.Realm;

public class ShrioRealm implements Realm {

    @Override
    public AuthenticationInfo getAuthenticationInfo(AuthenticationToken arg0) throws AuthenticationException {
        // TODO Auto-generated method stub
        return null;
    }

    @Override
    public String getName() {
        // TODO Auto-generated method stub
        return null;
    }

    @Override
    public boolean supports(AuthenticationToken arg0) {
        // TODO Auto-generated method stub
        return false;
    }

}
ShrioRealm
<?xml version="1.0" encoding="UTF-8"?>
<web-app xmlns:xsi="http://www.w3.org/2001/XMLSchema-instance" xmlns="http://java.sun.com/xml/ns/javaee" xsi:schemaLocation="http://java.sun.com/xml/ns/javaee http://java.sun.com/xml/ns/javaee/web-app_2_5.xsd" id="WebApp_ID" version="2.5">
<display-name>shiro2</display-name>
<welcome-file-list>
<welcome-file>index.html</welcome-file>
<welcome-file>index.htm</welcome-file>
<welcome-file>index.jsp</welcome-file>
<welcome-file>default.html</welcome-file>
<welcome-file>default.htm</welcome-file>
<welcome-file>default.jsp</welcome-file>
</welcome-file-list>
<!-- 配置文件路径 -->
<!-- needed for ContextLoaderListener -->
<context-param>
<param-name>contextConfigLocation</param-name>
<param-value>classpath:applicationContext.xml</param-value>
</context-param>
<!-- 配置一个上下文加载的监听器 -->
<!-- Bootstraps the root web application context before servlet initialization -->
<listener>
<listener-class>org.springframework.web.context.ContextLoaderListener</listener-class>
</listener>
<!-- The front controller of this Spring Web application, responsible for handling all application requests -->
<servlet>
<servlet-name>springDispatcherServlet</servlet-name>
<servlet-class>org.springframework.web.servlet.DispatcherServlet</servlet-class>
<init-param>
<param-name>contextConfigLocation</param-name>
<param-value>classpath:springmvc.xml</param-value>
</init-param>
<load-on-startup>1</load-on-startup>
</servlet>
<!-- Map all requests to the DispatcherServlet for handling -->
<servlet-mapping>
<servlet-name>springDispatcherServlet</servlet-name>
<url-pattern>/</url-pattern>
</servlet-mapping>
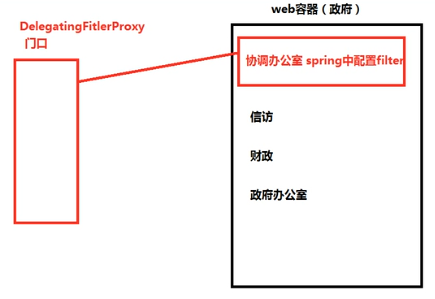
<!-- filter的代理类
代理类会到IOC容器中找在filter-name对应的bean对象
-->
<filter>
<filter-name>shiroFilter</filter-name>
<filter-class>org.springframework.web.filter.DelegatingFilterProxy</filter-class>
<init-param>
<param-name>targetFilterLifecycle</param-name>
<param-value>true</param-value>
</init-param>
</filter>
<filter-mapping>
<filter-name>shiroFilter</filter-name>
<url-pattern>/*</url-pattern>
</filter-mapping>
</web-app>
web.xml
<%@ page language="java" contentType="text/html; charset=UTF-8"
    pageEncoding="UTF-8"%>
<!DOCTYPE html PUBLIC "-//W3C//DTD HTML 4.01 Transitional//EN" "http://www.w3.org/TR/html4/loose.dtd">
<html>
<head>
<meta http-equiv="Content-Type" content="text/html; charset=UTF-8">
<title>Insert title here</title>
</head>
<body>
<h1>失败页面unauthorizedUrl</h1>
</body>
</html>
abc.jsp
<%@ page language="java" contentType="text/html; charset=UTF-8"
    pageEncoding="UTF-8"%>
<!DOCTYPE html PUBLIC "-//W3C//DTD HTML 4.01 Transitional//EN" "http://www.w3.org/TR/html4/loose.dtd">
<html>
<head>
<meta http-equiv="Content-Type" content="text/html; charset=UTF-8">
<title>Insert title here</title>
</head>
<body>
    <h1>Logon Page</h1>
</body>
</html>
logon.jsp
<%@ page language="java" contentType="text/html; charset=UTF-8"
    pageEncoding="UTF-8"%>
<!DOCTYPE html PUBLIC "-//W3C//DTD HTML 4.01 Transitional//EN" "http://www.w3.org/TR/html4/loose.dtd">
<html>
<head>
<meta http-equiv="Content-Type" content="text/html; charset=UTF-8">
<title>Insert title here</title>
</head>
<body>
<h1>Success</h1>
</body>
</html>
success.jsp
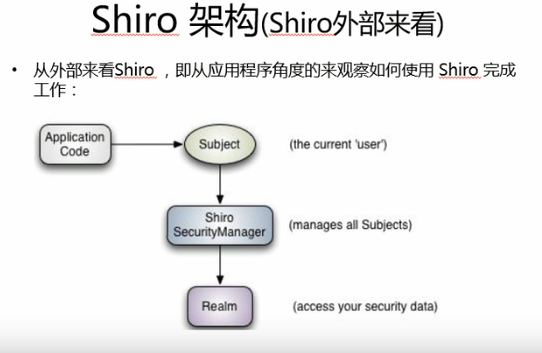
shiro的基本工作原理
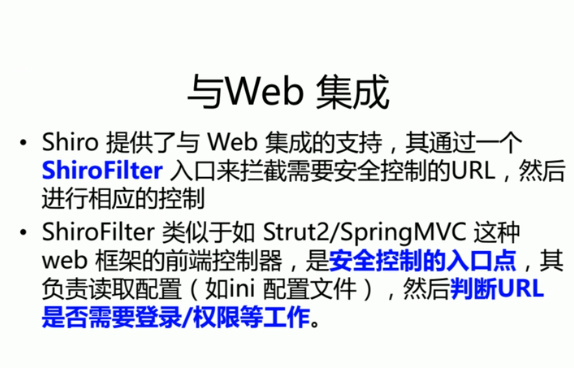
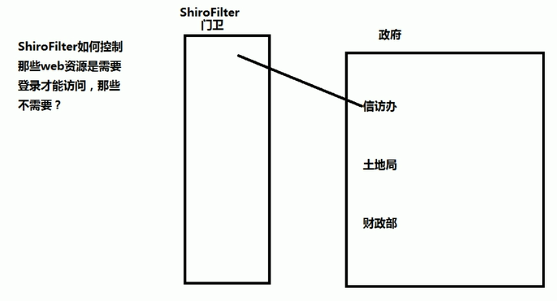
WEB环境认证
1、JSP,包含用户登录的信息,form表单
2、springmvc控制器,处理用户的请求
-获取用户输入的登录信息
-shiro API来完成用户的认证
来一波数据库前台交互
在上述代码中添加
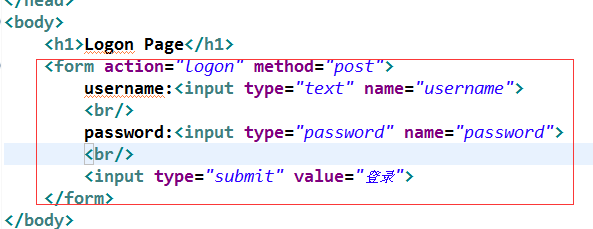
<%@ page language="java" contentType="text/html; charset=UTF-8"
    pageEncoding="UTF-8"%>
<!DOCTYPE html PUBLIC "-//W3C//DTD HTML 4.01 Transitional//EN" "http://www.w3.org/TR/html4/loose.dtd">
<html>
<head>
<meta http-equiv="Content-Type" content="text/html; charset=UTF-8">
<title>Insert title here</title>
</head>
<body>
    <h1>Logon Page</h1>
    <form action="logon" method="post">
        username:<input type="text" name="username">
        <br/>
        password:<input type="password" name="password">
        <br/>
        <input type="submit" value="登录">
    </form>
</body>
</html>
logon.jsp
<?xml version="1.0" encoding="UTF-8"?>
<beans xmlns="http://www.springframework.org/schema/beans"
xmlns:xsi="http://www.w3.org/2001/XMLSchema-instance"
xsi:schemaLocation="http://www.springframework.org/schema/beans http://www.springframework.org/schema/beans/spring-beans.xsd">
<!-- 配置securityManager!!!
安全管理器
1、缓存技术:缓存管理
2、realm:负责获取处理数据的。
-->
<bean id="securityManager" class="org.apache.shiro.web.mgt.DefaultWebSecurityManager">
<property name="cacheManager" ref="cacheManager" />
<!-- Realm,实现类 自己写一个咯-->
<property name="realm" ref="jdbcRealm" />
</bean>
<!-- 添加自己写的Realm -->
<bean id="jdbcRealm" class="com.shiro.bean.ShrioRealm"></bean>
<!-- 配置cacheManager(缓存)
想到eache就想到hibernate里面有
找到hibernate-release-5.2.12.Final\lib\optional\ehcache对应的核心架包ehcache-2.10.3.jar,添加
找到hibernate-release-5.2.12.Final\project\etc下的ehcache.xml
-->
<bean id="cacheManager" class="org.apache.shiro.cache.ehcache.EhCacheManager">
<!-- Set a net.sf.ehcache.CacheManager instance here if you already have
one. If not, a new one will be creaed with a default config:
<property name="cacheManager" ref="ehCacheManager"/> -->
<!-- If you don't have a pre-built net.sf.ehcache.CacheManager instance
to inject, but you want a specific Ehcache configuration to be used, specify
that here. If you don't, a default will be used.: -->
<property name="cacheManagerConfigFile" value="classpath:ehcache.xml"/>
</bean>
<!-- 必须要有这样的实例,用来管理Spring容器中得shiro常见的对象 -->
<bean id="lifecycleBeanPostProcessor" class="org.apache.shiro.spring.LifecycleBeanPostProcessor" />
<!-- 启用shiro注解 -->
<bean
class="org.springframework.aop.framework.autoproxy.DefaultAdvisorAutoProxyCreator"
depends-on="lifecycleBeanPostProcessor" />
<bean
class="org.apache.shiro.spring.security.interceptor.AuthorizationAttributeSourceAdvisor">
<property name="securityManager" ref="securityManager" />
</bean>
<!-- 属于网络的 -->
<bean id="secureRemoteInvocationExecutor"
class="org.apache.shiro.spring.remoting.SecureRemoteInvocationExecutor">
<property name="securityManager" ref="securityManager" />
</bean>
<!-- 配置shiroFilter
1、shiroFilter这个bean的id必须和web.xml文件中得filter-name保持一致
-->
<bean id="shiroFilter" class="org.apache.shiro.spring.web.ShiroFilterFactoryBean">
<property name="securityManager" ref="securityManager" />
<!-- 初始页面 -->
<property name="loginUrl" value="logon.jsp" />
<!-- 认证成功页面 -->
<property name="successUrl" value="success.jsp" />
<!-- 认证失败页面 -->
<property name="unauthorizedUrl" value="abc.jsp" />
<!-- The 'filters' property is not necessary since any declared javax.servlet.Filter
bean defined will be automatically acquired and available via its beanName
in chain definitions, but you can perform overrides or parent/child consolidated
configuration here if you like: -->
<!-- <property name="filters"> <util:map> <entry key="aName" value-ref="someFilterPojo"/>
</util:map> </property> -->
<!-- !!!代表 要完成shiro过滤器的具体配置!!!-->
<property name="filterChainDefinitions">
<value>
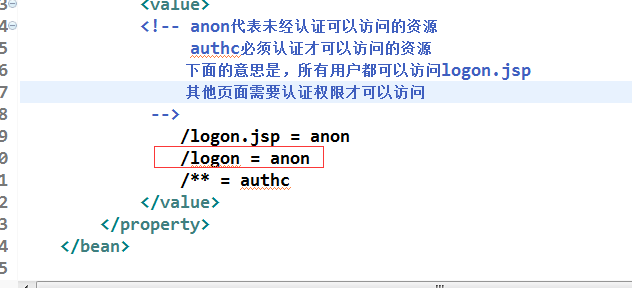
<!-- anon代表未经认证可以访问的资源
authc必须认证才可以访问的资源
下面的意思是,所有用户都可以访问logon.jsp
其他页面需要认证权限才可以访问
-->
/logon.jsp = anon
/logon = anon
/** = authc
</value>
</property>
</bean>
</beans>
applicationContext.xml
package com.shiro.action;

import org.springframework.stereotype.Controller;
import org.springframework.web.bind.annotation.RequestMapping;
import org.springframework.web.bind.annotation.RequestParam;

@Controller
public class LogonAction {
    @RequestMapping("/logon")
    public String logon(@RequestParam("username") String username, @RequestParam("password") String password) {
        if (username.equals("tom") && password.equals("123")) {
            return "success";
        }
        return "abc";
    }
}
LogonAction
这里测试能否跳转
上述shiro API来完成用户的认证
1、获取Subject类型的实例
Subject subject = SecurityUtils.getSubject()
2、判断用户是否已经登录
subject.isAuthenticated()
3、使用UsernamePasswordToken对象封装用户名及密码
4、使用subject.login(token)登录
5、Realm:从数据中获取安全数据的。
修改
package com.shiro.action;

import org.apache.shiro.SecurityUtils;
import org.apache.shiro.authc.AuthenticationException;
import org.apache.shiro.authc.UsernamePasswordToken;
import org.apache.shiro.subject.Subject;
import org.springframework.stereotype.Controller;
import org.springframework.web.bind.annotation.RequestMapping;
import org.springframework.web.bind.annotation.RequestParam;

@Controller
public class LogonAction {
    @RequestMapping("/logon")
    public String logon(@RequestParam("username") String username, @RequestParam("password") String password) {
        //1、创建Subject实例
        Subject subject = SecurityUtils.getSubject();

        //2、判断当前用户是否登录
        if(subject.isAuthenticated()==false){
            //3、将用户名密码封装UsernamePasswordToken
            UsernamePasswordToken token = new UsernamePasswordToken(username,password);
            try {
                subject.login(token);
            } catch (AuthenticationException e) {
                //这里跳转页面
                System.out.println("登录失败");
                return "abc";
            }
        }

        return "success";
    }
}
LogonAction
package com.shiro.bean;

import java.sql.Connection;
import java.sql.DriverManager;
import java.sql.PreparedStatement;
import java.sql.ResultSet;
import java.sql.SQLException;

import org.apache.shiro.authc.AuthenticationException;
import org.apache.shiro.authc.AuthenticationInfo;
import org.apache.shiro.authc.AuthenticationToken;
import org.apache.shiro.authc.SimpleAuthenticationInfo;
import org.apache.shiro.authc.UsernamePasswordToken;
import org.apache.shiro.realm.AuthenticatingRealm;
//Realm 需要查询数据库,并且得到正确的数据
public class ShrioRealm extends AuthenticatingRealm {

    /**
     * 1、doGetAuthenticationInfo,获取认证消息,如果数据库中没有数据,返回null
     * 如果得到了正确的用户名和密码,返回指定对象AuthenticationInfo
     * 2、AuthenticationInfo,可以使用SimpleAuthenticationInfo实现类,封装正确的用户名和密码
     * 3、token参数,就是我们需要认证的token
     *
     */
    @Override
    protected AuthenticationInfo doGetAuthenticationInfo(AuthenticationToken token) throws AuthenticationException {
        SimpleAuthenticationInfo info = null;

        //1、将token转换成UsernamePasswordToken
        UsernamePasswordToken upToken = (UsernamePasswordToken) token;
        //2、获取用户名即可
        String username = upToken.getUsername();
        //3、查询数据库,是否存在指定用户名和密码的用户(加入mysql架包)
        try {
            Class.forName("com.mysql.jdbc.Driver");
            Connection c = DriverManager.getConnection("jdbc:mysql://localhost:3306/mydata","root","root");
            PreparedStatement ps = c.prepareStatement("select * from user where name=?");
            ps.setString(1, username);
            ResultSet rs = ps.executeQuery();
            if(rs.next()){
                Object principal = username;
                Object credentials =rs.getString(3);
                String realmName = this.getName();

                info = new SimpleAuthenticationInfo(principal, credentials, realmName);
            }else{
                throw new AuthenticationException();
            }
        } catch (ClassNotFoundException e) {
            e.printStackTrace();
        }catch (SQLException e) {
            e.printStackTrace();
        }
        //4、如果查询到了,封装查询结构,返回给我们的调用

        //5、如果没有查询到,抛出一个异常

        return info;
    }

}
ShrioRealm
数据库


测试发现,只要登录成功一次,那么在此输入错密码,也能登录成功,原因是shiro提供了缓存技术,一次验证就可以使用。
那么我们不想这样,可以在success.jsp页面添加登出按钮

在applicationContext中添加
这样就可以登出,测试达到效果
跑一波debug发现shrio帮我们完成了密码比对。
用户输入的内容,UsernamePasswordToken这个类封装
查询数据库密码,SimpleAuthenticationInfo这个类封装
之后,在UsernamePasswordToken类里面有一个doCredentialsMatch(token,info)进行两个对象的比对。
加密:(MD5,SHA1)
1、存储数据的时候,用户输入的明文进行加密(存入数据库的时候加密)
2、前端用户输入的值,进行加密,String类型字符串经过MD5加密得到一个值。
shiro底层进行密码比对:用户输入值进行MD5的加密。
可以通过Realm中得属性:
Spring IOC配置
加密器:credentialsMatcher:HashedcredetialsMacher,创建实例的时候注入算法名称,加密次数
<?xml version="1.0" encoding="UTF-8"?>
<beans xmlns="http://www.springframework.org/schema/beans"
    xmlns:xsi="http://www.w3.org/2001/XMLSchema-instance"
    xsi:schemaLocation="http://www.springframework.org/schema/beans http://www.springframework.org/schema/beans/spring-beans.xsd">

    <!-- 配置securityManager!!!
        安全管理器
        1、缓存技术:缓存管理
        2、realm:负责获取处理数据的。
     -->
    <bean id="securityManager" class="org.apache.shiro.web.mgt.DefaultWebSecurityManager">
        <property name="cacheManager" ref="cacheManager" />
        <!-- Realm,实现类 自己写一个咯-->
        <property name="realm" ref="jdbcRealm" />
    </bean>
    <!-- 添加自己写的Realm -->
    <bean id="jdbcRealm" class="com.shiro.bean.ShrioRealm">
        <property name="credentialsMatcher">
            <bean class="org.apache.shiro.authc.credential.HashedCredentialsMatcher">
                <property name="hashAlgorithmName" value="MD5"></property>
                <!-- 加密次数 -->
                <property name="hashIterations" value="1024"></property>
            </bean>
        </property>
    </bean>

    <!-- 配置cacheManager(缓存)
        想到eache就想到hibernate里面有
        找到hibernate-release-5.2.12.Final\lib\optional\ehcache对应的核心架包ehcache-2.10.3.jar,添加
        找到hibernate-release-5.2.12.Final\project\etc下的ehcache.xml
    -->
    <bean id="cacheManager" class="org.apache.shiro.cache.ehcache.EhCacheManager">
        <!-- Set a net.sf.ehcache.CacheManager instance here if you already have
            one. If not, a new one will be creaed with a default config:
            <property name="cacheManager" ref="ehCacheManager"/> -->
        <!-- If you don't have a pre-built net.sf.ehcache.CacheManager instance
            to inject, but you want a specific Ehcache configuration to be used, specify
            that here. If you don't, a default will be used.: -->
            <property name="cacheManagerConfigFile" value="classpath:ehcache.xml"/>
    </bean>

    <!-- 必须要有这样的实例,用来管理Spring容器中得shiro常见的对象 -->
    <bean id="lifecycleBeanPostProcessor" class="org.apache.shiro.spring.LifecycleBeanPostProcessor" />

     <!-- 启用shiro注解 -->
    <bean
        class="org.springframework.aop.framework.autoproxy.DefaultAdvisorAutoProxyCreator"
        depends-on="lifecycleBeanPostProcessor" />
    <bean
        class="org.apache.shiro.spring.security.interceptor.AuthorizationAttributeSourceAdvisor">
        <property name="securityManager" ref="securityManager" />
    </bean>

    <!-- 属于网络的 -->
    <bean id="secureRemoteInvocationExecutor"
        class="org.apache.shiro.spring.remoting.SecureRemoteInvocationExecutor">
        <property name="securityManager" ref="securityManager" />
    </bean>

<!-- 配置shiroFilter
    1、shiroFilter这个bean的id必须和web.xml文件中得filter-name保持一致
 -->
    <bean id="shiroFilter" class="org.apache.shiro.spring.web.ShiroFilterFactoryBean">
        <property name="securityManager" ref="securityManager" />
        <!-- 初始页面 -->
        <property name="loginUrl" value="logon.jsp" />
        <!-- 认证成功页面 -->
        <property name="successUrl" value="success.jsp" />
        <!-- 认证失败页面 -->
        <property name="unauthorizedUrl" value="abc.jsp" />
        <!-- The 'filters' property is not necessary since any declared javax.servlet.Filter
            bean defined will be automatically acquired and available via its beanName
            in chain definitions, but you can perform overrides or parent/child consolidated
            configuration here if you like: -->
        <!-- <property name="filters"> <util:map> <entry key="aName" value-ref="someFilterPojo"/>
            </util:map> </property> -->
        <!-- !!!代表 要完成shiro过滤器的具体配置!!!-->
        <property name="filterChainDefinitions">
            <value>
            <!-- anon代表未经认证可以访问的资源
                 authc必须认证才可以访问的资源
                 下面的意思是,所有用户都可以访问logon.jsp
                 其他页面需要认证权限才可以访问
             -->
                /logon.jsp = anon
                /logon = anon
                /logout = logout
                /** = authc
            </value>
        </property>
    </bean>

</beans>
applicationContext.xml
这个配置相当于前台输入的值加密
package com.shiro.bean;
import java.sql.Connection;
import java.sql.DriverManager;
import java.sql.PreparedStatement;
import java.sql.ResultSet;
import java.sql.SQLException;
import org.apache.shiro.authc.AuthenticationException;
import org.apache.shiro.authc.AuthenticationInfo;
import org.apache.shiro.authc.AuthenticationToken;
import org.apache.shiro.authc.SimpleAuthenticationInfo;
import org.apache.shiro.authc.UsernamePasswordToken;
import org.apache.shiro.crypto.hash.SimpleHash;
import org.apache.shiro.realm.AuthenticatingRealm;
//Realm 需要查询数据库,并且得到正确的数据
public class ShrioRealm extends AuthenticatingRealm {
/**
* 1、doGetAuthenticationInfo,获取认证消息,如果数据库中没有数据,返回null
* 如果得到了正确的用户名和密码,返回指定对象AuthenticationInfo
* 2、AuthenticationInfo,可以使用SimpleAuthenticationInfo实现类,封装正确的用户名和密码
* 3、token参数,就是我们需要认证的token
*
*/
@Override
protected AuthenticationInfo doGetAuthenticationInfo(AuthenticationToken token) throws AuthenticationException {
SimpleAuthenticationInfo info = null;
//1、将token转换成UsernamePasswordToken
UsernamePasswordToken upToken = (UsernamePasswordToken) token;
//2、获取用户名即可
String username = upToken.getUsername();
//3、查询数据库,是否存在指定用户名和密码的用户(加入mysql架包)
try {
Class.forName("com.mysql.jdbc.Driver");
Connection c = DriverManager.getConnection("jdbc:mysql://localhost:3306/mydata","root","root");
PreparedStatement ps = c.prepareStatement("select * from user where name=?");
ps.setString(1, username);
ResultSet rs = ps.executeQuery();
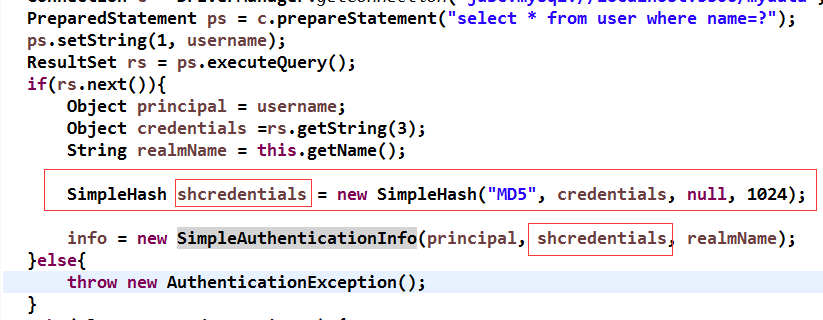
if(rs.next()){
Object principal = username;
Object credentials =rs.getString(3);
String realmName = this.getName();
SimpleHash shcredentials = new SimpleHash("MD5", credentials, null, 1024);
info = new SimpleAuthenticationInfo(principal, shcredentials, realmName);
}else{
throw new AuthenticationException();
}
} catch (ClassNotFoundException e) {
e.printStackTrace();
}catch (SQLException e) {
e.printStackTrace();
}
//4、如果查询到了,封装查询结构,返回给我们的调用
//5、如果没有查询到,抛出一个异常
return info;
}
}
ShrioRealm
把数据库取出来的值加密
debug可以看出加密效果
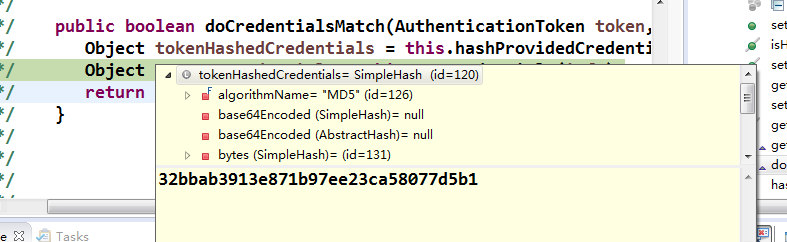
那么问题来了,如:2个人密码是一样的,让加密后密码不同,怎么办呢?
盐值加密:原有的算法加密的基础上。
可以理解为加盐的量多少决定相同的食材做成什么味道。
1、前段token当中获取的密码应该进行盐值加密
realm方法返回的对象,调用下面的构造。
info = new SimpleAuthenticationInfo(principal, shcredentials, credentialsSalt, realmName);
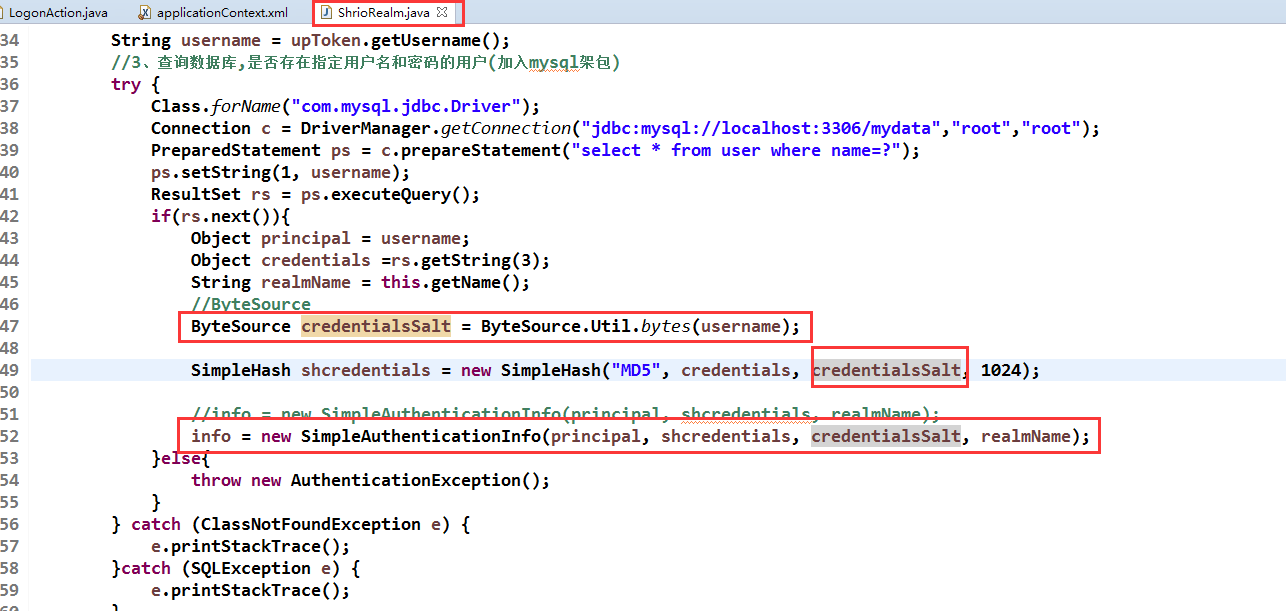
debug可以看出,加密出的密码完全不同,那么我们就可以通过这种方法对相同密码加密区分。
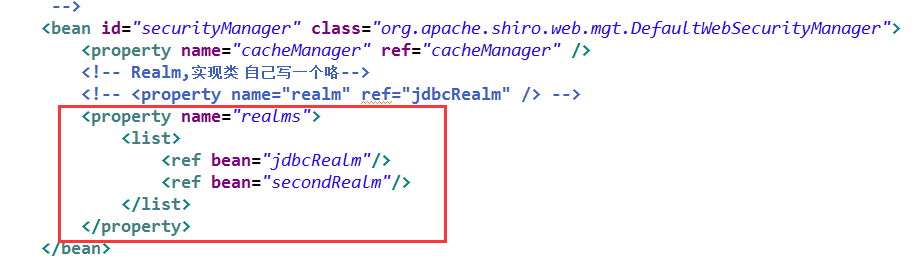
多Realm获取数据:为什么要使用?提高数据安全性
怎么配置呢?
复制一个之前的realm将加密格式改变成SHA1,在修改applicationContext.xml文件


package com.shiro.bean;

import java.sql.Connection;
import java.sql.DriverManager;
import java.sql.PreparedStatement;
import java.sql.ResultSet;
import java.sql.SQLException;

import org.apache.shiro.authc.AuthenticationException;
import org.apache.shiro.authc.AuthenticationInfo;
import org.apache.shiro.authc.AuthenticationToken;
import org.apache.shiro.authc.SimpleAuthenticationInfo;
import org.apache.shiro.authc.UsernamePasswordToken;
import org.apache.shiro.crypto.hash.SimpleHash;
import org.apache.shiro.realm.AuthenticatingRealm;
import org.apache.shiro.util.ByteSource;
//Realm 需要查询数据库,并且得到正确的数据
public class SecondRealm extends AuthenticatingRealm {

    /**
     * 1、doGetAuthenticationInfo,获取认证消息,如果数据库中没有数据,返回null
     * 如果得到了正确的用户名和密码,返回指定对象AuthenticationInfo
     * 2、AuthenticationInfo,可以使用SimpleAuthenticationInfo实现类,封装正确的用户名和密码
     * 3、token参数,就是我们需要认证的token
     *
     */
    @Override
    protected AuthenticationInfo doGetAuthenticationInfo(AuthenticationToken token) throws AuthenticationException {
        System.out.println("The Second Real is working!!");
        SimpleAuthenticationInfo info = null;

        //1、将token转换成UsernamePasswordToken
        UsernamePasswordToken upToken = (UsernamePasswordToken) token;
        //2、获取用户名即可
        String username = upToken.getUsername();
        //3、查询数据库,是否存在指定用户名和密码的用户(加入mysql架包)
        try {
            Class.forName("com.mysql.jdbc.Driver");
            Connection c = DriverManager.getConnection("jdbc:mysql://localhost:3306/mydata","root","root");
            PreparedStatement ps = c.prepareStatement("select * from user where name=?");
            ps.setString(1, username);
            ResultSet rs = ps.executeQuery();
            if(rs.next()){
                Object principal = username;
                Object credentials =rs.getString(3);
                String realmName = this.getName();
                //ByteSource
                ByteSource credentialsSalt = ByteSource.Util.bytes(username);

                SimpleHash shcredentials = new SimpleHash("SHA1", credentials, credentialsSalt, 1024);

                //info = new SimpleAuthenticationInfo(principal, shcredentials, realmName);
                info = new SimpleAuthenticationInfo(principal, shcredentials, credentialsSalt, realmName);
            }else{
                throw new AuthenticationException();
            }
        } catch (ClassNotFoundException e) {
            e.printStackTrace();
        }catch (SQLException e) {
            e.printStackTrace();
        }
        //4、如果查询到了,封装查询结构,返回给我们的调用

        //5、如果没有查询到,抛出一个异常

        return info;
    }

}
SecondRealm
package com.shiro.bean;

import java.sql.Connection;
import java.sql.DriverManager;
import java.sql.PreparedStatement;
import java.sql.ResultSet;
import java.sql.SQLException;

import org.apache.shiro.authc.AuthenticationException;
import org.apache.shiro.authc.AuthenticationInfo;
import org.apache.shiro.authc.AuthenticationToken;
import org.apache.shiro.authc.SimpleAuthenticationInfo;
import org.apache.shiro.authc.UsernamePasswordToken;
import org.apache.shiro.crypto.hash.SimpleHash;
import org.apache.shiro.realm.AuthenticatingRealm;
import org.apache.shiro.util.ByteSource;
//Realm 需要查询数据库,并且得到正确的数据
public class ShrioRealm extends AuthenticatingRealm {

    /**
     * 1、doGetAuthenticationInfo,获取认证消息,如果数据库中没有数据,返回null
     * 如果得到了正确的用户名和密码,返回指定对象AuthenticationInfo
     * 2、AuthenticationInfo,可以使用SimpleAuthenticationInfo实现类,封装正确的用户名和密码
     * 3、token参数,就是我们需要认证的token
     *
     */
    @Override
    protected AuthenticationInfo doGetAuthenticationInfo(AuthenticationToken token) throws AuthenticationException {
        System.out.println("The first Real is working!!");
        SimpleAuthenticationInfo info = null;

        //1、将token转换成UsernamePasswordToken
        UsernamePasswordToken upToken = (UsernamePasswordToken) token;
        //2、获取用户名即可
        String username = upToken.getUsername();
        //3、查询数据库,是否存在指定用户名和密码的用户(加入mysql架包)
        try {
            Class.forName("com.mysql.jdbc.Driver");
            Connection c = DriverManager.getConnection("jdbc:mysql://localhost:3306/mydata","root","root");
            PreparedStatement ps = c.prepareStatement("select * from user where name=?");
            ps.setString(1, username);
            ResultSet rs = ps.executeQuery();
            if(rs.next()){
                Object principal = username;
                Object credentials =rs.getString(3);
                String realmName = this.getName();
                //ByteSource
                ByteSource credentialsSalt = ByteSource.Util.bytes(username);

                SimpleHash shcredentials = new SimpleHash("MD5", credentials, credentialsSalt, 1024);

                //info = new SimpleAuthenticationInfo(principal, shcredentials, realmName);
                info = new SimpleAuthenticationInfo(principal, shcredentials, credentialsSalt, realmName);
            }else{
                throw new AuthenticationException();
            }
        } catch (ClassNotFoundException e) {
            e.printStackTrace();
        }catch (SQLException e) {
            e.printStackTrace();
        }
        //4、如果查询到了,封装查询结构,返回给我们的调用

        //5、如果没有查询到,抛出一个异常

        return info;
    }

}
ShrioRealm
<?xml version="1.0" encoding="UTF-8"?>
<beans xmlns="http://www.springframework.org/schema/beans"
    xmlns:xsi="http://www.w3.org/2001/XMLSchema-instance"
    xsi:schemaLocation="http://www.springframework.org/schema/beans http://www.springframework.org/schema/beans/spring-beans.xsd">

    <!-- 配置securityManager!!!
        安全管理器
        1、缓存技术:缓存管理
        2、realm:负责获取处理数据的。
     -->
    <bean id="securityManager" class="org.apache.shiro.web.mgt.DefaultWebSecurityManager">
        <property name="cacheManager" ref="cacheManager" />
        <!-- Realm,实现类 自己写一个咯-->
        <!-- <property name="realm" ref="jdbcRealm" /> -->
        <property name="realms">
            <list>
                <ref bean="jdbcRealm"/>
                <ref bean="secondRealm"/>
            </list>
        </property>
    </bean>
    <!-- 添加自己写的Realm -->
    <bean id="jdbcRealm" class="com.shiro.bean.ShrioRealm">
        <property name="credentialsMatcher">
            <bean class="org.apache.shiro.authc.credential.HashedCredentialsMatcher">
                <property name="hashAlgorithmName" value="MD5"></property>
                <!-- 加密次数 -->
                <property name="hashIterations" value="1024"></property>
            </bean>
        </property>
    </bean>

    <bean id="secondRealm" class="com.shiro.bean.SecondRealm">
        <property name="credentialsMatcher">
            <bean class="org.apache.shiro.authc.credential.HashedCredentialsMatcher">
                <property name="hashAlgorithmName" value="SHA1"></property>
                <!-- 加密次数 -->
                <property name="hashIterations" value="1024"></property>
            </bean>
        </property>
    </bean>
    <!-- 配置cacheManager(缓存)
        想到eache就想到hibernate里面有
        找到hibernate-release-5.2.12.Final\lib\optional\ehcache对应的核心架包ehcache-2.10.3.jar,添加
        找到hibernate-release-5.2.12.Final\project\etc下的ehcache.xml
    -->
    <bean id="cacheManager" class="org.apache.shiro.cache.ehcache.EhCacheManager">
        <!-- Set a net.sf.ehcache.CacheManager instance here if you already have
            one. If not, a new one will be creaed with a default config:
            <property name="cacheManager" ref="ehCacheManager"/> -->
        <!-- If you don't have a pre-built net.sf.ehcache.CacheManager instance
            to inject, but you want a specific Ehcache configuration to be used, specify
            that here. If you don't, a default will be used.: -->
            <property name="cacheManagerConfigFile" value="classpath:ehcache.xml"/>
    </bean>

    <!-- 必须要有这样的实例,用来管理Spring容器中得shiro常见的对象 -->
    <bean id="lifecycleBeanPostProcessor" class="org.apache.shiro.spring.LifecycleBeanPostProcessor" />

     <!-- 启用shiro注解 -->
    <bean
        class="org.springframework.aop.framework.autoproxy.DefaultAdvisorAutoProxyCreator"
        depends-on="lifecycleBeanPostProcessor" />
    <bean
        class="org.apache.shiro.spring.security.interceptor.AuthorizationAttributeSourceAdvisor">
        <property name="securityManager" ref="securityManager" />
    </bean>

    <!-- 属于网络的 -->
    <bean id="secureRemoteInvocationExecutor"
        class="org.apache.shiro.spring.remoting.SecureRemoteInvocationExecutor">
        <property name="securityManager" ref="securityManager" />
    </bean>

<!-- 配置shiroFilter
    1、shiroFilter这个bean的id必须和web.xml文件中得filter-name保持一致
 -->
    <bean id="shiroFilter" class="org.apache.shiro.spring.web.ShiroFilterFactoryBean">
        <property name="securityManager" ref="securityManager" />
        <!-- 初始页面 -->
        <property name="loginUrl" value="logon.jsp" />
        <!-- 认证成功页面 -->
        <property name="successUrl" value="success.jsp" />
        <!-- 认证失败页面 -->
        <property name="unauthorizedUrl" value="abc.jsp" />
        <!-- The 'filters' property is not necessary since any declared javax.servlet.Filter
            bean defined will be automatically acquired and available via its beanName
            in chain definitions, but you can perform overrides or parent/child consolidated
            configuration here if you like: -->
        <!-- <property name="filters"> <util:map> <entry key="aName" value-ref="someFilterPojo"/>
            </util:map> </property> -->
        <!-- !!!代表 要完成shiro过滤器的具体配置!!!-->
        <property name="filterChainDefinitions">
            <value>
            <!-- anon代表未经认证可以访问的资源
                 authc必须认证才可以访问的资源
                 下面的意思是,所有用户都可以访问logon.jsp
                 其他页面需要认证权限才可以访问
             -->
                /logon.jsp = anon
                /logon = anon
                /logout = logout
                /** = authc
            </value>
        </property>
    </bean>

</beans>
applicationContext.xml
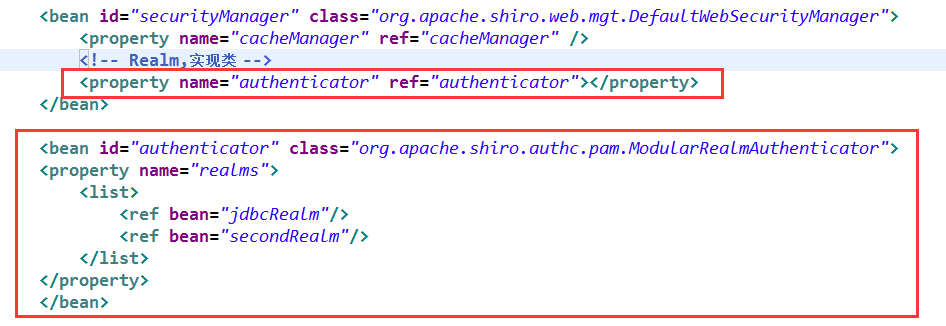
第二种方式:
1、需要一个认证器:ModularRealmAuthenticator
2、bean的realms属性完成注入
修改上述applicationContext.xml
<?xml version="1.0" encoding="UTF-8"?>
<beans xmlns="http://www.springframework.org/schema/beans"
    xmlns:xsi="http://www.w3.org/2001/XMLSchema-instance"
    xsi:schemaLocation="http://www.springframework.org/schema/beans http://www.springframework.org/schema/beans/spring-beans.xsd">

    <!-- 配置securityManager!!!
        安全管理器
        1、缓存技术:缓存管理
        2、realm:负责获取处理数据的。
     -->
    <bean id="securityManager" class="org.apache.shiro.web.mgt.DefaultWebSecurityManager">
        <property name="cacheManager" ref="cacheManager" />
        <!-- Realm,实现类 -->
        <property name="authenticator" ref="authenticator"></property>
    </bean>

    <bean id="authenticator" class="org.apache.shiro.authc.pam.ModularRealmAuthenticator">
    <property name="realms">
        <list>
            <ref bean="jdbcRealm"/>
            <ref bean="secondRealm"/>
        </list>
    </property>
    </bean>

    <!-- 添加自己写的Realm -->
    <bean id="jdbcRealm" class="com.shiro.bean.ShrioRealm">
        <property name="credentialsMatcher">
            <bean class="org.apache.shiro.authc.credential.HashedCredentialsMatcher">
                <property name="hashAlgorithmName" value="MD5"></property>
                <!-- 加密次数 -->
                <property name="hashIterations" value="1024"></property>
            </bean>
        </property>
    </bean>

    <bean id="secondRealm" class="com.shiro.bean.SecondRealm">
        <property name="credentialsMatcher">
            <bean class="org.apache.shiro.authc.credential.HashedCredentialsMatcher">
                <property name="hashAlgorithmName" value="SHA1"></property>
                <!-- 加密次数 -->
                <property name="hashIterations" value="1024"></property>
            </bean>
        </property>
    </bean>
    <!-- 配置cacheManager(缓存)
        想到eache就想到hibernate里面有
        找到hibernate-release-5.2.12.Final\lib\optional\ehcache对应的核心架包ehcache-2.10.3.jar,添加
        找到hibernate-release-5.2.12.Final\project\etc下的ehcache.xml
    -->
    <bean id="cacheManager" class="org.apache.shiro.cache.ehcache.EhCacheManager">
        <!-- Set a net.sf.ehcache.CacheManager instance here if you already have
            one. If not, a new one will be creaed with a default config:
            <property name="cacheManager" ref="ehCacheManager"/> -->
        <!-- If you don't have a pre-built net.sf.ehcache.CacheManager instance
            to inject, but you want a specific Ehcache configuration to be used, specify
            that here. If you don't, a default will be used.: -->
            <property name="cacheManagerConfigFile" value="classpath:ehcache.xml"/>
    </bean>

    <!-- 必须要有这样的实例,用来管理Spring容器中得shiro常见的对象 -->
    <bean id="lifecycleBeanPostProcessor" class="org.apache.shiro.spring.LifecycleBeanPostProcessor" />

     <!-- 启用shiro注解 -->
    <bean
        class="org.springframework.aop.framework.autoproxy.DefaultAdvisorAutoProxyCreator"
        depends-on="lifecycleBeanPostProcessor" />
    <bean
        class="org.apache.shiro.spring.security.interceptor.AuthorizationAttributeSourceAdvisor">
        <property name="securityManager" ref="securityManager" />
    </bean>

    <!-- 属于网络的 -->
    <bean id="secureRemoteInvocationExecutor"
        class="org.apache.shiro.spring.remoting.SecureRemoteInvocationExecutor">
        <property name="securityManager" ref="securityManager" />
    </bean>

<!-- 配置shiroFilter
    1、shiroFilter这个bean的id必须和web.xml文件中得filter-name保持一致
 -->
    <bean id="shiroFilter" class="org.apache.shiro.spring.web.ShiroFilterFactoryBean">
        <property name="securityManager" ref="securityManager" />
        <!-- 初始页面 -->
        <property name="loginUrl" value="logon.jsp" />
        <!-- 认证成功页面 -->
        <property name="successUrl" value="success.jsp" />
        <!-- 认证失败页面 -->
        <property name="unauthorizedUrl" value="abc.jsp" />
        <!-- The 'filters' property is not necessary since any declared javax.servlet.Filter
            bean defined will be automatically acquired and available via its beanName
            in chain definitions, but you can perform overrides or parent/child consolidated
            configuration here if you like: -->
        <!-- <property name="filters"> <util:map> <entry key="aName" value-ref="someFilterPojo"/>
            </util:map> </property> -->
        <!-- !!!代表 要完成shiro过滤器的具体配置!!!-->
        <property name="filterChainDefinitions">
            <value>
            <!-- anon代表未经认证可以访问的资源
                 authc必须认证才可以访问的资源
                 下面的意思是,所有用户都可以访问logon.jsp
                 其他页面需要认证权限才可以访问
             -->
                /logon.jsp = anon
                /logon = anon
                /logout = logout
                /** = authc
            </value>
        </property>
    </bean>

</beans>
applicationContext.xml
那么问题又来了,用了多realm实现数据安全性,如果一个数据库认证成功,另一个认证失败了呢?
引入概念,认证策略
Shiro在进行认证的时候,如何识别认证成功的方式
1、多个realm认证,只要一个成功,代表登录成功
2、多个realm认证,全部成功,代表登录成功
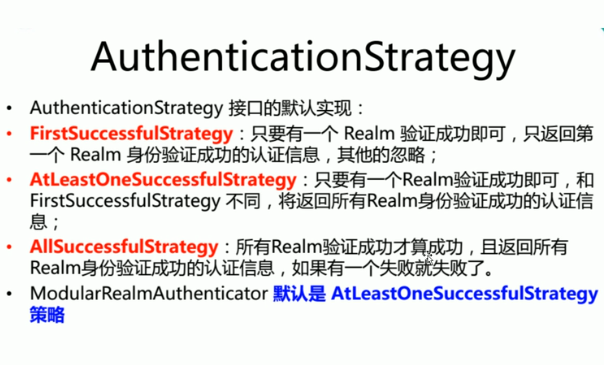
realm认证是默认的单个成功就成功
在applicationContext.xml中修改

这样就用的是全成功才能成功登录
<?xml version="1.0" encoding="UTF-8"?>
<beans xmlns="http://www.springframework.org/schema/beans"
    xmlns:xsi="http://www.w3.org/2001/XMLSchema-instance"
    xsi:schemaLocation="http://www.springframework.org/schema/beans http://www.springframework.org/schema/beans/spring-beans.xsd">

    <!-- 配置securityManager!!!
        安全管理器
        1、缓存技术:缓存管理
        2、realm:负责获取处理数据的。
     -->
    <bean id="securityManager" class="org.apache.shiro.web.mgt.DefaultWebSecurityManager">
        <property name="cacheManager" ref="cacheManager" />
        <!-- Realm,实现类 -->
        <property name="authenticator" ref="authenticator"></property>
    </bean>

    <bean id="authenticator" class="org.apache.shiro.authc.pam.ModularRealmAuthenticator">
    <property name="realms">
        <list>
            <ref bean="jdbcRealm"/>
            <ref bean="secondRealm"/>
        </list>
    </property>
    <property name="authenticationStrategy" ref="allSuccessfulStrategy"></property>
    </bean>

    <bean id="allSuccessfulStrategy" class="org.apache.shiro.authc.pam.AllSuccessfulStrategy"></bean>

    <!-- 添加自己写的Realm -->
    <bean id="jdbcRealm" class="com.shiro.bean.ShrioRealm">
        <property name="credentialsMatcher">
            <bean class="org.apache.shiro.authc.credential.HashedCredentialsMatcher">
                <property name="hashAlgorithmName" value="MD5"></property>
                <!-- 加密次数 -->
                <property name="hashIterations" value="1024"></property>
            </bean>
        </property>
    </bean>

    <bean id="secondRealm" class="com.shiro.bean.SecondRealm">
        <property name="credentialsMatcher">
            <bean class="org.apache.shiro.authc.credential.HashedCredentialsMatcher">
                <property name="hashAlgorithmName" value="SHA1"></property>
                <!-- 加密次数 -->
                <property name="hashIterations" value="1024"></property>
            </bean>
        </property>
    </bean>
    <!-- 配置cacheManager(缓存)
        想到eache就想到hibernate里面有
        找到hibernate-release-5.2.12.Final\lib\optional\ehcache对应的核心架包ehcache-2.10.3.jar,添加
        找到hibernate-release-5.2.12.Final\project\etc下的ehcache.xml
    -->
    <bean id="cacheManager" class="org.apache.shiro.cache.ehcache.EhCacheManager">
        <!-- Set a net.sf.ehcache.CacheManager instance here if you already have
            one. If not, a new one will be creaed with a default config:
            <property name="cacheManager" ref="ehCacheManager"/> -->
        <!-- If you don't have a pre-built net.sf.ehcache.CacheManager instance
            to inject, but you want a specific Ehcache configuration to be used, specify
            that here. If you don't, a default will be used.: -->
            <property name="cacheManagerConfigFile" value="classpath:ehcache.xml"/>
    </bean>

    <!-- 必须要有这样的实例,用来管理Spring容器中得shiro常见的对象 -->
    <bean id="lifecycleBeanPostProcessor" class="org.apache.shiro.spring.LifecycleBeanPostProcessor" />

     <!-- 启用shiro注解 -->
    <bean
        class="org.springframework.aop.framework.autoproxy.DefaultAdvisorAutoProxyCreator"
        depends-on="lifecycleBeanPostProcessor" />
    <bean
        class="org.apache.shiro.spring.security.interceptor.AuthorizationAttributeSourceAdvisor">
        <property name="securityManager" ref="securityManager" />
    </bean>

    <!-- 属于网络的 -->
    <bean id="secureRemoteInvocationExecutor"
        class="org.apache.shiro.spring.remoting.SecureRemoteInvocationExecutor">
        <property name="securityManager" ref="securityManager" />
    </bean>

<!-- 配置shiroFilter
    1、shiroFilter这个bean的id必须和web.xml文件中得filter-name保持一致
 -->
    <bean id="shiroFilter" class="org.apache.shiro.spring.web.ShiroFilterFactoryBean">
        <property name="securityManager" ref="securityManager" />
        <!-- 初始页面 -->
        <property name="loginUrl" value="logon.jsp" />
        <!-- 认证成功页面 -->
        <property name="successUrl" value="success.jsp" />
        <!-- 认证失败页面 -->
        <property name="unauthorizedUrl" value="abc.jsp" />
        <!-- The 'filters' property is not necessary since any declared javax.servlet.Filter
            bean defined will be automatically acquired and available via its beanName
            in chain definitions, but you can perform overrides or parent/child consolidated
            configuration here if you like: -->
        <!-- <property name="filters"> <util:map> <entry key="aName" value-ref="someFilterPojo"/>
            </util:map> </property> -->
        <!-- !!!代表 要完成shiro过滤器的具体配置!!!-->
        <property name="filterChainDefinitions">
            <value>
            <!-- anon代表未经认证可以访问的资源
                 authc必须认证才可以访问的资源
                 下面的意思是,所有用户都可以访问logon.jsp
                 其他页面需要认证权限才可以访问
             -->
                /logon.jsp = anon
                /logon = anon
                /logout = logout
                /** = authc
            </value>
        </property>
    </bean>

</beans>
applicationContext.xml
授权
可以控制哪一个用户可以访问哪一个web资源.
tom-admin--->权限的web资源
jim-user---->
主题:Subject,用户
资源:可以访问的URL
权限:用户能不能访问某个资源
角色:包含了多个权限
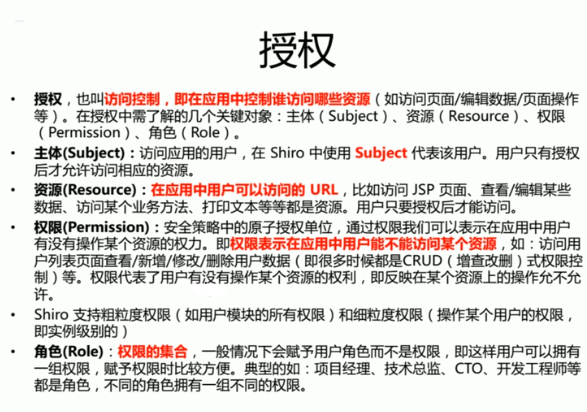
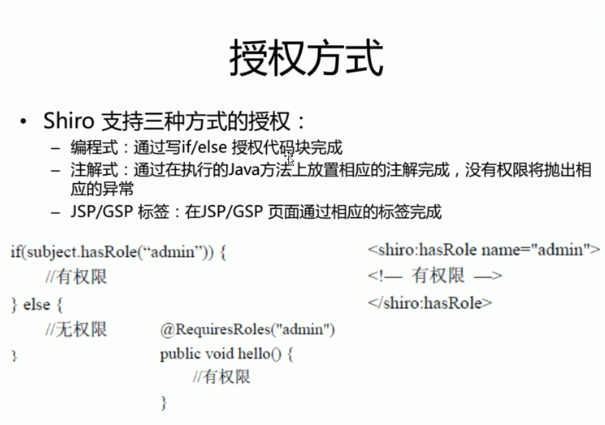
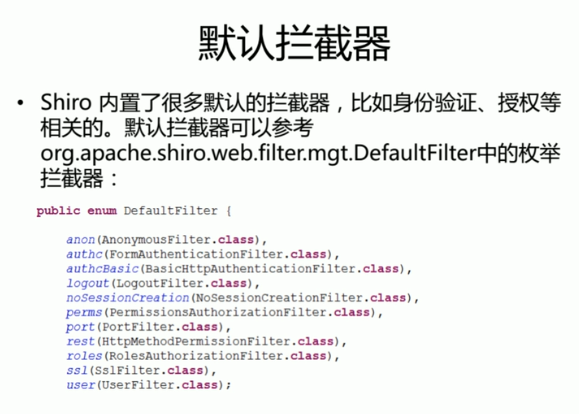
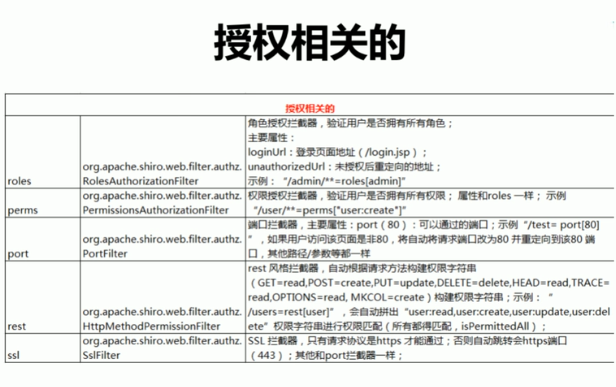
修改数据库表
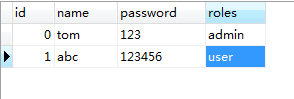
修改success页面模拟,然后添加需要页面

在修改applicationContext.xml文件,配置roles拦截器
(登录用户如果拥有什么角色,可以访问什么.jsp页面)
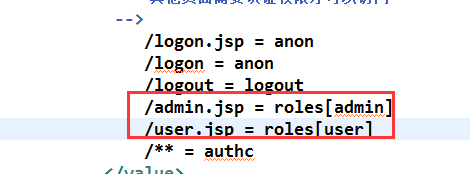
然而报错,少了什么呢?
一个用户进行登录,认证成功之后,最终还要查找认证成功的用户拥有什么样的角色。
Realm可以帮我们与数据库进行互交,获取指定认证成功的用户对应的角色
---自定义一个Reaml,集成AuthorizingRealm,认证和授权的工作。
---IOC容器当中配置指定Realm的Bean实例
---告知SecurityManager使用哪一个授权管理器
配置一个授权管理器:
1、IOC的配置文件中,加入一个bean
<bean id="authorizer" class="org.apache.shiro.authz.ModularRealmAuthorizer">
        <property name="realms">
        <list>
            <ref bean="jdbcRealm"/>
            <ref bean="secondRealm"/>
        </list>
    </property>
    </bean>
2、告知,securityManager,我要用到哪一个授权器

至此,全部代码上一波

<%@ page language="java" contentType="text/html; charset=UTF-8"
    pageEncoding="UTF-8"%>
<!DOCTYPE html PUBLIC "-//W3C//DTD HTML 4.01 Transitional//EN" "http://www.w3.org/TR/html4/loose.dtd">
<html>
<head>
<meta http-equiv="Content-Type" content="text/html; charset=UTF-8">
<title>Insert title here</title>
</head>
<body>
<h1>User Page</h1>
</body>
</html>
user.jsp
<%@ page language="java" contentType="text/html; charset=UTF-8"
    pageEncoding="UTF-8"%>
<!DOCTYPE html PUBLIC "-//W3C//DTD HTML 4.01 Transitional//EN" "http://www.w3.org/TR/html4/loose.dtd">
<html>
<head>
<meta http-equiv="Content-Type" content="text/html; charset=UTF-8">
<title>Insert title here</title>
</head>
<body>
<h1>Success</h1>
<a href="logout">LOGOUT</a>
<br/><br/><br/>
<a href="admin.jsp">Admin Page</a>
<br/>
<a href="user.jsp">User Page</a>

</body>
</html>
success.jsp
<%@ page language="java" contentType="text/html; charset=UTF-8"
    pageEncoding="UTF-8"%>
<!DOCTYPE html PUBLIC "-//W3C//DTD HTML 4.01 Transitional//EN" "http://www.w3.org/TR/html4/loose.dtd">
<html>
<head>
<meta http-equiv="Content-Type" content="text/html; charset=UTF-8">
<title>Insert title here</title>
</head>
<body>
    <h1>Logon Page</h1>
    <form action="logon" method="post">
        username:<input type="text" name="username">
        <br/>
        password:<input type="password" name="password">
        <br/>
        <input type="submit" value="登录">
    </form>
</body>
</html>
logon.jsp
<%@ page language="java" contentType="text/html; charset=UTF-8"
    pageEncoding="UTF-8"%>
<!DOCTYPE html PUBLIC "-//W3C//DTD HTML 4.01 Transitional//EN" "http://www.w3.org/TR/html4/loose.dtd">
<html>
<head>
<meta http-equiv="Content-Type" content="text/html; charset=UTF-8">
<title>Insert title here</title>
</head>
<body>
<h1>admin Page</h1>
</body>
</html>
admin.jsp
<%@ page language="java" contentType="text/html; charset=UTF-8"
    pageEncoding="UTF-8"%>
<!DOCTYPE html PUBLIC "-//W3C//DTD HTML 4.01 Transitional//EN" "http://www.w3.org/TR/html4/loose.dtd">
<html>
<head>
<meta http-equiv="Content-Type" content="text/html; charset=UTF-8">
<title>Insert title here</title>
</head>
<body>
<h1>失败页面unauthorizedUrl</h1>
</body>
</html>
abc.jsp
<?xml version="1.0" encoding="UTF-8"?>
<web-app xmlns:xsi="http://www.w3.org/2001/XMLSchema-instance" xmlns="http://java.sun.com/xml/ns/javaee" xsi:schemaLocation="http://java.sun.com/xml/ns/javaee http://java.sun.com/xml/ns/javaee/web-app_2_5.xsd" id="WebApp_ID" version="2.5">
  <display-name>shiro2</display-name>
  <welcome-file-list>
    <welcome-file>logon.jsp</welcome-file>
  </welcome-file-list>
  <!-- 配置文件路径 -->
  <!-- needed for ContextLoaderListener -->
    <context-param>
        <param-name>contextConfigLocation</param-name>
        <param-value>classpath:applicationContext.xml</param-value>
    </context-param>
    <!-- 配置一个上下文加载的监听器 -->
    <!-- Bootstraps the root web application context before servlet initialization -->
    <listener>
        <listener-class>org.springframework.web.context.ContextLoaderListener</listener-class>
    </listener>

      <!-- The front controller of this Spring Web application, responsible for handling all application requests -->
    <servlet>
        <servlet-name>springDispatcherServlet</servlet-name>
        <servlet-class>org.springframework.web.servlet.DispatcherServlet</servlet-class>
        <init-param>
            <param-name>contextConfigLocation</param-name>
            <param-value>classpath:springmvc.xml</param-value>
        </init-param>
        <load-on-startup>1</load-on-startup>
    </servlet>

    <!-- Map all requests to the DispatcherServlet for handling -->
    <servlet-mapping>
        <servlet-name>springDispatcherServlet</servlet-name>
        <url-pattern>/</url-pattern>
    </servlet-mapping>

    <!-- filter的代理类
        代理类会到IOC容器中找在filter-name对应的bean对象
    -->
        <filter>
        <filter-name>shiroFilter</filter-name>
        <filter-class>org.springframework.web.filter.DelegatingFilterProxy</filter-class>
        <init-param>
            <param-name>targetFilterLifecycle</param-name>
            <param-value>true</param-value>
        </init-param>
    </filter>

    <filter-mapping>
        <filter-name>shiroFilter</filter-name>
        <url-pattern>/*</url-pattern>
    </filter-mapping>

</web-app>
web.xml
<?xml version="1.0" encoding="UTF-8"?>
<beans xmlns="http://www.springframework.org/schema/beans"
    xmlns:xsi="http://www.w3.org/2001/XMLSchema-instance"
    xmlns:mvc="http://www.springframework.org/schema/mvc"
    xmlns:context="http://www.springframework.org/schema/context"
    xsi:schemaLocation="http://www.springframework.org/schema/mvc http://www.springframework.org/schema/mvc/spring-mvc-4.1.xsd
        http://www.springframework.org/schema/beans http://www.springframework.org/schema/beans/spring-beans.xsd
        http://www.springframework.org/schema/context http://www.springframework.org/schema/context/spring-context-4.1.xsd">
<!-- 视图管理器 -->
    <bean class="org.springframework.web.servlet.view.InternalResourceViewResolver">
        <property name="prefix" value="/"></property>
        <property name="suffix" value=".jsp"></property>
    </bean>

    <context:component-scan base-package="com.shiro.action"/>
    <mvc:annotation-driven></mvc:annotation-driven>
    <mvc:default-servlet-handler/>

</beans>
springmvc.xml
<!--
  ~ Hibernate, Relational Persistence for Idiomatic Java
  ~
  ~ License: GNU Lesser General Public License (LGPL), version 2.1 or later.
  ~ See the lgpl.txt file in the root directory or <http://www.gnu.org/licenses/lgpl-2.1.html>.
  -->
<ehcache>

    <!-- Sets the path to the directory where cache .data files are created.

         If the path is a Java System Property it is replaced by
         its value in the running VM.

         The following properties are translated:
         user.home - User's home directory
         user.dir - User's current working directory
         java.io.tmpdir - Default temp file path -->
    <diskStore path="java.io.tmpdir"/>

    <!--Default Cache configuration. These will applied to caches programmatically created through
        the CacheManager.

        The following attributes are required for defaultCache:

        maxInMemory       - Sets the maximum number of objects that will be created in memory
        eternal           - Sets whether elements are eternal. If eternal,  timeouts are ignored and the element
                            is never expired.
        timeToIdleSeconds - Sets the time to idle for an element before it expires. Is only used
                            if the element is not eternal. Idle time is now - last accessed time
        timeToLiveSeconds - Sets the time to live for an element before it expires. Is only used
                            if the element is not eternal. TTL is now - creation time
        overflowToDisk    - Sets whether elements can overflow to disk when the in-memory cache
                            has reached the maxInMemory limit.

        -->
    <defaultCache
        maxElementsInMemory="10000"
        eternal="false"
        timeToIdleSeconds="120"
        timeToLiveSeconds="120"
        overflowToDisk="true"
        />

    <!--Predefined caches.  Add your cache configuration settings here.
        If you do not have a configuration for your cache a WARNING will be issued when the
        CacheManager starts

        The following attributes are required for defaultCache:

        name              - Sets the name of the cache. This is used to identify the cache. It must be unique.
        maxInMemory       - Sets the maximum number of objects that will be created in memory
        eternal           - Sets whether elements are eternal. If eternal,  timeouts are ignored and the element
                            is never expired.
        timeToIdleSeconds - Sets the time to idle for an element before it expires. Is only used
                            if the element is not eternal. Idle time is now - last accessed time
        timeToLiveSeconds - Sets the time to live for an element before it expires. Is only used
                            if the element is not eternal. TTL is now - creation time
        overflowToDisk    - Sets whether elements can overflow to disk when the in-memory cache
                            has reached the maxInMemory limit.

        -->

    <!-- Sample cache named sampleCache1
        This cache contains a maximum in memory of 10000 elements, and will expire
        an element if it is idle for more than 5 minutes and lives for more than
        10 minutes.

        If there are more than 10000 elements it will overflow to the
        disk cache, which in this configuration will go to wherever java.io.tmp is
        defined on your system. On a standard Linux system this will be /tmp"
        -->
    <cache name="sampleCache1"
        maxElementsInMemory="10000"
        eternal="false"
        timeToIdleSeconds="300"
        timeToLiveSeconds="600"
        overflowToDisk="true"
        />

    <!-- Sample cache named sampleCache2
        This cache contains 1000 elements. Elements will always be held in memory.
        They are not expired. -->
    <cache name="sampleCache2"
        maxElementsInMemory="1000"
        eternal="true"
        timeToIdleSeconds="0"
        timeToLiveSeconds="0"
        overflowToDisk="false"
        /> -->

    <!-- Place configuration for your caches following -->

</ehcache>
ehcache.xml
<?xml version="1.0" encoding="UTF-8"?>
<beans xmlns="http://www.springframework.org/schema/beans"
    xmlns:xsi="http://www.w3.org/2001/XMLSchema-instance"
    xsi:schemaLocation="http://www.springframework.org/schema/beans http://www.springframework.org/schema/beans/spring-beans.xsd">

    <!-- 配置securityManager!!!
        安全管理器
        1、缓存技术:缓存管理
        2、realm:负责获取处理数据的。
     -->
    <bean id="securityManager" class="org.apache.shiro.web.mgt.DefaultWebSecurityManager">
        <property name="cacheManager" ref="cacheManager" />
        <!-- Realm,实现类 -->
        <property name="authenticator" ref="authenticator"></property>
        <property name="authorizer" ref="authorizer"></property>
    </bean>
    <bean id="authorizer" class="org.apache.shiro.authz.ModularRealmAuthorizer">
        <property name="realms">
        <list>
            <ref bean="jdbcRealm"/>
            <ref bean="secondRealm"/>
        </list>
    </property>
    </bean>

    <bean id="authenticator" class="org.apache.shiro.authc.pam.ModularRealmAuthenticator">
    <property name="realms">
        <list>
            <ref bean="jdbcRealm"/>
            <ref bean="secondRealm"/>
        </list>
    </property>
    <property name="authenticationStrategy" ref="allSuccessfulStrategy"></property>
    </bean>

    <bean id="allSuccessfulStrategy" class="org.apache.shiro.authc.pam.AllSuccessfulStrategy"></bean>

    <!-- 添加自己写的Realm -->
    <bean id="jdbcRealm" class="com.shiro.bean.ShrioRealm">
        <property name="credentialsMatcher">
            <bean class="org.apache.shiro.authc.credential.HashedCredentialsMatcher">
                <property name="hashAlgorithmName" value="MD5"></property>
                <!-- 加密次数 -->
                <property name="hashIterations" value="1024"></property>
            </bean>
        </property>
    </bean>

    <bean id="secondRealm" class="com.shiro.bean.SecondRealm">
        <property name="credentialsMatcher">
            <bean class="org.apache.shiro.authc.credential.HashedCredentialsMatcher">
                <property name="hashAlgorithmName" value="SHA1"></property>
                <!-- 加密次数 -->
                <property name="hashIterations" value="1024"></property>
            </bean>
        </property>
    </bean>
    <!-- 配置cacheManager(缓存)
        想到eache就想到hibernate里面有
        找到hibernate-release-5.2.12.Final\lib\optional\ehcache对应的核心架包ehcache-2.10.3.jar,添加
        找到hibernate-release-5.2.12.Final\project\etc下的ehcache.xml
    -->
    <bean id="cacheManager" class="org.apache.shiro.cache.ehcache.EhCacheManager">
        <!-- Set a net.sf.ehcache.CacheManager instance here if you already have
            one. If not, a new one will be creaed with a default config:
            <property name="cacheManager" ref="ehCacheManager"/> -->
        <!-- If you don't have a pre-built net.sf.ehcache.CacheManager instance
            to inject, but you want a specific Ehcache configuration to be used, specify
            that here. If you don't, a default will be used.: -->
            <property name="cacheManagerConfigFile" value="classpath:ehcache.xml"/>
    </bean>

    <!-- 必须要有这样的实例,用来管理Spring容器中得shiro常见的对象 -->
    <bean id="lifecycleBeanPostProcessor" class="org.apache.shiro.spring.LifecycleBeanPostProcessor" />

     <!-- 启用shiro注解 -->
    <bean
        class="org.springframework.aop.framework.autoproxy.DefaultAdvisorAutoProxyCreator"
        depends-on="lifecycleBeanPostProcessor" />
    <bean
        class="org.apache.shiro.spring.security.interceptor.AuthorizationAttributeSourceAdvisor">
        <property name="securityManager" ref="securityManager" />
    </bean>

    <!-- 属于网络的 -->
    <bean id="secureRemoteInvocationExecutor"
        class="org.apache.shiro.spring.remoting.SecureRemoteInvocationExecutor">
        <property name="securityManager" ref="securityManager" />
    </bean>

<!-- 配置shiroFilter
    1、shiroFilter这个bean的id必须和web.xml文件中得filter-name保持一致
 -->
    <bean id="shiroFilter" class="org.apache.shiro.spring.web.ShiroFilterFactoryBean">
        <property name="securityManager" ref="securityManager" />
        <!-- 初始页面 -->
        <property name="loginUrl" value="logon.jsp" />
        <!-- 认证成功页面 -->
        <property name="successUrl" value="success.jsp" />
        <!-- 认证失败页面 -->
        <property name="unauthorizedUrl" value="abc.jsp" />
        <!-- The 'filters' property is not necessary since any declared javax.servlet.Filter
            bean defined will be automatically acquired and available via its beanName
            in chain definitions, but you can perform overrides or parent/child consolidated
            configuration here if you like: -->
        <!-- <property name="filters"> <util:map> <entry key="aName" value-ref="someFilterPojo"/>
            </util:map> </property> -->
        <!-- !!!代表 要完成shiro过滤器的具体配置!!!-->
        <property name="filterChainDefinitions">
            <value>
            <!-- anon代表未经认证可以访问的资源
                 authc必须认证才可以访问的资源
                 下面的意思是,所有用户都可以访问logon.jsp
                 其他页面需要认证权限才可以访问
             -->
                /logon.jsp = anon
                /logon = anon
                /logout = logout
                /admin.jsp = roles[admin]
                /user.jsp = roles[user]
                /** = authc
            </value>
        </property>
    </bean>

</beans>
applicationContext.xml
package com.shiro.bean;

import java.sql.Connection;
import java.sql.DriverManager;
import java.sql.PreparedStatement;
import java.sql.ResultSet;
import java.sql.SQLException;
import java.util.HashSet;
import java.util.Set;

import org.apache.shiro.authc.AuthenticationException;
import org.apache.shiro.authc.AuthenticationInfo;
import org.apache.shiro.authc.AuthenticationToken;
import org.apache.shiro.authc.SimpleAuthenticationInfo;
import org.apache.shiro.authc.UsernamePasswordToken;
import org.apache.shiro.authz.AuthorizationInfo;
import org.apache.shiro.authz.SimpleAuthorizationInfo;
import org.apache.shiro.crypto.hash.SimpleHash;
import org.apache.shiro.realm.AuthorizingRealm;
import org.apache.shiro.subject.PrincipalCollection;
import org.apache.shiro.util.ByteSource;
//Realm 需要查询数据库,并且得到正确的数据
public class ShrioRealm extends AuthorizingRealm {

    /**
     * 1、doGetAuthenticationInfo,获取认证消息,如果数据库中没有数据,返回null
     * 如果得到了正确的用户名和密码,返回指定对象AuthenticationInfo
     * 2、AuthenticationInfo,可以使用SimpleAuthenticationInfo实现类,封装正确的用户名和密码
     * 3、token参数,就是我们需要认证的token
     *
     */
    @Override
    protected AuthenticationInfo doGetAuthenticationInfo(AuthenticationToken token) throws AuthenticationException {
        System.out.println("The first Real is working!!");
        SimpleAuthenticationInfo info = null;

        //1、将token转换成UsernamePasswordToken
        UsernamePasswordToken upToken = (UsernamePasswordToken) token;
        //2、获取用户名即可
        String username = upToken.getUsername();
        //3、查询数据库,是否存在指定用户名和密码的用户(加入mysql架包)
        try {
            Class.forName("com.mysql.jdbc.Driver");
            Connection c = DriverManager.getConnection("jdbc:mysql://localhost:3306/mydata","root","root");
            PreparedStatement ps = c.prepareStatement("select * from user where name=?");
            ps.setString(1, username);
            ResultSet rs = ps.executeQuery();
            if(rs.next()){
                Object principal = username;
                Object credentials =rs.getString(3);
                String realmName = this.getName();
                //ByteSource
                ByteSource credentialsSalt = ByteSource.Util.bytes(username);

                SimpleHash shcredentials = new SimpleHash("MD5", credentials, credentialsSalt, 1024);

                //info = new SimpleAuthenticationInfo(principal, shcredentials, realmName);
                info = new SimpleAuthenticationInfo(principal, shcredentials, credentialsSalt, realmName);
            }else{
                throw new AuthenticationException();
            }
        } catch (ClassNotFoundException e) {
            e.printStackTrace();
        }catch (SQLException e) {
            e.printStackTrace();
        }
        //4、如果查询到了,封装查询结构,返回给我们的调用

        //5、如果没有查询到,抛出一个异常

        return info;
    }

    @Override
    protected AuthorizationInfo doGetAuthorizationInfo(PrincipalCollection principals) {
    //返回值:AuthorizationInfo封装获取的用户对应的所有角色,SimpleAuthorizationInfo(Set<String> roles)
    //参数列表,    PrincipalCollection登录的身份,登录的用户名
        SimpleAuthorizationInfo info = null;
        try {
            Class.forName("com.mysql.jdbc.Driver");
            Connection c = DriverManager.getConnection("jdbc:mysql://localhost:3306/mydata","root","root");
            PreparedStatement ps = c.prepareStatement("select * from user where name=?");
            String username = principals.toString();
            ps.setString(1, username);
            ResultSet rs = ps.executeQuery();
            if(rs.next()){
                Set<String> roles = new HashSet<String>();
                roles.add(rs.getString(4));
                info = new SimpleAuthorizationInfo(roles);
            }else{
                throw new AuthenticationException();
            }
        } catch (ClassNotFoundException e) {
            e.printStackTrace();
        }catch (SQLException e) {
            e.printStackTrace();
        }
        return info;
    }

}
ShrioRealm.java
package com.shiro.bean;

import java.sql.Connection;
import java.sql.DriverManager;
import java.sql.PreparedStatement;
import java.sql.ResultSet;
import java.sql.SQLException;

import org.apache.shiro.authc.AuthenticationException;
import org.apache.shiro.authc.AuthenticationInfo;
import org.apache.shiro.authc.AuthenticationToken;
import org.apache.shiro.authc.SimpleAuthenticationInfo;
import org.apache.shiro.authc.UsernamePasswordToken;
import org.apache.shiro.crypto.hash.SimpleHash;
import org.apache.shiro.realm.AuthenticatingRealm;
import org.apache.shiro.util.ByteSource;
//Realm 需要查询数据库,并且得到正确的数据
public class SecondRealm extends AuthenticatingRealm {

    /**
     * 1、doGetAuthenticationInfo,获取认证消息,如果数据库中没有数据,返回null
     * 如果得到了正确的用户名和密码,返回指定对象AuthenticationInfo
     * 2、AuthenticationInfo,可以使用SimpleAuthenticationInfo实现类,封装正确的用户名和密码
     * 3、token参数,就是我们需要认证的token
     *
     */
    @Override
    protected AuthenticationInfo doGetAuthenticationInfo(AuthenticationToken token) throws AuthenticationException {
        System.out.println("The Second Real is working!!");
        SimpleAuthenticationInfo info = null;

        //1、将token转换成UsernamePasswordToken
        UsernamePasswordToken upToken = (UsernamePasswordToken) token;
        //2、获取用户名即可
        String username = upToken.getUsername();
        //3、查询数据库,是否存在指定用户名和密码的用户(加入mysql架包)
        try {
            Class.forName("com.mysql.jdbc.Driver");
            Connection c = DriverManager.getConnection("jdbc:mysql://localhost:3306/mydata","root","root");
            PreparedStatement ps = c.prepareStatement("select * from user where name=?");
            ps.setString(1, username);
            ResultSet rs = ps.executeQuery();
            if(rs.next()){
                Object principal = username;
                Object credentials =rs.getString(3);
                String realmName = this.getName();
                //ByteSource
                ByteSource credentialsSalt = ByteSource.Util.bytes(username);

                SimpleHash shcredentials = new SimpleHash("SHA1", credentials, credentialsSalt, 1024);

                //info = new SimpleAuthenticationInfo(principal, shcredentials, realmName);
                info = new SimpleAuthenticationInfo(principal, shcredentials, credentialsSalt, realmName);
            }else{
                throw new AuthenticationException();
            }
        } catch (ClassNotFoundException e) {
            e.printStackTrace();
        }catch (SQLException e) {
            e.printStackTrace();
        }
        //4、如果查询到了,封装查询结构,返回给我们的调用

        //5、如果没有查询到,抛出一个异常

        return info;
    }

}
SecondRealm.java
package com.shiro.action;

import org.apache.shiro.SecurityUtils;
import org.apache.shiro.authc.AuthenticationException;
import org.apache.shiro.authc.UsernamePasswordToken;
import org.apache.shiro.subject.Subject;
import org.springframework.stereotype.Controller;
import org.springframework.web.bind.annotation.RequestMapping;
import org.springframework.web.bind.annotation.RequestParam;

@Controller
public class LogonAction {
    @RequestMapping("/logon")
    public String logon(@RequestParam("username") String username, @RequestParam("password") String password) {
        //1、创建Subject实例
        Subject subject = SecurityUtils.getSubject();

        //2、判断当前用户是否登录
        if(subject.isAuthenticated()==false){
            //3、将用户名密码封装UsernamePasswordToken
            UsernamePasswordToken token = new UsernamePasswordToken(username,password);
            try {
                subject.login(token);
            } catch (AuthenticationException e) {
                //这里跳转页面
                System.out.println("登录失败");
                return "abc";
            }
        }

        return "success";
    }
}
LogonAction.java
shiro(安全框架)的更多相关文章
- shiro安全框架
原文:http://blog.csdn.net/boonya/article/details/8233303 可能大家早先会见过 J-security,这个是 Shiro 的前身.在 2009 年 3 ...
- thymeleaf模板引擎shiro集成框架
shiro权限框架.前端验证jsp设计.间tag它只能用于jsp系列模板引擎. 使用最近项目thymeleaf作为前端模板引擎,采用HTML档,未出台shiro的tag lib,假设你想利用这段时间s ...
- shiro权限框架(一)
不知不觉接触shiro安全框架都快三个月了,这中间配合项目开发踩过无数的坑.现在回想总结下,也算是一种积累,一种分享.中间有不够完美的地方或者不好的地方,希望大家指出来能一起交流.在这里谢谢开涛老师的 ...
- Shiro安全框架【快速入门】就这一篇!
Shiro 简介 照例又去官网扒了扒介绍: Apache Shiro™ is a powerful and easy-to-use Java security framework that perfo ...
- SpringBoot集成Shiro安全框架
跟着我的步骤:先运行起来再说 Spring集成Shiro的GitHub:https://github.com/yueshutong/shiro-imooc 一:导包 <!-- Shiro安全框架 ...
- Shiro权限框架简介
http://blog.csdn.net/xiaoxian8023/article/details/17892041 Shiro权限框架简介 2014-01-05 23:51 3111人阅读 评论 ...
- Springboot整合Shiro安全框架
最近在学习Springboot,在这个过程中遇到了很多之前都没有技术知识,学习了一阵子,稍微总结一些. ---- Shiro框架 shiro框架,是一个相对比较简便的安全框架,它可以干净利落地处理身份 ...
- 在前后端分离的SpringBoot项目中集成Shiro权限框架
参考[1].在前后端分离的SpringBoot项目中集成Shiro权限框架 参考[2]. Springboot + Vue + shiro 实现前后端分离.权限控制 以及跨域的问题也有涉及
- (转) shiro权限框架详解06-shiro与web项目整合(上)
http://blog.csdn.net/facekbook/article/details/54947730 shiro和web项目整合,实现类似真实项目的应用 本文中使用的项目架构是springM ...
- Shiro安全框架入门使用方法
详见:https://blog.csdn.net/qq_32651225/article/details/77199464 框架介绍Apache Shiro是一个强大且易用的Java安全框架,执行身份 ...
随机推荐
- Java对象的访问方式
之前写过一篇随笔 https://www.cnblogs.com/qianjinyan/p/10352749.html 现在看看,貌似不是很准确,方法区和栈应当区分开来,两者有很大的区别 看下面的一个 ...
- POJ 1088 滑雪(模板题 DFS+记忆化)
Description Michael喜欢滑雪百这并不奇怪, 因为滑雪的确很刺激.可是为了获得速度,滑的区域必须向下倾斜,而且当你滑到坡底,你不得不再次走上坡或者等待升降机来载你.Michael想知道 ...
- js时间戳转化成日期格式
function timestampToTime(timestamp) { var date = new Date(timestamp * 1000);//时间戳为10位需*1000,时间戳为13位的 ...
- Go语言学习之9 网络协议TCP、Redis与聊天室
主要内容 1. Tcp编程2. redis使用 1. Tcp编程 (1)简介 Golang是谷歌设计开发的语言,在Golang的设计之初就把高并发的性能作为Golang的主要特性之一,也是 ...
- [Android - QPST] 高通刷机/QPST刷机
参考网站: https://forum.xda-developers.com/zuk-z2-pro/how-to/howto-flash-stock-rom-t3435109 http://ask.l ...
- DFS 之 全排列
题目描述输出自然数1到n所有不重复的排列,即n的全排列,要求所产生的任一数字序列中不允许出现重复的数字. 我们可以模拟出n个盒子和n张卡片,我们需要将n张卡片分别放到n个盒子里,且每个盒子只能放1张卡 ...
- YII实现restful,postman进行接口测试
Yii2 restful API文档 一.配置模块: 1.Config/main.php: 2.创建模块目录: 3.Module.php: 二.路由配置: 三.控制器: 四.Models: 五.测试: ...
- 【CUDA】Win10 + VS2017新 CUDA 项目配置
一.新建项目 打开VS2017 → 新建项目 → Win32控制台应用程序 → “空项目”打钩 二.调整配置管理器平台类型 右键项目 → 属性 → 配置管理器 → 全改为“x64” 三.配置生成属性 ...
- c# 后台处理获取的JSON 数据
原创: http://www.imooc.com/article/8913 自己的例子: web.config <appSettings> <add key="GmailU ...
- springCloud配置本地配中心SpringCloudConfig
多环境配置 在一般开发过程中如果调试都在本地进行,则可以设置一个多环境配置,在本地与线上配置间来回切换. springcloud默认会访问的配置文件名是application.properties, ...