十三、java_GUI
目录:
一、AWT
- AWT(Abstract Window Toolkit)包括了很多类和接口,用于Java Application的GUI(Graphics User Interface 提醒用户界面)编程
- GUI的各种元素(如:窗口,按钮,文本框等)由java类来实现
- 使用AWT锁涉及的类一般在java.awt包及子包中
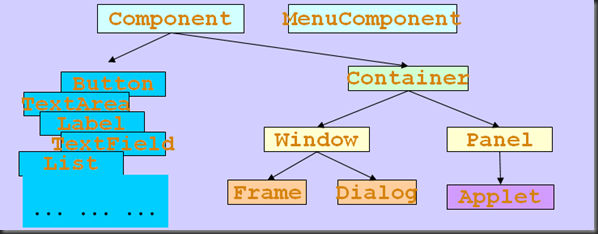
- Container和Component是AWT中的两个核心类

二、组件和容器
Component && Container
- java的图形用户界面的最基本组成部分是Component,component类及其子类的对象用来描述以图形化的方式显示在屏幕上并能与用户进行交互的GUI元素,例如,一个按钮,一个标签等
- 一般的Component对象不能独立地显示出来, 必需将其放在某一Containner对象中才可以显示出来
- Container是Component的子类,Container子类对象可以容纳别的Component对象
- Container对象可使用方法add(…)向其中添加其他Component对象
- Containter是Component的子类,因此Conatainter对象也可以被当作Component对象添加到其他Container对象中
- 有两种常见的Containter:
Window:其对象表示自由停泊的顶级装口
Panel:其对象可作为容纳其他Conpinent对象,但不能独立存在,必需被添加到其他Conatinner中(如Window或Applet)
Frame:
- Frame是Window的子类,由Frame或其子类创建的对象为一个窗体
- Frame的常用构造方法:
Frame()
Frame(String s)//创建标题为字符串S的窗口
setBounds(int x, int y, int width, int height)//设置窗体位置和大小,x,y是左上角坐标

setSize(int width, int height)//设置窗体的大小,width和height分别是宽度和高度

setLocation(int x, int y)//设置窗体的位置,x,y是左上角坐标、

setBackground(Color c)//设置背景颜色,参数为Color对象

setVisible(boolean b)//设置是否可见

setTitle(String name)//设置标题栏上的文字

String getTitle()//获取标题的内容

setResizable(boolean b)//设置是否可以调整大小
看一个例子:
public class TestFrame {

    /*

     * 这个窗口是关不掉的,后面才会学习到

     */

    public static void main(String[] args) {

        Frame f = new Frame("My First GUI");

        f.setSize(800,600);//设置窗口大小

         f.setBackground(Color.blue);//设置背景色

         f.setVisible(true);//设置窗口可见

         f.setResizable(false);//设置窗口不可变大小

         f.setLocation(300,300);//设置窗口刚开始出来的时候的落脚点在什么位置,如果不加这个落脚点应该是在左上角

    }

}
再来看一个例子:
public class MyFrame extends Frame{

    static int id = 0;

    MyFrame(int x, int y, int w, int h, Color color) {

        super("My Frame" + (++id));

        setBackground(color);

        setLayout(null);//后面再介绍

         setBounds(x,y,w,h);//设置大小和起始位置

         setVisible(true);

    }

}
/*

 * 自己运行看看

 */

public class TestMultiFrame {

    public static void main(String[] args) {

        MyFrame f1 = new MyFrame(100, 100, 200, 200, Color.black);

        MyFrame f2 = new MyFrame(300, 100, 200, 200, Color.blue);

        MyFrame f3 = new MyFrame(100, 300, 200, 200, Color.red);

        MyFrame f4 = new MyFrame(300, 300, 200, 200, Color.yellow);

    }

}
Panel:
- Panel对象可以堪称可以容纳Component的空间
- Panel对象可以拥有自己的布局管理器
- Panel类拥有从其父类继承来的:
- setBounds(int x, int y, int width, int height)
- setSize(int width, int height)
- setLocation(int x, int y)
- setBackground(Color c)
- setLayout(LayoutManager mgr)等方法
- Panel的构造方法:
Panel()//使用默认的FalowLayout类布局管理器初始化

Panel(LayoutManager layout)//使用指定的布局管理器初始化
看一个例子:
public class TestPanel {

    public static void main(String[] args) {

        Frame f = new Frame("Java Frame with Panel");

        Panel p = new Panel(null);

        f.setLayout(null);//后面再说

        f.setBounds(300,300,500,500);//设置frame的起始位置和大小

        f.setBackground(new Color(0,0,102));//使用三原色值作为frame的背景色

        p.setBounds(50,50,400,400);//设置panel的起始位置和大小,panel的起始坐标是相对于frame的起始坐标

        p.setBackground(new Color(204,204,255));//使用三原色值作为panel的背景色

        f.add(p);//把panel加到frame中

        f.setVisible(true);//设置frame可见

    }

}
在看一个例子:
/*

 * 为了节约空间,我这里没太注意编写的格式

 */

public class MyFrame2 extends Frame{

    private Panel p1,p2,p3,p4;

    MyFrame2(String s, int x, int y, int w, int h) {

        super(s);

        setLayout(null);

        p1 = new Panel(null);        p2 = new Panel(null);

        p3 = new Panel(null);        p4 = new Panel(null);

        p1.setBounds(0, 0, w/2, h/2);        p2.setBounds(0, h/2, w/2, h/2);

        p3.setBounds(w/2, 0, w/2, h/2);        p4.setBounds(w/2, h/2, w/2, h/2);

        p1.setBackground(Color.black);        p2.setBackground(Color.blue);

        p3.setBackground(Color.yellow);        p4.setBackground(Color.red);

        add(p1); add(p2); add(p3); add(p4);

        setBounds(x, y, w, h);

        setVisible(true);

    }

}
public class TestMultipanel {

    public static void main(String[] args) {

        new MyFrame2("MyFrameWithPanel", 300, 300, 400, 300);

    }

}
三、布局管理器
java语言中,提供了布局管理器类的对象可以管理:
- 管理Component在Container中的布局,不必直接设置Component位置和大小
- 每个Container都有一个布局管理对象,当容器需要对摸个组件进行定位或判断其大小尺寸时,就会调用其对应的布局管理器,调用Container的SetLayout方法改变其布局管理器对象
Awt提供了5种布局管理器类:
- FlowLayout
- BorderLayout
- GridLayout
- GardLayout
- GirdBagLayout
1.FlowLayout布局管理器:
FlowLayout是Panel类的默认布局管理器
- FlowLayout布局管理器对组件逐行定位,行内从左到右,一行排满后换行
- 不改变组件的大小,按组件原有吃寻显示组件,可设置不同的组件间距,行距以及对齐方式
FlowLayout布局管理器默认的对齐方式是居中
构造方法:
new FlowLayout(FlowLayout.RIGHT, 20, 40);//右对齐,组件之间水平间距20个像素,垂直间距40个像素

new FlowLayout(FlowLayout.LEFT);//左对齐,水平和垂直间距为缺省值(5)

new FlowLayout();//使用缺省的居中对其方式,水平和垂直间距为缺省值(5)
看一个例子:
public class TestFlowLayout {

    public static void main(String[] args) {

        Frame f = new Frame("Flow Layout");

        //new三个按钮

        Button button1 = new Button("Ok");

        Button button2 = new Button("Open");

        Button button3 = new Button("Close");

        //f.setLayout(new FlowLayout());//设置布局方式1

        //f.setLayout(new FlowLayout(FlowLayout.LEFT));设置布局方式2

        f.add(button1);

        f.add(button2);

        f.add(button3);

        f.setSize(100,100);

        f.setVisible(true);

    }

}
再看一个例子:
public class TestFlowLayout2 {

    public static void main(String[] args) {

        Frame f = new Frame("Java Frame");

        FlowLayout l = new FlowLayout(FlowLayout.CENTER, 20, 40);//new 一个layout

        f.setLayout(l);//设置Layout为l

        f.setLocation(300, 400);//设置窗体位置

        f.setSize(300, 200);//设置窗口尺寸

        f.setBackground(new Color(204, 204, 255));//设置背景色

        for(int i=1; i<=7; i++) {

            f.add(new Button("BUTTON"));//循环增加7个按钮

        }

        f.setVisible(true);//设置窗口可见

    }

}
2.BorderLayout布局管理器
- BorderLayout是Frame类的默认布局管理器
- BorderLayout将整个容器的布局划分成:东(EAST)西(WEST)南(SOUTH)北(NORTH)中(CENTER)五个区域,组件只能被添加到指定的区域
- 如不指定组件的加入不为,则默认加入到CENTER区
- 每个区域只能加入一个组件,如加入多个,则先前加入的会被覆盖
BordeLayout型布局容器尺寸缩放原则:
- 北、南两个区域在水平方向缩放
- 东西两个区域在垂直方向缩放
- 中部可在两个方向上缩放
看一个例子:
public class TestBorderLayout {

    public static void main(String[] args) {

        Frame f = new Frame("Border Layout");

        Button bn = new Button("BN");

        Button bs = new Button("BS");

        Button bw = new Button("BW");

        Button be = new Button("BE");

        Button bc = new Button("BC");

        /*

        f.add(bn, "North");

        f.add(bs, "South");

        f.add(bw, "West");

        f.add(be, "East");

        f.add(bc, "Center");

        */

        //也可以使用下述语句

        f.add(bn, BorderLayout.NORTH);

        f.add(bs, BorderLayout.SOUTH);

        f.add(bw, BorderLayout.WEST);

        f.add(be, BorderLayout.EAST);

        f.add(bc, BorderLayout.CENTER);

        f.setSize(200, 200);//设置窗口大小

        f.setVisible(true);//设置窗口可见

    }

}
3.GriLayout布局管理器
GridLayout型布局管理器将空间划分成规则的矩形网格,每个单元格区域大小相等。组件被添加到每个单元格中,先从左到右添满一行后换行,再从上到下
在GridLayout的构造方法中指定分割的行数和列数,如:GridLayout(3,4)
看一个例子:
public class TestGridLayout {

    public static void main(String[] args) {

        Frame f = new Frame("GridLayout");

        Button b1 = new Button("b1");

        Button b2 = new Button("b2");

        Button b3 = new Button("b3");

        Button b4 = new Button("b4");

        Button b5 = new Button("b5");

        Button b6 = new Button("b6");

        f.setLayout(new GridLayout(3, 2));//三行两列布局

        f.add(b1);

        f.add(b2);

        f.add(b3);

        f.add(b4);

        f.add(b5);

        f.add(b6);

        f.pack();//里面的内容写好后正好把它包起来的大小,相当于是在指定窗口大小了

        f.setVisible(true);//设置窗口可见

    }

}
看一个综合学习的例子:
注释没解释全,看起来比较乱,自行领悟
public static void main(String[] args) {

        Frame f = new Frame("Java Frame");

        f.setLayout(new GridLayout(2, 1));//两行一列

         f.setLocation(300, 400);

        f.setSize(300, 200);

        f.setBackground(new Color(204,204,255));

        Panel p1 = new Panel(new BorderLayout());//行的上面是p1

        Panel p2 = new Panel(new BorderLayout());//行的下面是p2

        Panel p11 = new Panel(new GridLayout(2,1));//一个两行一列的布局

         Panel p21 = new Panel(new GridLayout(2,2));//一个两行两列的布局

         p1.add(new Button("BUTTON"), BorderLayout.WEST);//上面一行的西边加了一个按钮

         p1.add(new Button("BUTTON"), BorderLayout.EAST);//上面一行的东边加了一个按钮

         p11.add(new Button("BUTTON"));//上面一行中间上面的按钮

         p11.add(new Button("BUTTON"));//上面一行中间下面的按钮

         p1.add(p11, BorderLayout.CENTER);

        p2.add(new Button("BUTTON"), BorderLayout.WEST);

        p2.add(new Button("BUTTON"), BorderLayout.EAST);

        for(int i=1; i<=4; i++) {

            p21.add(new Button("Button"));    //为下面一行中间的四个空添加按钮

         }

        p2.add(p21,BorderLayout.CENTER);

        f.add(p1);

        f.add(p2);

        f.setVisible(true);

    }

}
布局管理器总结:
- Frame是一个顶级窗口,Frame的缺省布局管理器为BorderLayout
- Panel无法单独显示,他必须添加到某个容器中(Panel的缺省布局管理器为FlowLayout)
- 当把Panel作为一个组件添加到某个容器中后,该Panel仍然可以有自己的布局管理器
- 使用布局管理器时,布局管理器负责各个组件的大小和位置,因此用户无法在这种情况下设置组件大小和位置属性,如果视图使用JAVA语言提供的setLocation(),setSize(),setBounds()等方法,则都会被布局管理器覆盖
- 如果用户确实需要亲自设置组件大小或位置,则应取消该容器的布局管理器,方法为:setLayout(null)
四、事件处理
事件监听

Button事件监听:
先看一个例子:
public class Monitor implements ActionListener{//实现了ActionListener接口

    public void actionPerformed(ActionEvent e) {//重写了那个接口里的actionPerforme方法

        System.out.println("a button has been pressed");//输出一句话

    }

}
public class TestActionEvent {

    public static void main(String[] args) {

       Frame f = new Frame("Test");//new一个frame

       Button b = new Button("Press me");//new一个按钮

        Monitor bh = new Monitor();//new一个监听器

        b.addActionListener(bh);//把监听器添加到按钮中,一旦按钮触发则运行监听器中的内容

        f.add(b, BorderLayout.CENTER);//把按钮加到frame中

        f.pack();//设置窗口大小为按钮默认大小

        f.setVisible(true);

    }

}
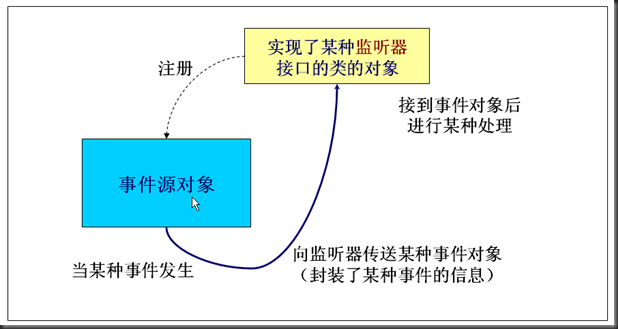
main方法中,先是new了一个button出来,然后new了一个监听器,也就是继承了ActionListener的Monitor类,并将监听器添加到了button中,当点击事件发生时,程序会自动到Monitor找对应的事件(上面例子中是press事件)并执行事件中的方法,上面第一段代码重写了接口中actionPerformed方法,改为输出,所以当点击按钮的时候会输出”a button has been pressed”相应的方法可以在api文档中查到
对照这个小程序分析上面的事件监听流程图
接下来再看一个小例子:
/*

 * 利用获取ActionCommand值来让让自己区程序运行的时候分到底是哪个按钮调用了监听器

 * 这是一个针对多个控件调用同一监听事件的取巧的让自己识别的小办法

 */

public class Monitor2 implements ActionListener{

    public void actionPerformed(ActionEvent e) {

        System.out.println("a button has been pressed, "+"the relative info is : \n "+e.getActionCommand());

    }

}
public class TestActionEvent2 {

    public static void main(String[] args) {

        Frame f = new Frame("Test");

        Button b1 = new Button("start");

        Button b2 = new Button("stop");

        Monitor2 bh = new Monitor2();

        b1.addActionListener(bh);//一个监听器监听两个button1

        b2.addActionListener(bh);//一个监听器监听两个button2

        b2.setActionCommand("game over");//将button的ActionCommand属性设置为"game over"

        f.add(b1,"North");

        f.add(b2,"Center");

        f.pack();

        f.setVisible(true);

    }

}
TextFiled类:
java.awt.Text.Filed类用来创建文本框对象
TextFiled有如下常用方法:
//构造方法

TextFile()

TextFile(int columns)

TextFile(String text)

TextFile(String text, int columns)

//方法

public void setText(String t)

public String getText()

public void setEchoChar(char c)//设置回显字符

public void setEditable(boolean b)

public boolran isEditable()

public void setBackground(Color c)

public void select(int selectionStart, int selectionEnd)

public void selectAll()

public void addActionListener(ActionListener l)//添加动作监听器
TextFiled事件监听:
- TextFiled对象可能发生Action(光标在文本框内敲回车)事件。与该事件对应的事件类是java.awt.event.ActionEvent
- 用来处理ActionEvent事件是实现了java.awt.event.ActionListener接口的类的对象。ActionListener接口定义有方法:public void actionPerformed(ActionEvent e)
- 实现该接口的类要在该方法中添加处理该事件(Action)的语句
- 使用addActionListener(ActionListener l)方法为TextFiled对象注册一个ActionListener对象,当TextFiled对象发生Action事件时,会生成一个ActionEvent对象,当TextFiled对象发生Action事件时,会生成一个ActionEvent对象,该对象作为参数传递给ActionListener对象的actionPerformer方法在方法中可以获取该对象的信息,并做相应处理
看一个例子:
public class TFActionEvent {

    public static void main(String[] args) {

        new TFFrame();

    }

}
class TFFrame extends Frame{

    TFFrame() {

       TextField tf = new TextField();//new一个TextFiled对象

        add(tf);

       tf.addActionListener(new TFActionListener());//添加事件

        //tf.setEchoChar('*');//设置回显字符,加了这行代码后再执行一次该程序看看会有什么效果

        pack();//界面打包

        setVisible(true);//界面可见

    }

}
//实现ActionListener接口并重写actionPerformered方法

class TFActionListener implements ActionListener{

    public void actionPerformed(ActionEvent e) {

       TextField tf = (TextField)e.getSource();//获取事件源,也就是事件信息

        System.out.println(tf.getText());//打印获取到的资源的文本信息

        tf.setText("");//再把他的值再设为空

    }

}
上面的例子程序中会产生一个输入框,每次输入完内容后再按回车会在控制台中打印输入内容
加了回显字符后所有打印的内容都将在输入框内显示为’*’
再看一个小程序:
public class TFMath {

    public static void main(String[] args) {

        new TFFrame().launchFrame();

    }

}
class TFFrame extends Frame{

    TextField num1, num2, num3;

    public void launchFrame() {

        num1 = new TextField(10);//new一个TextFiled并设置宽度为10个字符宽

        num2 = new TextField(10);

        num3 = new TextField(15);

        Label lblplus = new Label("+");

        Button btnEqual = new Button("=");

        //btnEqual.addActionListener(new MyMonitor(num1, num2, num3));

        btnEqual.addActionListener(new MyMonitor(this));

        setLayout(new FlowLayout());

        add(num1);

        add(lblplus);

        add(num2);

        add(btnEqual);

        add(num3);

        pack();

        setVisible(true);

    }

}
public class MyMonitor implements ActionListener{

/*

    TextField num1, num2, num3;

    public MyMonitor(TextField num1, TextField num2, TextField num3) {

        this.num1 = num1;

        this.num2 = num2;

        this.num3 = num3;

    }

    public void actionPerformed(ActionEvent e) {

    int n1 = Integer.parseInt(num1.getText());

    int n2 = Integer.parseInt(num2.getText());

    num3.setText(""+(n1+n2));

}

*/

    TFFrame tf = null;

    public MyMonitor(TFFrame tf) {

        this.tf = tf;

    }

    public void actionPerformed(ActionEvent e) {

        int n1 = Integer.parseInt(tf.num1.getText());

        int n2 = Integer.parseInt(tf.num2.getText());

        tf.num3.setText(""+(n1+n2));

    }
这个小程序实现的是一个整数加法计算器的功能,三个输入框,在前两个输入框内输入数字,然后点击等号按钮在第三个输入框输出加法结果
这个程序的事件监听器中,通过引用TFFrame对象来使用他里面的变量,获取前两个输入框的值,这样看起来比较简洁,另外一种方法也可以实现同样的效果,只是需要在事件监听器里面重新创建新的变量,这样在一个变量较多的程序中看起来就会比较复杂,这种写法叫”持有对方引用”
注:想要试下复杂点的方法的话
1.将事件监听器,也就是MyMonitor类中的注释代码替换为不注释的代码
2.将TFFrame类里注释的那行代码替换掉他下面哪一行的代码,也就是更改一下监听器注册的写法
以上的小程序还有一个更加好用的写法,内部类:
class TFFrame extends Frame{

    TextField num1, num2, num3;

    public void launchFrame() {

        num1 = new TextField(10);//new一个TextFiled并设置宽度为10个字符宽

         num2 = new TextField(10);

        num3 = new TextField(15);

        Label lblplus = new Label("+");

        Button btnEqual = new Button("=");

        //btnEqual.addActionListener(new MyMonitor(num1, num2, num3));

        btnEqual.addActionListener(new MyMonitor());

        setLayout(new FlowLayout());

        add(num1);

        add(lblplus);

        add(num2);

        add(btnEqual);

        add(num3);

        pack();

        setVisible(true);

    }

    //内部类

    class MyMonitor implements ActionListener {

        public void actionPerformed(ActionEvent e) {

            int n1 = Integer.parseInt(num1.getText());

            int n2 = Integer.parseInt(num2.getText());

            num3.setText(""+(n1+n2));

        }

    }

}
把原先MyMonitor的类写到TFFrame类之中去,这样MyMonitor类就可以直接使用TFFrame中声明的成员变量,而不需要持有对方引用或者是再添加新的变量,写法更为简单
注:正常的类编译出来之后应该是.java后缀变.class后缀,也就是说TFFrame.java会变成TFFrame.class,但是当TFFrame.java中有内部类MyMonitor的时候,则编译出来的文件为TFFrame$MyMonitor.class
内部类的优点:
- 可以方便的访问包装类的成员
- 可以更清楚的组织逻辑,防止不应该被其他类访问的类进行访问
何时使用:
- 该内部类不允许或不需要其他类进行访问时
五、java图形
Graphics类:
每个Component都有一个paint(Graphics g)用于实现绘图目的,每次重画该Component时都子都自动调用Paint方法。
Graphics类中提供了旭东绘图方法,如:
drawRect(int x, int y, int width, int height)

fillRoundRect(int x, int y, int width, int height, int arcWidth, int arcHeight)
看一个例子:
public class TestPaint {

    public static void main(String[] args) {

        new PaintFrame().launchFrame();

    }

}
public class PaintFrame extends Frame{

    public void launchFrame() {

        setBounds(200, 200, 640, 480); //设置窗口起始位置和窗口大小

        setVisible(true);

    }

    //画图方法,paint方法是自动调用的一个方法,不需要调用

    public void paint(Graphics g) {

        Color c = g.getColor();//获取画笔颜色

        g.setColor(Color.red);//设置画笔为红色

        g.fillOval(50, 50, 30, 30);//画一个椭圆,50,50是相对于frame的位置坐标,30,30是宽度跟高度

        g.setColor(Color.green);//设置画笔为绿色

        g.fillRect(80, 80, 40, 40);//画一个矩形,80,80是位置,40,40是大小

        g.setColor(c);//恢复默认画笔颜色

    }

}
鼠标事件适配器--MouseAdapter:
- 抽象类java.awt.event.MouseAdapter实现了MouseListener接口,可以使用其子类作为MouseEvent的监听器,只要重写其相应的方法即可
- 对于其他的监听器,也有对应的适配器
- 使用适配器可以避免监听器类定义没有必要的空方法
- repaint—update()—paint()这是repaint方法的内部流程
看一个例子:
//主方法

public class MyMouseAdapter {

    public static void main(String[] args) {

        new MyFrame("drawing...");

    }

}
public class MyFrame extends Frame{

    ArrayList points = null;

    MyFrame(String s) {

        super(s);

        points = new ArrayList();//初始化ArrayList

        setLayout(null);

        setBounds(300, 300, 400, 300);

        this.setBackground(new Color(204,204,255));

        setVisible(true);

        this.addMouseListener(new Monitor());//添加了一个对鼠标的监听器

    }

    //画一个实心圆

    public void paint(Graphics g) {

        Iterator i = points.iterator();

        while(i.hasNext()) {

            Point p = (Point)i.next();

            g.setColor(Color.blue);

            g.fillOval(p.x, p.y, 10, 10);

        }

    }

    //每点一下就添加一个点

    public void addPoint(Point p) {

        points.add(p);

    }

}
/*

 * 这里之所以是继承而不是实现MounseListerer接口,是因为实现接口要重写该接口内的所有方法,即便用不到也需要重写一遍空的方法,而JDK提供了MouseAdapter类里面有MouseListener的所有方法,这样就简便的多

 */

//鼠标事件

public class Monitor extends MouseAdapter{

    public void mousePressed(MouseEvent e) {

        MyFrame f = (MyFrame)e.getSource();//获取事件源的信息

        f.addPoint(new Point(e.getX(), e.getY()));//拿到发生这件事时候的xy坐标位置

        f.repaint();//强制对Frame进行重画,像是刷新一样,每点一次刷新一次,可以在调试的时候注释掉这行代码试下

    }

}
运行小程序,在弹出的界面内进行鼠标点击的操作,鼠标点击的位置会生成一个个的小圆点。仔细阅读代码进行理解
六、window事件
window事件锁对应的事件类为WindowEvent,锁对应的事件监听接口为WindowListener
WindowListener定义的方法有:
public void windowOpened(WindowEvent e)

public void windowClosing(WindowEvent e)

public void windowClosed(WindowEvent e)

public void windowIconified(WindowEvent e)

public void windowActivated(WindowEvent e)

public void windowDeactivated(WindowEvent e)
与WindowListener对应的适配器为:WindowAdapter
看一个例子:
public class TestWindowClose {

    public static void main(String[] args) {

        new MyFrame4("MyFrame");

    }

}
public class MyFrame4 extends Frame{

    MyFrame4(String s) {

        super(s);

        setLayout(null);

        setBounds(300, 300, 400, 300);

        this.setBackground(new Color(204, 204, 255));

        setVisible(true);

        this.addWindowListener(new MyWindowMonitor());//添加监听器,

        /*添加监听器

         * 这是监听器的另外一种写法--方法内的类(匿名的内部类)

        this.addWindowListener(new WindowAdapter() {

            public void windowClosing(WindowEvent e) {

                setVisible(false);

                System.exit(-1);

            }

        });

        */

    }

    //内部类退出监听器

    class MyWindowMonitor extends WindowAdapter {

        public void windowClosing( WindowEvent     e) {

            setVisible(false);

            System.exit(0);//-1和0都可以

        }

    }

}
运行上面的小程序,点击左上角的X实现退出效果
匿名类是一种变成方式,尽量少用,代码看起来比较复杂,且扩展性不是很好
再看一个匿名类的小例子:
public class TestAnonymouse2 {

    Frame f = new Frame("Test");

    TextField tf = new TextField(10);

    Button b1 = new Button("Start");

    public static void main(String[] args) {

        new TestAnonymouse2();

    }

    public TestAnonymouse2() {

        f.add(b1, "North");

        f.add(tf, "South");

        //添加按钮监听器

        b1.addActionListener(new ActionListener() {

            private int i;

            public void actionPerformed(ActionEvent e) {

                tf.setText(e.getActionCommand() + ++i);

            }

        });

        //添加右上角x监听

        f.addWindowListener(new WindowAdapter() {

            public void windowClosing(WindowEvent e) {

                System.exit(0);

            }

        });

        f.pack();

        f.setVisible(true);

    }

}
通过前面鼠标事件、按钮事件,再来看一下键盘事件,结合一个小程序进行理解:
/*

 * 如果按向上的箭头则打印一句话,否则什么反映也没有

 */

public class TestKey extends Frame{

    public static void main(String[] args) {

        new TestKey();

    }

    TestKey() {

        setSize(200, 200);

        setLocation(300, 300);

        addKeyListener(new MyKeyMonitor());

        setVisible(true);

    }

    class MyKeyMonitor extends KeyAdapter {

        public void keyPressed(KeyEvent e) {

            if(e.getKeyCode() == 38){

            System.out.println("按下了向上的箭头");

            }

        }

    }

}
十三、java_GUI的更多相关文章
- CRL快速开发框架系列教程十三(嵌套查询)
本系列目录 CRL快速开发框架系列教程一(Code First数据表不需再关心) CRL快速开发框架系列教程二(基于Lambda表达式查询) CRL快速开发框架系列教程三(更新数据) CRL快速开发框 ...
- 我的MYSQL学习心得(十三) 权限管理
我的MYSQL学习心得(十三) 权限管理 我的MYSQL学习心得(一) 简单语法 我的MYSQL学习心得(二) 数据类型宽度 我的MYSQL学习心得(三) 查看字段长度 我的MYSQL学习心得(四) ...
- WPF入门教程系列二十三——DataGrid示例(三)
DataGrid的选择模式 默认情况下,DataGrid 的选择模式为“全行选择”,并且可以同时选择多行(如下图所示),我们可以通过SelectionMode 和SelectionUnit 属性来修改 ...
- Java期末设计(十三周)
一.项目完成计划 十三周和十四周完成用户交互界面的设计(1.登陆界面2.订票以及查询界面3.用户管理界面4.退票界面): 十三周完成登陆界面,十四周完成订票以及查询界面,用户管理界面和 ...
- Bootstrap <基础二十三>页面标题(Page Header)
页面标题(Page Header)是个不错的功能,它会在网页标题四周添加适当的间距.当一个网页中有多个标题且每个标题之间需要添加一定的间距时,页面标题这个功能就显得特别有用.如需使用页面标题(Page ...
- Bootstrap<基础十三> 按钮组
按钮组允许多个按钮被堆叠在同一行上.当你想要把按钮对齐在一起时,这就显得非常有用.你可以通过Bootstrap 按钮(Button) 插件 添加可选的 JavaScript 单选框和复选框样式行为. ...
- AngularJs的UI组件ui-Bootstrap分享(十三)——Progressbar
进度条控件有两种指令,第一种是uib-progressbar指令,表示单一颜色和进度的一个进度条.第二种是uib-bar和uib-progress指令,表示多种颜色和多个进度组合而成的一个进度条. 这 ...
- 第十一&十二&十三周周记
周数 专业学习目标 专业学习时间 新增代码量 博客发表量 人文方面的学习 知识技能总结 第十一周 认真学习网络技术,了解路由器和交换机之间的联通和使用. 一天一小时 300 一篇 每天用一小时看关于经 ...
- JAVA EE的十三种技术
java ee 的十三中技术 一.jdbc 1). jdbc-odbc桥 2). jdbc-native 驱动桥 3). jdbc-network 桥 4). 纯java驱动 二. java命令和目录 ...
随机推荐
- use_frameworks!和#use_frameworks!的区别、解决Swift项目中use_frameworks!冲突的问题
use_frameworks!和#use_frameworks!的区别 转自:https://www.jianshu.com/p/0ae58a477459 1. 用cocoapods 导入swift ...
- 2017乌鲁木齐区域赛D题Fence Building-平面图的欧拉公式
这个题B站上面有这题很完整的分析和证明,你实在不懂,可以看看这个视频 https://www.bilibili.com/video/av19849697?share_medium=android&a ...
- M2团队贡献分分配
经过考虑,M2阶段团队贡献分分配如下: 团队成员 贡献分 12061166 宋天舒 56 12061157 黄漠源 52 12061159 张迎春 55 12061175 刘翔宇 54 1206117 ...
- Scrum Meeting NO.9
Scrum Meeting No.9 1.会议内容 2.任务清单 徐越 序号 近期的任务 进行中 已完成 1 代码重构:前端通讯模块改为HttpClient+Json √ 2 "我" ...
- Beta版发布说明
我们的作品“校友聊”软件的最终版本于6月19日最终发布了,下面我们将对自己的产品进行介绍. 在使用之前,首先要进行用户注册,用户可以自行设置自己的账号,姓名,密码,签名,头像等信息,头像信息也可以在文 ...
- atcoder B - Frog 2 (DP)
B - Frog 2 Time Limit: 2 sec / Memory Limit: 1024 MB Score : 100100 points Problem Statement There a ...
- Delphi处理Http请求自定义Header
在HTTP请求中,get方法是默认的,但在URL地址长度是有限的,请求方法能传送的数据也是有限的,一般get方法传递的数据不能大于2KB,当get请求方法传递的数据长度不能满足需求时,就需要采用另一种 ...
- Vue 初识Vue
<!DOCTYPE html><html lang="zh-cn"><head> <meta charset="utf-8&qu ...
- array与List之间相互转化
#!/usr/bin/env python # -*- coding: utf-8 -*- # @Time : 2018/5/28 16:05 # @Author : zhang chao # @Fi ...
- 创建一个规范的django项目
1. 创建项目 2. 创建static目录及配置 1.创建放css, javascript,img的目录 2.在settings.py中将static绝对路径保存到变量STATICFILES_DIRS ...
