网络文件系统NFS
NFS介绍
什么是NFS?
NFS是Network File System的缩写,即网络文件系统。它的主要功能是通过网络(一般是局域网)让不同的主机系统之间可以共享文件或目录。NFS客户端(一般为应用服务器,例如web)可以通过挂载(mount)的方式将NFS服务端共享的数据目录挂载到NFS客户端本地系统中(就是某一个挂载点下)。从NFS客户端的机器本地看,NFS服务端共享的目录就好像是客户自己的磁盘分区或者目录一样,而实际上确是远端的NFS服务端的目录。
NFS网络文件系统类似windows系统的网络共享、安全功能、网络驱动器映射,这也和linux系统里的samba服务类似。应用于互联网中小型集群架构后端作为数据共享,如果是大型网站,那么有可能还会用到更复杂的分布式文件系统,例如Moosefs(mfs)、glusterfs、FastDFS。
NFS在企业中的应用场景
在企业集群架构的工作场景中,NFS网络文件系统一般被用来存储共享视频、图片、附件等静态资源文件。一般是把网站用户上传的文件都放在NFS共享里,例如,BBS产品的图片、附件、头像,注意网站BBS程序不要放在NFS共享里,然后前端所有的节点访问存储服务之一,特别是中小网站公司应用频率更高。

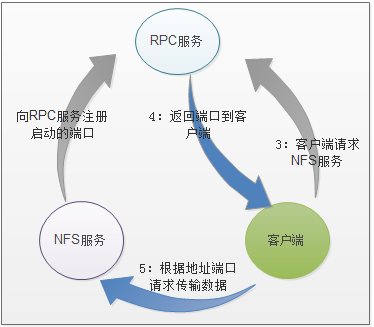
NFS流程图

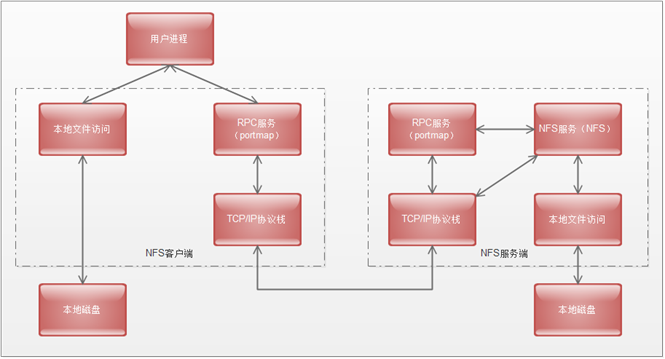
NFS原理图

NFS的RPC服务,在CentOS5.x下名称为portmap,在CentOS6.x下名称为rpcbind。
NFS服务端部署环境准备
NFS服务部署服务器准备
|
服务器系统 |
角色 |
ip |
|
CentOS 6.6 x86_64 |
NFS服务端(nfs-server) |
自定义 |
|
CentOS 6.6 x86_64 |
NFS客户端(nfs-client1) |
自定义 |
|
CentOS 6.6 x86_64 |
NFS客户端(nfs-client2) |
自定义 |
NFS SERVER端设置
NFS软件列表
部署NFS服务,需要安装下面的软件包:
nfs-utils:这个NFS服务主程序包括rpc.nfsd、rpc.mountd两个daemons和相关文档说明及执行命令文件等。
rpcbind:CentOS 6.x下面RPC的主程序(CentOS 5.x下面的portmap)
NFS可以被视为一个RPC程序,在启动任何一个RPC程序之前,需要做好端口映射工作,这个映射工作就是由rpcbind服务来完成的。因此,必须先启动rpcbind服务。
CentOS 6.6默认没有安装NFS软件包(CentOS 5默认已经安装)。
- [root@web-lnmp01 ~]# yum install nfs-utils rpcbind -y
- [root@web-lamp01 ~]# rpm -qa nfs-utils rpcbind
- [root@web-lnmp01 ~]# rpm -qa nfs-utils rpcbind
- nfs-utils-1.2.3-70.el6_8.2.x86_64 #这个包在5.8为portmap
- rpcbind-0.2.0-12.el6.x86_64
出现两个软件包,表示NFS服务端软件安装完毕。
启动NFS相关服务
- [root@nfs-server ~]# /etc/init.d/rpcbind status #查看rpcbind服务
- rpcbind is stopped
- [root@nfs-server ~]# /etc/init.d/rpcbind start #启动rpcbind服务
- Starting rpcbind: [ OK ]
- [root@nfs-server ~]# /etc/init.d/rpcbind status
- rpcbind (pid 26101) is running...
- [root@nfs-server ~]# lsof -i:111 #rpcbind服务端口111
- COMMAND PID USER FD TYPE DEVICE SIZE/OFF NODE NAME
- rpcbind 26101 rpc 6u IPv4 28829 0t0 UDP *:sunrpc
- rpcbind 26101 rpc 8u IPv4 28832 0t0 TCP *:sunrpc (LISTEN)
- rpcbind 26101 rpc 9u IPv6 28834 0t0 UDP *:sunrpc
- rpcbind 26101 rpc 11u IPv6 28837 0t0 TCP *:sunrpc (LISTEN)
- [root@nfs-server ~]# netstat -lntup|grep rpcbind
- tcp 0 0 0.0.0.0:111 0.0.0.0:* LISTEN 26101/rpcbind
- tcp 0 0 :::111 :::* LISTEN 26101/rpcbind
- udp 0 0 0.0.0.0:836 0.0.0.0:* 26101/rpcbind
- udp 0 0 0.0.0.0:111 0.0.0.0:* 26101/rpcbind
- udp 0 0 :::836 :::* 26101/rpcbind
- udp 0 0 :::111 :::* 26101/rpcbind
- [root@nfs-server ~]# chkconfig --list|grep rpcbind
- rpcbind 0:off 1:off 2:on 3:on 4:on 5:on 6:off
- [root@nfs-server ~]# rpcinfo -p localhost
- program vers proto port service
- 100000 4 tcp 111 portmapper
- 100000 3 tcp 111 portmapper
- 100000 2 tcp 111 portmapper
- 100000 4 udp 111 portmapper
- 100000 3 udp 111 portmapper
- 100000 2 udp 111 portmapper
- [root@nfs-server ~]# /etc/init.d/nfs status #查看nfs服务
- rpc.svcgssd is stopped
- rpc.mountd is stopped
- nfsd is stopped
- rpc.rquotad is stopped
- [root@nfs-server ~]# /etc/init.d/nfs start #启动nfs服务
- Starting NFS services: [ OK ]
- Starting NFS quotas: [ OK ]
- Starting NFS mountd: [ OK ]
- Starting NFS daemon: [ OK ]
- Starting RPC idmapd: [ OK ]
- [root@nfs-server ~]# /etc/init.d/nfs status
- rpc.svcgssd is stopped
- rpc.mountd (pid 26225) is running...
- nfsd (pid 26241 26240 26239 26238 26237 26236 26235 26234) is running...
- rpc.rquotad (pid 26220) is running...
- [root@nfs-server ~]# netstat -lntup|grep 2049 #nfs服务端口2049
- tcp 0 0 0.0.0.0:2049 0.0.0.0:* LISTEN -
- tcp 0 0 :::2049 :::* LISTEN -
- udp 0 0 0.0.0.0:2049 0.0.0.0:* -
- udp 0 0 :::2049 :::* -
- [root@nfs-server ~]# rpcinfo -p localhost
- program vers proto port service
- 100000 4 tcp 111 portmapper
- 100000 3 tcp 111 portmapper
- 100000 2 tcp 111 portmapper
- 100000 4 udp 111 portmapper
- 100000 3 udp 111 portmapper
- 100000 2 udp 111 portmapper
- 100011 1 udp 875 rquotad
- 100011 2 udp 875 rquotad
- 100011 1 tcp 875 rquotad
- 100011 2 tcp 875 rquotad
- 100005 1 udp 56844 mountd
- 100005 1 tcp 49326 mountd
- 100005 2 udp 47287 mountd
- 100005 2 tcp 47817 mountd
- 100005 3 udp 56317 mountd
- 100005 3 tcp 47741 mountd
- 100003 2 tcp 2049 nfs
- 100003 3 tcp 2049 nfs
- 100003 4 tcp 2049 nfs
- 100227 2 tcp 2049 nfs_acl
- 100227 3 tcp 2049 nfs_acl
- 100003 2 udp 2049 nfs
- 100003 3 udp 2049 nfs
- 100003 4 udp 2049 nfs
- 100227 2 udp 2049 nfs_acl
- 100227 3 udp 2049 nfs_acl
- 100021 1 udp 45085 nlockmgr
- 100021 3 udp 45085 nlockmgr
- 100021 4 udp 45085 nlockmgr
- 100021 1 tcp 42582 nlockmgr
- 100021 3 tcp 42582 nlockmgr
- 100021 4 tcp 42582 nlockmgr
- [root@nfs-server ~]# chkconfig --list nfs
- nfs 0:off 1:off 2:off 3:off 4:off 5:off 6:off
- [root@nfs-server ~]# chkconfig nfs on #nfs添加开机自启动
- [root@nfs-server ~]# chkconfig --list nfs
- nfs 0:off 1:off 2:on 3:on 4:on 5:on 6:off
- [root@nfs-server ~]# less /etc/init.d/rpcbind
- #! /bin/sh
- #
- # rpcbind Start/Stop RPCbind
- #
- # chkconfig: 2345 13 87 #开机启动顺序
- [root@nfs-server ~]# less /etc/init.d/nfs
- #!/bin/sh
- #
- # nfs This shell script takes care of starting and stopping
- # the NFS services.
- #
- # chkconfig: - 30 60 #开机启动顺序
工作中推荐使用/etc/rc.local进行服务的启动,不推荐使用chkconfig,目的是为了方便管理。
- [root@nfs-server ~]# ps -ef|egrep "rpc|nfs"
- rpc 26101 1 0 09:45 ? 00:00:00 rpcbind
- root 26211 2 0 09:52 ? 00:00:00 [rpciod/0]
- root 26220 1 0 09:52 ? 00:00:00 rpc.rquotad #磁盘配额进程
- root 26225 1 0 09:52 ? 00:00:00 rpc.mountd #权限管理验证
- root 26232 2 0 09:52 ? 00:00:00 [nfsd4]
- root 26233 2 0 09:52 ? 00:00:00 [nfsd4_callbacks]
- root 26234 2 0 09:52 ? 00:00:00 [nfsd] #NFS主进程
- root 26235 2 0 09:52 ? 00:00:00 [nfsd]
- root 26236 2 0 09:52 ? 00:00:00 [nfsd]
- root 26237 2 0 09:52 ? 00:00:00 [nfsd]
- root 26238 2 0 09:52 ? 00:00:00 [nfsd]
- root 26239 2 0 09:52 ? 00:00:00 [nfsd]
- root 26240 2 0 09:52 ? 00:00:00 [nfsd]
- root 26241 2 0 09:52 ? 00:00:00 [nfsd]
- root 26268 1 0 09:52 ? 00:00:00 rpc.idmapd
- root 26418 1023 0 10:41 pts/0 00:00:00 egrep rpc|nfs
配置NFS服务端
NFS服务的默认配置文件路径为:/etc/exports,并且默认是空的。
- [root@nfs-server ~]# ls -l /etc/exports
- -rw-r--r--. 1 root root 0 Jan 12 2010 /etc/exports
exports配置文件格式
/etc/exports文件配置格式
NFS 共享目录 NFS客户端地址1(参数1,参数2,参数3…) 客户端地址1(参数1,参数2,参数3…)
NFS 共享目录 NFS客户端地址(参数1,参数2…)
- [root@nfs-server ~]# cat /etc/exports
- /data 192.168.31.*(rw,sync)
- [root@nfs-server ~]# /etc/init.d/nfs reload
- exportfs: Failed to stat /data: No such file or directory #/data目录不存在
- [root@nfs-server ~]# mkdir /data
- [root@nfs-server ~]# /etc/init.d/nfs reload #exports -r
- [root@nfs-server ~]# showmount -e 127.0.0.1
- Export list for 127.0.0.1:
- /data 192.168.31.* #共享目录
- [root@nfs-server ~]# mount -t nfs 192.168.31.129:/data /mnt #挂载
- [root@nfs-server ~]# df -h
- Filesystem Size Used Avail Use% Mounted on
- /dev/sda3 7.1G 1.5G 5.3G 21% /
- tmpfs 497M 0 497M 0% /dev/shm
- /dev/sda1 190M 27M 153M 15% /boot
- 192.168.31.129:/data 7.1G 1.5G 5.3G 21% /mnt #挂载成功
- [root@nfs-server ~]# touch /data/oldboy.txt
- [root@nfs-server ~]# ls /mnt
- oldboy.txt
- [root@nfs-server ~]# touch /mnt/test.txt
- touch: cannot touch `/mnt/test.txt': Permission denied #无权限
客户端配置
启动rpcbind
- [root@web-lamp01 ~]# /etc/init.d/rpcbind start
- Starting rpcbind: [ OK ]
- [root@web-lamp01 ~]# /etc/init.d/rpcbind status
- rpcbind (pid 26272) is running...
- [root@web-lamp01 ~]# cat /etc/rc.local
- #启动rpcbind
- /etc/init.d/rpcbind start
- [root@web-lamp01 ~]# showmount -e 192.168.31.129
- Export list for 192.168.31.129:
- /data 192.168.31.*
- [root@web-lamp01 ~]# mount -t nfs 192.168.31.129:/data /mnt
- [root@web-lamp01 ~]# df -h
- Filesystem Size Used Avail Use% Mounted on
- /dev/sda3 7.1G 1.5G 5.3G 21% /
- tmpfs 497M 0 497M 0% /dev/shm
- /dev/sda1 190M 27M 153M 16% /boot
- 192.168.31.129:/data 7.1G 1.5G 5.3G 21% /mnt
- [root@web-lamp01 ~]# ls /mnt
- oldboy.txt
在服务端删除/data中的文件/oldboy.txt,然后在客户端进行查看,文件已经不存在。
无法写入是因为权限的问题,解决办法如下。
- [root@nfs-server ~]# cat /var/lib/nfs/etab
- /data 192.168.31.*(rw,sync,wdelay,hide,nocrossmnt,secure,root_squash,no_all_squash,no_subtree_check,secure_locks,acl,anonuid=65534,anongid=65534,sec=sys,rw,root_squash,no_all_squash) #nfs的由65534进行管理
- [root@nfs-server ~]# cat /etc/exports
- /data 192.168.31.*(rw,sync)
- [root@nfs-server ~]# ls -ld /data
- drwxr-xr-x 2 root root 4096 Jan 19 11:36 /data #/data的属主是root
- [root@nfs-server ~]# grep 65534 /etc/passwd #查看65534的用户名
- nfsnobody:x:65534:65534:Anonymous NFS User:/var/lib/nfs:/sbin/nologin
- [root@nfs-server ~]# chown -R nfsnobody /data #更改/data属主
- [root@nfs-server ~]# ls -ld /data
- drwxr-xr-x 2 nfsnobody root 4096 Jan 19 11:36 /data
- [root@nfs-server ~]# cd /mnt
- [root@nfs-server mnt]# pwd
- /mnt
- [root@nfs-server mnt]# ls
- [root@nfs-server mnt]# touch test.txt #服务端创建
- [root@nfs-server mnt]# ls
- test.txt
- [root@web-lamp01 mnt]# touch test2.txt #客户端创建
- [root@web-lamp01 mnt]# ls
- test2.txt test.txt
客户端设置开机自动挂载
- [root@web-lamp01 mnt]# cat /etc/rc.local
- #!/bin/sh
- #
- # This script will be executed *after* all the other init scripts.
- # You can put your own initialization stuff in here if you don't
- # want to do the full Sys V style init stuff.
- touch /var/lock/subsys/local
- #启动rpcbind
- /etc/init.d/rpcbind start
- #挂载nfs /data
- /bin/mount -t nfs 192.168.31.129:/data /mnt
同样配置另外一台客户端。
故障排查
1、首先确认NFS服务端配置和服务是否正常。
- [root@nfs-server ~]# showmount -e localhost
- Export list for localhost:
- /data 192.168.31.*
最好服务端自己挂载自己看看是否成功。
- [root@nfs-server ~]# mount -t nfs 192.168.31.129:/data /mnt
- [root@nfs-server ~]# df -h
- Filesystem Size Used Avail Use% Mounted on
- /dev/sda3 7.1G 1.4G 5.4G 21% /
- tmpfs 497M 0 497M 0% /dev/shm
- /dev/sda1 190M 27M 153M 15% /boot
- 192.168.31.129:/data 7.1G 1.4G 5.4G 21% /mnt
这一步主要是检查服务端的NFS服务是不是正常的。
2、确认NFS客户端showmount是否正常。
- [root@web-lamp01 ~]# showmount -e 192.168.31.129
- Export list for 192.168.31.129:
- /data 192.168.31.*
如果有问题进行下面排查。
1)ping NFS服务端IP检查
- [root@web-lamp01 ~]# ping 192.168.31.129
- PING 192.168.31.129 (192.168.31.129) 56(84) bytes of data.
- 64 bytes from 192.168.31.129: icmp_seq=1 ttl=64 time=1.40 ms
- 64 bytes from 192.168.31.129: icmp_seq=2 ttl=64 time=0.392 ms
2)telnet NFS服务端IP端口检查
- [root@web-lamp01 ~]# telnet 192.168.31.129 111
- Trying 192.168.31.129...
- Connected to 192.168.31.129.
- Escape character is '^]'.
如果出现No route to host很有可能是服务端防火墙引起。
此外,还需要注意服务端RPC服务启动顺序问题。
/etc/init.d/rpcbind start
rpcinfo -p localhost
/etc/init.d/nfs start
rpcinfo -p localhost
NFS配置参数权限
NFS配置文件权限参数说明
NFS服务器端的权限设置,即/etc/exports文件配置格式中小括号的参数。
- [root@nfs-server ~]# cat /etc/exports
- /data 192.168.31.*(rw,sync)
|
参数名称 |
参数用途 |
|
rw |
read-write,表示可读写权限* |
|
ro |
read-only,表示只读权限 |
|
sync |
请求或写入数据时,数据同步写入到NFS Server的硬盘后才返回。数据安全不会丢,缺点,性能下降。 |
|
async |
请求或写入数据是,先返回请求,再将数据写入到内存缓存和硬盘中,即异步写入数据。此参数可以提升NFS性能,但是会降低数据的安全。因此,一般情况下建议不用,如果NFS处于瓶颈状态,并且运行数据丢失的话可以打开此参数提升NFS性能。写入时数据会先写到内存缓冲区,等硬盘有空档再写入磁盘,这样可以提升写入效率,风险若服务器宕机或不正常关机,会损失缓冲区中未写入磁盘的数据(解决办法:服务器主板电池或加UPS不间断电源)。(电商秒杀是异步) |
|
no_root_squash |
访问NFS Server共享目录的用户如果是root的话,它对该共享目录具有root权限。这个配置原本为无盘客户端准备的。用户应避免使用。 |
|
root_squash |
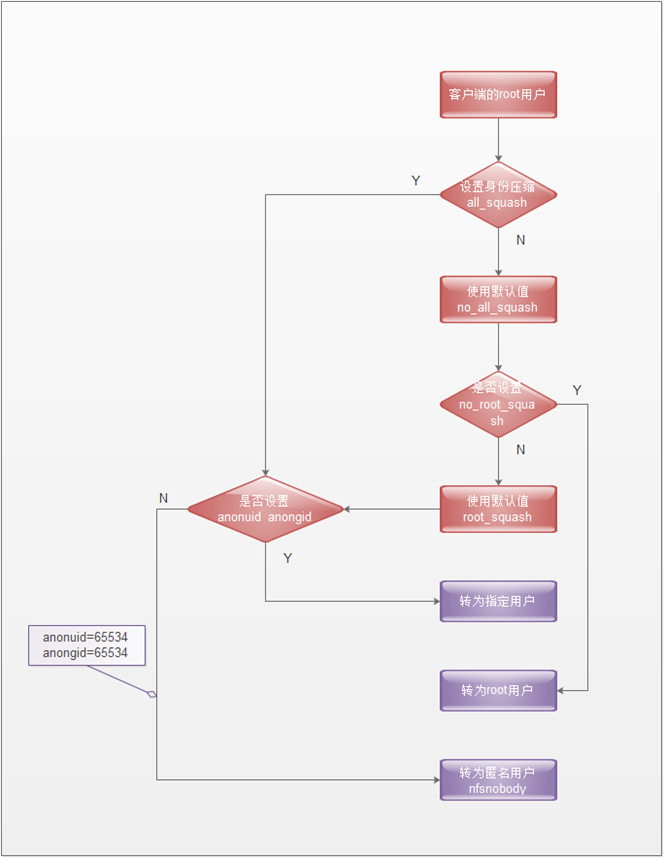
对于访问NFS Server共享目录的用户如果是root的话,则它的权限将被压缩成匿名用户,同时它的UID和GID通常会变成nfsnobody账号身份 |
|
all_squash |
不管访问NFS Server共享目录的用户身份如何,它的权限都被压缩成匿名用户,同时它的UID和GID都会变成nfsnobody账号身份。在早期多个NFS客户端同时读写NFS Server数据时,这个参数很有用。* |
|
anonuid |
参数以anon*开头即值anonymous匿名用户,这个用户的UID设置值通常为nfsnobody的UID值,当然我们也可以自行设置这个UID值。但是,UID必须存在于/etc/passwd中。在多个NFS Clients时,如多台web server共享一个NFS目录时,通过这个参数可以使得不同的NFS Clients写入的数据对所有NFS Clients保持同样的用户权限,即为配置的匿名UID对应用户权限,这个参数很有用。* |
|
anongid |
同anonuid,区别是把uid(用户id)换成gid(组id)。 |
推荐使用配置。
- [root@nfs-server ~]# cat /etc/exports
- /data 192.168.31.0/24(rw,sync,all_squash)
- [root@nfs-server ~]# exportfs -rv
- exporting 192.168.31.0/24:/data

NFS服务总结
使得NFS Client端可写的服务端配置条件
当多个NFS客户端以NFS方式写入修改服务器端的文件系统时,需要具有以下权限:
1、NFS服务器/etc/exports设置需要开放可写入的权限,即服务端的共享权限。
2、NFS服务器实际要共享的NFS目录权限具有可写入w的权限,即服务端本地目录的安全权限。
3、每台机器都对应存在和nfs默认配置UID的相同UID65534的nfsnobody用户(确保所有客户端的访问权限统一,否则每个机器需要同时建立相同UID的用户,并覆盖NFS的默认配置)。
当满足三个条件,多个NFS客户端才能具有互相写入,互相修改其他主机写入文件的权限。
NFS服务重要文件说明
/etc/exports
NFS服务主配置文件,配置NFS具体共享服务的地点,默认内容为空,以行为单位。
- [root@nfs-server ~]# cat /etc/exports
- /data 192.168.31.0/24(rw,sync,all_squash)
/usr/sbin/exportfs
NFS服务的管理命令。例如,可以加载NFS配置生效,还可以直接配置NFS共享目录,即无需配置/etc/exports实现共享。
- [root@nfs-server ~]# exportfs –rv #加载配置生效,等价于重启/etc/init.d/nfs reload
- exporting 192.168.31.0/24:/data
exportfs不但可以加载配置生效,也可以通过命令直接共享目录。越过/etc/exports,但重启失效。
/usr/sbin/showmount
常用在客户端,查看NFS配置及挂载结果的命令。配置nfsserver,分别在服务端以及客户端查看挂载情况。
/var/lib/nfs/etab
NFS配置文件的完整参数设定的文件(有很多没有配置但是默认就有的NFS参数)。
- [root@nfs-server ~]# cat /var/lib/nfs/etab
- /data 192.168.31.0/24(rw,sync,wdelay,hide,nocrossmnt,secure,root_squash,all_squash,no_subtree_check,secure_locks,acl,anonuid=65534,anongid=65534,sec=sys,rw,root_squash,all_squash)
/proc/mounts
客户端挂载参数
- [root@web-lamp01 ~]# cat /proc/mounts
- rootfs / rootfs rw 0 0
- proc /proc proc rw,relatime 0 0
- sysfs /sys sysfs rw,relatime 0 0
- devtmpfs /dev devtmpfs rw,relatime,size=496952k,nr_inodes=124238,mode=755 0 0
- devpts /dev/pts devpts rw,relatime,gid=5,mode=620,ptmxmode=000 0 0
- tmpfs /dev/shm tmpfs rw,relatime 0 0
- /dev/sda3 / ext4 rw,relatime,barrier=1,data=ordered 0 0
- /proc/bus/usb /proc/bus/usb usbfs rw,relatime 0 0
- /dev/sda1 /boot ext4 rw,relatime,barrier=1,data=ordered 0 0
- none /proc/sys/fs/binfmt_misc binfmt_misc rw,relatime 0 0
- sunrpc /var/lib/nfs/rpc_pipefs rpc_pipefs rw,relatime 0 0
- 192.168.31.129:/data/ /mnt nfs4 rw,relatime,vers=4,rsize=131072,wsize=131072,namlen=255,hard,proto=tcp,port=0,timeo=600,retrans=2,sec=sys,clientaddr=192.168.31.130,minorversion=0,local_lock=none,addr=192.168.31.129 0 0
NFS客户端mount挂载命令
NFS客户端挂载的命令
|
挂载命令 |
挂载的格式类型 |
NFS服务器提供的共享目录 |
NFS客户端要挂载的目录 |
|
mount |
-t nfs |
192.168.31.129:/data |
/mnt(必须存在) |
|
完整挂载命令为:mount -t nfs 192.168.31.129:/data /mnt |
|||
执行挂载的过程
- [root@web-lamp01 ~]# showmount -e 192.168.31.129 #挂载前先检查有权限需要挂载的信息是否能够挂载
- Export list for 192.168.31.129:
- /data 192.168.31.0/24 #可以清晰的看到共享了/data目录
- [root@web-lamp01 ~]# mount -t nfs 192.168.31.129:/data /mnt #执行挂载命令
- [root@web-lamp01 ~]# df –h #查看挂载后的结果
- Filesystem Size Used Avail Use% Mounted on
- /dev/sda3 7.1G 1.4G 5.4G 21% /
- tmpfs 497M 0 497M 0% /dev/shm
- /dev/sda1 190M 27M 153M 16% /boot
- 192.168.31.129:/data 7.1G 1.4G 5.4G 21% /mnt
- [root@web-lamp01 ~]# mount #查看挂载后的结果
- /dev/sda3 on / type ext4 (rw)
- proc on /proc type proc (rw)
- sysfs on /sys type sysfs (rw)
- devpts on /dev/pts type devpts (rw,gid=5,mode=620)
- tmpfs on /dev/shm type tmpfs (rw)
- /dev/sda1 on /boot type ext4 (rw)
- none on /proc/sys/fs/binfmt_misc type binfmt_misc (rw)
- sunrpc on /var/lib/nfs/rpc_pipefs type rpc_pipefs (rw)
- 192.168.31.129:/data on /mnt type nfs (rw,vers=4,addr=192.168.31.129,clientaddr=192.168.31.130)
- [root@web-lamp01 ~]# grep mnt /proc/mounts #查看挂载后的结果
- 192.168.31.129:/data/ /mnt nfs4 rw,relatime,vers=4,rsize=131072,wsize=131072,namlen=255,hard,proto=tcp,port=0,timeo=600,retrans=2,sec=sys,clientaddr=192.168.31.130,minorversion=0,local_lock=none,addr=192.168.31.129 0 0
NFS客户端mount挂载深入
NFS客户端mount挂载参数说明
在NFS服务端可以通过cat /var/lib/nfs/etab查看NFS服务端配置的参数细节。
在NFS客户端可以通过cat /proc/mounts查看mount的挂载参数细节。
NFS Client mount挂载参数列表
|
参数 |
参数功能 |
默认参数 |
|
fg bg |
当在客户端执行挂载时,可选择是前台fg还是在后台bg执行。若在前台执行,则mount会持续尝试挂载,直到成功或挂载时间超时为止,若在后台执行,则mount会在后台持续多次进行mount,而不会影响到前台的其它程序操作。如果网络联机不稳定,或是服务器常常需要开关机,建议使用bg比较好。 |
fg |
|
soft hard |
当NFS Client以soft挂载Server后,若网络或Server出现问题,造成Client和Server无法传输资料时,Client会一直尝试到timeout后显示错误并且停止尝试。若使用soft mount的话,可能会在timeout出现时造成资料丢失,一般不建议使用。 若用hard模式挂载硬盘时,刚好和soft相反,此时Client会一直尝试连线到Server,若Server有回应就继续刚才的操作,若没有回应NFS Client会一直尝试,此时无法umount或kill,所以常常会配合intr使用。 |
hard |
|
intr |
当使用hard挂载的资源timeout后,若有指定intr参数,可以在timeout后把它中断掉,这避免出问题时系统整个被NFS锁死。 |
无 |
|
rsize wsize |
读出(rsize)与写入(wrize)的区块大小(block size),这个设置值可以影响客户端与服务端传输数据的缓冲存储量,一般来说,如果在局域网内(LAN),并且客户端与服务端都具有足够的内存,这个值可以设置大一点(65535bytes),提升缓冲区块将可提升NFS文件系统的传输能力。但设置的值也不能太大,最好是实现网络能够传输的最大值为限。 |
CentOS 5:默认1024 CentOS 6:默认131072 |
|
proto=udp |
使用UDP协议来传输资料,在LAN中会有比较好的性能。若要跨越Internet的话,使用proto=tcp多传输的数据会有比较好的纠错能力 |
proto=tcp |
man nfs查看上述信息。
优化:
- [root@web-lamp01 ~]# mount -t nfs -o bg,hard,intr,rsize=131072,wsize=131072 192.168.31.129:/data /mnt
下面是mount -o参数对应的选项列表
|
参数 |
参数意义 |
默认值 |
|
suid nosuid |
当挂载的文件系统上有任何SUID的程序时,只要使用nosuid就能够取消设置SUID的功能。 |
suid |
|
rw ro |
可以指定文件系统是只读ro或可写rw |
rw |
|
dev nodev |
是否可以保留装置文件的特殊功能,一般来说只有/dev才有特殊的装置,因此可以选择nodev |
dev |
|
exec noexec |
是否具有执行文件的权限,如果想要挂载的仅仅是普通资源数据区(例如图片、附件),可以选择noexec |
exec |
|
user nouser |
是否允许用户进行文件的挂载与卸载功能,如果要保护文件系统,最好不要提供用户选择挂载与卸载 |
nouser |
|
auto noauto |
这个auto指的是"mount -a"时会不会被挂载的项目,如果不需要这个分区随时被挂载,可设置为noauto |
auto |
NFS客户端mount挂载优化
在企业工作场景,一般来说,NFS服务器共享的只是普通静态数据(图片、附件、视频),不需要执行suid、exec等权限,挂载的这类文件系统只能作为数据存取之用,无法执行程序,对于客户端来讲增加了安全性。例如,很多木马篡改站点文件都是由上传入口上传的程序到存储目录,然后执行的。
因此在挂载的时候用下面的命令很有必要。
mount安全挂载参数
mount -t nfs -o nosuid,noexec,nodev,rw 192.168.31.129:/data /mnt
通过mount -o指定挂载参数和在/etc/fstab里指定挂载参数效果是一样的。
mount挂载性能优化参数选项
1、禁止更新目录及文件时间戳挂载
mount -t nfs -o noatime,nodiratime 192.168.31.129:/data /mnt
2、安全加优化的挂载方式
mount -t nfs -o nosuid,noexec,nodev,noatime,nodiratime,intr,rsize=131072,wsize=131072 192.168.31.129:/data /mnt
3、默认的挂载方式(推荐)
mount -t nfs 192.168.31.129:/data /mnt
如果是本地文件系统
mount /dev/sdb1 /mnt -o defaults,async,noatime,data=writeback,barrier=0
NFS服务内核优化
优化选项说明:
1、/proc/sys/net/core/rmem_default
该文件指定了接收套接字缓冲区大小的缺失值(以字节为单位),缺省设置:124928。
2、/proc/sys/net/core/rmem_max
该文件指定了接收套接字缓冲区大小的最大值(以字节为单位),缺省设置:124928。
3、/proc/sys/net/core/wmem_default
该文件指定了发送套接字缓冲区大小的缺失值(以字节为单位),缺省设置:124928。
4、/proc/sys/net/core/wmem_max
该文件指定了发送套接字缓冲区大小的最大值(以字节为单位),缺省设置:124928。
上述文件对应的具体内核优化命令:
- cat >>/etc/sysctl.conf<<EOF
- net.core.wmem_default=8388608
- net.core.wmem_max=16777216
- net.core.rmem_datault=8388608
- net.core.rmem_max=16777216
- EOF
- sysctl -p
企业场景NFS共享存储优化小结
1、硬件:sas、ssd硬盘,买多块,raid0、raid10。网卡吞吐量要大,至少千兆
2、NFS服务器端配置:/data
192.168.31.0/24(rw,sync,all_squash,anonuid=65534,anongid=65534)
3、NFS客户端挂载:rsize、wsize、noatime、nodirtime、nosuid、noexec、soft(hard、intr)
mount -t nfs -o nosuid,noexec,nodev,noatime,rsize=131072,wsize=131072 192.168.31.129:/data /mnt
mount -t nfs -o noatime,nodiratime,rsize=131072,wsize=131072 192.168.31.129:/data /mnt
mount -t nfs -o noatime,nodiratime 192.168.31.129:/data /mnt
4、有关NFS服务的所有服务器内核优化
- cat >>/etc/sysctl.conf<<EOF
- net.core.wmem_default=8388608
- net.core.wmem_max=16777216
- net.core.rmem_datault=8388608
- net.core.rmem_max=16777216
- EOF
- sysctl -p
5、如果卸载的时候提示:umount:/mnt:device is busy,需要退出挂载目录后进行卸载,或是NFS Server宕机了,需要强制卸载mount -lf /mnt。
6、大型网站NFS网络文件系统替代软件,分布式文件系统Moosefs(mfs)、glusterfs、FastDFS。
NFS系统应用优缺点说明
作用:
NFS服务可以让不同的客户端挂载使用同一目录,作为共享存储使用,这样可以保证不同节点客户端数据的一致性,在集群架构环境中经常会用到。如果windows+linux可以用samba。
优点:
1、简单,容易上手,容易掌握。
2、NFS文件系统内数据是在文件系统之上的,即数据能看见。
3、方便,部署快速,维护简单,可控且满足需求。
4、可靠,从软件层面上看,数据可靠性高,经久耐用。数据是在文件系统之上的
5、稳定。
局限:
1、局限性是存在单点故障,如果nfs server宕机了所有客户端都不能访问共享目录
可以通过负载均衡及高可用方案弥补。
2、在大数据高并发的场合,NFS效率、性能有限(一般几千万pv的网站不是瓶颈,除非网站架构太差,2千万pv/日)。
3、客户端认证是基于ip和主机名的,权限是根据ID识别,安全性一般(用于内外则问题不大)。
4、NFS数据是明文的,NFS本身对数据完整性不作验证。
5、多台客户机器挂载一个NFS服务器时,连接管理维护麻烦(耦合度高)。尤其NFS服务出现问题后,所有NFS客户端都挂掉状态(测试环境可以使用autofs自动挂载解决)。
6、大中小型网站(2千万PV以下)线上应用,都有用武之地。
showmount命令说明
|
短格式 |
长格式 |
用途及实例结果 |
|
-e |
--exports |
显示NFS服务器输出的目录列表 [root@web-lamp01 ~]# showmount -e 192.168.31.129 Export list for 192.168.31.129: /data 192.168.31.0/24 |
|
-d |
--directories |
显示NFS服务器中提供共享的目录 |
|
-a |
--all |
以ip:/die格式显示NFS服务器的ip和可被挂载的目录 |
网络文件系统NFS的更多相关文章
- Linux下网络文件系统NFS服务搭建易错点总结
一.环境准备: 1 [root@czh ~]# cat /etc/redhat-release 2 CentOS release 6.7 (Final) 3 [root@czh ~]# uname - ...
- 网络文件系统(NFS)简介
网络文件系统(Network File System, NFS)是一种分布式文件系统协议,最初由Sun Microsystems公司开发,并于1984年发布.其功能旨在允许客户端主机可以像访问本地存储 ...
- Centos 7网络文件系统nfs服务的安装与配置
实验环境>>>>>>>>> nfs服务端:(nfs-server)192.168.100.2 nfs客户端:(nfs-client)192.168 ...
- Linux网络文件系统NFS详解
什么是文件系统,NFS文件系统又是什么? 简单的说,文件系统就是通过软件对磁盘上的数据进行组织和管理的一种机制,对其的一种封装或透视. 你女朋友拍了美美的暧昧照片,放一个文件夹里发送给了A服务器,当你 ...
- 网络文件系统-NFS
1. 什么是NFS NFS是 Network File System 的缩写,即网络文件系统.一种使用于分散式文件系统的协议,有Sun公司开发,于1984年向外公布.功能是通过网络让不同的机器.不同的 ...
- NFS的安装以及windows/linux挂载linux网络文件系统NFS
1.创建linux的NFS服务端安装centos6.4,关闭防火墙/etc/init.d/iptables status yum install nfs-utils rpcbind [root@lin ...
- 网络文件系统nfs文件系统使用(很全面)
一.NFS简介 1.NFS就是Network FileSystem的缩写,它的最大功能就是可以通过网络让不同的机器,不同的操作系统彼此共享文件(sharefiles)——可以通过NFS挂载远程主机的目 ...
- 网络文件系统nfs文件系统使用(比较全面)
一.NFS简介 1.NFS就是Network FileSystem的缩写,它的最大功能就是可以通过网络让不同的机器,不同的操作系统彼此共享文件(sharefiles)——可以通过NFS挂载远程主机的目 ...
- 网络文件系统nfs在ubuntu16.04的安装
1.搜索nfs-sudo apt-cache search nfs- 2.安装sudo apt-get install nfs-kernel-server 3.配置:/etc/exports /hom ...
随机推荐
- freebsd安装python2
第一步 cd /usr/ports/lang/python27 第二步 输入以下命令(需要联网) make make install 到此如果输入python无效 继续 第三步 cd /usr/ ...
- nginx的白名单
为nginx设置白名单的几个步骤: 第一步:指定能访问的白名单 vim /etc/nginx/ip.conf (如果在公司,记得这里是外网IP,要不然测很久都不知道为什么不行) ; 第二步 ...
- pac4j探索(一)之buji-pac4j shiro整合Cas实现单点登录
https://blog.csdn.net/hxm_code/article/details/79181218 https://blog.csdn.net/hxm_code/article/detai ...
- QQ群成员发言次数统计(正则表达式版)
1.先将QQ群的消息记录以.txt文件格式导出来,保存路径及名称自己定义(在本文我导出到Y盘,命名为test.txt) 2.程序如下: data statistics1; if _n_=1 then ...
- tomcat的 tomcat-user.xml
http://blog.csdn.net/asdeak/article/details/1879284 很多个tomcat因为在缺少 " <role rolename="m ...
- Linux Bash Shell字符串分割substring等(转)
原文https://blog.csdn.net/wuyinggui10000/article/details/52779364 脚本开发中遇到的问题是:原java中的字符串分割操作(substring ...
- Bootstrap 前端UI框架
Bootstrap 有哪些优越性? 1.简单灵活的用于搭建WEB页面的HTML,CSS, JavaScript的工具集 2.基于html5, css3, 具有良好特性,友好的学习曲线,卓越的兼容性,1 ...
- 记一次sshd启动报错,Failed to start OpenSSH server daemon.
sshd -t [root@mysql5-slave proj]# sshd -t @@@@@@@@@@@@@@@@@@@@@@@@@@@@@@@@@@@@@@@@@@@@@@@@@@@@@@@@@@ ...
- Numpy学习笔记(一)
(1)NumPy的核心对象 ndarray 用于表示N 维数组类型.它描述相同类型的元素集合. 可以使用基于零的索引访问集合中的项目. (2)Ndarray的创建 可以使用numpy.array() ...
- [HNOI2012]射箭(计算几何)
设抛物线方程\(y = ax^2 + bx\), 那么对于一个靶子\((x_i,y_{down},y_{up})\)我们需要满足的条件就是 \(\frac{y_{down}}{x_i} \leq ax ...
