彻底搞懂kubernetes调度框架与插件
调度框架 [1]
本文基于 kubernetes 1.24 进行分析
调度框架(Scheduling Framework)是Kubernetes 的调度器 kube-scheduler 设计的的可插拔架构,将插件(调度算法)嵌入到调度上下文的每个扩展点中,并编译为 kube-scheduler
在 kube-scheduler 1.22 之后,在 pkg/scheduler/framework/interface.go 中定义了一个 Plugin 的 interface,这个 interface 作为了所有插件的父级。而每个未调度的 Pod,Kubernetes 调度器会根据一组规则尝试在集群中寻找一个节点。
type Plugin interface {Name() string}
下面会对每个算法是如何实现的进行分析
在初始化 scheduler 时,会创建一个 profile,profile是关于 scheduler 调度配置相关的定义
func New(client clientset.Interface,...profiles, err := profile.NewMap(options.profiles, registry, recorderFactory, stopCh,frameworkruntime.WithComponentConfigVersion(options.componentConfigVersion),frameworkruntime.WithClientSet(client),frameworkruntime.WithKubeConfig(options.kubeConfig),frameworkruntime.WithInformerFactory(informerFactory),frameworkruntime.WithSnapshotSharedLister(snapshot),frameworkruntime.WithPodNominator(nominator),frameworkruntime.WithCaptureProfile(frameworkruntime.CaptureProfile(options.frameworkCapturer)),frameworkruntime.WithClusterEventMap(clusterEventMap),frameworkruntime.WithParallelism(int(options.parallelism)),frameworkruntime.WithExtenders(extenders),)if err != nil {return nil, fmt.Errorf("initializing profiles: %v", err)}if len(profiles) == 0 {return nil, errors.New("at least one profile is required")}....}
关于 profile 的实现,则为 KubeSchedulerProfile,也是作为 yaml生成时传入的配置
// KubeSchedulerProfile 是一个 scheduling profile.type KubeSchedulerProfile struct {// SchedulerName 是与此配置文件关联的调度程序的名称。// 如果 SchedulerName 与 pod “spec.schedulerName”匹配,则使用此配置文件调度 pod。SchedulerName string// Plugins指定应该启用或禁用的插件集。// 启用的插件是除了默认插件之外应该启用的插件。禁用插件应是禁用的任何默认插件。// 当没有为扩展点指定启用或禁用插件时,将使用该扩展点的默认插件(如果有)。// 如果指定了 QueueSort 插件,/// 则必须为所有配置文件指定相同的 QueueSort Plugin 和 PluginConfig。// 这个Plugins展现的形式则是调度上下文中的所有扩展点(这是抽象),实际中会表现为多个扩展点Plugins *Plugins// PluginConfig 是每个插件的一组可选的自定义插件参数。// 如果省略PluginConfig参数等同于使用该插件的默认配置。PluginConfig []PluginConfig}
对于 profile.NewMap 就是根据给定的配置来构建这个framework,因为配置可能是存在多个的。而 Registry 则是所有可用插件的集合,内部构造则是 PluginFactory ,通过函数来构建出对应的 plugin
func NewMap(cfgs []config.KubeSchedulerProfile, r frameworkruntime.Registry, recorderFact RecorderFactory,stopCh <-chan struct{}, opts ...frameworkruntime.Option) (Map, error) {m := make(Map)v := cfgValidator{m: m}for _, cfg := range cfgs {p, err := newProfile(cfg, r, recorderFact, stopCh, opts...)if err != nil {return nil, fmt.Errorf("creating profile for scheduler name %s: %v", cfg.SchedulerName, err)}if err := v.validate(cfg, p); err != nil {return nil, err}m[cfg.SchedulerName] = p}return m, nil}// newProfile 给的配置构建出一个profilefunc newProfile(cfg config.KubeSchedulerProfile, r frameworkruntime.Registry, recorderFact RecorderFactory,stopCh <-chan struct{}, opts ...frameworkruntime.Option) (framework.Framework, error) {recorder := recorderFact(cfg.SchedulerName)opts = append(opts, frameworkruntime.WithEventRecorder(recorder))return frameworkruntime.NewFramework(r, &cfg, stopCh, opts...)}
可以看到最终返回的是一个 Framework 。那么来看下这个 Framework
Framework 是一个抽象,管理着调度过程中所使用的所有插件,并在调度上下文中适当的位置去运行对应的插件
type Framework interface {Handle// QueueSortFunc 返回对调度队列中的 Pod 进行排序的函数// 也就是less,在Sort打分阶段的打分函数QueueSortFunc() LessFunc// RunPreFilterPlugins 运行配置的一组PreFilter插件。// 如果这组插件中,任何一个插件失败,则返回 *Status 并设置为non-success。// 如果返回状态为non-success,则调度周期中止。// 它还返回一个 PreFilterResult,它可能会影响到要评估下游的节点。RunPreFilterPlugins(ctx context.Context, state *CycleState, pod *v1.Pod) (*PreFilterResult, *Status)// RunPostFilterPlugins 运行配置的一组PostFilter插件。// PostFilter 插件是通知性插件,在这种情况下应配置为先执行并返回 Unschedulable 状态,// 或者尝试更改集群状态以使 pod 在未来的调度周期中可能会被调度。RunPostFilterPlugins(ctx context.Context, state *CycleState, pod *v1.Pod, filteredNodeStatusMap NodeToStatusMap) (*PostFilterResult, *Status)// RunPreBindPlugins 运行配置的一组 PreBind 插件。// 如果任何一个插件返回错误,则返回 *Status 并且code设置为non-success。// 如果code为“Unschedulable”,则调度检查失败,// 则认为是内部错误。在任何一种情况下,Pod都不会被bound。RunPreBindPlugins(ctx context.Context, state *CycleState, pod *v1.Pod, nodeName string) *Status// RunPostBindPlugins 运行配置的一组PostBind插件RunPostBindPlugins(ctx context.Context, state *CycleState, pod *v1.Pod, nodeName string)// RunReservePluginsReserve运行配置的一组Reserve插件的Reserve方法。// 如果在这组调用中的任何一个插件返回错误,则不会继续运行剩余调用的插件并返回错误。// 在这种情况下,pod将不能被调度。RunReservePluginsReserve(ctx context.Context, state *CycleState, pod *v1.Pod, nodeName string) *Status// RunReservePluginsUnreserve运行配置的一组Reserve插件的Unreserve方法。RunReservePluginsUnreserve(ctx context.Context, state *CycleState, pod *v1.Pod, nodeName string)// RunPermitPlugins运行配置的一组Permit插件。// 如果这些插件中的任何一个返回“Success”或“Wait”之外的状态,则它不会继续运行其余插件并返回错误。// 否则,如果任何插件返回 “Wait”,则此函数将创建等待pod并将其添加到当前等待pod的map中,// 并使用“Wait” code返回状态。 Pod将在Permit插件返回的最短持续时间内保持等待pod。RunPermitPlugins(ctx context.Context, state *CycleState, pod *v1.Pod, nodeName string) *Status// 如果pod是waiting pod,WaitOnPermit 将阻塞,直到等待的pod被允许或拒绝。WaitOnPermit(ctx context.Context, pod *v1.Pod) *Status// RunBindPlugins运行配置的一组bind插件。 Bind插件可以选择是否处理Pod。// 如果 Bind 插件选择跳过binding,它应该返回 code=5("skip")状态。// 否则,它应该返回“Error”或“Success”。// 如果没有插件处理绑定,则RunBindPlugins返回code=5("skip")的状态。RunBindPlugins(ctx context.Context, state *CycleState, pod *v1.Pod, nodeName string) *Status// 如果至少定义了一个filter插件,则HasFilterPlugins返回trueHasFilterPlugins() bool// 如果至少定义了一个PostFilter插件,则HasPostFilterPlugins返回 true。HasPostFilterPlugins() bool// 如果至少定义了一个Score插件,则HasScorePlugins返回 true。HasScorePlugins() bool// ListPlugins将返回map。key为扩展点名称,value则是配置的插件列表。ListPlugins() *config.Plugins// ProfileName则是与profile name关联的frameworkProfileName() string}
而实现这个抽象的则是 frameworkImpl;frameworkImpl 是初始化与运行 scheduler plugins 的组件,并在调度上下文中会运行这些扩展点
type frameworkImpl struct {registry RegistrysnapshotSharedLister framework.SharedListerwaitingPods *waitingPodsMapscorePluginWeight map[string]intqueueSortPlugins []framework.QueueSortPluginpreFilterPlugins []framework.PreFilterPluginfilterPlugins []framework.FilterPluginpostFilterPlugins []framework.PostFilterPluginpreScorePlugins []framework.PreScorePluginscorePlugins []framework.ScorePluginreservePlugins []framework.ReservePluginpreBindPlugins []framework.PreBindPluginbindPlugins []framework.BindPluginpostBindPlugins []framework.PostBindPluginpermitPlugins []framework.PermitPluginclientSet clientset.InterfacekubeConfig *restclient.ConfigeventRecorder events.EventRecorderinformerFactory informers.SharedInformerFactorymetricsRecorder *metricsRecorderprofileName stringextenders []framework.Extenderframework.PodNominatorparallelizer parallelize.Parallelizer}
那么来看下 Registry ,Registry 是作为一个可用插件的集合。framework 使用 registry 来启用和对插件配置的初始化。在初始化框架之前,所有插件都必须在注册表中。表现形式就是一个 map[];key 是插件的名称,value是 PluginFactory 。
type Registry map[string]PluginFactory
而在 pkg\scheduler\framework\plugins\registry.go 中会将所有的 in-tree plugin 注册进来。通过 NewInTreeRegistry 。后续如果还有插件要注册,可以通过 WithFrameworkOutOfTreeRegistry 来注册其他的插件。
func NewInTreeRegistry() runtime.Registry {fts := plfeature.Features{EnableReadWriteOncePod: feature.DefaultFeatureGate.Enabled(features.ReadWriteOncePod),EnableVolumeCapacityPriority: feature.DefaultFeatureGate.Enabled(features.VolumeCapacityPriority),EnableMinDomainsInPodTopologySpread: feature.DefaultFeatureGate.Enabled(features.MinDomainsInPodTopologySpread),EnableNodeInclusionPolicyInPodTopologySpread: feature.DefaultFeatureGate.Enabled(features.NodeInclusionPolicyInPodTopologySpread),}return runtime.Registry{selectorspread.Name: selectorspread.New,imagelocality.Name: imagelocality.New,tainttoleration.Name: tainttoleration.New,nodename.Name: nodename.New,nodeports.Name: nodeports.New,nodeaffinity.Name: nodeaffinity.New,podtopologyspread.Name: runtime.FactoryAdapter(fts, podtopologyspread.New),nodeunschedulable.Name: nodeunschedulable.New,noderesources.Name: runtime.FactoryAdapter(fts, noderesources.NewFit),noderesources.BalancedAllocationName: runtime.FactoryAdapter(fts, noderesources.NewBalancedAllocation),volumebinding.Name: runtime.FactoryAdapter(fts, volumebinding.New),volumerestrictions.Name: runtime.FactoryAdapter(fts, volumerestrictions.New),volumezone.Name: volumezone.New,nodevolumelimits.CSIName: runtime.FactoryAdapter(fts, nodevolumelimits.NewCSI),nodevolumelimits.EBSName: runtime.FactoryAdapter(fts, nodevolumelimits.NewEBS),nodevolumelimits.GCEPDName: runtime.FactoryAdapter(fts, nodevolumelimits.NewGCEPD),nodevolumelimits.AzureDiskName: runtime.FactoryAdapter(fts, nodevolumelimits.NewAzureDisk),nodevolumelimits.CinderName: runtime.FactoryAdapter(fts, nodevolumelimits.NewCinder),interpodaffinity.Name: interpodaffinity.New,queuesort.Name: queuesort.New,defaultbinder.Name: defaultbinder.New,defaultpreemption.Name: runtime.FactoryAdapter(fts, defaultpreemption.New),}}
这里插入一个题外话,关于 in-tree plugin
在这里没有找到关于,kube-scheduler ,只是找到有关的概念,大概可以解释为,in-tree表示为随kubernetes官方提供的二进制构建的 plugin 则为
in-tree,而独立于kubernetes代码库之外的为out-of-tree[3] 。这种情况下,可以理解为,AA则是out-of-tree而Pod,DeplymentSet等是in-tree。
接下来回到初始化 scheduler ,在初始化一个 scheduler 时,会通过NewInTreeRegistry 来初始化
func New(client clientset.Interface,....registry := frameworkplugins.NewInTreeRegistry()if err := registry.Merge(options.frameworkOutOfTreeRegistry); err != nil {return nil, err}...profiles, err := profile.NewMap(options.profiles, registry, recorderFactory, stopCh,frameworkruntime.WithComponentConfigVersion(options.componentConfigVersion),frameworkruntime.WithClientSet(client),frameworkruntime.WithKubeConfig(options.kubeConfig),frameworkruntime.WithInformerFactory(informerFactory),frameworkruntime.WithSnapshotSharedLister(snapshot),frameworkruntime.WithPodNominator(nominator),frameworkruntime.WithCaptureProfile(frameworkruntime.CaptureProfile(options.frameworkCapturer)),frameworkruntime.WithClusterEventMap(clusterEventMap),frameworkruntime.WithParallelism(int(options.parallelism)),frameworkruntime.WithExtenders(extenders),)...}
接下来在调度上下文 scheduleOne 中 schedulePod 时,会通过 framework 调用对应的插件来处理这个扩展点工作。具体的体现在,pkg\scheduler\schedule_one.go 中的预选阶段
func (sched *Scheduler) schedulePod(ctx context.Context, fwk framework.Framework, state *framework.CycleState, pod *v1.Pod) (result ScheduleResult, err error) {trace := utiltrace.New("Scheduling", utiltrace.Field{Key: "namespace", Value: pod.Namespace}, utiltrace.Field{Key: "name", Value: pod.Name})defer trace.LogIfLong(100 * time.Millisecond)if err := sched.Cache.UpdateSnapshot(sched.nodeInfoSnapshot); err != nil {return result, err}trace.Step("Snapshotting scheduler cache and node infos done")if sched.nodeInfoSnapshot.NumNodes() == 0 {return result, ErrNoNodesAvailable}feasibleNodes, diagnosis, err := sched.findNodesThatFitPod(ctx, fwk, state, pod)if err != nil {return result, err}trace.Step("Computing predicates done")
与其他扩展点部分,在调度上下文 scheduleOne 中可以很好的看出,功能都是 framework 提供的。
func (sched *Scheduler) scheduleOne(ctx context.Context) {...scheduleResult, err := sched.SchedulePod(schedulingCycleCtx, fwk, state, pod)...// Run the Reserve method of reserve plugins.if sts := fwk.RunReservePluginsReserve(schedulingCycleCtx, state, assumedPod, scheduleResult.SuggestedHost); !sts.IsSuccess() {}...// Run "permit" plugins.runPermitStatus := fwk.RunPermitPlugins(schedulingCycleCtx, state, assumedPod, scheduleResult.SuggestedHost)// One of the plugins returned status different than success or wait.fwk.RunReservePluginsUnreserve(schedulingCycleCtx, state, assumedPod, scheduleResult.SuggestedHost)...// bind the pod to its host asynchronously (we can do this b/c of the assumption step above).go func() {...waitOnPermitStatus := fwk.WaitOnPermit(bindingCycleCtx, assumedPod)if !waitOnPermitStatus.IsSuccess() {...// trigger un-reserve plugins to clean up state associated with the reserved Podfwk.RunReservePluginsUnreserve(bindingCycleCtx, state, assumedPod, scheduleResult.SuggestedHost)}// Run "prebind" plugins.preBindStatus := fwk.RunPreBindPlugins(bindingCycleCtx, state, assumedPod, scheduleResult.SuggestedHost)...// trigger un-reserve plugins to clean up state associated with the reserved Podfwk.RunReservePluginsUnreserve(bindingCycleCtx, state, assumedPod, scheduleResult.SuggestedHost)......// trigger un-reserve plugins to clean up state associated with the reserved Podfwk.RunReservePluginsUnreserve(bindingCycleCtx, state, assumedPod, scheduleResult.SuggestedHost)...// Run "postbind" plugins.fwk.RunPostBindPlugins(bindingCycleCtx, state, assumedPod, scheduleResult.SuggestedHost)...}
插件 [4]
插件(Plugins)(也可以算是调度策略)在 kube-scheduler 中的实现为 framework plugin,插件API的实现分为两个步骤:register 和 configured,然后都实现了其父方法 Plugin。然后可以通过配置(kube-scheduler --config 提供)启动或禁用插件;除了默认插件外,还可以实现自定义调度插件与默认插件进行绑定。
type Plugin interface {Name() string}// sort扩展点type QueueSortPlugin interface {PluginLess(*v1.pod, *v1.pod) bool}// PreFilter扩展点type PreFilterPlugin interface {PluginPreFilter(context.Context, *framework.CycleState, *v1.pod) error}
插件的载入过程
在 scheduler 被启动时,会 scheduler.New(cc.Client.. 这个时候会传入 profiles,整个的流如下:
NewScheduler:kubernetes/cmd/kube-scheduler/app/server.goprofile.NewMap:kubernetes/pkg/scheduler/scheduler.gonewProfile:kubernetes/pkg/scheduler/scheduler.go
frameworkruntime.NewFramework:kubernetes/pkg/scheduler/framework/runtime/framework.gopluginsNeeded:kubernetes/pkg/scheduler/framework/runtime/framework.go
NewScheduler
我们了解如何 New 一个 scheduler 即为 Setup 中去配置这些参数,
func Setup(ctx context.Context, opts *options.Options, outOfTreeRegistryOptions ...Option) (*schedulerserverconfig.CompletedConfig, *scheduler.Scheduler, error) {...// Create the scheduler.sched, err := scheduler.New(cc.Client,cc.InformerFactory,cc.DynInformerFactory,recorderFactory,ctx.Done(),scheduler.WithComponentConfigVersion(cc.ComponentConfig.TypeMeta.APIVersion),scheduler.WithKubeConfig(cc.KubeConfig),scheduler.WithProfiles(cc.ComponentConfig.Profiles...),scheduler.WithPercentageOfNodesToScore(cc.ComponentConfig.PercentageOfNodesToScore),scheduler.WithFrameworkOutOfTreeRegistry(outOfTreeRegistry),scheduler.WithPodMaxBackoffSeconds(cc.ComponentConfig.PodMaxBackoffSeconds),scheduler.WithPodInitialBackoffSeconds(cc.ComponentConfig.PodInitialBackoffSeconds),scheduler.WithPodMaxInUnschedulablePodsDuration(cc.PodMaxInUnschedulablePodsDuration),scheduler.WithExtenders(cc.ComponentConfig.Extenders...),scheduler.WithParallelism(cc.ComponentConfig.Parallelism),scheduler.WithBuildFrameworkCapturer(func(profile kubeschedulerconfig.KubeSchedulerProfile) {// Profiles are processed during Framework instantiation to set default plugins and configurations. Capturing them for loggingcompletedProfiles = append(completedProfiles, profile)}),)...}
profile.NewMap
在 scheduler.New 中,会根据配置生成profile,而 profile.NewMap 会完成这一步
func New(client clientset.Interface,...clusterEventMap := make(map[framework.ClusterEvent]sets.String)profiles, err := profile.NewMap(options.profiles, registry, recorderFactory, stopCh,frameworkruntime.WithComponentConfigVersion(options.componentConfigVersion),frameworkruntime.WithClientSet(client),frameworkruntime.WithKubeConfig(options.kubeConfig),frameworkruntime.WithInformerFactory(informerFactory),frameworkruntime.WithSnapshotSharedLister(snapshot),frameworkruntime.WithPodNominator(nominator),frameworkruntime.WithCaptureProfile(frameworkruntime.CaptureProfile(options.frameworkCapturer)),frameworkruntime.WithClusterEventMap(clusterEventMap),frameworkruntime.WithParallelism(int(options.parallelism)),frameworkruntime.WithExtenders(extenders),)...}
NewFramework
newProfile 返回的则是一个创建好的 framework
func newProfile(cfg config.KubeSchedulerProfile, r frameworkruntime.Registry, recorderFact RecorderFactory,stopCh <-chan struct{}, opts ...frameworkruntime.Option) (framework.Framework, error) {recorder := recorderFact(cfg.SchedulerName)opts = append(opts, frameworkruntime.WithEventRecorder(recorder))return frameworkruntime.NewFramework(r, &cfg, stopCh, opts...)}
最终会走到 pluginsNeeded,这里会根据配置中开启的插件而返回一个插件集,这个就是最终在每个扩展点中药执行的插件。
func (f *frameworkImpl) pluginsNeeded(plugins *config.Plugins) sets.String {pgSet := sets.String{}if plugins == nil {return pgSet}find := func(pgs *config.PluginSet) {for _, pg := range pgs.Enabled {pgSet.Insert(pg.Name)}}// 获取到所有的扩展点,找到为Enabled的插件加入到pgSetfor _, e := range f.getExtensionPoints(plugins) {find(e.plugins)}// Parse MultiPoint separately since they are not returned by f.getExtensionPoints()find(&plugins.MultiPoint)return pgSet}
插件的执行
在对插件源码部分分析,会找几个典型的插件进行分析,而不会对全部的进行分析,因为总的来说是大同小异,分析的插件有 NodePorts,NodeResourcesFit,podtopologyspread
NodePorts
这里以一个简单的插件来分析;NodePorts 插件用于检查Pod请求的端口,在节点上是否为空闲端口。
NodePorts 实现了 FilterPlugin 和 PreFilterPlugin
PreFilter 将会被 framework 中 PreFilter 扩展点被调用。
func (pl *NodePorts) PreFilter(ctx context.Context, cycleState *framework.CycleState, pod *v1.Pod) (*framework.PreFilterResult, *framework.Status) {s := getContainerPorts(pod) // 或得Pod得端口// 写入状态cycleState.Write(preFilterStateKey, preFilterState(s))return nil, nil}
Filter 将会被 framework 中 Filter 扩展点被调用。
// Filter invoked at the filter extension point.func (pl *NodePorts) Filter(ctx context.Context, cycleState *framework.CycleState, pod *v1.Pod, nodeInfo *framework.NodeInfo) *framework.Status {wantPorts, err := getPreFilterState(cycleState)if err != nil {return framework.AsStatus(err)}fits := fitsPorts(wantPorts, nodeInfo)if !fits {return framework.NewStatus(framework.Unschedulable, ErrReason)}return nil}func fitsPorts(wantPorts []*v1.ContainerPort, nodeInfo *framework.NodeInfo) bool {// 对比existingPorts 和 wantPorts是否冲突,冲突则调度失败existingPorts := nodeInfo.UsedPortsfor _, cp := range wantPorts {if existingPorts.CheckConflict(cp.HostIP, string(cp.Protocol), cp.HostPort) {return false}}return true}
New ,初始化新插件,在 register 中注册得
func New(_ runtime.Object, _ framework.Handle) (framework.Plugin, error) {return &NodePorts{}, nil}
在调用中,如果有任何一个插件返回错误,则跳过该扩展点注册得其他插件,返回失败。
func (f *frameworkImpl) RunFilterPlugins(ctx context.Context,state *framework.CycleState,pod *v1.Pod,nodeInfo *framework.NodeInfo,) framework.PluginToStatus {statuses := make(framework.PluginToStatus)for _, pl := range f.filterPlugins {pluginStatus := f.runFilterPlugin(ctx, pl, state, pod, nodeInfo)if !pluginStatus.IsSuccess() {if !pluginStatus.IsUnschedulable()errStatus := framework.AsStatus(fmt.Errorf("running %q filter plugin: %w", pl.Name(), pluginStatus.AsError())).WithFailedPlugin(pl.Name())return map[string]*framework.Status{pl.Name(): errStatus}}pluginStatus.SetFailedPlugin(pl.Name())statuses[pl.Name()] = pluginStatus}}return statuses}
返回得状态是一个 Status 结构体,该结构体表示了插件运行的结果。由 Code、reasons、(可选)err 和 failedPlugin (失败的那个插件名)组成。当 code 不是 Success 时,应说明原因。而且,当 code 为 Success 时,其他所有字段都应为空。nil 状态也被视为成功。
type Status struct {code Codereasons []stringerr error// failedPlugin is an optional field that records the plugin name a Pod failed by.// It's set by the framework when code is Error, Unschedulable or UnschedulableAndUnresolvable.failedPlugin string}
NodeResourcesFit [5]
NodeResourcesFit 扩展检查节点是否拥有 Pod 请求的所有资源。分数可以使用以下三种策略之一,扩展点为:preFilter, filter,score
LeastAllocated(默认)MostAllocatedRequestedToCapacityRatio
Fit
NodeResourcesFit PreFilter 可以看到调用得 computePodResourceRequest
// PreFilter invoked at the prefilter extension point.func (f *Fit) PreFilter(ctx context.Context, cycleState *framework.CycleState, pod *v1.Pod) (*framework.PreFilterResult, *framework.Status) {cycleState.Write(preFilterStateKey, computePodResourceRequest(pod))return nil, nil}
computePodResourceRequest 这里有一个注释,总体解释起来是这样得:computePodResourceRequest ,返回值( framework.Resource)覆盖了每一个维度中资源的最大宽度。因为将按照 init-containers , containers 得顺序运行,会通过迭代方式收集每个维度中的最大值。计算时会对常规容器的资源向量求和,因为containers 运行会同时运行多个容器。计算示例为:
Pod:InitContainersIC1:CPU: 2Memory: 1GIC2:CPU: 2Memory: 3GContainersC1:CPU: 2Memory: 1GC2:CPU: 1Memory: 1G
在维度1中(InitContainers)所需资源最大值时,CPU=2, Memory=3G;而维度2(Containers)所需资源最大值为:CPU=2, Memory=1G;那么最终结果为 CPU=3, Memory=3G,因为在维度1,最大资源时Memory=3G;而维度2最大资源是CPU=1+2, Memory=1+1,取每个维度中最大资源最大宽度即为 CPU=3, Memory=3G。
下面则看下代码得实现
func computePodResourceRequest(pod *v1.Pod) *preFilterState {result := &preFilterState{}for _, container := range pod.Spec.Containers {result.Add(container.Resources.Requests)}// 取最大得资源for _, container := range pod.Spec.InitContainers {result.SetMaxResource(container.Resources.Requests)}// 如果Overhead正在使用,需要将其计算到总资源中if pod.Spec.Overhead != nil {result.Add(pod.Spec.Overhead)}return result}// SetMaxResource 是比较ResourceList并为每个资源取最大值。func (r *Resource) SetMaxResource(rl v1.ResourceList) {if r == nil {return}for rName, rQuantity := range rl {switch rName {case v1.ResourceMemory:r.Memory = max(r.Memory, rQuantity.Value())case v1.ResourceCPU:r.MilliCPU = max(r.MilliCPU, rQuantity.MilliValue())case v1.ResourceEphemeralStorage:if utilfeature.DefaultFeatureGate.Enabled(features.LocalStorageCapacityIsolation) {r.EphemeralStorage = max(r.EphemeralStorage, rQuantity.Value())}default:if schedutil.IsScalarResourceName(rName) {r.SetScalar(rName, max(r.ScalarResources[rName], rQuantity.Value()))}}}}
leastAllocate
LeastAllocated 是 NodeResourcesFit 的打分策略 ,LeastAllocated 打分的标准是更偏向于请求资源较少的Node。将会先计算出Node上调度的pod请求的内存、CPU与其他资源的百分比,然后并根据请求的比例与容量的平均值的最小值进行优先级排序。
计算公式是这样的:\(\frac{\frac{cpu((capacity-requested) \times MaxNodeScore \times cpuWeight)}{capacity} + \frac{memory((capacity-requested) \times MaxNodeScore \times memoryWeight}{capacity}) + ...}{weightSum}\)
下面来看下实现
func leastResourceScorer(resToWeightMap resourceToWeightMap) func(resourceToValueMap, resourceToValueMap) int64 {return func(requested, allocable resourceToValueMap) int64 {var nodeScore, weightSum int64for resource := range requested {weight := resToWeightMap[resource]// 计算出的资源分数乘weightresourceScore := leastRequestedScore(requested[resource], allocable[resource])nodeScore += resourceScore * weightweightSum += weight}if weightSum == 0 {return 0}// 最终除weightSumreturn nodeScore / weightSum}}
leastRequestedScore 计算标准为未使用容量的计算范围为 0~MaxNodeScore,0 为最低优先级,MaxNodeScore 为最高优先级。未使用的资源越多,得分越高。
func leastRequestedScore(requested, capacity int64) int64 {if capacity == 0 {return 0}if requested > capacity {return 0}// 容量 - 请求的 x 预期值(100)/ 容量return ((capacity - requested) * int64(framework.MaxNodeScore)) / capacity}
Topology [6]
Concept
在对 podtopologyspread 插件进行分析前,先需要掌握Pod拓扑的概念。
Pod拓扑(Pod Topology)是Kubernetes Pod调度机制,可以将Pod分布在集群中不同 Zone ,以及用户自定义的各种拓扑域 (topology domains)。当有了拓扑域后,用户可以更高效的利用集群资源。
如何来解释拓扑域,首先需要提及为什么需要拓扑域,在集群有3个节点,并且当Pod副本数为2时,又不希望两个Pod在同一个Node上运行。在随着扩大Pod的规模,副本数扩展到到15个时,这时候最理想的方式是每个Node运行5个Pod,在这种背景下,用户希望对集群中Zone的安排为相似的副本数量,并且在集群存在部分问题时可以更好的自愈(也是按照相似的副本数量均匀的分布在Node上)。在这种情况下Kubernetes 提供了Pod 拓扑约束来解决这个问题。
定义一个Topology
apiVersion: v1kind: Podmetadata:name: example-podspec:# Configure a topology spread constrainttopologySpreadConstraints:- maxSkew: <integer> #minDomains: <integer> # optional; alpha since v1.24topologyKey: <string>whenUnsatisfiable: <string>labelSelector: <object>
参数的描述:
- maxSkew:Required,Pod分布不均的程度,并且数字必须大于零
- 当
whenUnsatisfiable: DoNotSchedule,则定义目标拓扑中匹配 pod 的数量与 全局最小值(拓扑域中的标签选择器匹配的 pod 的最小数量 )maxSkew之间的最大允许差异。例如有 3 个Zone,分别具有 2、4 和 5 个匹配的 pod,则全局最小值为 2 - 当
whenUnsatisfiable: ScheduleAnyway,scheduler 会为减少倾斜的拓扑提供更高的优先级。
- 当
- minDomains:optional,符合条件的域的最小数量。
- 如果不指定该选项
minDomains,则约束的行为minDomains: 1。 minDomains必须大于 0。minDomains与whenUnsatisfiable一起时为whenUnsatisfiable: DoNotSchedule。
- 如果不指定该选项
- topologyKey:Node label的key,如果多个Node都使用了这个lable key那么 scheduler 将这些 Node 看作为相同的拓扑域。
- whenUnsatisfiable:当 Pod 不满足分布的约束时,怎么去处理
DoNotSchedule(默认)不要调度。ScheduleAnyway仍然调度它,同时优先考虑最小化倾斜节点
- labelSelector:查找匹配的 Pod label选择器的node进行技术,以计算Pod如何分布在拓扑域中
对于拓扑域的理解
对于拓扑域,官方是这么说明的,假设有一个带有以下lable的 4 节点集群:
NAME STATUS ROLES AGE VERSION LABELSnode1 Ready <none> 4m26s v1.16.0 node=node1,zone=zoneAnode2 Ready <none> 3m58s v1.16.0 node=node2,zone=zoneAnode3 Ready <none> 3m17s v1.16.0 node=node3,zone=zoneBnode4 Ready <none> 2m43s v1.16.0 node=node4,zone=zoneB
那么集群拓扑如图:

图1:集群拓扑图
Source:https://kubernetes.io/docs/concepts/scheduling-eviction/topology-spread-constraints/
假设一个 4 节点集群,其中 3个label被标记为foo: bar的 Pod 分别位于Node1、Node2 和 Node3:
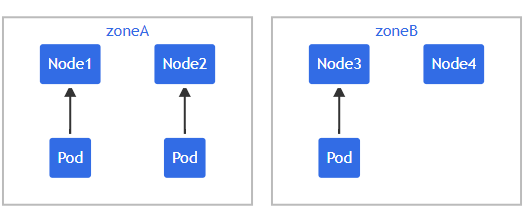
图2:集群拓扑图
Source:https://kubernetes.io/docs/concepts/scheduling-eviction/topology-spread-constraints/
这种情况下,新部署一个Pod,并希望新Pod与现有Pod跨 Zone均匀分布,资源清单文件如下:
kind: PodapiVersion: v1metadata:name: mypodlabels:foo: barspec:topologySpreadConstraints:- maxSkew: 1topologyKey: zonewhenUnsatisfiable: DoNotSchedulelabelSelector:matchLabels:foo: barcontainers:- name: pauseimage: k8s.gcr.io/pause:3.1
这个清单对于拓扑域来说,topologyKey: zone 表示对Pod均匀分布仅应用于已标记的节点(如 foo: bar),将会跳过没有标签的节点(如zone: <any value>)。如果 scheduler 找不到满足约束的方法,whenUnsatisfiable: DoNotSchedule 设置的策略则是 scheduler 对新部署的Pod保持 Pendding
如果此时 scheduler 将新Pod 调度至 \(Zone_A\),此时Pod分布在拓扑域间为 \([3,1]\) ,而 maxSkew 配置的值是1。此时倾斜值为 \(Zone_A - Zone_B = 3-1=2\),不满足 maxSkew=1,故这个Pod只能被调度到 \(Zone_B\)。
此时Pod调度拓扑图为图3或图4
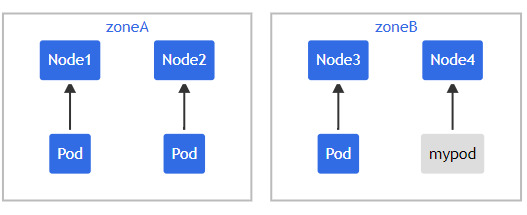
图3:集群拓扑图
Source:https://kubernetes.io/docs/concepts/scheduling-eviction/topology-spread-constraints/
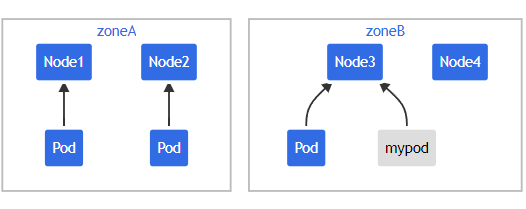
图4:集群拓扑图
Source:https://kubernetes.io/docs/concepts/scheduling-eviction/topology-spread-constraints/
如果需要将Pod调度到 \(Zone_A\) ,可以按照如下方式进行:
- 修改
maxSkew=2 - 修改
topologyKey: node而不是Zone,这种模式下可以将 Pod 均匀分布在Node而不是Zone之间。 - 修改
whenUnsatisfiable: DoNotSchedule为whenUnsatisfiable: ScheduleAnyway确保新的Pod始终可被调度
下面再通过一个例子增强对拓扑域了解
多拓扑约束
设拥有一个 4 节点集群,其中 3 个现有 Pod 标记 foo: bar 分别位于 node1、node2 和 node3
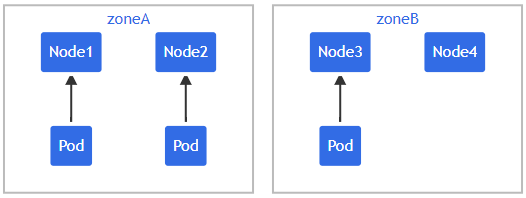
图5:集群拓扑图
Source:https://kubernetes.io/docs/concepts/scheduling-eviction/topology-spread-constraints/
部署的资源清单如下:可以看出拓扑分布约束配置了多个
kind: PodapiVersion: v1metadata:name: mypodlabels:foo: barspec:topologySpreadConstraints:- maxSkew: 1topologyKey: zonewhenUnsatisfiable: DoNotSchedulelabelSelector:matchLabels:foo: bar- maxSkew: 1topologyKey: nodewhenUnsatisfiable: DoNotSchedulelabelSelector:matchLabels:foo: barcontainers:- name: pauseimage: k8s.gcr.io/pause:3.1
在这种情况下,为了匹配第一个约束条件,新Pod 只能放置在 \(Zone_B\) ;而就第二个约束条件,新Pod只能调度到 node4。在这种配置多约束条件下, scheduler 只考虑满足所有约束的值,因此唯一有效的是 node4。
如何为集群设置一个默认拓扑域约束
默认情况下,拓扑域约束也作 scheduler 的为 scheduler configurtion 中的一部分参数,这也意味着,可以通过profile为整个集群级别指定一个默认的拓扑域调度约束,
apiVersion: kubescheduler.config.k8s.io/v1beta3kind: KubeSchedulerConfigurationprofiles:- schedulerName: default-schedulerpluginConfig:- name: PodTopologySpreadargs:defaultConstraints:- maxSkew: 1topologyKey: topology.kubernetes.io/zonewhenUnsatisfiable: ScheduleAnywaydefaultingType: List
默认约束策略
如果在没有配置集群级别的约束策略时,kube-scheduler 内部 topologyspread 插件提供了一个默认的拓扑约束策略,大致上如下列清单所示
defaultConstraints:- maxSkew: 3topologyKey: "kubernetes.io/hostname"whenUnsatisfiable: ScheduleAnyway- maxSkew: 5topologyKey: "topology.kubernetes.io/zone"whenUnsatisfiable: ScheduleAnyway
上述清单中内容可以在 pkg\scheduler\framework\plugins\podtopologyspread\plugin.go
var systemDefaultConstraints = []v1.TopologySpreadConstraint{{TopologyKey: v1.LabelHostname,WhenUnsatisfiable: v1.ScheduleAnyway,MaxSkew: 3,},{TopologyKey: v1.LabelTopologyZone,WhenUnsatisfiable: v1.ScheduleAnyway,MaxSkew: 5,},}
可以通过在配置文件中留空,来禁用默认配置
defaultConstraints: []defaultingType: List
apiVersion: kubescheduler.config.k8s.io/v1beta3kind: KubeSchedulerConfigurationprofiles:- schedulerName: default-schedulerpluginConfig:- name: PodTopologySpreadargs:defaultConstraints: []defaultingType: List
通过源码学习Topology
podtopologyspread 实现了4种扩展点方法,包含 filter 和 score
PreFilter
可以看到 PreFilter 的核心为 calPreFilterState
func (pl *PodTopologySpread) PreFilter(ctx context.Context, cycleState *framework.CycleState, pod *v1.Pod) (*framework.PreFilterResult, *framework.Status) {s, err := pl.calPreFilterState(ctx, pod)if err != nil {return nil, framework.AsStatus(err)}cycleState.Write(preFilterStateKey, s)return nil, nil}
calPreFilterState 主要功能是用在计算如何在拓扑域中分布Pod,首先看段代码时,需要掌握下属几个概念
func (pl *PodTopologySpread) calPreFilterState(ctx context.Context, pod *v1.Pod) (*preFilterState, error) {// 获取NodeallNodes, err := pl.sharedLister.NodeInfos().List()if err != nil {return nil, fmt.Errorf("listing NodeInfos: %w", err)}var constraints []topologySpreadConstraintif len(pod.Spec.TopologySpreadConstraints) > 0 {// 这里会构建出TopologySpreadConstraints,因为约束是不确定的constraints, err = filterTopologySpreadConstraints(pod.Spec.TopologySpreadConstraints,v1.DoNotSchedule,pl.enableMinDomainsInPodTopologySpread,pl.enableNodeInclusionPolicyInPodTopologySpread,)if err != nil {return nil, fmt.Errorf("obtaining pod's hard topology spread constraints: %w", err)}} else {// buildDefaultConstraints使用".DefaultConstraints"与pod匹配的// service、replication controllers、replica sets// 和stateful sets的选择器为pod构建一个约束。constraints, err = pl.buildDefaultConstraints(pod, v1.DoNotSchedule)if err != nil {return nil, fmt.Errorf("setting default hard topology spread constraints: %w", err)}}if len(constraints) == 0 { // 如果是空的,则返回空preFilterStatereturn &preFilterState{}, nil}// 初始化一个 preFilterState 状态s := preFilterState{Constraints: constraints,TpKeyToCriticalPaths: make(map[string]*criticalPaths, len(constraints)),TpPairToMatchNum: make(map[topologyPair]int, sizeHeuristic(len(allNodes), constraints)),}// 根据node统计拓扑域数量tpCountsByNode := make([]map[topologyPair]int, len(allNodes))// 获取pod亲和度配置requiredNodeAffinity := nodeaffinity.GetRequiredNodeAffinity(pod)processNode := func(i int) {nodeInfo := allNodes[i]node := nodeInfo.Node()if node == nil {klog.ErrorS(nil, "Node not found")return}// 通过spreading去过滤node以用作filters,错误解析以向后兼容if !pl.enableNodeInclusionPolicyInPodTopologySpread {if match, _ := requiredNodeAffinity.Match(node); !match {return}}// 确保node的lable 包含topologyKeys定义的值if !nodeLabelsMatchSpreadConstraints(node.Labels, constraints) {return}tpCounts := make(map[topologyPair]int, len(constraints))for _, c := range constraints { // 对应的约束列表if pl.enableNodeInclusionPolicyInPodTopologySpread &&!c.matchNodeInclusionPolicies(pod, node, requiredNodeAffinity) {continue}// 构建出 topologyPair 以key value形式,// 通常情况下TopologyKey属于什么类型的拓扑// node.Labels[c.TopologyKey] 则是属于这个拓扑中那个子域pair := topologyPair{key: c.TopologyKey, value: node.Labels[c.TopologyKey]}// 计算与标签选择器相匹配的pod有多少个count := countPodsMatchSelector(nodeInfo.Pods, c.Selector, pod.Namespace)tpCounts[pair] = count}tpCountsByNode[i] = tpCounts // 最终形成的拓扑结构}// 执行上面的定义的processNode,执行的数量就是node的数量pl.parallelizer.Until(ctx, len(allNodes), processNode)// 最后构建出 TpPairToMatchNum// 表示每个拓扑域中的每个子域各分布多少Pod,如图6所示for _, tpCounts := range tpCountsByNode {for tp, count := range tpCounts {s.TpPairToMatchNum[tp] += count}}if pl.enableMinDomainsInPodTopologySpread {// 根据状态进行构建 preFilterStates.TpKeyToDomainsNum = make(map[string]int, len(constraints))for tp := range s.TpPairToMatchNum {s.TpKeyToDomainsNum[tp.key]++}}// 计算最小匹配出的拓扑对for i := 0; i < len(constraints); i++ {key := constraints[i].TopologyKeys.TpKeyToCriticalPaths[key] = newCriticalPaths()}for pair, num := range s.TpPairToMatchNum {s.TpKeyToCriticalPaths[pair.key].update(pair.value, num)}return &s, nil // 返回的值则包含最小的分布}
preFilterState
// preFilterState 是在PreFilter处计算并在Filter处使用。// 它结合了 “TpKeyToCriticalPaths” 和 “TpPairToMatchNum” 来表示://(1)在每个分布约束上匹配最少pod的criticalPaths。// (2) 在每个分布约束上匹配的pod的数量。// “nil preFilterState” 则表示没有设置(在PreFilter阶段);// empty “preFilterState”对象则表示它是一个合法的状态,并在PreFilter阶段设置。type preFilterState struct {Constraints []topologySpreadConstraint// 这里记录2条关键路径而不是所有关键路径。// criticalPaths[0].MatchNum 始终保存最小匹配数。// criticalPaths[1].MatchNum 总是大于或等于criticalPaths[0].MatchNum,但不能保证是第二个最小匹配数。TpKeyToCriticalPaths map[string]*criticalPaths// TpKeyToDomainsNum 以 “topologyKey” 作为key ,并以zone的数量作为值。TpKeyToDomainsNum map[string]int// TpPairToMatchNum 以 “topologyPair作为key” ,并以匹配到pod的数量作为value。TpPairToMatchNum map[topologyPair]int}
criticalPaths
// [2]criticalPath能够工作的原因是基于当前抢占算法的实现,特别是以下两个事实// 事实 1:只抢占同一节点上的Pod,而不是多个节点上的 Pod。// 事实 2:每个节点在其抢占周期期间在“preFilterState”的单独副本上进行评估。如果我们计划转向更复杂的算法,例如“多个节点上的任意pod”时则需要重新考虑这种结构。type criticalPaths [2]struct {// TopologyValue代表映射到拓扑键的拓扑值。TopologyValue string// MatchNum代表匹配到的pod数量MatchNum int}
单元测试中的测试案例,具有两个约束条件的场景,通过表格来解析如下:
Node列表与标签如下表:
| Node Name | ️Lable-zone | ️Lable-node |
|---|---|---|
| node-a | zone1 | node-a |
| node-b | zone1 | node-b |
| node-x | zone2 | node-x |
| node-y | zone2 | node-y |
Pod列表与标签如下表:
| Pod Name | Node | ️Label |
|---|---|---|
| p-a1 | node-a | foo: |
| p-a2 | node-a | foo: |
| p-b1 | node-b | foo: |
| p-y1 | node-y | foo: |
| p-y2 | node-y | foo: |
| p-y3 | node-y | foo: |
| p-y4 | node-y | foo: |
对应的拓扑约束
spec:topologySpreadConstraints:- MaxSkew: 1TopologyKey: zonelabelSelector:matchLabels:foo: barMinDomains: 1NodeAffinityPolicy: HonorNodeTaintsPolicy: Ignore- MaxSkew: 1TopologyKey: nodelabelSelector:matchLabels:foo: barMinDomains: 1NodeAffinityPolicy: HonorNodeTaintsPolicy: Ignore
那么整个分布如下:
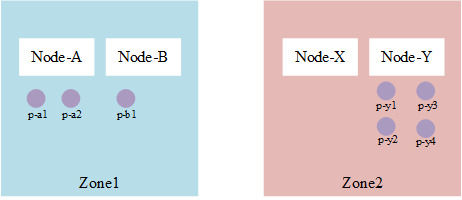
图6:具有两个场景的分布图
实现的测试代码如下
{name: "normal case with two spreadConstraints",pod: st.MakePod().Name("p").Label("foo", "").SpreadConstraint(1, "zone", v1.DoNotSchedule, fooSelector, nil, nil, nil).SpreadConstraint(1, "node", v1.DoNotSchedule, fooSelector, nil, nil, nil).Obj(),nodes: []*v1.Node{st.MakeNode().Name("node-a").Label("zone", "zone1").Label("node", "node-a").Obj(),st.MakeNode().Name("node-b").Label("zone", "zone1").Label("node", "node-b").Obj(),st.MakeNode().Name("node-x").Label("zone", "zone2").Label("node", "node-x").Obj(),st.MakeNode().Name("node-y").Label("zone", "zone2").Label("node", "node-y").Obj(),},existingPods: []*v1.Pod{st.MakePod().Name("p-a1").Node("node-a").Label("foo", "").Obj(),st.MakePod().Name("p-a2").Node("node-a").Label("foo", "").Obj(),st.MakePod().Name("p-b1").Node("node-b").Label("foo", "").Obj(),st.MakePod().Name("p-y1").Node("node-y").Label("foo", "").Obj(),st.MakePod().Name("p-y2").Node("node-y").Label("foo", "").Obj(),st.MakePod().Name("p-y3").Node("node-y").Label("foo", "").Obj(),st.MakePod().Name("p-y4").Node("node-y").Label("foo", "").Obj(),},want: &preFilterState{Constraints: []topologySpreadConstraint{{MaxSkew: 1,TopologyKey: "zone",Selector: mustConvertLabelSelectorAsSelector(t, fooSelector),MinDomains: 1,NodeAffinityPolicy: v1.NodeInclusionPolicyHonor,NodeTaintsPolicy: v1.NodeInclusionPolicyIgnore,},{MaxSkew: 1,TopologyKey: "node",Selector: mustConvertLabelSelectorAsSelector(t, fooSelector),MinDomains: 1,NodeAffinityPolicy: v1.NodeInclusionPolicyHonor,NodeTaintsPolicy: v1.NodeInclusionPolicyIgnore,},},TpKeyToCriticalPaths: map[string]*criticalPaths{"zone": {{"zone1", 3}, {"zone2", 4}},"node": {{"node-x", 0}, {"node-b", 1}},},for pair, num := range s.TpPairToMatchNum {s.TpKeyToCriticalPaths[pair.key].update(pair.value, num)}TpPairToMatchNum: map[topologyPair]int{{key: "zone", value: "zone1"}: 3,{key: "zone", value: "zone2"}: 4,{key: "node", value: "node-a"}: 2,{key: "node", value: "node-b"}: 1,{key: "node", value: "node-x"}: 0,{key: "node", value: "node-y"}: 4,},},},
update
update 函数实际上时用于计算 criticalPaths 中的第一位始终保持为是一个最小Pod匹配值
func (p *criticalPaths) update(tpVal string, num int) {// first verify if `tpVal` exists or noti := -1if tpVal == p[0].TopologyValue {i = 0} else if tpVal == p[1].TopologyValue {i = 1}if i >= 0 {// `tpVal` 表示已经存在p[i].MatchNum = numif p[0].MatchNum > p[1].MatchNum {// swap paths[0] and paths[1]p[0], p[1] = p[1], p[0]}} else {// `tpVal` 表示不存在,如一个新初始化的值// num对应子域分布的pod// 说明第一个元素不是最小的,则作为交换if num < p[0].MatchNum {// update paths[1] with paths[0]p[1] = p[0]// update paths[0]p[0].TopologyValue, p[0].MatchNum = tpVal, num} else if num < p[1].MatchNum {// 如果小于 paths[1],则更新它,永远保证元素0是最小,1是次小的p[1].TopologyValue, p[1].MatchNum = tpVal, num}}}
综合来讲 Prefilter 主要做的工作是。循环所有的节点,先根据 NodeAffinity 或者 NodeSelector 进行过滤,然后根据约束中定义的 topologyKeys (拓扑划分的依据) 来选择节点。
接下来会计算出每个拓扑域下的拓扑对(可以理解为子域)匹配的 Pod 数量,存入 TpPairToMatchNum 中,最后就是要把所有约束中匹配的 Pod 数量最小(第二小)匹配出来的路径(代码是这么定义的,理解上可以看作是分布图)放入 TpKeyToCriticalPaths 中保存起来。整个 preFilterState 保存下来传递到后续的 filter 插件中使用。
Filter
在 preFilter 中 最后的计算结果会保存在 CycleState 中
cycleState.Write(preFilterStateKey, s)
Filter 主要是从 PreFilter 处理的过程中拿到状态 preFilterState,然后看下每个拓扑约束中的 MaxSkew 是否合法,具体的计算公式为:\(matchNum + selfMatchNum - minMatchNum\)
matchNum:Prefilter 中计算出的对应的拓扑分布数量,可以在Prefilter中参考对应的内容if tpCount, ok := s.TpPairToMatchNum[pair]; ok {
selfMatchNum:匹配到label的数量,匹配到则是1,否则为0minMatchNum:获的Prefilter中计算出来的最小匹配的值
func (pl *PodTopologySpread) Filter(ctx context.Context, cycleState *framework.CycleState, pod *v1.Pod, nodeInfo *framework.NodeInfo) *framework.Status {node := nodeInfo.Node()if node == nil {return framework.AsStatus(fmt.Errorf("node not found"))}// 拿到 prefilter处理的s,即preFilterStates, err := getPreFilterState(cycleState)if err != nil {return framework.AsStatus(err)}// 一个 空类型的 preFilterState是合法的,这种情况下将容忍每一个被调度的 Podif len(s.Constraints) == 0 {return nil}podLabelSet := labels.Set(pod.Labels) // 设置标签for _, c := range s.Constraints { // 因为拓扑约束允许多个所以tpKey := c.TopologyKeytpVal, ok := node.Labels[c.TopologyKey]if !ok {klog.V(5).InfoS("Node doesn't have required label", "node", klog.KObj(node), "label", tpKey)return framework.NewStatus(framework.UnschedulableAndUnresolvable, ErrReasonNodeLabelNotMatch)}// 判断标准// 现有的匹配数量 + 子匹配(1|0) - 全局minimum <= maxSkewminMatchNum, err := s.minMatchNum(tpKey, c.MinDomains, pl.enableMinDomainsInPodTopologySpread)if err != nil {klog.ErrorS(err, "Internal error occurred while retrieving value precalculated in PreFilter", "topologyKey", tpKey, "paths", s.TpKeyToCriticalPaths)continue}selfMatchNum := 0if c.Selector.Matches(podLabelSet) {selfMatchNum = 1}pair := topologyPair{key: tpKey, value: tpVal}matchNum := 0if tpCount, ok := s.TpPairToMatchNum[pair]; ok {matchNum = tpCount}skew := matchNum + selfMatchNum - minMatchNumif skew > int(c.MaxSkew) {klog.V(5).InfoS("Node failed spreadConstraint: matchNum + selfMatchNum - minMatchNum > maxSkew", "node", klog.KObj(node), "topologyKey", tpKey, "matchNum", matchNum, "selfMatchNum", selfMatchNum, "minMatchNum", minMatchNum, "maxSkew", c.MaxSkew)return framework.NewStatus(framework.Unschedulable, ErrReasonConstraintsNotMatch)}}return nil}
minMatchNum
// minMatchNum用于计算 倾斜的全局最小值,同时考虑 MinDomains。func (s *preFilterState) minMatchNum(tpKey string, minDomains int32, enableMinDomainsInPodTopologySpread bool) (int, error) {paths, ok := s.TpKeyToCriticalPaths[tpKey]if !ok {return 0, fmt.Errorf("failed to retrieve path by topology key")}// 通常来说最小值是第一个minMatchNum := paths[0].MatchNumif !enableMinDomainsInPodTopologySpread { // 就是plugin的配置的 enableMinDomainsInPodTopologySpreadreturn minMatchNum, nil}domainsNum, ok := s.TpKeyToDomainsNum[tpKey]if !ok {return 0, fmt.Errorf("failed to retrieve the number of domains by topology key")}if domainsNum < int(minDomains) {// 当有匹配拓扑键的符合条件的域的数量小于 配置的"minDomains"(每个约束条件的这个配置) 时,//它将全局“minimum” 设置为0。// 因为minimum默认就为1,如果他小于1,就让他为0minMatchNum = 0}return minMatchNum, nil}
PreScore
与 Filter 类似, PreScore 也是类似 PreFilter 的构成。 initPreScoreState 来完成过滤。
有了 PreFilter 基础后,对于 Score 来说大同小异
func (pl *PodTopologySpread) PreScore(ctx context.Context,cycleState *framework.CycleState,pod *v1.Pod,filteredNodes []*v1.Node,) *framework.Status {allNodes, err := pl.sharedLister.NodeInfos().List()if err != nil {return framework.AsStatus(fmt.Errorf("getting all nodes: %w", err))}if len(filteredNodes) == 0 || len(allNodes) == 0 {// No nodes to score.return nil}state := &preScoreState{IgnoredNodes: sets.NewString(),TopologyPairToPodCounts: make(map[topologyPair]*int64),}// Only require that nodes have all the topology labels if using// non-system-default spreading rules. This allows nodes that don't have a// zone label to still have hostname spreading.// 如果使用非系统默认分布规则,则仅要求节点具有所有拓扑标签。// 这将允许没有zone标签的节点仍然具有hostname分布。requireAllTopologies := len(pod.Spec.TopologySpreadConstraints) > 0 || !pl.systemDefaultederr = pl.initPreScoreState(state, pod, filteredNodes, requireAllTopologies)if err != nil {return framework.AsStatus(fmt.Errorf("calculating preScoreState: %w", err))}// return if incoming pod doesn't have soft topology spread Constraints.if len(state.Constraints) == 0 {cycleState.Write(preScoreStateKey, state)return nil}// Ignore parsing errors for backwards compatibility.requiredNodeAffinity := nodeaffinity.GetRequiredNodeAffinity(pod)processAllNode := func(i int) {nodeInfo := allNodes[i]node := nodeInfo.Node()if node == nil {return}if !pl.enableNodeInclusionPolicyInPodTopologySpread {// `node` should satisfy incoming pod's NodeSelector/NodeAffinityif match, _ := requiredNodeAffinity.Match(node); !match {return}}// All topologyKeys need to be present in `node`if requireAllTopologies && !nodeLabelsMatchSpreadConstraints(node.Labels, state.Constraints) {return}for _, c := range state.Constraints {if pl.enableNodeInclusionPolicyInPodTopologySpread &&!c.matchNodeInclusionPolicies(pod, node, requiredNodeAffinity) {continue}pair := topologyPair{key: c.TopologyKey, value: node.Labels[c.TopologyKey]}// If current topology pair is not associated with any candidate node,// continue to avoid unnecessary calculation.// Per-node counts are also skipped, as they are done during Score.tpCount := state.TopologyPairToPodCounts[pair]if tpCount == nil {continue}count := countPodsMatchSelector(nodeInfo.Pods, c.Selector, pod.Namespace)atomic.AddInt64(tpCount, int64(count))}}pl.parallelizer.Until(ctx, len(allNodes), processAllNode)// 保存状态给后面sorce调用cycleState.Write(preScoreStateKey, state)return nil}
与Filter中Update使用的函数一样,这里也会到这一步,这里会构建出TopologySpreadConstraints,因为约束是不确定的
func filterTopologySpreadConstraints(constraints []v1.TopologySpreadConstraint, action v1.UnsatisfiableConstraintAction, enableMinDomainsInPodTopologySpread, enableNodeInclusionPolicyInPodTopologySpread bool) ([]topologySpreadConstraint, error) {var result []topologySpreadConstraintfor _, c := range constraints {if c.WhenUnsatisfiable == action { // 始终调度时selector, err := metav1.LabelSelectorAsSelector(c.LabelSelector)if err != nil {return nil, err}tsc := topologySpreadConstraint{MaxSkew: c.MaxSkew,TopologyKey: c.TopologyKey,Selector: selector,MinDomains: 1, // If MinDomains is nil, we treat MinDomains as 1.NodeAffinityPolicy: v1.NodeInclusionPolicyHonor, // If NodeAffinityPolicy is nil, we treat NodeAffinityPolicy as "Honor".NodeTaintsPolicy: v1.NodeInclusionPolicyIgnore, // If NodeTaintsPolicy is nil, we treat NodeTaintsPolicy as "Ignore".}if enableMinDomainsInPodTopologySpread && c.MinDomains != nil {tsc.MinDomains = *c.MinDomains}if enableNodeInclusionPolicyInPodTopologySpread {if c.NodeAffinityPolicy != nil {tsc.NodeAffinityPolicy = *c.NodeAffinityPolicy}if c.NodeTaintsPolicy != nil {tsc.NodeTaintsPolicy = *c.NodeTaintsPolicy}}result = append(result, tsc)}}return result, nil}
Score
// 在分数扩展点调用分数。该函数返回的“score”是 `nodeName` 上匹配的 pod 数量,稍后会进行归一化。func (pl *PodTopologySpread) Score(ctx context.Context, cycleState *framework.CycleState, pod *v1.Pod, nodeName string) (int64, *framework.Status) {nodeInfo, err := pl.sharedLister.NodeInfos().Get(nodeName)if err != nil {return 0, framework.AsStatus(fmt.Errorf("getting node %q from Snapshot: %w", nodeName, err))}node := nodeInfo.Node()s, err := getPreScoreState(cycleState)if err != nil {return 0, framework.AsStatus(err)}// Return if the node is not qualified.if s.IgnoredNodes.Has(node.Name) {return 0, nil}// 对于每个当前的 <pair>,当前节点获得 <matchSum> 的信用分。// 计算 <matchSum>总和 并将其作为该节点的分数返回。var score float64for i, c := range s.Constraints {if tpVal, ok := node.Labels[c.TopologyKey]; ok {var cnt int64if c.TopologyKey == v1.LabelHostname {cnt = int64(countPodsMatchSelector(nodeInfo.Pods, c.Selector, pod.Namespace))} else {pair := topologyPair{key: c.TopologyKey, value: tpVal}cnt = *s.TopologyPairToPodCounts[pair]}score += scoreForCount(cnt, c.MaxSkew, s.TopologyNormalizingWeight[i])}}return int64(math.Round(score)), nil}
在 Framework 中会运行 ScoreExtension ,即 NormalizeScore
// Run NormalizeScore method for each ScorePlugin in parallel.f.Parallelizer().Until(ctx, len(f.scorePlugins), func(index int) {pl := f.scorePlugins[index]nodeScoreList := pluginToNodeScores[pl.Name()]if pl.ScoreExtensions() == nil {return}status := f.runScoreExtension(ctx, pl, state, pod, nodeScoreList)if !status.IsSuccess() {err := fmt.Errorf("plugin %q failed with: %w", pl.Name(), status.AsError())errCh.SendErrorWithCancel(err, cancel)return}})if err := errCh.ReceiveError(); err != nil {return nil, framework.AsStatus(fmt.Errorf("running Normalize on Score plugins: %w", err))}
NormalizeScore 会为所有的node根据之前计算出的权重进行打分
func (pl *PodTopologySpread) NormalizeScore(ctx context.Context, cycleState *framework.CycleState, pod *v1.Pod, scores framework.NodeScoreList) *framework.Status {s, err := getPreScoreState(cycleState)if err != nil {return framework.AsStatus(err)}if s == nil {return nil}// 计算 <minScore> 和 <maxScore>var minScore int64 = math.MaxInt64var maxScore int64for i, score := range scores {// it's mandatory to check if <score.Name> is present in m.IgnoredNodesif s.IgnoredNodes.Has(score.Name) {scores[i].Score = invalidScorecontinue}if score.Score < minScore {minScore = score.Score}if score.Score > maxScore {maxScore = score.Score}}for i := range scores {if scores[i].Score == invalidScore {scores[i].Score = 0continue}if maxScore == 0 {scores[i].Score = framework.MaxNodeScorecontinue}s := scores[i].Scorescores[i].Score = framework.MaxNodeScore * (maxScore + minScore - s) / maxScore}return nil}
到此,对于pod拓扑插件功能大概可以明了了,
- Filter 部分(
PreFilter,Filter)完成拓扑对(Topology Pair)划分 - Score部分(
PreScore,Score,NormalizeScore)主要是对拓扑对(可以理解为拓扑结构划分)来选择一个最适合的pod的节点(即分数最优的节点)
而在 scoring_test.go 给了很多用例,可以更深入的了解这部分算法
Reference
[3] in tree VS out of tree volume plugins
彻底搞懂kubernetes调度框架与插件的更多相关文章
- 夯实Java基础系列19:一文搞懂Java集合类框架,以及常见面试题
本系列文章将整理到我在GitHub上的<Java面试指南>仓库,更多精彩内容请到我的仓库里查看 https://github.com/h2pl/Java-Tutorial 喜欢的话麻烦点下 ...
- Hadoop系列番外篇之一文搞懂Hadoop RPC框架及细节实现
@ 目录 Hadoop RPC 框架解析 1.Hadoop RPC框架概述 1.1 RPC框架特点 1.2 Hadoop RPC框架 2.Java基础知识回顾 2.1 Java反射机制与动态代理 2. ...
- kubernetes 调度器
调度器 kube-scheduler 是 kubernetes 的核心组件之一,主要负责整个集群资源的调度功能,根据特定的调度算法和策略,将 Pod 调度到最优的工作节点上面去,从而更加合理.更加充分 ...
- # kubernetes调度之nodeName与NodeSelector
系列目录 Kubernetes的调度有简单,有复杂,指定NodeName和使用NodeSelector调度是最简单的,可以将Pod调度到期望的节点上. 本文主要介绍kubernetes调度框架中的No ...
- 搞懂 XML 解析,徒手造 WEB 框架
恕我斗胆直言,对开源的 WEB 框架了解多少,有没有尝试写过框架呢?XML 的解析方式有哪些?能答出来吗?! 心中没有答案也没关系,因为通过今天的分享,能让你轻松 get 如下几点,绝对收获满满. a ...
- React16源码解读:开篇带你搞懂几个面试考点
引言 如今,主流的前端框架React,Vue和Angular在前端领域已成三足鼎立之势,基于前端技术栈的发展现状,大大小小的公司或多或少也会使用其中某一项或者多项技术栈,那么掌握并熟练使用其中至少一种 ...
- 搞懂分布式技术10:LVS实现负载均衡的原理与实践
搞懂分布式技术10:LVS实现负载均衡的原理与实践 浅析负载均衡及LVS实现 原创: fireflyc 写程序的康德 2017-09-19 负载均衡 负载均衡(Load Balance,缩写LB)是一 ...
- 搞懂ELK并不是一件特别难的事(ELK)
本篇文章主要介绍elk的一些框架组成,原理和实践,采用的ELK本版为7.7.0版本 一.ELK介绍 1.1.ELK简介 ELK是Elasticsearch.Logstash.Kibana三大开源框架首 ...
- k8s调度器介绍(调度框架版本)
从一个pod的创建开始 由kubectl解析创建pod的yaml,发送创建pod请求到APIServer. APIServer首先做权限认证,然后检查信息并把数据存储到ETCD里,创建deployme ...
随机推荐
- zabbix 1.1
1.zabbix监控平台 2.zabbix的三部分组件: Zabbix server 是 Zabbix软件的核心组件,agent 向其报告可用性.系统完整性信息和统计信息.server也是存 ...
- Blazor和Vue对比学习(基础1.9):表单输入绑定和验证,VeeValidate和EditFrom
这是基础部分的最后一章,内容比较简单,算是为基础部分来个HappyEnding.我们分三个部分来学习: 表单输入绑定 Vue的表单验证:VeeValidate Blazor的表单验证:EditForm ...
- pymysql.err.OperationalError: (1054, "Unknown column 'aa' in 'field list'")(已解决)
错误描述: 今天使用python连接mysql数据库进行数据添加时,出现报错"pymysql.err.OperationalError: (1054, "Unknown colum ...
- 安装PostgreSQL到CentOS(YUM)
运行环境 系统版本:CentOS Linux release 7.6.1810 (Core) 软件版本:postgresql-12 硬件要求:无 安装过程 1.安装YUM-PostgreSQL存储库 ...
- 关于我学git这档子事(4)
------------恢复内容开始------------ 当本地分支(main/dev)比远程仓库分支(main/dev)落后几次提交时 先: git pull 更新本地仓库 再 git push ...
- 【Unity Shader】syntax error: unexpected token 'struct' at line x 错误解决办法
以下代码处出现了syntax error: unexpected token 'struct' at line 33的错误 struct a2v { float4 vertex_position : ...
- 什么是Netty编解码,Netty编解码器有哪些?Protostuff怎么使用?
哈喽!大家好,我是小奇,一位热爱分享的程序员 小奇打算以轻松幽默的对话方式来分享一些技术,如果你觉得通过小奇的文章学到了东西,那就给小奇一个赞吧 文章持续更新 一.前言 书接上回,昨天下雨没怎么上街上 ...
- 关于p命名空间和c命名空间 外加一个context
P命名空间注入 : 需要在头文件中加入约束文件 导入约束 : xmlns:p="http://www.springframework.org/schema/p" 如 xmlns=& ...
- 1. 时序练习(广告渠道vs销量预测)
用散点图来看下sales销量与哪一维度更相关. 和目标销量的关系的话,那么这就是多元线性回归问题了. 上面把所有的200个数据集都用来训练了,现在把数据集拆分一下,分成训练集合测试集,再进行训练. 可 ...
- Charles如何抓取https请求-移动端+PC端
Charles安装完成,默认只能抓取到http请求,如果查看https请求,会显示unkonw或其它之类的响应.所以需要先进行一些配置,才能抓取到完整的https请求信息.下面针对PC端和手机端抓包的 ...
