Spring框架1--IoC
Spring框架之IoC

Spring的后处理器 待补充~
- BeanFactoryPostProcessor
- BeanPostProcessor
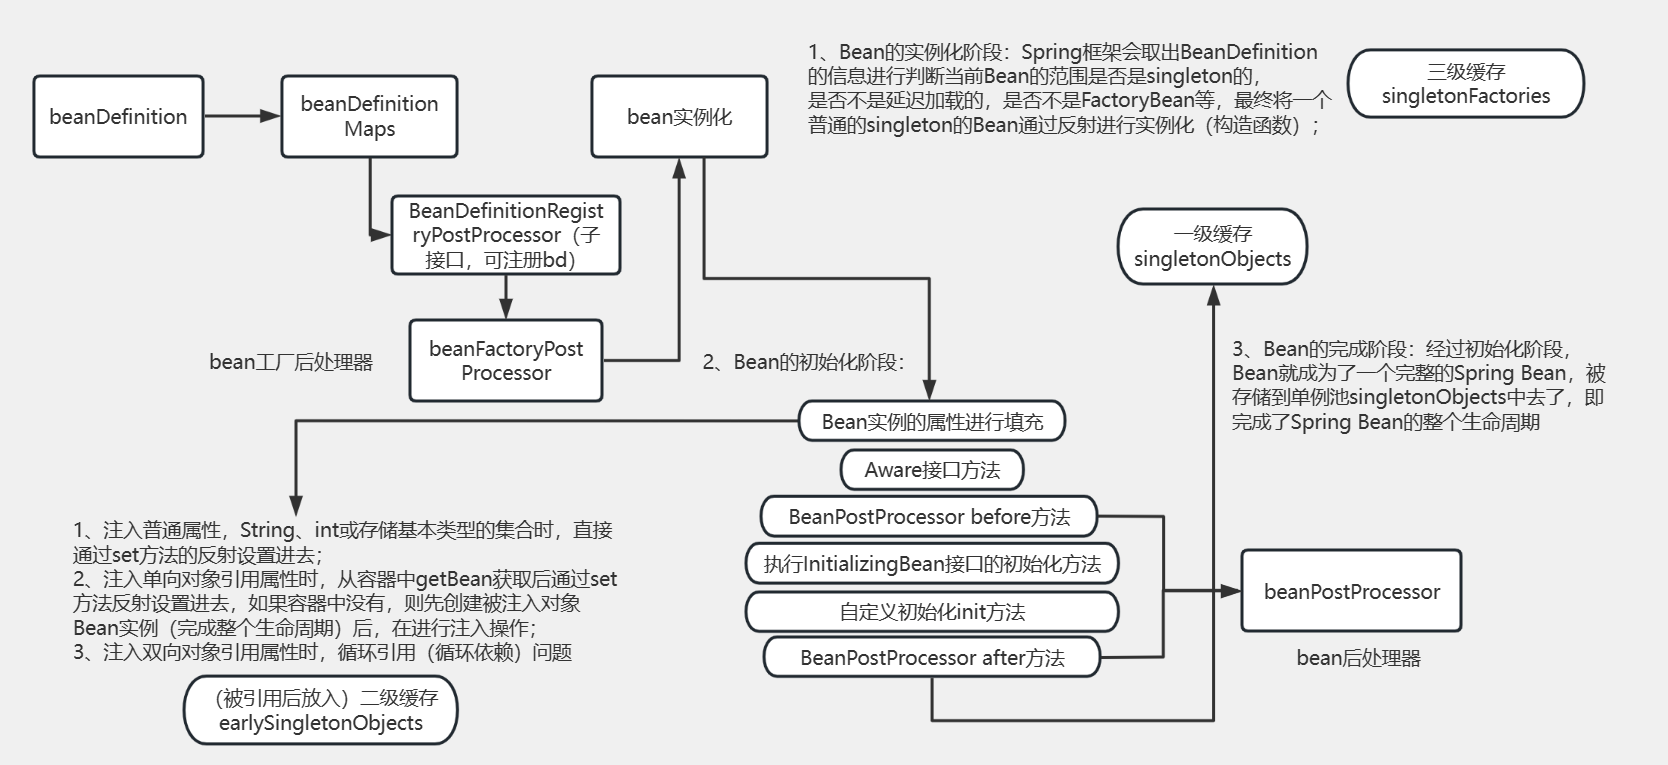
Bean的生命周期

具体可见图解:点击这里
补充:
- Aware
- Ordered
Bean的加载方式
1.xml方式
<?xml version="1.0" encoding="UTF-8"?>

<beans xmlns="http://www.springframework.org/schema/beans"

xmlns:xsi="http://www.w3.org/2001/XMLSchema-instance"

xsi:schemaLocation="http://www.springframework.org/schema/beans

http://www.springframework.org/schema/beans/spring-beans.xsd">

    <!--声明自定义bean-->

    <bean id="bookService" class="com.azy.service.impl.BookServiceImpl"

    scope="singleton"/>

    <!--声明第三方开发bean-->

    <bean id="dataSource" class="com.alibaba.druid.pool.DruidDataSource"/>

</beans>
2.xml文件+Component注解
<?xml version="1.0" encoding="UTF-8"?>

<beans xmlns="http://www.springframework.org/schema/beans"

xmlns:xsi="http://www.w3.org/2001/XMLSchema-instance"

xmlns:context="http://www.springframework.org/schema/context"

xsi:schemaLocation="http://www.springframework.org/schema/beans

https://www.springframework.org/schema/beans/spring-beans.xsd

http://www.springframework.org/schema/context

http://www.springframework.org/schema/context/spring-context.xsd">

	<!--扫描bean-->

    <context:component-scan base-package="com.azy"/>

</beans>
类上面加上@Component注解
@Component

//@Service,@Controller,@Repository为@Component衍生注解,效果相同

public class BookServiceImpl implements BookService {

}
//第三方Bean

@Component

public class DruidBean {

    @Bean

    public DataSource dataSource(){

        DruidDataSource dataSource = new DruidDataSource();

        dataSource.setDriverClassName("");

        dataSource.setUrl("");

        dataSource.setUsername("");

        dataSource.setPassword("");

        return dataSource;

    }

}
3.纯注解
//配置类:

//注解开发,替换配置文件xml文件

@Configuration

@ComponentScan("com.azy") //包扫描

public class SpringConfig {

}
扩展:
FactoryBean接口产生BeanImportSource注解可以加载旧的配置文件@Configuration
@ComponentScan("com.azy") //包扫描
@ImportResource("applicationContext-config.xml")
public class SpringConfig {
}
Configuration注解默认有个参数proxyBeanMethods=true可以保障调用此方法得到的对象是从容器中获取的而不是重新创建的
4.Import注解导入
//配置类:

//注解开发,替换配置文件xml文件

@Configuration

@ComponentScan("com.azy") //包扫描

@Import(DruidBean.class)

public class SpringConfig {

}
Import可以导入普通类或者配置类,导入的普通类或者配置类不用再加@Component注解:
//第三方Bean

//@Component

public class DruidBean {

    @Bean

    public DataSource dataSource(){

        DruidDataSource dataSource = new DruidDataSource();

        dataSource.setDriverClassName("");

        dataSource.setUrl("");

        dataSource.setUsername("");

        dataSource.setPassword("");

        return dataSource;

    }

}
5.Spring容器注册
public class AppImport {

    public static void main(String[] args) {

        AnnotationConfigApplicationContext ctx =

        new AnnotationConfigApplicationContext(SpringConfig.class);

        ctx.register(Cat.class);//注册

		//……

    }

}
6.Import注解导入接口
ImportSelector接口:
public class MyImportSelector implements ImportSelector {

    @Override

    public String[] selectImports(AnnotationMetadata importingClassMetadata) {

        return new String[0];

    }

}

//可以根据importingClassMetadata参数来判断导入该实现类所在的类的条件,

//从而返回要进行创建的Bean的类名
ImportBeanDefinitionRegistrar接口
public class MyImportBeanDefinitionRegistrar implements ImportBeanDefinitionRegistrar {

    @Override

    public void registerBeanDefinitions(AnnotationMetadata importingClassMetadata, BeanDefinitionRegistry registry) {

    }

}

//通过BeanDefinition的注册器注册实名bean,实现对容器中bean的裁定,

//例如对现有bean的覆盖,进而达成不修改源代码的情况下更换实现的效果
BeanDefinitionRegistryPostProcessor接口
public class MyPostProcessor implements BeanDefinitionRegistryPostProcessor {

    public void postProcessBeanDefinitionRegistry(BeanDefinitionRegistry registry) {

        BeanDefinition beanDefinition = BeanDefinitionBuilder

                                    .rootBeanDefinition(BookServiceImpl.class)

                                    .getBeanDefinition();

        registry.registerBeanDefinition("bookService", beanDefinition);

    }

}

//通过BeanDefinition的注册器注册实名bean,实现对容器中bean的最终裁定
Bean的加载控制
1.Spring容器注册
2.Import注解导入接口
ImportSelector接口ImportBeanDefinitionRegistrar接口BeanDefinitionRegistryPostProcessor接口
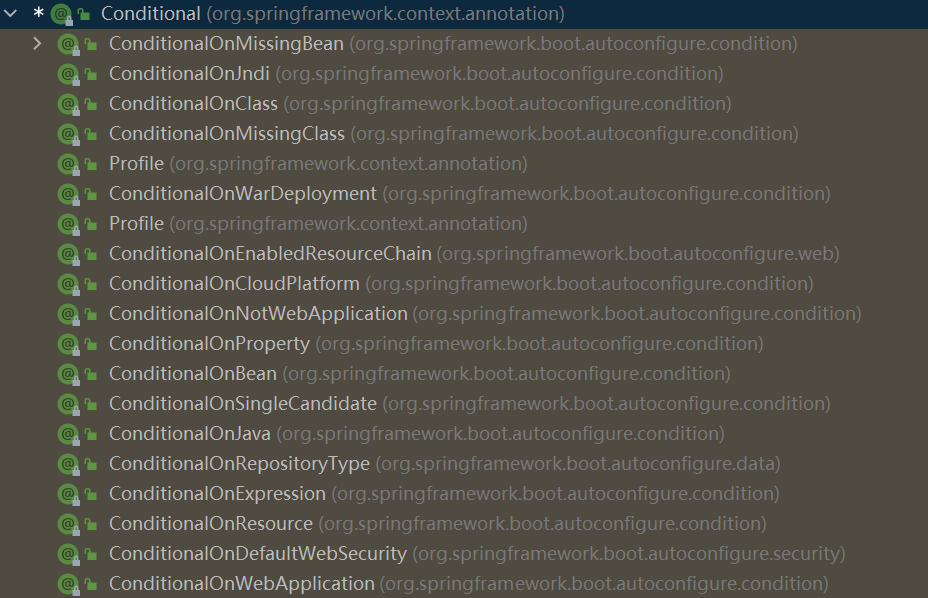
3.Conditional衍生注解

这些衍生注解都是SpringBoot实现的
@Component

//@ConditionalOnClass(Book.class)

//ConditionalOnClass可以直接导入类,但是ConditionalOnMissingClass不可以,建议使用name

@ConditionalOnClass(name="com.azy.pojo.Book")//有这个类才加载下面的BookService

@ConditionalOnMissingClass("com.azy.pojo.Book")//没有这个类才加载下面的BookService

public class BookServiceImpl implements BookService {

}
第三方Bean:
//有数据库驱动的时候才加载DataSource

@Component

public class DruidBean {

    @Bean

    @ConditionalOnClass(name="com.mysql.jdbc.Driver")

    public DataSource dataSource(){

        DruidDataSource dataSource = new DruidDataSource();

        dataSource.setDriverClassName("");

        dataSource.setUrl("");

        dataSource.setUsername("");

        dataSource.setPassword("");

        return dataSource;

    }

}
Spring自定义标签解析 待补充~
Spring注解的解析原理
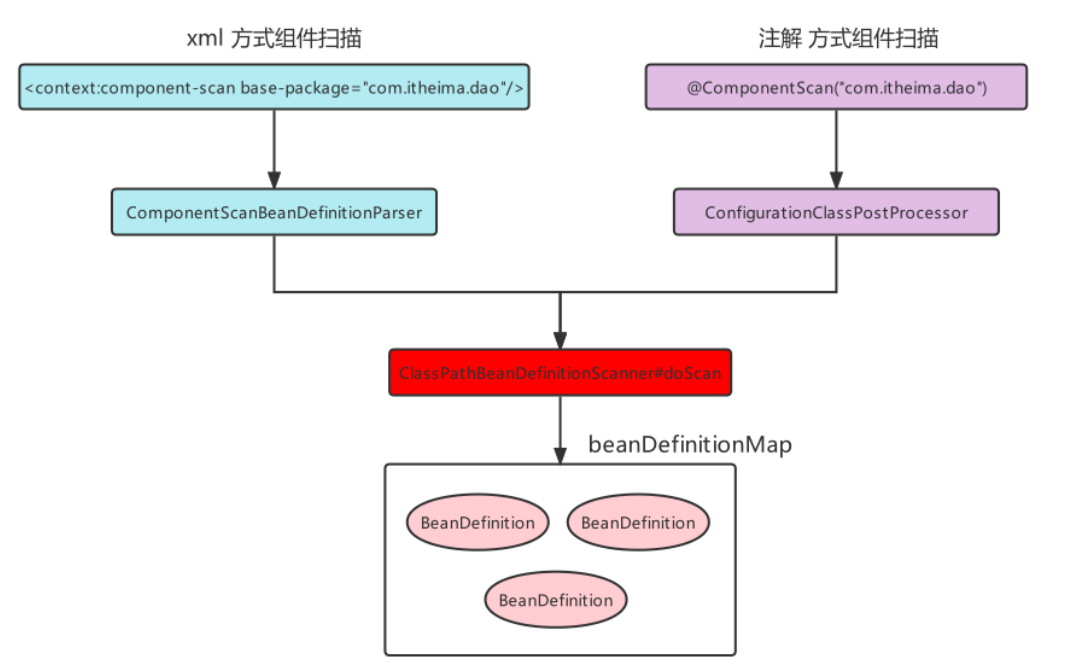
Spring注解的解析主要包含两种方式(即Bean的加载方式中的2和3):
配置文件中自定义标签:
<context:component-scan base-package="com.azy"/>
使用xml方式配置组件扫描,而component-scan是一个context命名空间下的自定义标签,所以要找到对应的命名空间处理器NamespaceHandler和解析器,查看spring-context包下的spring.handlers文件:
http\://www.springframework.org/schema/context=org.springframework.context.config.ContextNamespaceHandler
查看 ContextNamespaceHandler 类 :
public void init() {

    this.registerBeanDefinitionParser("component-scan", new  ComponentScanBeanDefinitionParser());

}
将ComponentScanBeanDefinitionParser进行了注册,对其源码进行跟踪,最终将标注的@Component的类,生成对应的BeanDefiition进行了注册。
- 配置类上添加
ComponentScan注解
使用配置类配置组件扫描,使用AnnotationConfigApplicationContext容器在进行创建时,内部调用了如下代码, 该工具注册了几个Bean后处理器:
AnnotationConfigUtils.registerAnnotationConfigProcessors(this.registry);

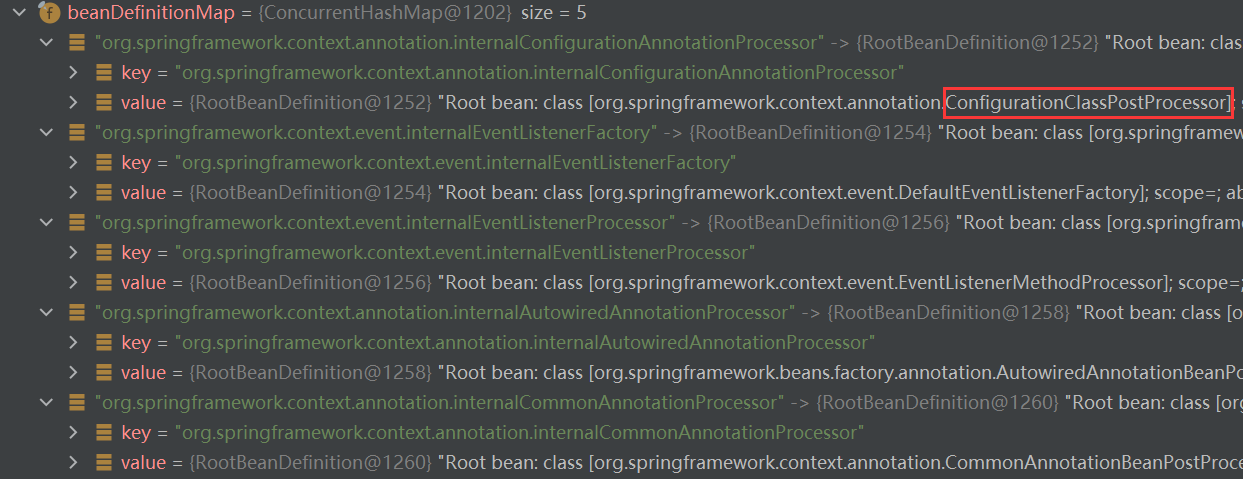
其中,ConfigurationClassPostProcessor 实现了 BeanDefinitionRegistryPostProcessor ,经过一系列源码调用,最终也指到了 ClassPathBeanDefinitionScanner 的 doScan 方法,与xml方式最终终点一致。

Spring整合Mybatis原理
xml方式整合:
<?xml version="1.0" encoding="UTF-8"?>

<beans xmlns="http://www.springframework.org/schema/beans"

       xmlns:xsi="http://www.w3.org/2001/XMLSchema-instance"

       xsi:schemaLocation="http://www.springframework.org/schema/beans http://www.springframework.org/schema/beans/spring-beans.xsd">

    <bean id="druidDataSource" class="com.alibaba.druid.pool.DruidDataSource">

        <property name="driverClassName" value="com.mysql.cj.jdbc.Driver"/>

        <property name="url" value=""/>

        <property name="username" value=""/>

        <property name="password" value=""/>

    </bean>

    <bean class="org.mybatis.spring.SqlSessionFactoryBean">

        <property name="dataSource" ref="druidDataSource"/>

    </bean>

    <bean class="org.mybatis.spring.mapper.MapperScannerConfigurer">

        <property name="basePackage" value="com.azy.ioc.mapper"/>

    </bean>

</beans>
主要是依靠
SqlSessionFactoryBean和MapperScannerConfigurer来进行整合的:SqlSessionFactoryBean的作用是向容器中提供SqlSessionFactorypublic class SqlSessionFactoryBean implements FactoryBean<SqlSessionFactory>, InitializingBean, ApplicationListener<ApplicationEvent> {
//这里实现了FactoryBean接口,getObject方法获取Bean
public void afterPropertiesSet() throws Exception {
//创建SqlSessionFactory对象
this.sqlSessionFactory = this.buildSqlSessionFactory();
}
public SqlSessionFactory getObject() throws Exception {
return this.sqlSessionFactory;
}
}
MapperScannerConfigurer的作用是扫描Mapper,向容器中注册Mapper对应的MapperFactoryBean://MapperScannerConfigurer实现了BeanDefinitionRegistryPostProcessor,在postProcessBeanDefinitionRegistry方法中利用ClassPathMapperScanner向容器中注册MapperFactoryBean
class MapperScannerConfigurer implements BeanDefinitionRegistryPostProcessor, InitializingBean{
public void postProcessBeanDefinitionRegistry(BeanDefinitionRegistry registry) {
ClassPathMapperScanner scanner = new ClassPathMapperScanner(registry);
scanner.scan(StringUtils.tokenizeToStringArray(this.basePackage, ",; \t\n"));
}
} //ClassPathMapperScanner继承了ClassPathBeanDefinitionScanner
class ClassPathMapperScanner extends ClassPathBeanDefinitionScanner {
public Set<BeanDefinitionHolder> doScan(String... basePackages) {
Set<BeanDefinitionHolder> beanDefinitions = super.doScan(basePackages);
if (beanDefinitions.isEmpty()) {
} else {
this.processBeanDefinitions(beanDefinitions);
}
}
private void processBeanDefinitions(Set<BeanDefinitionHolder> beanDefinitions) {
//设置Mapper的beanClass是org.mybatis.spring.mapper.MapperFactoryBean
definition.setBeanClass(this.mapperFactoryBeanClass);
definition.setAutowireMode(2); //设置MapperBeanFactory 进行自动注入
}
}
MapperFactoryBean的作用就是产生对应的Mapper,其底层实际上还是调用的Mybatis的方法:public class MapperFactoryBean<T> extends SqlSessionDaoSupport implements FactoryBean<T> {
public MapperFactoryBean(Class<T> mapperInterface) {
this.mapperInterface = mapperInterface;
}
public void setSqlSessionFactory(SqlSessionFactory sqlSessionFactory) {
this.sqlSessionTemplate = this.createSqlSessionTemplate(sqlSessionFactory);
}
public T getObject() throws Exception {
return this.getSqlSession().getMapper(this.mapperInterface);
}//这里getSqlSession利用自动注入,然后再利用sqlSession调用getMapper
}
注解方式:
@Component

@MapperScan("com.azy.annotation.mapper")

public class MybatisConfig {

    @Bean //形参可以自动装配

    public SqlSessionFactoryBean sqlSessionFactoryBean(DataSource dataSource) {

        SqlSessionFactoryBean sqlSessionFactory = new SqlSessionFactoryBean();

        sqlSessionFactory.setTypeAliasesPackage("com.azy.annotation.pojo");

        sqlSessionFactory.setDataSource(dataSource);

        return sqlSessionFactory;

    }

}
这里主要看
MapperScan注解,它导入了MapperScannerRegistrar:@Retention(RetentionPolicy.RUNTIME)
@Target(ElementType.TYPE)
@Documented
@Import(MapperScannerRegistrar.class)
public @interface MapperScan {
}
MapperScannerRegistrar实现了ImportBeanDefinitionRegistrar接口:public class MapperScannerRegistrar implements ImportBeanDefinitionRegistrar, ResourceLoaderAware { }
其中的
registerBeanDefinitions方法向容器中注册了Mapper对应的MapperFactoryBean,与前面相同。
Spring框架1--IoC的更多相关文章
- Spring框架(3)---IOC装配Bean(注解方式)
IOC装配Bean(注解方式) 上面一遍文章讲了通过xml来装配Bean,那么这篇来讲注解方式来讲装配Bean对象 注解方式需要在原先的基础上重新配置环境: (1)Component标签举例 1:导入 ...
- Spring框架之IOC(控制反转)
[TOC] 第一章Spring框架简介 IOC(控制反转)和AOP(面向方面编程)作为Spring框架的两个核心,很好地实现了解耦合.所以,简单来说,Spring是一个轻量级的控制反转(IoC)和面向 ...
- Spring框架中IoC(控制反转)的原理(转)
原文链接:Spring框架中IoC(控制反转)的原理 一.IoC的基础知识以及原理: 1.IoC理论的背景:在采用面向对象方法设计的软件系统中,底层实现都是由N个对象组成的,所有的对象通过彼此的合作, ...
- Spring框架的IOC核心功能快速入门
2. 步骤一:下载Spring框架的开发包 * 官网:http://spring.io/ * 下载地址:http://repo.springsource.org/libs-release-local/ ...
- (精简)Spring框架的IoC(替代工厂类实现方法)和AOP(定义规则,约定大于配置)
Spring的核心框架主要包含两个技术,分别用来处理工厂类,以及事务处理和连接管理的. 两大核心概念 1) IoC:控制反转,在现在的开发中,如果想建立对象并设置属性,是需要先new对象,再通过se ...
- 初识Spring框架实现IOC和DI(依赖注入)
学习过Spring框架的人一定都会听过Spring的IoC(控制反转) .DI(依赖注入)这两个概念,对于初学Spring的人来说,总觉得IoC .DI这两个概念是模糊不清的,是很难理解的, IoC是 ...
- Spring框架(2)---IOC装配Bean(xml配置方式)
IOC装配Bean (1)Spring框架Bean实例化的方式提供了三种方式实例化Bean 构造方法实例化(默认无参数,用的最多) 静态工厂实例化 实例工厂实例化 下面先写这三种方法的applicat ...
- 十七、Spring框架(IOC/DI)
一.Spring框架 Spring是一个基于IOC和AOP的结构J2EE系统的框架. 1.IOC反转控制是Spring的基础(Inversion Of Control).也就是说创建对象由以前的程序员 ...
- Spring框架的IOC之注解方式的快速入门
1. 步骤一:导入注解开发所有需要的jar包 * 引入IOC容器必须的6个jar包 * 多引入一个:Spring框架的AOP的jar包,spring-aop的jar包 2. 步骤二:创建对应的包结构, ...
- Spring框架之IoC和AOP
Spring框架简介: 2003年2月,Spring框架正式成为一个开源项目,并发布于SourceForge中.致力于Java EE应用的各种解决方案,而并不是仅仅专注于某一层的方案,是企业应用开发的 ...
随机推荐
- C语言定制DEBUG信息
C语言定制DEBUG信息 背景与问题 在日常编写程序中,我们经常需要输出一些调试信息帮助我们 DEBUG 或者更好的编程,通常我们的做法是这样的: 在需要的地方直接printf(...)输出有用的信息 ...
- 快速入门API Explorer
摘要:华为云API Explorer为开发者提供一站式API解决方案统一平台,集成华为云服务所有开放 API,支持全量快速检索.可视化调试.帮助文档.代码示例等能力,帮助开发者快速查找.学习API和使 ...
- spring cloud alibaba Nacos集群部署 Linux
参考:https://www.cnblogs.com/dw3306/p/12961353.html 1.官网: https://nacos.io/zh-cn/docs/cluster-mode- ...
- NETAPP 设备 C模式开关机顺序
设备正常开关机顺序开机顺序: 1.开启所有磁盘柜的电源,大概20秒后再开启存储控制器: 2.开启接有FAS2750存储的以太网交换机或者光纤交换机: 3.开启有挂载FAS2750存储空间的服务器或者磁 ...
- (原创)【B4A】一步一步入门04:编译模式、打包为APK、私钥签名
一.前言 上篇 (原创)[B4A]一步一步入门03:APP名称.图标等信息修改 中我们将APP做成了标准的样子. 本篇文章会讲解如何将程序打包成APK文件以分发,同时讲解如何制作私钥并签名APP,以用 ...
- JumpServer(v2.28.6) 堡垒机常见问题
JumpServer 各组件查询日志方法 # 默认持久化目录 /data/jumpserver ls -al /data/jumpserver/core/logs ls -al /data/jumps ...
- JZOJ 2114. 【GDKOI2011】反恐任务
\(\text{Problem}\) 给定一张无向图,\(q\) 次询问,删去一个点或一条相邻两点间的边,问两点是否连通 询问独立 \(\text{Solution}\) 明显的用圆方树把图变成树 然 ...
- .net 下SSE使用demo
所谓SSE,就是浏览器向服务器发送一个HTTP请求,然后服务器不断单向地向浏览器推送"信息"(message).这种信息在格式上很简单,就是"信息"加上前缀&q ...
- key对象转换数组title
before <!DOCTYPE HTML> <html> <head> <title>key对象转换数组title</title> < ...
- PE头结构解析(代码实现)
PE头结构解析(代码实现) 图表实现在:https://www.cnblogs.com/juicyhumberger/articles/17064764.html #include "std ...
