[SPDK/NVMe存储技术分析]009 - Introduction to RDMA Send | RDMA Send操作概论
来源: https://zcopy.wordpress.com/

说明: 本文不是对原文的逐字逐句翻译,而是摘取核心部分以介绍RDMA Send操作(后面凡是提到RDMA send, 都对应于IBA里的send操作)。文中给出的例子非常浅显易懂,很值得一读。
1. What is RDMA | 什么是RDMA

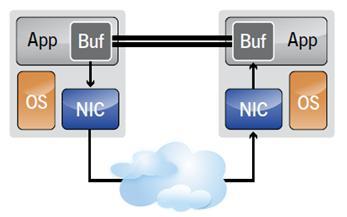
RDMA is Remote Direct Memory Access which is a way of moving buffers between two applications across a network. RDMA differs from traditional network interfaces because it bypasses the operating system. This allows programs that implement RDMA to have:
- The absolute lowest latency
- The highest throughput
- Smallest CPU footprint
RDMA指的是远程直接内存访问,这是一种通过网络在两个应用程序之间搬运缓冲区里的数据的方法。RDMA与传统的网络接口不同,因为它绕过了操作系统。这允许实现了RDMA的程序具有如下特点:
- 绝对的最低时延
- 最高的吞吐量
- 最小的CPU足迹 (也就是说,需要CPU参与的地方被最小化)
2. How Can We Use It | 怎么使用RDMA
To make use of RDMA we need to have a network interface card that implements an RDMA engine.
使用RDMA, 我们需要有一张实现了RDMA引擎的网卡。
We call this an HCA (Host Channel Adapter). The adapter creates a channel from it’s RDMA engine though the PCI Express bus to the application memory. A good HCA will implement in hardware all the logic needed to execute RDMA protocol over the wire. This includes segmentation and reassembly as well as flow control and reliability. So from the application perspective we deal with whole buffers.
我们把这种卡称之为HCA(主机通道适配器)。 适配器创建一个贯穿PCIe总线的从RDMA引擎到应用程序内存的通道。一个好的HCA将在导线上执行的RDMA协议所需要的全部逻辑都在硬件上予以实现。这包括分组,重组以及流量控制和可靠性保证。因此,从应用程序的角度看,只负责处理所有缓冲区即可。

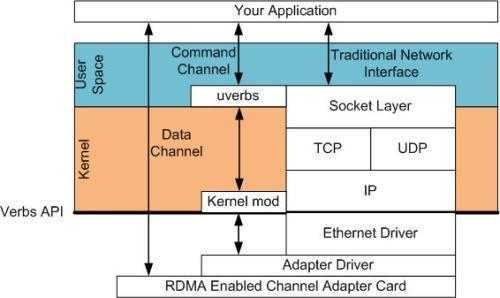
In RDMA we setup data channels using a kernel driver. We call this the command channel. We use the command channel to establish data channels which will allow us to move data bypassing the kernel entirely. Once we have established these data channels we can read and write buffers directly.
在RDMA中我们使用内核态驱动建立一个数据通道。我们称之为命令通道。使用命令通道,我们能够建立一个数据通道,该通道允许我们在搬运数据的时候完全绕过内核。一旦建立了这种数据通道,我们就能直接读写数据缓冲区。
The API to establish these the data channels are provided by an API called "verbs". The verbs API is a maintained in an open source linux project called the Open Fabrics Enterprise Distribution (OFED). (www.openfabrics.org). There is an equivalent project for Windows WinOF located at the same site.
建立数据通道的API是一种称之为"verbs"的API。"verbs" API是由一个叫做OFED的Linux开源项目维护的。在站点www.openfabrics.org上,为Windows WinOF提供了一个等价的项目。
The verbs API is different from the sockets programming API you might be used to. But once you learn some concepts it is actually a lot easier to use and much simpler to design your programs.
"verbs" API跟你用过的socket编程API是不一样的。但是,一旦你掌握了一些概念后,就会变得非常容易,而且在设计你的程序的时候更简单。
3. Queue Pairs | 队列对
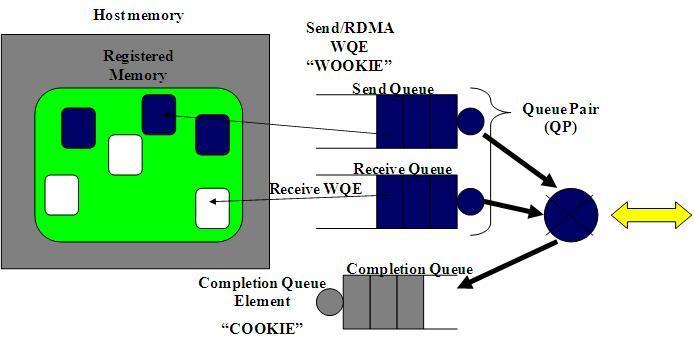
RDMA operations start by "pinning" memory. When you pin memory you are telling the kernel that this memory is owned by the application. Now we tell the HCA to address the memory and prepare a channel from the card to the memory. We refer to this as registering a Memory Region. We can now use the memory that has been registered in any of the RDMA operations we want to perform. The diagram below show the registered region and buffers within that region in use by the communication queues.
RDMA操作开始于“搞”内存。当你在“搞”内存的时候,就是告诉内核这段内存名花有主了,主人就是你的应用程序。于是,你告诉HCA,就在这段内存上寻址,赶紧准备开辟一条从HCA卡到这段内存的通道。我们将这一动作称之为注册一个内存区域(MR)。一旦MR注册完毕,我们就可以使用这段内存来做任何RDMA操作。在下面的图中,我们可以看到注册的内存区域(MR)和被通信队列所使用的位于内存区域之内的缓冲区(buffer)。
RDMA communication is based on a set of three queues. The send queue and receive queue are responsible for scheduling work. They are always created in pairs. They are referred to as a Queue Pair(QP). A Completion Queue (CQ) is used to notify us when the instructions placed on the work queues have been completed.
RDMA通信基于三条队列(SQ, RQ和CQ)组成的集合。 其中, 发送队列(SQ)和接收队列(RQ)负责调度工作,他们总是成对被创建,称之为队列对(QP)。当放置在工作队列上的指令被完成的时候,完成队列(CQ)用来发送通知。
A user places instructions on it’s work queues that tells the HCA what buffers it wants to send or receive. These instructions are small structs called work requests or Work Queue Elements (WQE). WQE is pronounced "WOOKIE" like the creature from starwars. A WQE primarily contains a pointer to a buffer. A WQE placed on the send queue contains a pointer to the message to be sent. A pointer in the WQE on the receive queue contains a pointer to a buffer where an incoming message from the wire can be placed.
当用户把指令放置到工作队列的时候,就意味着告诉HCA那些缓冲区需要被发送或者用来接受数据。这些指令是一些小的结构体,称之为工作请求(WR)或者工作队列元素(WQE)。 WQE的发音为"WOOKIE",就像星球大战里的猛兽。一个WQE主要包含一个指向某个缓冲区的指针。一个放置在发送队列(SQ)里的WQE中包含一个指向待发送的消息的指针。一个放置在接受队列里的WQE里的指针指向一段缓冲区,该缓冲区用来存放待接受的消息。
RDMA is an asynchronous transport mechanism. So we can queue a number of send or receive WQEs at a time. The HCA will process these WQE in order as fast as it can. When the WQE is processed the data is moved. Once the transaction completes a Completion Queue Element (CQE) is created and placed on the Completion Queue (CQ). We call a CQE a "COOKIE".
RDMA是一种异步传输机制。因此我们可以一次性在工作队列里放置好多个发送或接收WQE。HCA将尽可能快地按顺序处理这些WQE。当一个WQE被处理了,那么数据就被搬运了。 一旦传输完成,HCA就创建一个完成队列元素(CQE)并放置到完成队列(CQ)中去。 相应地,CQE的发音为"COOKIE"。
4. A Simple Example | 举个简单的例子
Lets look at a simple example. In this example we will move a buffer from the memory of system A to the memory of system B. This is what we call Message Passing semantics. The operation is a SEND, this is the most basic form of RDMA.
让我们看个简单的例子。在这个例子中,我们将把一个缓冲区里的数据从系统A的内存中搬到系统B的内存中去。这就是我们所说的消息传递语义学。接下来我们要讲的一种操作为SEND,是RDMA中最基础的操作类型。
Step 1 System A and B have created their QP's Completion Queue's and registered a regions in memory for RDMA to take place. System A identifies a buffer that it will want to move to System B. System B has an empty buffer allocated for the data to be placed.
第1步:系统A和B都创建了他们各自的QP的完成队列(CQ), 并为即将进行的RDMA传输注册了相应的内存区域(MR)。 系统A识别了一段缓冲区,该缓冲区的数据将被搬运到系统B上。系统B分配了一段空的缓冲区,用来存放来自系统A发送的数据。
Step 2 System B creates a WQE "WOOKIE" and places in on the Receive Queue. This WQE contains a pointer to the memory buffer where the data will be placed. System A also creates a WQE which points to the buffer in it's memory that will be transmitted.
第2步:系统B创建一个WQE并放置到它的接收队列(RQ)中。这个WQE包含了一个指针,该指针指向的内存缓冲区用来存放接收到的数据。系统A也创建一个WQE并放置到它的发送队列(SQ)中去,该WQE中的指针执行一段内存缓冲区,该缓冲区的数据将要被传送。
Step 3 The HCA is always working in hardware looking for WQE's on the send queue. The HCA will consume the WQE from System A and begin streaming the data from the memory region to system B. When data begins arriving at System B the HCA will consume the WQE in the receive queue to learn where it should place the data. The data streams over a high speed channel bypassing the kernel.
第3步:系统A上的HCA总是在硬件上干活,看看发送队列里有没有WQE。HCA将消费掉来自系统A的WQE, 然后将内存区域里的数据变成数据流发送给系统B。当数据流开始到达系统B的时候,系统B上的HCA就消费来自系统B的WQE,然后将数据放到该放的缓冲区上去。在高速通道上传输的数据流完全绕过了操作系统内核。
Step 4 When the data movement completes the HCA will create a CQE "COOKIE". This is placed in the Completion Queue and indicates that the transaction has completed. For every WQE consumed a CQE is generated. So a CQE is created on System A's CQ indicating that the operation completed and also on System B's CQ. A CQE is always generated even if there was an error. The CQE will contain field indicating the status of the transaction.
第4步:当数据搬运完成的时候,HCA会创建一个CQE。 这个CQE被放置到完成队列(CQ)中,表明数据传输已经完成。HCA每消费掉一个WQE, 都会生成一个CQE。因此,在系统A的完成队列中放置一个CQE,意味着对应的WQE的发送操作已经完成。同理,在系统B的完成队列中也会放置一个CQE,表明对应的WQE的接收操作已经完成。如果发生错误,HCA依然会创建一个CQE。在CQE中,包含了一个用来记录传输状态的字段。
The transaction we just demonstrated is an RDMA SEND operation. On Infiniband or RoCE the total time for a relatively small buffer would be about 1.3 µs. By creating many WQE's at once we could move millions of buffers every second.
我们刚刚举例说明的是一个RDMA Send操作。在IB或RoCE中,传送一个小缓冲区里的数据耗费的总时间大约在1.3µs。通过同时创建很多WQE, 就能在1秒内传输存放在数百万个缓冲区里的数据。
5. Summary | 总结
This lesson showed you how and where to get the software so you can start using the RDMA verbs API. It also introduced the Queuing concept that is the basis of the RDMA programming paradigm. Finally we showed how a buffer is moved between two systems, demonstrating an RDMA SEND operation.
在这一课中,我们学习了如何使用RDMA verbs API。同时也介绍了队列的概念,而队列概念是RDMA编程的基础。最后,我们演示了RDMA send操作,展现了缓冲区的数据是如何在从一个系统搬运到另一个系统上去的。
注记: 本文的原作者对RDMA Send操作讲得非常浅显易懂,只可惜没有继续讲解RDMA read和RDMA write操作。
参考资料:
The shortest way to do many things is to only one thing at a time. | 做许多事情的捷径就是一次只做一件事。
[SPDK/NVMe存储技术分析]009 - Introduction to RDMA Send | RDMA Send操作概论的更多相关文章
- [SPDK/NVMe存储技术分析]003 - NVMeDirect论文
说明: 之所以要翻译这篇论文,是因为参考此论文可以很好地理解SPDK/NVMe的设计思想. NVMeDirect: A User-space I/O Framework for Application ...
- [SPDK/NVMe存储技术分析]002 - SPDK官方介绍
Introduction to the Storage Performance Development Kit (SPDK) | SPDK概述 By Jonathan S. (Intel), Upda ...
- [SPDK/NVMe存储技术分析]008 - RDMA概述
毫无疑问地,用来取代iSCSI/iSER(iSCSI Extensions for RDMA)技术的NVMe over Fabrics着实让RDMA又火了一把.在介绍NVMe over Fabrics ...
- [SPDK/NVMe存储技术分析]005 - DPDK概述
注: 之所以要中英文对照翻译下面的文章,是因为SPDK严重依赖于DPDK的实现. Introduction to DPDK: Architecture and PrinciplesDPDK概论:体系结 ...
- [SPDK/NVMe存储技术分析]004 - SSD设备的发现
源代码及NVMe协议版本 SPDK : spdk-17.07.1 DPDK : dpdk-17.08 NVMe Spec: 1.2.1 基本分析方法 01 - 到官网http://www.spdk.i ...
- [SPDK/NVMe存储技术分析]001 - SPDK/NVMe概述
1. NVMe概述 NVMe是一个针对基于PCIe的固态硬盘的高性能的.可扩展的主机控制器接口. NVMe的显著特征是提供多个队列来处理I/O命令.单个NVMe设备支持多达64K个I/O 队列,每个I ...
- [SPDK/NVMe存储技术分析]012 - 用户态ibv_post_send()源码分析
OFA定义了一组标准的Verbs,并提供了一个标准库libibvers.在用户态实现NVMe over RDMA的Host(i.e. Initiator)和Target, 少不了要跟OFA定义的Ver ...
- [SPDK/NVMe存储技术分析]013 - libibverbs API应用案例分析
本文是对论文Dissecting a Small InfiniBand Application Using the Verbs API所做的中英文对照翻译 Dissecting a Small Inf ...
- [SPDK/NVMe存储技术分析]007 - 初识UIO
注: 要进一步搞清楚SSD盘对应的PCI的BAR寄存器的映射,有必要先了解一下UIO(Userspace I/O). UIO(Userspace I/O)是运行在用户空间的I/O技术.在Linux系统 ...
随机推荐
- 如何在Kubernetes 里添加自定义的 API 对象(一)
环境: golang 1.15 依赖包采用go module 实例:现在往 Kubernetes 添加一个名叫 Network 的 API 资源类型.它的作用是,一旦用户创建一个 Network 对象 ...
- Elasticsearch笔记2
1 搜索所有文档中还有某个字段的方法: localhost:9200/get-together/group/_search?pretty { "query": { "qu ...
- Note - 多项式乱写
基础篇戳这里. 大概是记录 @Tiw 的伟大智慧叭. 嗷,附赠一个 全家桶题. 目录 Newton 迭代法 多项式乱算 多项式求逆 多项式 多项式 多项式开根 多项式带余除法 多项式快速幂 ...
- ELK(Elasticsearch 、 Logstash以及Kibana)
配置日志收集系统 ELK需求背景:业务发展越来越庞大,服务器越来越多各种访问日志.应用日志.错误日志量越来越多,导致运维人员无法很好的去管理日志开发人员排查问题,需要到服务器上查日志,不方便运营人员需 ...
- Failed to restart ssh.service: Unit not found.
环境 操作系统:CentOS 7 问题 重启ssh服务,启动报错:Failed to restart ssh.service: Unit not found. 操作步骤 1. 编辑sshd_confi ...
- MShadow中的表达式模板
表达式模板是Eigen.GSL和boost.uBLAS等高性能C++矩阵库的核心技术.本文基于MXNet给出的教程文档来阐述MXNet所依赖的高性能矩阵库MShadow背后的原理. 编写高效的机器学习 ...
- ASP.NET Core 6框架揭秘实例演示[11]:诊断跟踪的几种基本编程方式
在整个软件开发维护生命周期内,最难的不是如何将软件系统开发出来,而是在系统上线之后及时解决遇到的问题.一个好的程序员能够在系统出现问题之后马上定位错误的根源并找到正确的解决方案,一个更好的程序员能够根 ...
- 【转】k8s集群自定义clusterRole样例
对pod资源可以删除,进入终端执行命令,其他资源只读权限 apiVersion: rbac.authorization.k8s.io/v1 kind: ClusterRole metadata: an ...
- Win10系统下WampServer运行之后显示橙色如何变成绿色的方法
我们可能会安装wampserver在本地环境下测试网站,不过wampserver运行之后,wampserver的图标呈现出橙色,而不是绿色,这就说明了wampserver在本地环境没有启动成功.那么我 ...
- tunneling socket could not be established, cause=connect ECONNREFUSED 127.0.0.1:56281 npm ERR! network This is most likely not a problem with npm itself npm ERR! network and is related to network
tunneling socket could not be established, cause=connect ECONNREFUSED 127.0.0.1:56281npm ERR! networ ...
