WPF设计の画刷(Brush)
一、什么是画刷
画刷是是一种渲染方式,用于填充图形形状,如矩形、椭圆、扇形、多边形和封闭路径。在GDI+中,画刷分为以下几种:SolidBrush,TextureBrush,HatchBrush,LinearGradientBrush和PathGradientBrush。在层次关系上,它们都位于System.Drawing空间下,继承自System.Drawing.Brush类。
画刷主要分为三大类:
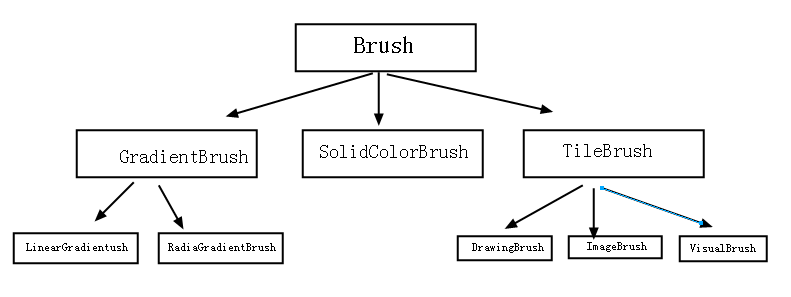
1、SolidBrush(实心画刷)我们最常用
实心画刷是我们用的最多的,也是最简单的一个,其实也就是填充色的意思,一个很简单的例子:

其实这里的Background=Red使用的就是SolidColorBrush,xaml进行解析时,发现Background是Brush类型,刚才我也说了
Brush具有图形转换的能力,最后xaml就会通过Transform把”Red"字符串解析成SolidColorBrush,更直观一点的话,我们可以
用C#代码来描述。
1     public partial class MainWindow : Window

2     {

3         public MainWindow()

4         {

5             InitializeComponent();

6

7             button1.Background = new SolidColorBrush(Colors.Red);

8         }

9     }
2、GradientBrush(梯度画刷、渐变画刷)
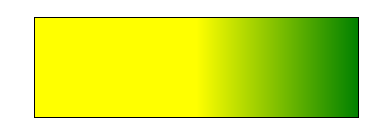
a、线性渐进画刷
<Window x:Class="WpfApplication2.MainWindow"

xmlns="http://schemas.microsoft.com/winfx/2006/xaml/presentation"

xmlns:x="http://schemas.microsoft.com/winfx/2006/xaml"

Title="MainWindow" Height="" Width="">

<Canvas>

<Rectangle Canvas.Left="" Canvas.Top="" Height="" Name="rectangle2" Stroke="Black" Width="">

<Rectangle.Fill>

<LinearGradientBrush StartPoint="0,0" EndPoint="1,0">

<GradientStop Color="Yellow" Offset="0.5"/>

<GradientStop Color="Green" Offset=""/>

</LinearGradientBrush>

</Rectangle.Fill>

</Rectangle>

</Canvas>

</Window>
得到的效果:
b、圆形梯度画刷
  <Ellipse x:Name="ellipseWithRadialGradientBrush" Height="113.56" Stroke="#FF000000">

   <Ellipse.Fill>

    <RadialGradientBrush>

     <GradientStop Color="#FFA21212" Offset=""/>

     <GradientStop Color="#FFF8C906" Offset=""/>

    </RadialGradientBrush>

   </Ellipse.Fill>

  </Ellipse>
效果:

中心偏移:
  <Ellipse x:Name="ellipseWithRadialGradientBrushCenterOffset" Stroke="#FF000000">

   <Ellipse.Fill>

    <RadialGradientBrush GradientOrigin="0.399,0.149">

     <GradientStop Color="#FFA21212" Offset=""/>

     <GradientStop Color="#FFF8C906" Offset=""/>

    </RadialGradientBrush>

   </Ellipse.Fill>

  </Ellipse>
3、ImageBrush(图像画刷)
顾名思义,就是把图像转换为画刷的方式渲染。
<Window x:Class="WpfApplication7.MainWindow"

        xmlns="http://schemas.microsoft.com/winfx/2006/xaml/presentation"

        xmlns:x="http://schemas.microsoft.com/winfx/2006/xaml"

        xmlns:my="clr-namespace:WpfApplication1"

        Title="MainWindow" Height="" Width="">

    <Grid>

        <Grid.Background>

            <ImageBrush x:Name="landBrush" ImageSource="C:\Users\john\Desktop\test.gif"/>

        </Grid.Background>

    </Grid>

</Window>

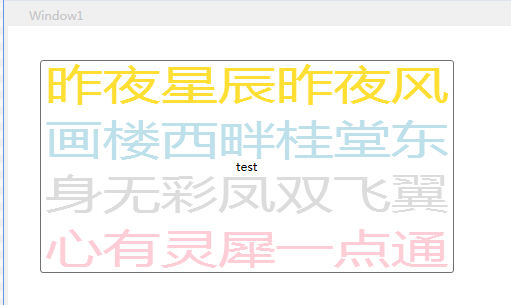
4、VisualBrush(控件画刷)
这个我们可以用来做水印。
首先作为windows资源引入:
        <Window.Resources>

            <VisualBrush x:Key="test" TileMode="Tile" Opacity="0.8">

                <VisualBrush.Visual>

                    <StackPanel>

                        <TextBlock Foreground="Gold">

                       昨夜星辰昨夜风

                        </TextBlock>

                        <TextBlock Foreground="LightBlue">

                       画楼西畔桂堂东

                        </TextBlock>

                        <TextBlock Foreground="LightGray">

                       身无彩凤双飞翼

                        </TextBlock>

                        <TextBlock Foreground="Pink">

                      心有灵犀一点通

                        </TextBlock>

                    </StackPanel>

                </VisualBrush.Visual>

            </VisualBrush>

        </Window.Resources>
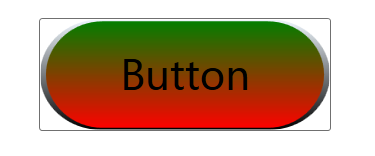
5、DrawingBrush(自定义画刷)
<Window x:Class="WpfApplication4.MainWindow"

        xmlns="http://schemas.microsoft.com/winfx/2006/xaml/presentation"

        xmlns:x="http://schemas.microsoft.com/winfx/2006/xaml"

        Title="MainWindow" Height="" Width="">

    <Window.Resources>

        <DrawingBrush x:Key="test">

            <DrawingBrush.Drawing>

                <DrawingGroup>

                    <DrawingGroup.Children>

                        <GeometryDrawing>

                            <!-- 绘制矩形 -->

                            <GeometryDrawing.Geometry>

                                <RectangleGeometry RadiusX="0.2" RadiusY="0.5"

                                                       Rect="0.02,0.02,0.96,0.96" />

                            </GeometryDrawing.Geometry>

                            <!-- 矩形填充色 -->

                            <GeometryDrawing.Brush>

                                <LinearGradientBrush StartPoint="0,0" EndPoint="0,1">

                                    <GradientStop Color="Green" Offset="" />

                                    <GradientStop Color="Red" Offset="" />

                                </LinearGradientBrush>

                            </GeometryDrawing.Brush>

                            <!-- 矩形边框 -->

                            <GeometryDrawing.Pen>

                                <Pen Thickness="0.02">

                                    <Pen.Brush>

                                        <LinearGradientBrush StartPoint="0,0" EndPoint="0,1">

                                            <GradientStop Color="AliceBlue" Offset="" />

                                            <GradientStop Color="Black" Offset="" />

                                        </LinearGradientBrush>

                                    </Pen.Brush>

                                </Pen>

                            </GeometryDrawing.Pen>

                        </GeometryDrawing>

                    </DrawingGroup.Children>

                </DrawingGroup>

            </DrawingBrush.Drawing>

        </DrawingBrush>

    </Window.Resources>

    <Grid>

        <Button Background="{StaticResource ResourceKey=test}" FontSize="" Content="Button" Height="" HorizontalAlignment="Left" Margin="89,80,0,0" Name="button1" VerticalAlignment="Top" Width="" />

    </Grid>

</Window>
6、常见效果举例:
a、头像:
    <Grid>

        <Ellipse x:Name="ellipseWithImageBrush" Stroke="#FF000000" Width="" Height="">

            <Ellipse.Fill>

                <ImageBrush ImageSource="Resources/wx_camera_1504279469046.jpg"/>

            </Ellipse.Fill>

        </Ellipse>

    </Grid>
效果:

b、对称:
XAML代码:

<Ellipse x:Name="ellipseWithDrawingBrush" Stroke="#FF000000" Width="" Height="">

  <Ellipse.Fill>

  <DrawingBrush Viewport="0,0,0.5,0.5" TileMode="Tile">

          <DrawingBrush.Drawing>

            <GeometryDrawing Brush="Red">

              <GeometryDrawing.Geometry>

                <GeometryGroup>

                  <EllipseGeometry RadiusX="" RadiusY="" Center="50,50" />

                  <EllipseGeometry RadiusX="" RadiusY="" Center="50,50" />

                </GeometryGroup>

              </GeometryDrawing.Geometry>

              <GeometryDrawing.Pen>

                <Pen Thickness="">

                  <Pen.Brush>

                    <LinearGradientBrush>

                      <GradientStop Offset="0.0" Color="Black" />

                      <GradientStop Offset="1.0" Color="Gray" />

                    </LinearGradientBrush>

                  </Pen.Brush>

                </Pen>

              </GeometryDrawing.Pen>

            </GeometryDrawing>

          </DrawingBrush.Drawing>

        </DrawingBrush>

</Ellipse.Fill>

  </Ellipse>

注意ImageBrush中属性的设置和不同的效果
TileMode="FlipX"
AlignmentX="Left"
AlignmentY="Top"
Viewport="0,0,0.3,0.3"
WPF设计の画刷(Brush)的更多相关文章
- 简述WPF中的画刷(Brush)
原文:简述WPF中的画刷(Brush) -------------------------------------------------------------------------------- ...
- Direct2D 学习笔记(2)画刷 Brush
画刷的使用方法 需要包含的文件:<wincodec.h> 需要包含的库: "windowscodecs.lib" 资源网址: https://docs.micro ...
- [No000012B]WPF(3/7)有趣的边框和画刷[译]
介绍 边框是每个WPF程序的主要构成块.在我现在的程序中,我使用了很多的边框来装饰界面.从把边框直接放到窗口中到把边框放到控件模板和列表项中,边框在创建一个好的应用界面上扮演了一个非常重要的角色.在这 ...
- 深入WPF中的图像画刷(ImageBrush)之2——ImageBrush的铺设方式
原文:深入WPF中的图像画刷(ImageBrush)之2--ImageBrush的铺设方式 ------------------------------------------------------ ...
- 深入WPF中的图像画刷(ImageBrush)之1——ImageBrush使用举例
原文:深入WPF中的图像画刷(ImageBrush)之1--ImageBrush使用举例 昨天我在<简述WPF中的画刷(Brush) >中简要介绍了WPF中的画刷的使用.现在接着深入研究 ...
- Unity3D-terrain brush地形画刷无法出现在Scene中,无法刷地图2
原因大概是 画刷brush 太小了,地图也太小了,没出出现. 如图,非正常状态: 解决方法: tag: terrain brush not working unity
- 《WPF程序设计指南》读书笔记——第2章 基本画刷
1.Color结构 using System; using System.Windows; using System.Windows.Input; using System.Windows.Media ...
- MFC更换画笔(画刷)颜色以及画眼睛(GDI画图)
MFC画眼睛 换画笔(画刷)颜色(参考链接:https://blog.csdn.net/sunxiving/article/details/51272001) 由于画笔一旦创建后就无法修改.所以要修改 ...
- Qt 学习之路 2(25):画刷和画笔
Home / Qt 学习之路 2 / Qt 学习之路 2(25):画刷和画笔 Qt 学习之路 2(25):画刷和画笔 豆子 2012年11月5日 Qt 学习之路 2 17条评论 前面一章我们提 ...
随机推荐
- ajax实现跨域访问
ajax跨域访问是一个老生畅谈的问题啦,网上解决方法很多,discuz用的p3p协议,有兴趣的朋友可以了解下,比较常用的是JSONP方法,貌似目前这种方法只支持GET方式,不如POST方式安全. 即使 ...
- 【Java基础】16、小数的浮点型和定点型
一.简介 1.对于不需要任何准确计算精度的数字可以直接使用浮点型,但是如果需要精确计算的结果,则必须使用定点型(BigDecimal类) 浮点型:float,double 定点型:BigDecimal ...
- Http协议请求头、响应头、响应码
Http部分请求头 Accept 客户机通过这个头,告诉服务器,它支持哪些数据类型 Accept-Charset 客户机通过这个头,告诉服务器,它支持的编码 Accept-Encoding 客户机通过 ...
- vue(一)使用vue-cli搭建项目
一.安装node.js 去官网下载安装node.js: https://nodejs.org/en/ 安装完成后,可以在命令行工具(Windows是cmd,苹果是终端控制)输入node -v 和 ...
- 微信小程序之发送模板消息(通过openid推送消息给用户)
一.获取access_token access_token是接口调用的凭证,目前有效期为两个小时,需要定时刷新,重复获取将导致上次获取的access_token失效.(注:不建议每次调用需要acces ...
- div添加cursor:pointer;失效问题。
如果你不小心给其它盒子设置了z-index属性显示在最上层而又没有将该盒子进行隐藏. <style> .bottom { position: absolute; width:100px; ...
- next.js学习笔记
github地址: https://github.com/zeit/next.js#fetching-data-and-component-lifecycle 简介 Next.js是一个用于React ...
- CSS效果:这里有你想要的CSS3漂亮的自定义Checkbox各种复选框
在原来有一篇文章写到了<CSS效果篇--纯CSS+HTML实现checkbox的思路与实例>. 今天这篇文章主要写各种自定义的checkbox复选框,实现如图所示的复选框: 大致的html ...
- vuejs通过filterBy,orderBy实现搜索筛选,降序排序数据实例
直接贴代码了: 先上输入前的样子: <style> #example{margin:100px auto;width:600px;} .show{margin:10px;} #search ...
- Human Motion Analysis with Wearable Inertial Sensors——阅读3
Human Motion Analysis with Wearable Inertial Sensors——阅读3 四元数方向滤波器 之前的研究开发了一种自适应增益互补滤波器,并结合高斯 - 牛顿优化 ...