spark sortShuffleWriter源码学习
查看的源码为spark2.3

调用ShuffleMapTask的runTask方法
org.apache.spark.scheduler.ShuffleMapTask#runTask
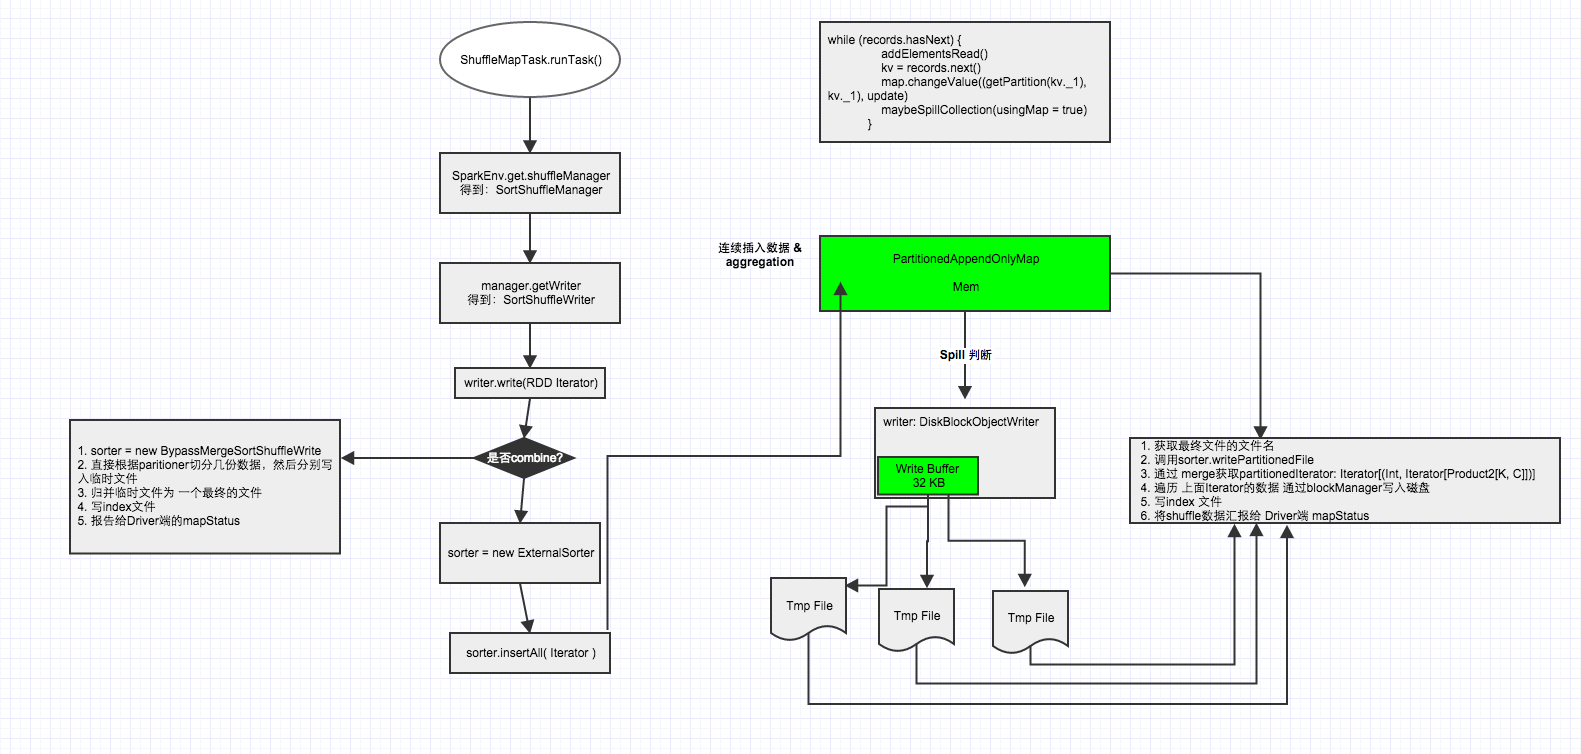
ShuffleMapTask继承了org.apache.spark.scheduler.Task,重写了Task的runTask方法,在该方法中关于shuffle部分主要是获取shuffleManager,然后得到sortShuffleManager,然后再通过manager获取writer,得到sortShuffleWriter,然后调用writer方法
- override def runTask(context: TaskContext): MapStatus = {
- // Deserialize the RDD using the broadcast variable.
- val threadMXBean = ManagementFactory.getThreadMXBean
- val deserializeStartTime = System.currentTimeMillis()
- val deserializeStartCpuTime = if (threadMXBean.isCurrentThreadCpuTimeSupported) {
- threadMXBean.getCurrentThreadCpuTime
- } else 0L
- val ser = SparkEnv.get.closureSerializer.newInstance()
- val (rdd, dep) = ser.deserialize[(RDD[_], ShuffleDependency[_, _, _])](
- ByteBuffer.wrap(taskBinary.value), Thread.currentThread.getContextClassLoader)
- _executorDeserializeTime = System.currentTimeMillis() - deserializeStartTime
- _executorDeserializeCpuTime = if (threadMXBean.isCurrentThreadCpuTimeSupported) {
- threadMXBean.getCurrentThreadCpuTime - deserializeStartCpuTime
- } else 0L
- //定义writer对象
- var writer: ShuffleWriter[Any, Any] = null
- try {
//获取shuffleManager- val manager = SparkEnv.get.shuffleManager
//通过shuffleManager获取Writer对象,这里的partitionId传入的其实是mapId,每个map有个mapId- writer = manager.getWriter[Any, Any](dep.shuffleHandle, partitionId, context)
//调用write方法。write方法如下- writer.write(rdd.iterator(partition, context).asInstanceOf[Iterator[_ <: Product2[Any, Any]]])
- writer.stop(success = true).get
- } catch {
- case e: Exception =>
- try {
- if (writer != null) {
- writer.stop(success = false)
- }
- } catch {
- case e: Exception =>
- log.debug("Could not stop writer", e)
- }
- throw e
- }
- }
调用SortShuffleWriter的write方法
org.apache.spark.shuffle.sort.SortShuffleWriter#write
SortShuffleWriter继承了org.apache.spark.shuffle.ShuffleWriter并重写了其write方法
- /** Write a bunch of records to this task's output */
- override def write(records: Iterator[Product2[K, V]]): Unit = {
- //根据是否存在map端聚合获取ExternalSorter对象(sorter)
- sorter = if (dep.mapSideCombine) {
- require(dep.aggregator.isDefined, "Map-side combine without Aggregator specified!")
- new ExternalSorter[K, V, C](
- context, dep.aggregator, Some(dep.partitioner), dep.keyOrdering, dep.serializer)
- } else {
- // In this case we pass neither an aggregator nor an ordering to the sorter, because we don't
- // care whether the keys get sorted in each partition; that will be done on the reduce side
- // if the operation being run is sortByKey.如果没有map-side聚合,那么创建sorter对象时候,aggregator和ordering将不传入对应的值
- new ExternalSorter[K, V, V](
- context, aggregator = None, Some(dep.partitioner), ordering = None, dep.serializer)
- }
//通过insertAll方法先写数据到buffer- sorter.insertAll(records)
- // Don't bother including the time to open the merged output file in the shuffle write time,
- // because it just opens a single file, so is typically too fast to measure accurately
- // (see SPARK-3570).
- //通过blockManager获取对应mapId.shuffleId的文件输出路径
- val output = shuffleBlockResolver.getDataFile(dep.shuffleId, mapId)
//返回与“path”位于同一目录中的临时文件的路径。- val tmp = Utils.tempFileWith(output)
- try {
- val blockId = ShuffleBlockId(dep.shuffleId, mapId, IndexShuffleBlockResolver.NOOP_REDUCE_ID)
//将所有的数据合并到一个文件中- val partitionLengths = sorter.writePartitionedFile(blockId, tmp)
//生成index文件,也就是每个reduce通过该index文件得知它哪些是属于它的数据- shuffleBlockResolver.writeIndexFileAndCommit(dep.shuffleId, mapId, partitionLengths, tmp)
- mapStatus = MapStatus(blockManager.shuffleServerId, partitionLengths)
- } finally {
- if (tmp.exists() && !tmp.delete()) {
- logError(s"Error while deleting temp file ${tmp.getAbsolutePath}")
- }
- }
- }
ExternalSorter类
创建ExternalSorter对象时,各参数对应的意思。
- class ExternalSorter[K, V, C](
- context: TaskContext,
- aggregator: Option[Aggregator[K, V, C]] = None,
- partitioner: Option[Partitioner] = None,
- ordering: Option[Ordering[K]] = None,
- serializer: Serializer = SparkEnv.get.serializer)
- aggregator:在RDD shuffle时,map/reduce-side使用的aggregator
- partitioner:对shuffle的输出,使用哪种partitioner对数据做分区,比如hashPartitioner或者rangePartitioner
- ordering:根据哪个key做排序
- serializer:使用哪种序列化,如果没有显示指定,默认使用spark.serializer参数值
从一个high level的角度看ExternalSorter到底做了什么?
第一:反复的将数据填充到内存buffer中(如果需要通过key做map-side聚合,则使用PartitionedAppendOnlyMap;如果不需要,则使用PartitionedPairBuffer),如下
- // Data structures to store in-memory objects before we spill. Depending on whether we have an
- // Aggregator set, we either put objects into an AppendOnlyMap where we combine them, or we
- // store them in an array buffer.
- @volatile private var map = new PartitionedAppendOnlyMap[K, C]
- @volatile private var buffer = new PartitionedPairBuffer[K, C]
第二:在buffer中,通过key计算partition ID,通过partition ID对数据进行排序(partition ID可以理解为reduce ID,意思就是数据被分给了哪个reduce),为了避免对key调用多次partitioner,spark会将partition ID跟每一条数据一起存储。
第三:当buffer达到内存限制时(buffer默认大小32k,由spark.shuffle.file.buffer参数决定),会将buffer中的数据spill到文件中(每次spill都会生成一个文件),如果我们需要做map-side聚合,该文件生成时会通过partition ID先做排序,然后通过key或者key的hashcode值做二次排序。
第四:将spill形成的多个文件合并包括还在内存中的数据,文件合并时候将会排序,排序方式跟上面一样,生成数据文件dataFile以及索引文件indexFile
第五:最后调用stop方法,删除所有中间文件
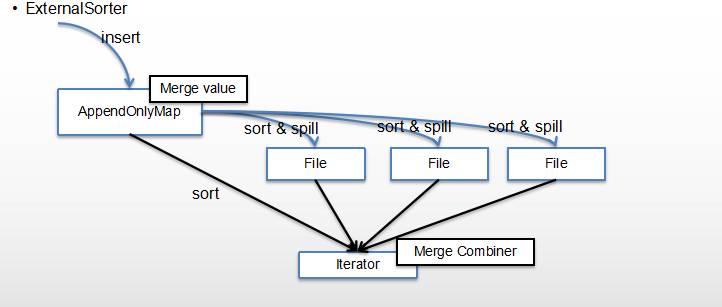
结合下图更好理解

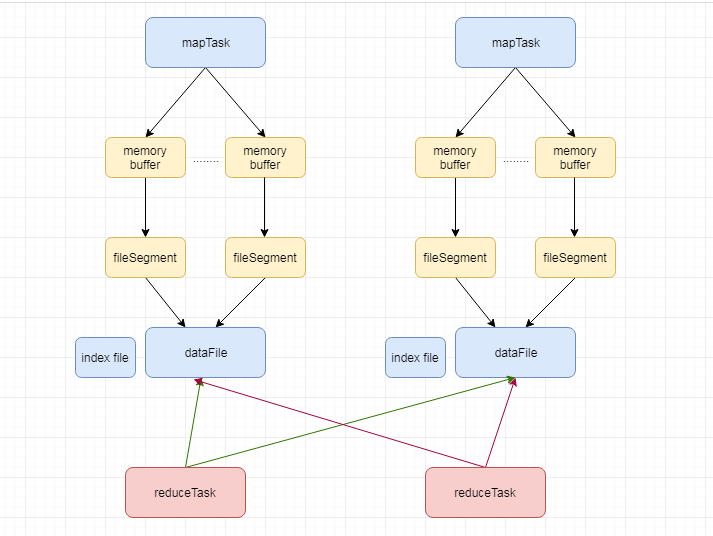
mapTask通过externalSorter生成多个文件,也就是fileSegment,最后每个map任务的所有filesegment将会合并成一个file

上图数据插入的是appendOnlyMap,也就是使用了map-side聚合,所以有merger value,appendOnlyMap在满了以后(默认32k)将spill成文件,多次spill生成多个文件,最后merge所有文件包括还在内存buffer中的数据。
调用ExternalSorter的insertAll方法
这一步主要是往buffer写数据,对数据分partition ID,buffer满了spill数据到磁盘且对数据排序
- def insertAll(records: Iterator[Product2[K, V]]): Unit = {
- // TODO: stop combining if we find that the reduction factor isn't high如果合并比例不高的话,就不会继续合并了
- // 通过创建ExternalSorter对象时传入的aggregator获取是否存在合并
- val shouldCombine = aggregator.isDefined
- if (shouldCombine) {
- // Combine values in-memory first using our AppendOnlyMap
- val mergeValue = aggregator.get.mergeValue
- val createCombiner = aggregator.get.createCombiner
- var kv: Product2[K, V] = null
- val update = (hadValue: Boolean, oldValue: C) => {
- //合并值方式
- if (hadValue) mergeValue(oldValue, kv._2) else createCombiner(kv._2)
- }
- while (records.hasNext) {
- addElementsRead()
- kv = records.next()
- //这个map就是该类中定义的PartitionedAppendOnlyMap,getPartition方法通过key获取所属Partition ID(hashPartitioner)
- map.changeValue((getPartition(kv._1), kv._1), update)
- // buffer满的话将内存中的数据spill成文件
- maybeSpillCollection(usingMap = true)
- }
- } else {
- // Stick values into our buffer
- while (records.hasNext) {
- addElementsRead()
- val kv = records.next()
- //这个buffer就是该类中定义的PartitionedPairBuffer
- buffer.insert(getPartition(kv._1), kv._1, kv._2.asInstanceOf[C])
- maybeSpillCollection(usingMap = false)
- }
- }
- }
insertAll方法中调用maybeSpillCollection方法
- /**
- * Spill the current in-memory collection to disk if needed.
- *
- * @param usingMap whether we're using a map or buffer as our current in-memory collection
- * 不同的数据结构(也就是buffer)调用不同的方法
- */
- private def maybeSpillCollection(usingMap: Boolean): Unit = {
- var estimatedSize = 0L
- if (usingMap) {
- estimatedSize = map.estimateSize()
//maybeSpill方法会尝试申请buffer内存,如果申请到内存,则spill且返回false。否则true- if (maybeSpill(map, estimatedSize)) {
//appendOnlyMap的数据spill以后,创建一个新的appendOnlyMap- map = new PartitionedAppendOnlyMap[K, C]
- }
- } else {
- estimatedSize = buffer.estimateSize()
- if (maybeSpill(buffer, estimatedSize)) {
- buffer = new PartitionedPairBuffer[K, C]
- }
- }
- if (estimatedSize > _peakMemoryUsedBytes) {
- _peakMemoryUsedBytes = estimatedSize
- }
- }
maybeSpillCollection方法中调用maybeSpill方法,判断是否应该执行spill
- /**
- * Spills the current in-memory collection to disk if needed. Attempts to acquire more
- * memory before spilling.
- * 在spill之前会尝试申请内存,最后才判断是否真正执行spill
- * @param collection collection to spill to disk
- * @param currentMemory estimated size of the collection in bytes
- * @return true if `collection` was spilled to disk; false otherwise
- */
- protected def maybeSpill(collection: C, currentMemory: Long): Boolean = {
- var shouldSpill = false
- if (elementsRead % 32 == 0 && currentMemory >= myMemoryThreshold) {
- // Claim up to double our current memory from the shuffle memory pool;从上次spill以后,每读取32个元素判断一次,声明申请额外内存
- val amountToRequest = 2 * currentMemory - myMemoryThreshold
- val granted = acquireMemory(amountToRequest)
- myMemoryThreshold += granted
- // If we were granted too little memory to grow further (either tryToAcquire returned 0,
- // or we already had more memory than myMemoryThreshold), spill the current collection
- shouldSpill = currentMemory >= myMemoryThreshold
- }
- shouldSpill = shouldSpill || _elementsRead > numElementsForceSpillThreshold
- // Actually spill
- if (shouldSpill) {
- _spillCount += 1
- logSpillage(currentMemory)
- spill(collection)
- _elementsRead = 0
- _memoryBytesSpilled += currentMemory
- releaseMemory()
- }
- shouldSpill
- }

1
spark sortShuffleWriter源码学习的更多相关文章
- Spark源码学习1.1——DAGScheduler.scala
本文以Spark1.1.0版本为基础. 经过前一段时间的学习,基本上能够对Spark的工作流程有一个了解,但是具体的细节还是需要阅读源码,而且后续的科研过程中也肯定要修改源码的,所以最近开始Spark ...
- 【Spark2.0源码学习】-1.概述
Spark作为当前主流的分布式计算框架,其高效性.通用性.易用性使其得到广泛的关注,本系列博客不会介绍其原理.安装与使用相关知识,将会从源码角度进行深度分析,理解其背后的设计精髓,以便后续 ...
- 使用 IntelliJ IDEA 导入 Spark 最新源码及编译 Spark 源代码(博主强烈推荐)
前言 其实啊,无论你是初学者还是具备了有一定spark编程经验,都需要对spark源码足够重视起来. 本人,肺腑之己见,想要成为大数据的大牛和顶尖专家,多结合源码和操练编程. 准备工作 1.sca ...
- 【Spark SQL 源码分析系列文章】
从决定写Spark SQL源码分析的文章,到现在一个月的时间里,陆陆续续差不多快完成了,这里也做一个整合和索引,方便大家阅读,这里给出阅读顺序 :) 第一篇 Spark SQL源码分析之核心流程 第二 ...
- Spark SQL源码解析(二)Antlr4解析Sql并生成树
Spark SQL原理解析前言: Spark SQL源码剖析(一)SQL解析框架Catalyst流程概述 这一次要开始真正介绍Spark解析SQL的流程,首先是从Sql Parse阶段开始,简单点说, ...
- Java集合专题总结(1):HashMap 和 HashTable 源码学习和面试总结
2017年的秋招彻底结束了,感觉Java上面的最常见的集合相关的问题就是hash--系列和一些常用并发集合和队列,堆等结合算法一起考察,不完全统计,本人经历:先后百度.唯品会.58同城.新浪微博.趣分 ...
- jQuery源码学习感想
还记得去年(2015)九月份的时候,作为一个大四的学生去参加美团霸面,结果被美团技术总监教育了一番,那次问了我很多jQuery源码的知识点,以前虽然喜欢研究框架,但水平还不足够来研究jQuery源码, ...
- MVC系列——MVC源码学习:打造自己的MVC框架(四:了解神奇的视图引擎)
前言:通过之前的三篇介绍,我们基本上完成了从请求发出到路由匹配.再到控制器的激活,再到Action的执行这些个过程.今天还是趁热打铁,将我们的View也来完善下,也让整个系列相对完整,博主不希望烂尾. ...
- MVC系列——MVC源码学习:打造自己的MVC框架(三:自定义路由规则)
前言:上篇介绍了下自己的MVC框架前两个版本,经过两天的整理,版本三基本已经完成,今天还是发出来供大家参考和学习.虽然微软的Routing功能已经非常强大,完全没有必要再“重复造轮子”了,但博主还是觉 ...
随机推荐
- PAT A1034 Head Of Gang
用并查集分割团伙,判断输出~ #include<bits/stdc++.h> using namespace std; ; },weight[maxn]; unordered_map< ...
- 【转】CGI 和 FastCGI 协议的运行原理
介绍 深入CGI协议 CGI的运行原理 CGI协议的缺陷 深入FastCGI协议 FastCGI协议运行原理 为什么是 FastCGI 而非 CGI 协议 CGI 与 FastCGI 架构 再看 Fa ...
- C语言入门---第七章 C语言函数
函数就是一段封装好的,可以重复使用的代码,它使得我们的程序更加模块化,不需要编写大量重复的代码.函数可以提前保存起来,并给它起一个独一无二的名字,只要知道它的名字就能使用这段代码.函数还可以接收数据, ...
- tensorflow中的图(02-1)
由于tensorflow版本迭代较快且不同版本的接口会有差距,我这里使用的是1.14.0的版本 安装指定版本的方法:pip install tensorflow==1.14.0 如果你之前安 ...
- go笔记(go中的方法调用)
最近接触go语言 发现和java的方法调用有些类似但又有自己的注意点 go的包我理解为则是隔离的最小模块 先在src目录下创建main.go文件 package为main,然后在src下创建mod ...
- Day1-B-CF-1144B
简述:有一个n个元素的序列,选奇数下一个就选偶数,偶数则下一个就是奇数,问能否取完,能取完输出0,否则输出能剩下的最小的之和 思路:统计奇偶数个数,若相等或相差一则取完,否则排列后取出最小的前x个(x ...
- 警示框UIAlertController的使用(看完马上会用!!)
本文尽量图文并茂,并且提供对应的代码,确保看到这篇文章马上能够上手使用UIAlertController控件.-我要兑现我的务实宣言- 本文构思: 1.出具效果图,通过这种最直接方式了解该控件的展示效 ...
- python如何在文件每一行前面加字符串?
对于python中原来的文件,需要在每一行前面添加一个特舒符号,比如逗号或者“--”,需要先把原来的文件内容记录下之后,进行清空,再进行写入,另外需要注意的是r+和a+都是可写可读,不过a+是从文件末 ...
- 五 Mybatis一对一关联查询的两种方式(基于resultType&基于resultMap)
关联查询: 一个用户对应多个订单,一个订单只有一个用户 订单关联用户:两种方式 一:基于resultTYpe,一个与表关系一样的pojo实现 主表订单,从表用户 首先要有一个与关联查询表关系一样的po ...
- linux 串口 拼帧处理
串口每次read数据可能不是完整的数据,参照网上的代码,写了拼帧的代码#include <stdio.h> #include <termios.h> #include < ...
