ASP.NET MVC IOC 之Ninject攻略
ASP.NET MVC IOC 之Ninject攻略
一、为什么要使用Ninject?
很多其它类型的IOC容器过于依赖配置文件,老是配置,总感觉有点不爽,而且要使用assembly-qualified名称(也就是类型的全名)来进行定义,稍不注意就会因为打错字而令整个程序崩掉。Ninject是一个快如闪电、超轻量级的基于.Net平台的IOC容器,主要用来解决程序中模块的耦合问题,它的目的在于做到最少配置。因此如果你不喜欢配置,不喜欢重量级IOC框架,那么就用小苹果Ninject吧!
二、Ninject的使用
首先你必须获取Ninject,其官网下载地址:http://www.ninject.org,你也可以通过VS中的NuGet来加载Nniject,不论是哪种方式,最终的目的就是将 Ninject.dll 这个程序集引用到你的项目中。这样在你的项目中,如果想使用Ninject,只需添加其命名空间引用即可~
using Ninject;
1、Ninject入门
我们先定义一个记录日志的接口:
public interface ILogger

{

    void Write(string message);

}
然后用文件记录日志方式和数据库记录日志方式分别实现这个接口,不过这里只是演示而已,所以并没有真正去实现这两个类,你懂的~

public class FileLogger : ILogger

{

    public void Write(string message)

    {

        Console.WriteLine(String.Format("文件记录日志:{0}", message));

    }

}

public class DBLogger : ILogger

{

    public void Write(string message)

    {

        Console.WriteLine(String.Format("数据库记录日志:{0}", message));

    }

}
在Ninject中,我们可以通过重写Ninject.Modules.NinjectModule类的方法Load()而实现依赖注入,注意这里用的是代码的形式!
public class MyModule : Ninject.Modules.NinjectModule

{

    public override void Load()

    {

        Bind<ILogger>().To<FileLogger>();

        Bind<ILogger>().To<DBLogger>();

    }

}
具体调用方法:
private static IKernel kernel = new StandardKernel(new MyModule());

static void Main(string[] args)

{

    ILogger logger = kernel.Get<ILogger>();//获取的是FileLogger

    logger.Write(" Hello Ninject!");

    Console.Read();

}
没错,用Ninject进行依赖注入就是这么爽歪歪~
2、Ninject常用方法属性说明
这里我们使用构造函数注入一个栗子:
首先新建一个测试接口ITester与其实现类NinjectTester ,显然NinjectTester依赖于ILogger
interface ITester

{

    void Test();

}

class NinjectTester:ITester

{

    public string _Message{set;get;}


    private ILogger _logger;

    public NinjectTester(ILogger logger)

    {

        _logger = logger;

    }

    public void Test()

    {

        _logger.Write("Hello Ninject!");

    }

}
下面就看看用Ninject的方式实现依赖注入的过程中用到的一些东东~
(1)Bind<T1>().To<T2>()
其实就是接口IKernel的方法,把某个类绑定到某个接口,T1代表的就是接口或者抽象类,而T2代表的就是其实现类
例如:
IKernel ninjectKernel = new StandardKernel();

ninjectKernel.Bind<ILogger>().To<FileLogger>();
(2)Get<ISomeInterface>()
其实就是得到某个接口的实例,例如下面的栗子就是得到ILogger的实例FileLogger:
ILogger myLogger= ninjectKernel.Get<ILogger>();
(3)Bind<T1>() .To<T2>(). WithPropertyValue("SomeProprity", value);
其实就是在绑定接口的实例时,同时给实例NinjectTester的属性赋值,例如:
ninjectKernel.Bind<ITester>().To<NinjectTester>().WithPropertyValue("_Message", "这是一个属性值注入");
(4)ninjectKernel.Bind<T1>().To<T2>(). WithConstructorArgument("someParam", value);
其实就是说我们可以为实例的构造方法所用的参数赋值,例如:
public class DefalutDiscountHelper : IDiscountHelper

    {

        private decimal discountRate;

        public decimal DiscountSize { get; set; }

        public DefalutDiscountHelper(decimal discountParam)

        {

            discountRate = discountParam;

        }

        public decimal ApplyDiscount(decimal totalParam)

        {

            return (totalParam - (discountRate / 100M * totalParam));

        }

    }
ninjectKernel.Bind<IDiscountHelper>().To<DefalutDiscountHelper>().WithConstructorArgument("discountParam", 50M);
(5)Bind<T1>().ToConstant()
这个方法的意思是绑定到某个已经存在的常量,例如:
StudentRepository sr = new StudentRepository();

ninjectKernel.Bind<IStudentRepository>().ToConstant(sr);
(6)Bind<T1>().ToSelf()
这个方法意思是绑定到自身,但是这个绑定的对象只能是具体类,不能是抽象类。为什么要自身绑定呢?其实也就是为了能够利用Ninject解析对象本身而已。例如:
ninjectKernel.Bind<StudentRepository>().ToSelf();
StudentRepository sr = ninjectKernel.Get<StudentRepository>();
(7)Bind<T1>().To<T2>().WhenInjectedInto<instance>()
这个方法是条件绑定,就是说只有当注入的对象是某个对象的实例时才会将绑定的接口进行实例化
ninjectKernel.Bind<IValueCalculater>().To<IterativeValueCalculatgor>().WhenInjectedInto<LimitShoppingCart>();
(8)Bind<T1>().To<T2>().InTransientScope()或者Bind<T1>().To<T2>().InSingletonScope()
这个方法是为绑定的对象指明生命周期其实
ninjectKernel.Bind<IStudentRepository>().To<StudentRepository>().InTransientScope();

//每次调用创建新实例
ninjectKernel.Bind<IStudentRepository>().To<StudentRepository>().InSingletonScope();
//每次调用是同一个实例
(9)Load()方法
这里的Load()方法其实是抽象类Ninject.Modules.NinjectModule的一个抽象方法,通过重写Load()方法可以对相关接口和类进行集中绑定,例如:
public class MyModule : Ninject.Modules.NinjectModule

{

    public override void Load()

    {

        Bind<ILogger>().To<FileLogger>();

        Bind<ITester>().To<NinjectTester>();

    }

}
这是通过Load()方法绑定之后的完整代码:
private static IKernel kernel = new StandardKernel(new MyModule());

static void Main(string[] args)

{

    ITester tester = kernel.Get<ITester>(); // 因为是链式解析,因此只解析ITester即可,其它依赖的东东都会顺带解析
    tester.Test();

    Console.Read();

}
(10)Inject属性
在Inject中,我们可以通过在构造函数、属性和字段上加 Inject特性指定注入的属性、方法和字段等,例如下面的栗子,MessageDB有两个构造函数:int和object类型的。现在我们已经为int型的指定了Inject特性,因此在注入的时候选择的就是int型的构造函数;如果没有在构造函数上指定Inject特性,则默认选择第一个构造函数:
public class MessageDB : IMessage

    {

        public MessageDB() { }

        public MessageDB(object msg)

        {

            Console.WriteLine("使用了object 参数构造:{0}", msg);

        }

        [Inject]

        public MessageDB(int msg)

        {

            Console.WriteLine("使用了int 参数构造:{0}", msg);

        }

        public string GetMsgNumber()

        {

            return "从数据中读取消息号!";

        }

    }
3、Ninject能使用配置文件吗?
答案是肯定的,要不怎么说Ninject是可扩展的呢,必须可以,但是如果这样的话,你就没必要用Ninject了,因为这样又回到了繁琐的配置上面,还不如用其他的IOC容器来得方便,这里用的是Ninject的XML扩展,你可以通过下面的地址https://github.com/ninject/ninject.extensions.xml下载扩展组件,主要也就是Ninject.Extensions.Xml这个东东起的作用,这里不想详说,给个栗子了结:
(1)配置文件
(2)利用扩展加载服务
(3)调用服务
三、ASP.NET MVC与Ninject
说了这么多Ninject,主要还是想将其用到ASP.NET MVC的IOC中,其实很简单,大概就几个步骤搞定:
1、继承DefaultControllerFactory,重载GetControllerInstance方法,实现自己的NinjectControllerFactory类
using System;

using System.Collections.Generic;

using System.Linq;

using System.Web;

using System.Web.Mvc;

using System.Web.Routing;

using Ninject;

using NinjectMvc.Models;

namespace NinjectMvc.Ioc

{

    public class NinjectControllerFactory : DefaultControllerFactory

    {

        private IKernel ninjectKernel;

        public NinjectControllerFactory()

        {

            ninjectKernel = new StandardKernel();

            AddBindings();

        }

        protected override IController GetControllerInstance(RequestContext requestContext, Type controllerType)

        {

            return controllerType == null ? null : (IController)ninjectKernel.Get(controllerType);

        }

        private void AddBindings()

        {

            ninjectKernel.Bind<IStudentRepository>().To<StudentRepository>();

        }

    }

}
2、在函数Application_Start() 注册自己的控制器工厂类
public class MvcApplication : System.Web.HttpApplication

    {

        protected void Application_Start()

        {

            AreaRegistration.RegisterAllAreas();

            WebApiConfig.Register(GlobalConfiguration.Configuration);

            FilterConfig.RegisterGlobalFilters(GlobalFilters.Filters);

            RouteConfig.RegisterRoutes(RouteTable.Routes);

            BundleConfig.RegisterBundles(BundleTable.Bundles);

            AuthConfig.RegisterAuth();

            ControllerBuilder.Current.SetControllerFactory(new NinjectControllerFactory());

            //设置控制器工厂生产类为自己定义的NinjectControllerFactory

        }

    }
3、现在在你的MVC程序中注入依赖代码就ok了
(1)首先声明一个Student学生类
using System;

using System.Collections.Generic;

using System.Linq;

using System.Web;

namespace NinjectMvc.Models

{

    public class Student

    {

        public int Id { get; set; }

        public string Name { get; set; }

        public string Graduation { get; set; }

        public string School { get; set; }

        public string Major { get; set; }

    }

}
(2)然后声明仓储接口和其实现
using System;

using System.Collections.Generic;

using System.Linq;

using System.Text;

namespace NinjectMvc.Models

{

    public interface IStudentRepository

    {

        IEnumerable<Student> GetAll();

        Student Get(int id);

        Student Add(Student item);

        bool Update(Student item);

        bool Delete(int id);

    }

}
(3)最后添加控制器StudentController,并注入依赖代码
using System;

using System.Collections.Generic;

using System.Linq;

using System.Web;

using System.Web.Mvc;

using NinjectMvc.Models;

namespace NinjectMvc.Controllers

{

    public class StudentController : Controller

    {

        readonly IStudentRepository repository;

        //构造器注入

        public StudentController(IStudentRepository repository)

        {

            this.repository = repository;

        }

        public ActionResult Index()

        {

            var data = repository.GetAll();

            return View(data);

        }

    }

}
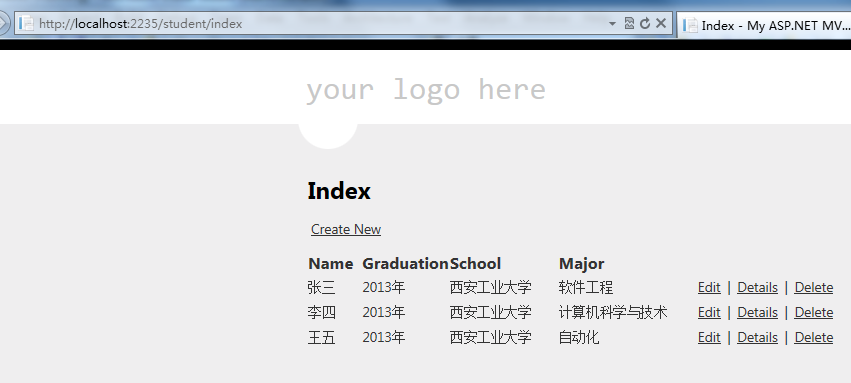
(4)最后为控制器StudentController的Index方法添加视图即可,这里不再详述,运行效果如下
总结
ASP.NET MVC IOC 之Ninject攻略的更多相关文章
- ASP.NET MVC IOC之Unity攻略
ASP.NET MVC IOC之Unity攻略 一.你知道IOC与DI吗? 1.IOC(Inversion of Control )——控制反转 即依赖对象不在被依赖模块的类中直接通过new来获取 先 ...
- [转]ASP.NET MVC IOC 之AutoFac攻略
本文转自:http://www.cnblogs.com/WeiGe/p/3871451.html 一.为什么使用AutoFac? 之前介绍了Unity和Ninject两个IOC容器,但是发现园子里用A ...
- ASP.NET MVC IOC 之AutoFac攻略
一.为什么使用AutoFac? 之前介绍了Unity和Ninject两个IOC容器,但是发现园子里用AutoFac的貌似更为普遍,于是捯饬了两天,发现这个东东确实是个高大上的IOC容器~ Autofa ...
- ASP.NET MVC Razor视图引擎攻略
--引子 看下面一段MVC 2.0的代码. <%if (Model != null){%> <p><%=Model%></p><%}%>&l ...
- ASP.NET MVC IOC 之AutoFac
ASP.NET MVC IOC 之AutoFac攻略 一.为什么使用AutoFac? 之前介绍了Unity和Ninject两个IOC容器,但是发现园子里用AutoFac的貌似更为普遍,于是捯饬了两天, ...
- ASP.NET没有魔法——ASP.NET MVC IoC
之前的文章介绍了MVC如何通过ControllerFactory及ControllerActivator创建Controller,而Controller又是如何通过ControllerBase这个模板 ...
- ASP.NET MVC中使用Ninject
ASP.NET MVC中使用Ninject 在[ASP.NET MVC 小牛之路]系列上一篇文章(依赖注入(DI)和Ninject)的末尾提到了在ASP.NET MVC中使用Ninject要做的两件事 ...
- ASP.NET MVC IOC依赖注入之Autofac系列(二)- WebForm当中应用
上一章主要介绍了Autofac在MVC当中的具体应用,本章将继续简单的介绍下Autofac在普通的WebForm当中的使用. PS:目前本人还不知道WebForm页面的构造函数要如何注入,以下在Web ...
- Asp.net MVC 中使用 Ninject 实现依赖注入
松耦合.针对抽象编程.不针对实现编程是面向对象设计的原则.依赖注入就是,在一个类的内部,不通过创建对象的实例而能够获得实现了某个公开接口的对象引用.所谓的控制反转也是相同的意思.把依赖的创建转移到了使 ...
随机推荐
- 单节点伪分布式Hadoop配置
本文所用软件版本: VMware-workstation-full-11.1.0 jdk-6u45-linux-i586.bin ubuntukylin-14.04-desktop-i386.iso ...
- Effective C++学习笔记(Part One:Item 1-4)
最近的最终effectvie C++仔细阅读侧,我很惊讶C++动力和魅力.最近的" LL最近记得阅读体验和读书笔记其.必要查找使用,是什么假设总结不合适.欢迎批评: 如今仅仅列出框架,近期会 ...
- C# 线程知识--使用Task执行异步操作
在C#4.0之前需要执行一个复杂的异步操作时,只能使用CLR线程池技术来执行一个任务.线程池执行异步任务时,不知道任务何时完成,以及任务的在任务完成后不能获取到返回值.但是在C#4.0中引人了一个的任 ...
- uva 10652 Board Wrapping (计算几何-凸包)
Problem B Board Wrapping Input: standard input Output: standard output Time Limit: 2 seconds The sma ...
- C语言字符串函数大全
C语言字符串函数大全 函数名: stpcpy 功 能: 拷贝一个字符串到另一个 用 法: char *stpcpy(char *destin, char *source); 程序例: #include ...
- ASPNETPager常用属性
<webdiyer:AspNetPager ID="pager" runat="server" class="page" FirstP ...
- ORACLE11G RAC 施加以分离不同的实例.TAF
有套POS制 现在应用大量的,大量的数据,! 年前的交易在一定程度上的统计分析影响了额外的应用程序. 这两种应用分别OLTP和OLAP. 其实很多本项目具有的应用要求双方. 看了很多近期的其他系统, ...
- 多层次的Json字符串转化为对象
using Arvato.CRM.DataTrans.ConsoleHost.Model;using System;using System.Collections.Generic;using Sys ...
- Dom中的nodeName、nodeValue 、nodeType
nodeName.nodeValue 以及 nodeType 包含有关于节点的信息. nodeName 属性含有某个节点的名称. 元素节点的 nodeName 是标签名称 属性节点的 nodeName ...
- android USB OTG功能实现
一个.检查HW概要,确认是否支持OTG特征(vbus无论是动力,IDDIG pin连接是否正确) 两.如果HW确认支持OTG特征,然后根据以下方法被打开USB OTG功能及实现山: 如何打开USB O ...