【spring boot】SpringBoot初学(6)– aop与自定义注解
前言
github: https://github.com/vergilyn/SpringBootDemo
一、AOP
1.1 pom依赖
<dependency>

	<groupId>org.springframework.boot</groupId>

	<artifactId>spring-boot-starter-aop</artifactId>

</dependency>
1.2 demo
对aop的properties配置有:
#### AOP

# spring.aop.auto=true # Add @EnableAspectJAutoProxy.

# spring.aop.proxy-target-class=false # Whether subclass-based (CGLIB) proxies are to be created (true) as opposed to standard Java interface-based proxies (false).
这两个配置都允许注解配置: @EnableAspectJAutoProxy (proxyTargetClass = false,exposeProxy = false),默认值都是false
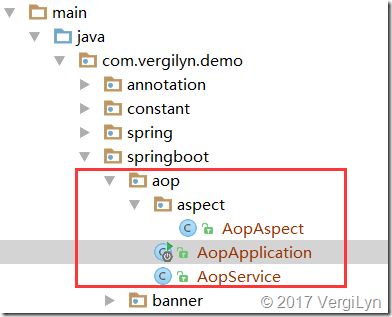
代码目录:

代码说明:
1. AopService:被aop增强的class。
AopAspect:aop增强的class。
AopApplication:启动、测试class。
2. 整个demo很简单,实际要用到再去细看AOP也可以。
@Component

public class AopService {

    @Value("${aop.name:Dante}")

    private String name;

    public String getMsg() {

        return "Hello, " + this.name;

    }

}
@Aspect

@Component

public class AopAspect {

    @AfterReturning("execution(* com.vergilyn.demo.springboot.aop.*Service.*(..))")

    public void afterReturning(JoinPoint joinPoint) {

        System.out.println("aop @AfterReturning: " + joinPoint);

    }

}
@SpringBootApplication

//开启aop支持; 可properties配置proxyTargetClass、exposeProxy

//@EnableAspectJAutoProxy //(proxyTargetClass = true,exposeProxy = false)

public class AopApplication implements CommandLineRunner {

    @Autowired

    private AopService aopService;

    public static void main(String[] args) {

        SpringApplication app = new SpringApplication(AopApplication.class);

        app.setAdditionalProfiles("aop");

        app.run(args);

    }

    @Override

    public void run(String... args) {

        System.out.println(this.aopService.getMsg());

    }

}

aop.name=vergilyn

#### AOP

# spring.aop.auto=true # Add @EnableAspectJAutoProxy.

# spring.aop.proxy-target-class=false # Whether subclass-based (CGLIB) proxies are to be created (true) as opposed to standard Java interface-based proxies (false).
application-aop.properties
console输出结果:
aop @AfterReturning: execution(String com.vergilyn.demo.springboot.aop.AopService.getMsg())

Hello, vergilyn
二、自定义注解
其实我本来是要做的是:自定义注解注入Logger,所以才顺道写了一下AOP的demo。
需求:
1. 通过注解,注入Logger(org.apache.log4j.Logger)。
说明:
之前注入日志都是在每个类中写代码,ex:
public class XXclass{

  private Logger log = Logger.getLogger(XXclass.class);

}
现在想通过自定义注解注入,ex:
public class XXclass{

  private Logger log1 = Logger.getLogger(XXclass.class);

  @Log //自定义注解

  private Logger log2;

}
其中log2的效果与log1一样。
实现:
1. 可以通过aop注入。
2. 可以通过实现org.springframework.beans.factory.config.BeanPostProcessor注入;
(其实是一样的,了解spring的就知道Bean的注入都会通过BeanPostProcessor)
代码demo:
注解Log的定义
@Retention(RUNTIME)

@Target(FIELD)

@Documented

@Inherited

public @interface Log {

}
注解的实现
@Component

@Aspect

public class LogInjector implements BeanPostProcessor {

    public Object postProcessAfterInitialization(Object bean, String beanName)

            throws BeansException {

        return bean;

    }

    public Object postProcessBeforeInitialization(final Object bean,String beanName) throws BeansException {

        ReflectionUtils.doWithFields(bean.getClass(), new FieldCallback() {

            public void doWith(Field field) throws IllegalArgumentException,

                    IllegalAccessException {

                // System.out.println("Logger Inject into :" + bean.getClass());

                // make the field accessible if defined private

                ReflectionUtils.makeAccessible(field);

                if (field.getAnnotation(Log.class) != null) {

                    Logger log = Logger.getLogger(bean.getClass());

                    field.set(bean, log);

                }

            }

        });

        return bean;

    }

}
启动、测试类
@SpringBootApplication

public class AnnotationApplication implements CommandLineRunner{

    @Log

    private Logger log;

    public static void main(String[] args) {

        SpringApplication app = new SpringApplication(AnnotationApplication.class);

        app.setAdditionalProfiles("log");

        app.run(args);

    }

    @Override

    public void run(String... args) throws Exception {

        System.out.println("log : " + log);

        log.info("log 注解注入成功. log:" + log);

    }

}
输出结果:
log : org.apache.log4j.Logger@24d31b86

2017-03-19 19:44:34.576  INFO 7688 --- [  restartedMain] ication$$EnhancerBySpringCGLIB$$52ae5e8e : log 注解注入成功. log:org.apache.log4j.Logger@24d31b86
三、扩展:spring boot之@Import、@ImportResource
缘由:由于我代码的目录结构是,一个project中根据package不同(因为spring boot默认扫描启动类所在的包,及其子包),测试spring boot的各种功能。

比如图中的*Application.class都是spring boot的启动类。然而我想把前面写的Log注解用在所有的*Application对应的项目中。
这就迁出一个问题:*Application.class只扫描所在的package及其sub-packages。从目录结构可以看到,Log并不能被别的*Application.class扫描到。
所以,要怎么解决呢?
这就需要spring boot提供的注解:@Import、@ImportResource。ex:
@SpringBootApplication

@EnableScheduling //通过@EnableScheduling注解开启对计划任务的支持

//@ImportResource(locations = "ConfigXML/annotation-scan.xml" )

@Import(value = LogInjector.class)

public class TimmerApplication {

	public static void main(String[] args) {

		SpringApplication.run(TimmerApplication.class, args);

	}

}
对于@ImportResource需要通过xml注入bean(就是普通的spring),annotation-scan.xml:
<beans xmlns="http://www.springframework.org/schema/beans"

	xmlns:xsi="http://www.w3.org/2001/XMLSchema-instance" xmlns:context="http://www.springframework.org/schema/context"

	xmlns:mvc="http://www.springframework.org/schema/mvc" xmlns:jee="http://www.springframework.org/schema/jee"

	xmlns:jdbc="http://www.springframework.org/schema/jdbc" xmlns:tx="http://www.springframework.org/schema/tx"

	xsi:schemaLocation="http://www.springframework.org/schema/beans http://www.springframework.org/schema/beans/spring-beans-3.1.xsd

        http://www.springframework.org/schema/context http://www.springframework.org/schema/context/spring-context-3.1.xsd

        http://www.springframework.org/schema/mvc http://www.springframework.org/schema/mvc/spring-mvc-3.1.xsd

        http://www.springframework.org/schema/jee http://www.springframework.org/schema/jee/spring-jee-3.1.xsd

        http://www.springframework.org/schema/jdbc http://www.springframework.org/schema/jdbc/spring-jdbc-3.1.xsd

         http://www.springframework.org/schema/tx http://www.springframework.org/schema/tx/spring-tx-3.1.xsd">

	<!-- 扫描公共组件 -->

	<context:component-scan base-package="com.vergilyn.demo.annotation" />

</beans>
【spring boot】SpringBoot初学(6)– aop与自定义注解的更多相关文章
- Java Spring Boot VS .NetCore (十一)自定义标签 Java Tag Freemarker VS .NetCore Tag TagHelper
Java Spring Boot VS .NetCore (一)来一个简单的 Hello World Java Spring Boot VS .NetCore (二)实现一个过滤器Filter Jav ...
- Spring Boot → 08:嵌入式Servlet容器自定义
Spring Boot → 08:嵌入式Servlet容器自定义
- Java Spring Boot VS .NetCore (八) Java 注解 vs .NetCore Attribute
Java Spring Boot VS .NetCore (一)来一个简单的 Hello World Java Spring Boot VS .NetCore (二)实现一个过滤器Filter Jav ...
- SpringBoot 源码解析 (十)----- Spring Boot的核心能力 - 集成AOP
本篇主要集成Sping一个重要功能AOP 我们还是先回顾一下以前Spring中是如何使用AOP的,大家可以看看我这篇文章spring5 源码深度解析----- AOP的使用及AOP自定义标签 Spri ...
- Spring Boot系列——AOP配自定义注解的最佳实践
AOP(Aspect Oriented Programming),即面向切面编程,是Spring框架的大杀器之一. 首先,我声明下,我不是来系统介绍什么是AOP,更不是照本宣科讲解什么是连接点.切面. ...
- Spring Boot 2.0 教程 | AOP 切面统一打印请求日志
欢迎关注微信公众号: 小哈学Java 文章首发于个人网站 https://www.exception.site/springboot/spring-boot-aop-web-request 本节中,您 ...
- 用AOP拦截自定义注解并获取注解属性与上下文参数(基于Springboot框架)
目录 自定义注解 定义切面 获取上下文信息JoinPoint ProceedingJoinPoint 定义测试方法 测试结果 小结 AOP可以用于日志的设计,这样话就少不了要获取上下文的信息,博主在设 ...
- Spring Boot(五):Spring Boot的启动器Starter大全及自定义Starter
现有启动器Starter目录 Spring Boot应用启动器基本的一共有44种,具体如下: 1)spring-boot-starter 这是Spring Boot的核心启动器,包含了自动配置.日志和 ...
- SpringBoot框架:通过AOP和自定义注解完成druid连接池的动态数据源切换(三)
一.引入依赖 引入数据库连接池的依赖--druid和面向切面编程的依赖--aop,如下所示: <!-- druid --> <dependency> <groupId&g ...
随机推荐
- Codeforces_712_A
http://codeforces.com/contest/712/problem/A 水题,写出来就看到规律了. #include<iostream> #include<cstri ...
- 阿里云服务器ECS Ubuntu18.04 建立新用户
昨天花了好长时间终于把界面功能弄好了,今天找时间再折腾一下: 1.建立新的用户: ssh连接上,用以下命令建立新用户,并设置密码: 创建普通用户“myname”成功,接下来为用户“myname”赋予s ...
- 从linux命令行分享文件:bashupload.com和transfer.sh
背景 传输文件是一个常见的需求,简单的做法是通过即时通讯工具,邮件,网盘完成. 但当分享或接收的一端为远程服务器,只有命令行可以操作时,一个能支持在命令行完成分享和下载的工具,就会省下不少麻烦. 下面 ...
- H3C router cmd
LAN转WAN:接口下port link-mode route windows CMD,本地连接5的链路本地地址经常有一个百分号加一个数字,该数字即接口索引,fe80::8c79:e4f9:f5a3: ...
- logstash 配置文件语法
需要一个配置文件 管理输入.过滤器和输出相关的配置.配置文件内容格式如下: # 输入 input { ... } # 过滤器 filter { ... } # 输出 output { ... } 先来 ...
- 论文翻译:Speech Enhancement Based on the General Transfer Function GSC and Postfiltering
论文地址:基于通用传递函数GSC和后置滤波的语音增强 博客作者:凌逆战 博客地址:https://www.cnblogs.com/LXP-Never/p/12232341.html 摘要 在语音增强应 ...
- python之基础中的基础(二)
1.字典 创建字典,alien_0={'color':'green','points':5}其中由一个又一个的“键-值”对组成. 访问键-值对相应的值,print(alien_0['color']), ...
- 利用VS Code在Azure上构建部署静态页面
0x00 前言 前一段时间,我找到了Jendrik Illner的个人网站.除了那里的精彩文章,网站的主题也吸引了我的注意力,而且我发现该网站的主题采用了Hugo的Academic主题. 然后,我认为 ...
- codewars--js--Pete, the baker
问题描述: Pete likes to bake some cakes. He has some recipes and ingredients. Unfortunately he is not go ...
- opencv —— calcHist、minMaxLoc 计算并绘制图像直方图、寻找图像全局最大最小值
直方图概述 简单来说,直方图就是对数据进行统计的一种方法,这些数据可以是梯度.方向.色彩或任何其他特征.它的表现形式是一种二维统计表,横纵坐标分别是统计样本和该样本对应的某个属性的度量. 计算直方图: ...
