本地缓存Caffeine
Caffeine
说起Guava Cache,很多人都不会陌生,它是Google Guava工具包中的一个非常方便易用的本地化缓存实现,基于LRU算法实现,支持多种缓存过期策略。由于Guava的大量使用,Guava Cache也得到了大量的应用。但是,Guava Cache的性能一定是最好的吗?也许,曾经,它的性能是非常不错的。但所谓长江后浪推前浪,总会有更加优秀的技术出现。今天,我就来介绍一个比Guava Cache性能更高的缓存框架:Caffeine。
Tips: Spring5(SpringBoot2)开始用Caffeine取代guava.详见官方信息SPR-13797
https://jira.spring.io/browse/SPR-13797
什么时候用
- 愿意消耗一些内存空间来提升速度
- 预料到某些键会被多次查询
- 缓存中存放的数据总量不会超出内存容量
性能
由图可以看出,Caffeine不论读还是写的效率都远高于其他缓存。
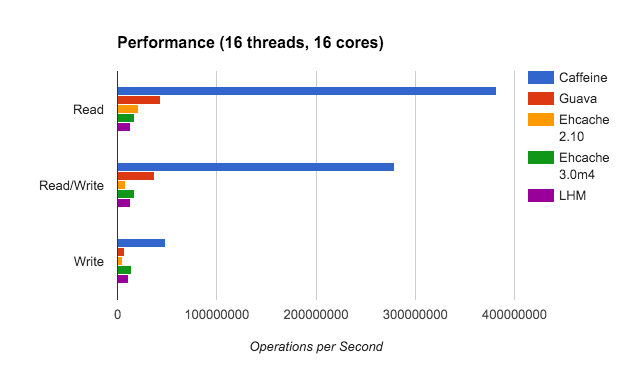
这里只列出部分性能比较,详细请看官方官方 https://github.com/ben-manes/caffeine/wiki/Benchmarks
依赖
我们需要在 pom.xml 中添加 caffeine 依赖:
版本问题参考https://mvnrepository.com/artifact/com.github.ben-manes.caffeine/caffeine
<dependency>

    <groupId>com.github.ben-manes.caffeine</groupId>

    <artifactId>caffeine</artifactId>

    <version>2.7.0</version>

</dependency>
新建对象
// 1、最简单

Cache<String, Object> cache = Caffeine.newBuilder()

    .build();

// 2、真实使用过程中我们需要自己配置参数。这里只列举部分,具体请看下面列表

Cache<String, Object> cache = Caffeine.newBuilder()

    .initialCapacity(2)//初始大小

    .maximumSize(2)//最大数量

    .expireAfterWrite(3, TimeUnit.SECONDS)//过期时间

    .build();
参数含义
- initialCapacity: 初始的缓存空间大小
- maximumSize: 缓存的最大数量
- maximumWeight: 缓存的最大权重
- expireAfterAccess: 最后一次读或写操作后经过指定时间过期
- expireAfterWrite: 最后一次写操作后经过指定时间过期
- refreshAfterWrite: 创建缓存或者最近一次更新缓存后经过指定时间间隔,刷新缓存
- weakKeys: 打开key的弱引用
- weakValues:打开value的弱引用
- softValues:打开value的软引用
- recordStats:开发统计功能
注意:
expireAfterWrite和expireAfterAccess同时存在时,以expireAfterWrite为准。
maximumSize和maximumWeight不可以同时使用
异步
AsyncCache<Object, Object> asyncCache = Caffeine.newBuilder()

        .buildAsync();
解释
A semi-persistent mapping from keys to values. Cache entries are manually added using

{@link #get(Object, Function)} or {@link #put(Object, CompletableFuture)}, and are stored in the

cache until either evicted or manually invalidated.

Implementations of this interface are expected to be thread-safe, and can be safely accessed by

multiple concurrent threads.
添加数据
Caffeine 为我们提供了三种填充策略:
手动、同步和异步
手动添加
很简单的
public static void main(String[] args) {

    Cache<String, String> cache = Caffeine.newBuilder()

            .build();

    cache.put("hello", "world");

    System.out.println(cache.getIfPresent("hello"));

}
自动添加1(自定义添加函数)
Cache<String, String> cache = Caffeine.newBuilder()

    .build();

// 1.如果缓存中能查到,则直接返回

// 2.如果查不到,则从我们自定义的getValue方法获取数据,并加入到缓存中

cache.get("hello", new Function<String, String>() {

    @Override

    public String apply(String k) {

        return getValue(k);

    }

});

System.out.println(cache.getIfPresent("hello"));

}

// 缓存中找不到,则会进入这个方法。一般是从数据库获取内容

private static String getValue(String k) {

    return k + ":value";
// 这种写法可以简化成下面Lambda表达式
cache.get("hello", new Function<String, String>() {
@Override
public String apply(String k) {
return getValue(k);
}
});
// 可以简写为
cache.get("hello", k -> getValue(k));
自动添加2(初始添加)
和上面方法一样,只不过这个是在新建对象的时候添加
LoadingCache<String, String> loadingCache = Caffeine.newBuilder()

    .build(new CacheLoader<String, String>() {

        @Override

        public String load(String k) {

            return getValue(k);

        }

    });

// 同样可简化为下面这样

LoadingCache<String, String> loadingCache2 = Caffeine.newBuilder()

    .build(k -> getValue(k));
过期策略
Caffeine提供三类驱逐策略:
- 基于大小(size-based)
- 基于时间(time-based)
- 基于引用(reference-based)
1、大小
Cache<String, String> cache = Caffeine.newBuilder()

        .maximumSize(3)

        .build();

cache.put("key1", "value1");

cache.put("key2", "value2");

cache.put("key3", "value3");

cache.put("key4", "value4");

cache.put("key5", "value5");

cache.cleanUp();

System.out.println(cache.getIfPresent("key1"));

System.out.println(cache.getIfPresent("key2"));

System.out.println(cache.getIfPresent("key3"));

System.out.println(cache.getIfPresent("key4"));

System.out.println(cache.getIfPresent("key5"));
输出结果
null

value2

null

value4

value5
1、淘汰2个
2、淘汰并不是按照先后顺序,内部有自己的算法
2、时间
Caffeine提供了三种定时驱逐策略:
- expireAfterAccess(long, TimeUnit):在最后一次访问或者写入后开始计时,在指定的时间后过期。假如一直有请求访问该key,那么这个缓存将一直不会过期。
- expireAfterWrite(long, TimeUnit): 在最后一次写入缓存后开始计时,在指定的时间后过期。
- expireAfter(Expiry): 自定义策略,过期时间由Expiry实现独自计算。
缓存的删除策略使用的是惰性删除和定时删除。这两个删除策略的时间复杂度都是O(1)。
expireAfterWrite
Cache<String, String> cache = Caffeine.newBuilder()

    .expireAfterWrite(3, TimeUnit.SECONDS)

    .build();

cache.put("key1", "value1");

cache.put("key2", "value2");

cache.put("key3", "value3");

cache.put("key4", "value4");

cache.put("key5", "value5");

System.out.println(cache.getIfPresent("key1"));

System.out.println(cache.getIfPresent("key2"));

Thread.sleep(3*1000);

System.out.println(cache.getIfPresent("key3"));

System.out.println(cache.getIfPresent("key4"));

System.out.println(cache.getIfPresent("key5"));
结果
value1

value2

null

null

null
例子2
Cache<String, String> cache = Caffeine.newBuilder()

        .expireAfterWrite(3, TimeUnit.SECONDS)

        .build();

cache.put("key1", "value1");

Thread.sleep(1*1000);

System.out.println(cache.getIfPresent("key1"));

Thread.sleep(1*1000);

System.out.println(cache.getIfPresent("key1"));

Thread.sleep(1*1000);

System.out.println(cache.getIfPresent("key1"));
结果
value1

value1

null
expireAfterAccess
Access就是读和写
Cache<String, String> cache = Caffeine.newBuilder()

        .expireAfterAccess(3, TimeUnit.SECONDS)

        .build();

cache.put("key1", "value1");

Thread.sleep(1*1000);

System.out.println(cache.getIfPresent("key1"));

Thread.sleep(1*1000);

System.out.println(cache.getIfPresent("key1"));

Thread.sleep(1*1000);

System.out.println(cache.getIfPresent("key1"));

Thread.sleep(3*1000);

System.out.println(cache.getIfPresent("key1"));
结果
value1

value1

value1

null
读和写都没有的情况下,3秒后才过期
也可以同时用expireAfterAccess和expireAfterWrite方法指定过期时间,这时只要对象满足两者中的一个条件就会被自动过期删除。
expireAfter 和 refreshAfter 之间的区别
- expireAfter 条件触发后,新的值更新完成前,所有请求都会被阻塞,更新完成后其他请求才能访问这个值。这样能确保获取到的都是最新的值,但是有性能损失。
- refreshAfter 条件触发后,新的值更新完成前也可以访问,不会被阻塞,只是获取的是旧的数据。更新结束后,获取的才是新的数据。有可能获取到脏数据。
3、引用
- Caffeine.weakKeys() 使用弱引用存储key。如果没有其他地方对该key有强引用,那么该缓存就会被垃圾回收器回收。
- Caffeine.weakValues() 使用弱引用存储value。如果没有其他地方对该value有强引用,那么该缓存就会被垃圾回收器回收。
- Caffeine.softValues() 使用软引用存储value。
Cache<String, Object> cache = Caffeine.newBuilder()

    .weakValues()

    .build();

Object value1 = new Object();

Object value2 = new Object();

cache.put("key1", value1);

cache.put("key2", value2);

value2 = new Object(); // 原对象不再有强引用

System.gc();

System.out.println(cache.getIfPresent("key1"));

System.out.println(cache.getIfPresent("key2"));
结果
java.lang.Object@7a4f0f29

null
解释:当给value2引用赋值一个新的对象之后,就不再有任何一个强引用指向原对象。System.gc()触发垃圾回收后,原对象就被清除了。
简单回顾下Java中的四种引用
Java4种引用的级别由高到低依次为:强引用 > 软引用 > 弱引用 > 虚引用
| 引用类型 | 被垃圾回收时间 | 用途 | 生存时间 |
|---|---|---|---|
| 强引用 | 从来不会 | 对象的一般状态 | JVM停止运行时终止 |
| 软引用 | 在内存不足时 | 对象缓存 | 内存不足时终止 |
| 弱引用 | 在垃圾回收时 | 对象缓存 | GC运行后终止 |
| 虚引用 | Unknown | Unknown | Unknown |
显式删除缓存
除了通过上面的缓存淘汰策略删除缓存,我们还可以手动的删除
// 1、指定key删除

cache.invalidate("key1");

// 2、批量指定key删除

List<String> list = new ArrayList<>();

list.add("key1");

list.add("key2");

cache.invalidateAll(list);//批量清除list中全部key对应的记录

// 3、删除全部

cache.invalidateAll();
淘汰、移除监听器
可以为缓存对象添加一个移除监听器,这样当有记录被删除时可以感知到这个事件。
Cache<String, String> cache = Caffeine.newBuilder()

        .expireAfterAccess(3, TimeUnit.SECONDS)

        .removalListener(new RemovalListener<Object, Object>() {

            @Override

            public void onRemoval(@Nullable Object key, @Nullable Object value, @NonNull RemovalCause cause) {

                System.out.println("key:" + key + ",value:" + value + ",删除原因:" + cause);

            }

        })

        .expireAfterWrite(1, TimeUnit.SECONDS)

        .build();

cache.put("key1", "value1");

cache.put("key2", "value2");

cache.invalidate("key1");

Thread.sleep(2 * 1000);

cache.cleanUp();
结果
key:key1,value:value1,删除原因:EXPLICIT

key:key2,value:value2,删除原因:EXPIRED
统计
Cache<String, String> cache = Caffeine.newBuilder()

    .maximumSize(3)

    .recordStats()

    .build();

cache.put("key1", "value1");

cache.put("key2", "value2");

cache.put("key3", "value3");

cache.put("key4", "value4");

cache.getIfPresent("key1");

cache.getIfPresent("key2");

cache.getIfPresent("key3");

cache.getIfPresent("key4");

cache.getIfPresent("key5");

cache.getIfPresent("key6");

System.out.println(cache.stats());
结果
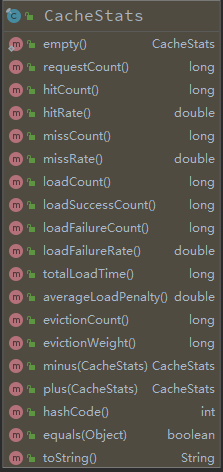
CacheStats{hitCount=4, missCount=2, loadSuccessCount=0, loadFailureCount=0, totalLoadTime=0, evictionCount=0, evictionWeight=0}
除了结果输出的内容,CacheStats还可以获取如下数据。
参考
http://oopsguy.com/2017/10/25/java-caching-caffeine/
https://juejin.im/post/5b8df63c6fb9a019e04ebaf4
https://www.jianshu.com/p/9a80c662dac4
https://www.sohu.com/a/235729991_100109711
https://www.cnblogs.com/yueshutong/p/9381540.html
https://blog.csdn.net/qq_38974634/article/details/80650810
https://blog.csdn.net/qq_32867467/article/details/82944506
https://blog.csdn.net/grafx/article/details/80462628
http://ifeve.com/google-guava-cachesexplained/
本地缓存Caffeine的更多相关文章
- springboot之本地缓存(guava与caffeine)
1. 场景描述 因项目要使用本地缓存,具体为啥不用redis等,就不讨论,记录下过程,希望能帮到需要的朋友. 2.解决方案 2.1 使用google的guava作为本地缓存 初步的想法是使用googl ...
- Caffeine Cache-高性能Java本地缓存组件
前面刚说到Guava Cache,他的优点是封装了get,put操作:提供线程安全的缓存操作:提供过期策略:提供回收策略:缓存监控.当缓存的数据超过最大值时,使用LRU算法替换.这一篇我们将要谈到一个 ...
- 本地缓存解决方案-Caffeine Cache
1.1 关于Caffeine Cache Google Guava Cache是一种非常优秀本地缓存解决方案,提供了基于容量,时间和引用的缓存回收方式.基于容量的方式内部实现采用LRU算法,基于引 ...
- spring boot: 用redis的消息订阅功能更新应用内的caffeine本地缓存(spring boot 2.3.2)
一,为什么要更新caffeine缓存? 1,caffeine缓存的优点和缺点 生产环境中,caffeine缓存是我们在应用中使用的本地缓存, 它的优势在于存在于应用内,访问速度最快,通常都不到1ms就 ...
- spring boot:使用spring cache+caffeine做进程内缓存(本地缓存)(spring boot 2.3.1)
一,为什么要使用caffeine做本地缓存? 1,spring boot默认集成的进程内缓存在1.x时代是guava cache 在2.x时代更新成了caffeine, 功能上差别不大,但后者在性能上 ...
- Java高性能本地缓存框架Caffeine
一.序言 Caffeine是一个进程内部缓存框架,使用了Java 8最新的[StampedLock]乐观锁技术,极大提高缓存并发吞吐量,一个高性能的 Java 缓存库,被称为最快缓存. 二.缓存简介 ...
- A comparison of local caches (1) 【本地缓存之比较 (1)】
1. Spring local cache [Spring 本地缓存] Spring provided cacheable annotation since 3.1. It's very supe ...
- A comparison of local caches (2) 【本地缓存之比较 (2)】
接上一篇: A comparison of local caches (1) [本地缓存之比较 (1)] This article will compare the asynchronous loca ...
- 深入解密来自未来的缓存-Caffeine
1.前言 读这篇文章之前希望你能好好的阅读: 你应该知道的缓存进化史 和 如何优雅的设计和使用缓存? .这两篇文章主要从一些实战上面去介绍如何去使用缓存.在这两篇文章中我都比较推荐Caffeine这款 ...
随机推荐
- 关于spring boot集成MQTT
安装 说到mqtt,首先肯定要安装了,安装什么的地址:http://activemq.apache.org/ap...我本地是Windows的环境,所以装的是Windows版本,这里是第一个注意的地方 ...
- SpringBoot中的bean加载顺序
https://www.dazhuanlan.com/2019/10/22/5daebc5d16429/ 最近在做传统Spring项目到SpringBoot项目迁移过程中,遇到了一些bean加载顺序的 ...
- 将项目部署到linux环境下的Jetty
1.将项目放到webapps文件夹下 2.进入到jetty/bin目录,有文件jetty.sh 3.运行 命令:./jetty.sh start 4.停止 命令:./jetty.sh stop
- bzoj4765: 普通计算姬 (分块 && BIT)
最近一直在刷分块啊 似乎感觉分块和BIT是超级棒的搭档啊 这道题首先用dfs预处理一下 得到每一个sum值 此时查询是O(1)的 (前缀和乱搞什么的 但是修改需要O(n) (需要修改该节点所有祖先的 ...
- Centos7 安装 Cockpit
1sudo yum -y install epel-release sudo yum -y update sudo shutdown -r now 2yum -y install cockpit sy ...
- 测试理论 - Test Double
概述 简述 test double mock, fake 之类的东西 背景 最近在看 google 软件测试之道 妈的 13 年的老书了 书里有提到 mock, fake, stub 刚好, 我又不太 ...
- softmax-Fork
softmax和分类模型 内容包含: softmax回归的基本概念 如何获取Fashion-MNIST数据集和读取数据 softmax回归模型的从零开始实现,实现一个对Fashion-MNIST训练集 ...
- 事务:Transaction详解
1.事务概念: 一组sql语句操作单元,组内所有SQL语句完成一个业务,如果整组成功:意味着全部SQL都实现:如果其中任何一个失败,意味着整个操作都失败.失败,意味着整个过程都是没有意义的.应该是数据 ...
- Rabbitmq启动报错
板卡掉电以后发现rabbitmq服务被停了,重启之: root@firefly:/var/lib/rabbitmq/mnesia# cd /usr/lib/rabbitmq/lib/rabbitmq_ ...
- 通过scrapy,从模拟登录开始爬取知乎的问答数据
这篇文章将讲解如何爬取知乎上面的问答数据. 首先,我们需要知道,想要爬取知乎上面的数据,第一步肯定是登录,所以我们先介绍一下模拟登录: 先说一下我的思路: 1.首先我们需要控制登录的入口,重写star ...