ext js/Ext.Net_演示 htmleditor 上传&插入图片
本文内容
- 解决方案结构
- HtmlEditor_Upload.js 脚本
- HtmlEditorUploadImg.ashx 上传图片到服务器
- 演示 htmleditor 控件添加插入图片功能
解决方案结构
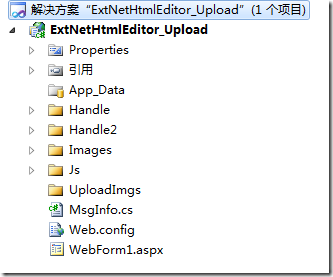
图 1 解决方案结构
说明:
- Handle 目录,是上传图片到服务器端的 Handle 处理程序;Handle2 目录,功能 Handle 目录里一样,只是另外一种写法,各有优点。Handle2 目录里的方法是目录在任何位置都能上传,而 Handle 目录里的,因为是 .net 自己封装的,需要上传目录在网站目录下,这样,如果把上传目录放在虚拟目录或是其他应用程序下就不行。看你的需求是什么,如果将来可能要做图片服务器,那 Handle2 里的方式比较合适。
- Images 目录,是扩展 ext js/Ext.Net htmleditor 控件功能需要的相关图标。
- Js 目录里的 HtmlEditor_Upload.js 文件,是扩展 ext js/Ext.Net htmleditor 控件功能的脚本,使其具备插入图片功能。
- UploadImgs 目录,是上传图片保存到服务器的目录。
- MsgInfo 类,是封装上传图片到服务器端后,服务器返回给客户端的自定义状态信息。
- WebForm1.aspx 页面,是演示扩展 ext js/Ext.Net htmleditor 控件功能。
HtmlEditor_Upload.js 脚本
HtmlEditor_Upload.js 是利用 ext js/Ext.Net 扩展其 htmleditor 功能,使它具备插入图片功能。如下代码所示:
HTMLEditor = Ext.extend(Ext.form.HtmlEditor, {
// 加入图片
addImage: function () {
var editor = this;
// 创建选择上传图片的表单
var imgform = new Ext.FormPanel({
region: 'center',
labelWidth: 55,
frame: true,
bodyStyle: 'padding:5px 5px 0',
autoScroll: true,
border: false,
fileUpload: true,
items: [{
xtype: 'textfield',
fieldLabel: '选择文件',
name: 'userfile',
inputType: 'file',
allowBlank: false,
blankText: '文件不能为空',
height: 25,
width: 300
}
],
buttons: [{
text: '确定',
type: 'submit',
handler: function () {
if (!imgform.form.isValid()) { return; }
imgform.form.submit({
waitTitle: '提示',
waitMsg: '正在上传……',
method: 'post',
url: 'Handle/HtmlEditorUploadImg.ashx',
//
success: function (form, action) {
var element = document.createElement("img");
element.src = action.result.fileURL;
if (Ext.isIE) {
editor.insertAtCursor(element.outerHTML);
}
else {
var selection = editor.win.getSelection();
if (!selection.isCollapsed) {
selection.deleteFromDocument();
}
selection.getRangeAt(0).insertNode(element);
}
win.removeAll();
win.hide();
},
//
failure: function (form, action) {
form.reset();
if (action.failureType == Ext.form.Action.SERVER_INVALID) {
Ext.MessageBox.alert('警告', action.result.msg);
}
else {
Ext.MessageBox.alert('警告', action.result.msg);
}
}
});
}
}]
});
// 创建上传的窗体
var win = new Ext.Window({
title: "上传图片",
width: 500,
height: 200,
modal: true,
border: false,
layout: "fit",
items: imgform
});
win.show();
}, // addImage end
//保存
addSave: function () {
// do something
alert('保存');
},
// 插入 htmleditor 工具栏项
createToolbar: function (editor) {
HTMLEditor.superclass.createToolbar.call(this, editor);
this.tb.insertButton(16,
{
cls: "x-btn-icon",
icon: "../Images/upload_1.jpg",
handler: this.addImage,
scope: this
});
this.tb.insertButton(0,
{
cls: "x-btn-icon",
icon: "../Images/upload_2.jpg",
handler: this.addSave,
scope: this
});
}
});
Ext.reg('htmleditor_upload', HTMLEditor);
说明:
上面代码创建一个 HTMLEditor 对象,它继承 Ext.form.HtmlEditor。对象中主要有三个方法:addImage,用来创建在本地选择图片的表单及其窗体。另外,在该方法可以看到,调用服务器端处理程序,将客户端图片上传到服务器后,调用回调函数,将图片显示在客户端;addSave,用来保存 htmleditor 的内容;createToolbar,用来向 htmleditor 控件的工具栏添加两个按钮,即 addImage 和 addSave 功能。
HtmlEditorUploadImg.ashx 上传图片到服务器
HtmlEditorUploadImg.ashx 处理程序用于将客户端选择的图片,上传到服务器端的指定位置。如下所示:
using System;
using System.Collections.Generic;
using System.Linq;
using System.Web;
using System.Web.Services;
using Ext.Net;
namespace ExtNetHtmlEditor_Upload.Handle
{
/// <summary>
/// $codebehindclassname$ 的摘要说明
/// </summary>
[WebService(Namespace = "http://tempuri.org/")]
[WebServiceBinding(ConformsTo = WsiProfiles.BasicProfile1_1)]
public class HtmlEditorUploadImg : IHttpHandler
{
HttpRequest httpRequest;
HttpResponse httpResponse;
string fileName = string.Empty;
string fileURL = string.Empty;
MsgInfo succ = null; // 必须叫 succ
public void ProcessRequest(HttpContext context)
{
httpRequest = context.Request;
httpResponse = context.Response;
try
{
HttpPostedFile file = httpRequest.Files[0];
fileName = GetFileName(file.FileName);
file.SaveAs(System.Web.HttpContext.Current.Server.MapPath("..\\UploadImgs\\") + fileName);
fileURL = "UploadImgs/" + fileName;
succ = new MsgInfo(true, fileURL, string.Empty);
}
catch
{
succ = new MsgInfo(false, fileURL, string.Empty);
}
httpResponse.Write(JSON.Serialize(succ));
}
public bool IsReusable
{
get
{
return false;
}
}
private string GetFileName(string FullName)
{
string fileName = string.Empty;
int last = FullName.LastIndexOf(@"\");
fileName = FullName.Substring(last + 1, FullName.Length - last - 1);
return fileName;
}
}
}
处理程序返回给客户端的信息,一序列化后的一个字符串。可以在服务器端先用类 MsgInfo,然后序列化后发给客户端。MsgInfo 类定义如下:
namespace ExtNetHtmlEditor_Upload{public class MsgInfo{public bool success { get; set; }public string fileURL { get; set; }public string msg { get; set; }public MsgInfo(bool success, string fileURL, string msg){this.success = success;this.fileURL = fileURL;this.msg = msg;}}}
说明:
处理程序返回给客户端的字符串必须叫 succ,即 MsgInfo 对象 succ,否则无论服务器端是否执行成功,客户端都调用 failure 回调程序,而不是 success。
演示 htmleditor 控件添加插入图片功能
<%@ Page Language="C#" %>
<%@ Register Assembly="Ext.Net" Namespace="Ext.Net" TagPrefix="ext" %>
<!DOCTYPE html PUBLIC "-//W3C//DTD XHTML 1.0 Transitional//EN" "http://www.w3.org/TR/xhtml1/DTD/xhtml1-transitional.dtd">
<html xmlns="http://www.w3.org/1999/xhtml">
<head runat="server">
<title></title>
<ext:ResourcePlaceHolder ID="ResourcePlaceHolder1" runat="server" Mode="Script" />
<script src="Js/HtmlEditor_Upload.js" type="text/javascript"></script>
<script type="text/javascript">
Ext.onReady(function () {
Ext.QuickTips.init();
var myEditor = new Ext.Panel({
title: "",
renderTo: 'div1',
width: 800,
height: 480,
labelWidth: 55,
frame: true,
layout: 'fit',
items: [{
xtype: "htmleditor_upload",
id: 'htmleditor_upload1',
name: "content",
enableColors: true
}]
});
});
var save = function () {
var content = htmleditor_upload1.getValue();
alert(content);
}
</script>
</head>
<body>
<form id="form1" runat="server">
<ext:ResourceManager ID="ResourceManager1" runat="server" />
<div id="div1">
</div>
<ext:Button ID="btn_save" runat="server" Text="保存">
<Listeners>
<Click Handler="save();" />
</Listeners>
</ext:Button>
</form>
</body>
</html>
运行结果:
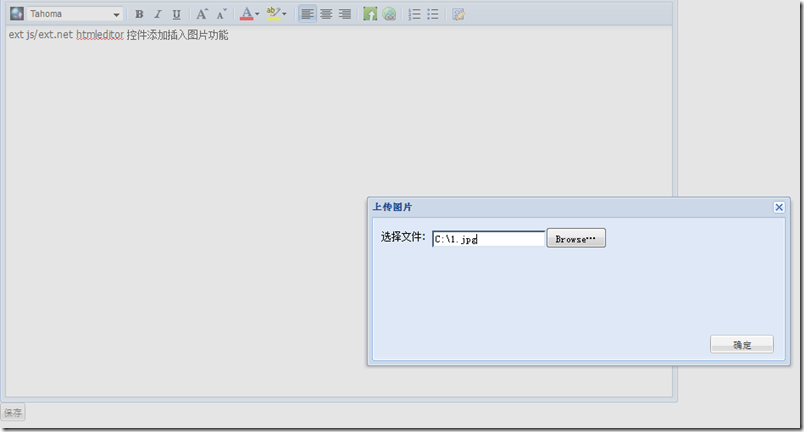
图 2 在客户端选择图片
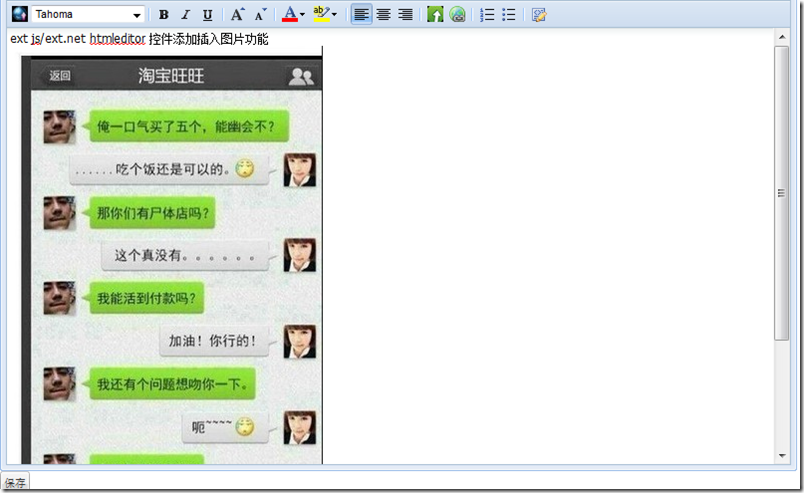
图 3 上传客户端图片到服务器,并在客户端显示
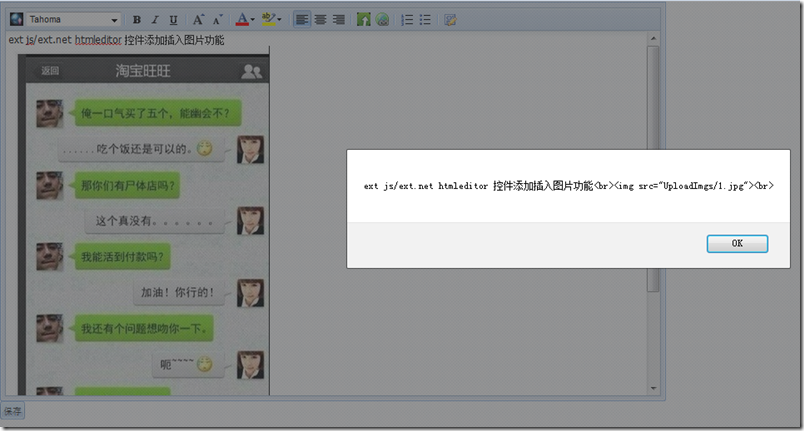
图 4
ext js/Ext.Net_演示 htmleditor 上传&插入图片的更多相关文章
- ckeditor 4.2.1_演示 ckeditor 上传&插入图片
本文内容 FineUI ckeditor fckeditor/ckeditor 演示 ckeditor 4.2.1 上传&插入图片 最近看了一下 FineUI_v3.3.1 控件,对里边的 c ...
- Devexpress HtmlEditor 上传本地图片
官方Demo地址:https://demos.devexpress.com/MVCxHTMLEditorDemos/Features/Features 控件的一定要包裹在form中 @using(Ht ...
- AjaxUpload.3.5.js之ASP.NET 文件上传
一.引入js文件 <script type="text/javascript" src="/Scripts/JQuery.min.js"></ ...
- Node + js实现大文件分片上传基本原理及实践(一)
_ 阅读目录 一:什么是分片上传? 二:理解Blob对象中的slice方法对文件进行分割及其他知识点 三. 使用 spark-md5 生成 md5文件 四. 使用koa+js实现大文件分片上传实践 回 ...
- 扩展 ajaxupload.js ,支持客户端判断上传文件的大小
onSubmit: function(file, extension){}, 修改为 onSubmit: function(file, extension, size){}, if (! (setti ...
- js上传压缩图片
原文链接:http://blog.csdn.net/iefreer/article/details/53039848 手机用户拍的照片通常会有2M以上,这对服务器带宽产生较大压力. 因此在某些应用下( ...
- JS打开摄像头并截图上传
直入正题,JS打开摄像头并截图上传至后端的一个完整步骤 1. 打开摄像头主要用到getUserMedia方法,然后将获取到的媒体流置入video标签 2. 截取图片主要用到canvas绘图,使用dra ...
- Selenium常用API用法示例集----下拉框、文本域及富文本框、弹窗、JS、frame、文件上传和下载
元素识别方法.一组元素定位.鼠标操作.多窗口处理.下拉框.文本域及富文本框.弹窗.JS.frame.文件上传和下载 元素识别方法: driver.find_element_by_id() driver ...
- JS 手机端多张图片上传
代码如下 <!DOCTYPE html> <html lang="zh-cn"> <head> <meta charset="u ...
随机推荐
- 关于pcie的备忘
总线驱动:深度优先统计资源,深度滞后分配资源 资源包括Bus id和内存(prefectable和non-prefectable内存) 设备驱动:包括设备驱动层和消息通信 主要是四个部分: (1)中断 ...
- poj 2429 GCD & LCM Inverse 【java】+【数学】
GCD & LCM Inverse Time Limit: 2000MS Memory Limit: 65536K Total Submissions: 9928 Accepted: ...
- 委托、Lambda表达式、事件系列07,使用EventHandler委托
谈到事件注册,EventHandler是最常用的. EventHandler是一个委托,接收2个形参.sender是指事件的发起者,e代表事件参数. □ 使用EventHandler实现猜拳游戏 使用 ...
- Delphi处理Android的路径信息
路径操作就使用TPath的方法都很方便.usesSystem.IoUtilsTPath.GetTempPath//临时目录TPath.GetCameraPath//照相机目录(照片/录像)TPath. ...
- VS Supercharger插件的破解
Supercharger我已经用了很多年了,感觉十分不错,最初使用的时候,是叫做CodeMap.不过要想很好的使用起来这个VS插件,需要对其进行细致的设置. 这里不再多说了,看下,这个软件怎么破解吧. ...
- IOS文件系统及其相关操作(NSFileManager,NSFileHandle)
How do you get the paths to these special sandbox directories? NSArray *NSSearchPathForDirectoriesIn ...
- FieldExists
import arcpy import os import sys def FieldExists(TableName,FieldName): desc = arcpy.Describe(TableN ...
- DotNetty 学习
[转载]http://www.cnblogs.com/littlegod/p/7699482.html DotNetty的学习是带着如下这些问题展开: 1. Socket基础框架方案: 通信模式:异步 ...
- spring mvc改动配置文件路径
1.1. Classpath project文件夹 在web.xml文件例如以下配置: <!-- 配置spring mvc 的核心servlet --> <servlet> ...
- python测试开发django-35.xadmin注册表信息
前言 xadmin后台如果要对表的内容增删改查,跟之前的admin.py文件里面写注册表信息一样,需在admin.py同一级目录新建一个adminx.py的文件. 然后在adminx.py文件控制页面 ...