webpack4.x配置详解,多页面,多入口,多出口,新特性新坑!!
花了差不多一天多的时间,重新撸了一遍webpack4.x的常用配置。
github详细代码地址,如有帮助,请赐我一颗小星星。 https://github.com/pomelott/webpack-multi-page-cli
基本上常用的配置都熟悉了一遍,总体上来讲,为了对parcel进行反击,webpack从4.x开始,正在朝着尽可能的简化配置文件的方向发展。
一、首先来看下,webpack4的新特性。
1.webpack不在单独使用,4.x版本将很多命令移动到了webpack-cli包中。若想要本地安装使用webpack,一般需要以下两步
(1)全局安装webpack,webpack-cli
(2)局部安装webpack,weback-cli
2.增加了模式区分(development,production):
开发者可通过webpack --mode development/production 进行模式切换,也可以通过在配置文件中添加mode配置项进行模式选择。
development:开发模式,打包默认不压缩代码,默认开启代码调试
production:生产模式,上线时使用,打包压缩代码,不开启代码调试。
***若要开启代码调试可在配置文件中增加devtool配置项
devtool: "source-map"
3.固定入口目录为src,与入口默认文件index.js(webpack4.x向简化配置方向发展的第一步)。
当只有src目录与src目录下的index.js时,无需增加webpack.config.js,4.x版本也会将打包后文件放至新增的dist目录下。
4. js代码抽离时,需在config中新增optimization配置项(下面会详细说拆分代码的规则)
  optimization: {

        splitChunks: {

            cacheGroups: {

                vendor: {

                    chunks: "initial",

                    name: "jquery",

                    enforce: true

                }

            }

        }

    }
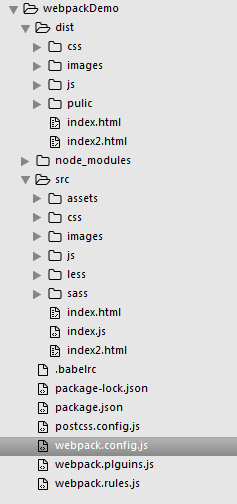
二、4.x版本个人习惯的项目目录结构如下图,整个目录完全为动手搭建,并非用脚手架修改而成。

三、配置文件核心要点
(1)当项目需要多文件入口时,入口项需要以json的格式添加
    entry: {

        // 多入口文件

        a: './src/js/index.js',

        b: './src/js/index2.js',

        jquery: 'jquery'

    }
(2)当多入口文件对应多出口文件时,出口文件的name需要与入口项的key相对应
    output: {

        path:path.resolve(__dirname, 'dist'),

        // 打包多出口文件

        // 生成 a.bundle.js  b.bundle.js  jquery.bundle.js

        filename: './js/[name].bundle.js'

    }
(3)多html文件需要new多个htmlWebpackPlugin实例
         // 自动生成html模板

        new htmlWebpackPlugin({

            filename: "index.html",

            title: "xxxx",

            chunks: ['a',"jquery"],  // 按需引入对应名字的js文件

            template: "./src/index.html"

        }),

        new htmlWebpackPlugin({

            chunks: ['b'],

            filename: "index2.html",

            title: "page2",

            template: "./src/index2.html"

        })
(4)按依赖提取js时,4.x版本写法与之前完全不同
    // 提取js,lib1名字可改

    optimization: {

        splitChunks: {

            cacheGroups: {

                lib1: {

                    chunks: "initial",

                    name: "jquery",

                    enforce: true

                }

            }

        }

    }
在多页使用webpack时,其实我们最头疼的或者需求最大的就是代码拆分问题。代码是否拆分,怎么拆,什么情况下拆。最新的splitChunksPlugin基本能满足我们的所有需求。
我在 webpack4.x版本splitChunksPlugin的配置项详解与实际应用场景 中提到过,最重要的就是priority这个属性。下面具体说下我们的实际需要:
首先需要确定的是你是想优先匹配自己定义的拆分规则还是想优先匹配webpack默认的拆分规则,若相匹配自己定义的拆分规则,则priority需要设置为正数,优先匹配默认拆分规则就设置为负数。
最终webpack会根据优先级进行打包(从大到小,从正数到负数)。
(5)引入第三方库时,建议全局暴露。这样在打包时,4.x会按需打包。
        // 全局暴露统一入口,其他文件直接用就可以

        new webpack.ProvidePlugin({

            $: "jquery"

        }),
四、下面附上三个主要的配置文件
1.webpack.config.js
const path = require('path');

const pluginsConfig = require("./webpack.plguins.js");

const rulesConfig = require("./webpack.rules.js");

module.exports = {

    entry: {

        // 多入口文件

        a: './src/js/index.js',

        b: './src/js/index2.js',

        jquery: 'jquery'

    },

    output: {

        path:path.resolve(__dirname, 'dist'),

        // 打包多出口文件

        // 生成 a.bundle.js  b.bundle.js  jquery.bundle.js

        filename: './js/[name].bundle.js'

    },

    plugins: pluginsConfig,

    devServer: {

        contentBase: path.resolve(__dirname, "dist"),

        host: "localhost",

        port: "8090",

        open: true, // 开启浏览器

        hot: true   // 开启热更新

    },

    // devtool: "source-map",  // 开启调试模式

    module:{

        rules: rulesConfig

    },

    // 提取js,lib1名字可改

    optimization: {

        splitChunks: {

            cacheGroups: {

                lib1: {

                    chunks: "initial",

                    name: "jquery",

                    enforce: true

                }

            }

        }

    }

}
2.webpack.plugins.js
const webpack = require("webpack");

const path = require('path');

const glob = require("glob");

//消除冗余的css

const purifyCssWebpack = require("purifycss-webpack");

// html模板

const htmlWebpackPlugin = require("html-webpack-plugin");

// 清除目录等

const cleanWebpackPlugin = require("clean-webpack-plugin");

//4.x之前用以压缩

const uglifyjsWebpackPlugin = require("uglifyjs-webpack-plugin");

// 分离css

const extractTextPlugin = require("extract-text-webpack-plugin");

//静态资源输出

const copyWebpackPlugin = require("copy-webpack-plugin");

module.exports = [

        new webpack.HotModuleReplacementPlugin(),

        // 调用之前先清除

        new cleanWebpackPlugin(["dist"]),

        // 4.x之前可用uglifyjs-webpack-plugin用以压缩文件,4.x可用--mode更改模式为production来压缩文件

        // new uglifyjsWebpackPlugin(),

        new copyWebpackPlugin([{

            from: path.resolve(__dirname,"src/assets"),

            to: './pulic'

        }]),

        // 分离css插件参数为提取出去的路径

        new extractTextPlugin("css/index.css"),

        // 消除冗余的css代码

        new purifyCssWebpack({

            // glob为扫描模块,使用其同步方法

            paths: glob.sync(path.join(__dirname, "src/*.html"))

        }),

        // 全局暴露统一入口

        new webpack.ProvidePlugin({

            $: "jquery"

        }),

        // 自动生成html模板

        new htmlWebpackPlugin({

            filename: "index.html",

            title: "xxxx",

            chunks: ['a',"jquery"],  // 按需引入对应名字的js文件

            template: "./src/index.html"

        }),

        new htmlWebpackPlugin({

            chunks: ['b'],

            filename: "index2.html",

            title: "page2",

            template: "./src/index2.html"

        })

]
3.webpack.rules.js
const extractTextPlugin = require("extract-text-webpack-plugin");

module.exports = [

            {

                test: /\.css$/,

                // 不分离的写法

                // use: ["style-loader", "css-loader"]

                // 使用postcss不分离的写法

                // use: ["style-loader", "css-loader", "postcss-loader"]

                // 此处为分离css的写法

                /*use: extractTextPlugin.extract({

                    fallback: "style-loader",

                    use: "css-loader",

                    // css中的基础路径

                    publicPath: "../"

                })*/

                // 此处为使用postcss分离css的写法

                use: extractTextPlugin.extract({

                    fallback: "style-loader",

                    use: ["css-loader", "postcss-loader"],

                    // css中的基础路径

                    publicPath: "../"

                })

            },

            {

                test: /\.js$/,

                use: ["babel-loader"],

                // 不检查node_modules下的js文件

                exclude: "/node_modules/"

            },

            {

                test: /\.(png|jpg|gif)$/,

                use: [{

                        // 需要下载file-loader和url-loader

                        loader: "url-loader",

                        options: {

                            limit: 50,

                            // 图片文件输出的文件夹

                            outputPath: "images"

                        }

                    }

                ]

            },

            {

                test: /\.html$/,

                // html中的img标签

                use: ["html-withimg-loader"]

            },

            {

                test: /\.less$/,

                // 三个loader的顺序不能变

                // 不分离的写法

                // use: ["style-loader", "css-loader", "less-loader"]

                // 分离的写法

                use: extractTextPlugin.extract({

                    fallback:"style-loader",

                    use: ["css-loader", "less-loader"]

                })

            },

            {

                test: /\.(scss|sass)$/,

                // sass不分离的写法,顺序不能变

                // use: ["style-loader", "css-loader", "sass-loader"]

                // 分离的写法

                use: extractTextPlugin.extract({

                    fallback:"style-loader",

                    use: ["css-loader", "sass-loader"]

                })

            }

        ]
***习惯用webpack之后,会很方便。不要怕出问题,解决问题后的成就感会让你更加强大。github上有本次4.x版本的demo,欢迎小伙伴提问题,如果觉得还不错,请给星!!
webpack4.x配置详解,多页面,多入口,多出口,新特性新坑!!的更多相关文章
- webpack4配置详解之常用插件分享
前言 继上一次webpack的基础配置分享之后,本次将分享一些工作中项目常用的配置插件.也会包含一些自己了解过觉得不错的插件,如有分析不到位的,欢迎纠错,嗯,这些东西文档都有,大佬可绕过. Wepac ...
- [转]阿里巴巴数据库连接池 druid配置详解
一.背景 java程序很大一部分要操作数据库,为了提高性能操作数据库的时候,又不得不使用数据库连接池.数据库连接池有很多选择,c3p.dhcp.proxool等,druid作为一名后起之秀,凭借其出色 ...
- Nginx配置文件(nginx.conf)配置详解(2)
Nginx的配置文件nginx.conf配置详解如下: user nginx nginx ; Nginx用户及组:用户 组.window下不指定 worker_processes 8; 工作进程:数目 ...
- apache 虚拟主机详细配置:http.conf配置详解
apache 虚拟主机详细配置:http.conf配置详解 Apache的配置文件http.conf参数含义详解 Apache的配置由httpd.conf文件配置,因此下面的配置指令都是在httpd. ...
- JSHint配置详解
Also available on Github JSHint配置详解 增强参数(Enforcing Options) 本类参数设为true,JSHint会产生更多告警. bitwise 禁用位运算符 ...
- Nginx配置文件(nginx.conf)配置详解
Nginx的配置文件nginx.conf配置详解如下: user nginx nginx ; Nginx用户及组:用户 组.window下不指定 worker_processes 8; 工作进程:数目 ...
- Maven使用笔记(四)pom.xml配置详解
pom.xml文件配置详解 --声明规范 <project xmlns="http://maven.apache.org/POM/4.0.0" xmlns:xsi=" ...
- Cloudera CDH 、Impala本地通过Parcel安装配置详解及什么是Parcel
本文引用自:Cloudera CDH .Impala本地通过Parcel安装配置详解及什么是Parcelhttp://www.aboutyun.com/forum.php?mod=viewthread ...
- maven常用插件配置详解
常用插件配置详解Java代码 <!-- 全局属性配置 --> <properties> <project.build.name>tools</proje ...
随机推荐
- javascript学习总结一
1. 变量提升hoisting 变量提升的意思是在一个变量作用域里定义的变量的声明会被提升到作用域的顶部,这是变量只会被声明,不会被初始化复制,而是undefined. 代码如下: function ...
- Windows10下的docker安装与入门 (一)使用docker toolbox安装docker
Docker 是一个开源的应用容器引擎,让开发者可以打包他们的应用以及依赖包到一个可移植的容器中,然后发布到任何流行的 Linux 机器上,也可以实现虚拟化.容器是完全使用沙箱机制,相互之间不会有任何 ...
- ZOJ-1586 QS Network---最小生成树Prim
题目链接: https://vjudge.net/problem/ZOJ-1586 题目大意: 首先给一个t,代表t个测试样例,再给一个n,表示有n个QS装置,接下来一行是n个QS装置的成本.接下来是 ...
- 【转】Linux下统计当前文件夹下的文件个数、目录个数
1) 统计当前文件夹下文件的个数 复制代码代码如下: ls -l |grep "^-"|wc -l 2) 统计当前文件夹下目录的个数 复制代码代码如下: ls -l |grep & ...
- 学习React系列(七)——Fragments、Portals、Error Boundaries与WEB组件
React.Fragment portals Error Boundaries WEB组件 React.Fragment 想象一个场景,想把td包装为组件添加到table中去,代码如下: class ...
- javascript实现有限状态机
1.状态机描述 简单说,有限状态机是一种模型,模型都用来模拟事物,能够被有限状态机这种模型模拟的事物,一般都有以下特点: 1)可以用状态来描述事物,并且任一时刻,事物总是处于一种状态: 2)事物拥有的 ...
- .NET MD5 加密
using System; using System.Security.Cryptography; using System.Text; namespace Md5Demo { /// <sum ...
- [LeetCode] Subarray Product Less Than K 子数组乘积小于K
Your are given an array of positive integers nums. Count and print the number of (contiguous) subarr ...
- hibernate--HelloWorld
本次学习版本:hibernate-release-5.2.6.Final,要求java 1.8 和JDBC 4.2. hibernate是一个开放源代码的对象关系映射框架.对JDBC进行了非常轻量的封 ...
- [HNOI 2010]Bus 公交线路
Description 题库链接 有 \(N\) 个车站, \(K\) 条公交线路.第 \(1\) 到 \(K\) 站是这 \(K\) 线路的起点站.第 \(N-K+1\) 到 \(N\) 是终点站. ...
