ioc初步理解(二) 简单实用autofac搭建mvc三层+automapper=》ioc(codeFirst)
之前在园子闲逛的时候,发现许多关于automapper的文章,以及用aotufac+automapper合在一起用。当然发现大多数文章是将automapper的特点说出或将automapper几处关键代码放出。当然有过基础的人看这种文章没有什么问题,但是对于完全没有基础的小白来看完全是灾难级别的(我就是),经常按着博文一点一点的写,突然发现少了一部分导致代码无法运行。在搜索各种文章之后,终于用自己的理解写出了一个简单的运用automapper的demo,日后待我对automapper理解加深会进一步更新。【此文章希望对想能初步运用automapper的小白写出。当然也希望各位大牛提出意见】(关于autofac详细讲解)
0】首先看看automapper的介绍吧:
automapper是对象到对象的映射工具。在完成映射规则之后,automapper可以将源对象转换为目标对象。
1】首先放出项目结构图
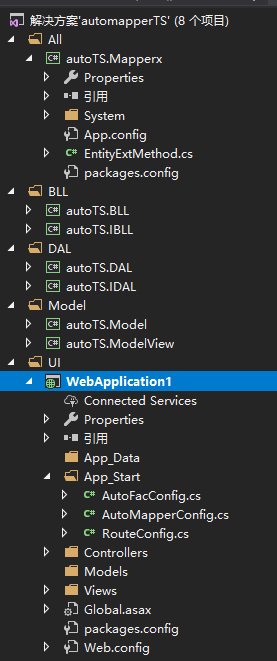
由于此demo运用的是mvc三层+autofac实现依赖注入,所以文件中有三层以及ui层app_Start下的autoFacConfig.cs文件。之前有一篇博文详细讲解了autofac,所以这里只是简单介绍一下代码。主要目光放在mode层和automapper相关的文件。
2】首先贴出各层代码
model文件下结构
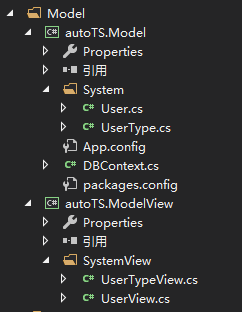
可以看到model文件夹下有两个内库autoTS.Model和autoTS.ModelView(其实autoTS.ModelView下文件可以放到autoTS.Model中,刚刚写的时候忘记了)
autoTS.Mode中system文件夹中文件是和数据库中表一一对应。而autoTS.ModelView下system中文件则是和autoTS.Mode中system文件夹中文件对应(为了实现automapper的功能)将两者进行对比一下

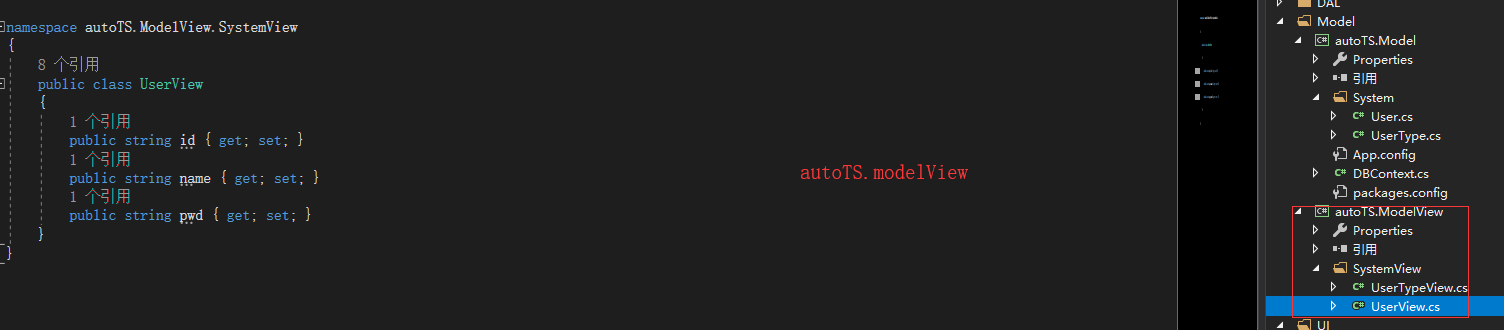
可以看到两者的不同,明显负责连接数据库的model彼modelView多了一些标志(上传csdn中代码的时候忘记写这些,可以下载demo和阅读此博客)
然后autoTs.model层下DBContext.cs代码(autoTS.Model层需要在nuget中引用EntityFramework)
   public class DBContext : DbContext

    {

        public DBContext() : base("name=DatabaseTS") { }//配置文件中连接数据库设置的name

        public DbSet<User> User { get; set; }

        public DbSet<UserType> UserType { get; set; }

    }
3】接下来是DAL文件的结构以及代码(不是本文章主要内容值贴出代码,不加以详细说明)
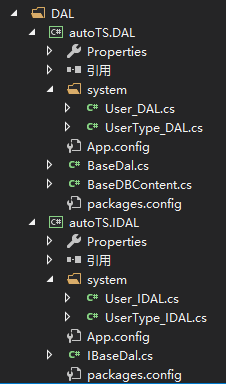
先是idal层中的文件代码(需要nuget中引用EntityFramework 和autoTS.Model)
IBaseDal.cs
  //具体业务依赖于接口

    public interface IBaseDal<TEntity> where TEntity : class

    {

        #region 1.0 增

        void Add(TEntity model);

        #endregion

        #region 2.0 删

        void Delete(TEntity model, bool isAddedDbContext);

        #endregion

        #region 3.0 改

        void Edit(TEntity model, string[] propertyNames);

        #endregion

        #region 4.0 查

        #region 4.0.1 根据条件查询

        List<TEntity> QueryWhere(Expression<Func<TEntity, bool>> where);

        #endregion

        #endregion

        #region 5.0 统一保存

        /// <summary>

        /// 统一将EF容器对象中的所有代理类生成相应的sql语句发给db服务器执行

        /// </summary>

        /// <returns></returns>

        int SaveChanges();

        #endregion

    }
system中User_IDAL.cs
    public interface User_IDAL : IBaseDal<User>

    {

    }
然后是dal层中的代码(需要引用EntityFramework 和autoTS.Model、autoTS.IDAL)
BaseDal.cs
    public class BaseDal<TEntity> : IBaseDal<TEntity> where TEntity : class

    {

        //1.0  实例化EF上下文

        DbContext db = BaseDBContent.GetCurrentThreadInstance();

        //2.0 定义DbSet<T> 对象

        public DbSet<TEntity> _dbset;

        //3.0 在构造函数的初始化_dbset

        public BaseDal()

        {

            _dbset = db.Set<TEntity>();

        }

        #region 1.0 增

        public virtual void Add(TEntity model)

        {

            //1.0 参数合法性验证

            if (model == null)

            {

                throw new Exception("BaseRepository泛型类中,新增操作的实体不能为空");

            }

            //2.0 进行新增操作

            _dbset.Add(model);

        }

        #endregion

        #region 2.0 删

        public virtual void Delete(TEntity model, bool isAddedDbContext)

        {

            //1.0 参数合法性验证

            if (model == null)

            {

                throw new Exception("BaseRepository泛型类中,删除操作的实体不能为空");

            }

            //2.0 进行删除逻辑处理

            if (!isAddedDbContext)

            {

                _dbset.Attach(model);

            }

            _dbset.Remove(model);

        }

        #endregion

        #region 3.0 改

        /// <summary>

        /// 编辑,约定model 是一个自定义的实体,没有追加到EF容器中的

        /// </summary>

        /// <param name="model"></param>

        public virtual void Edit(TEntity model, string[] propertyNames)

        {

            //0.0 关闭EF的实体属性合法性检查

            db.Configuration.ValidateOnSaveEnabled = false;

            //1.0 参数合法性验证

            if (model == null)

            {

                throw new Exception("BaseRepository泛型类中,编辑操作的实体不能为空");

            }

            if (propertyNames == null || propertyNames.Length == )

            {

                throw new Exception("BaseRepository泛型类中,编辑操作的属性数组必须至少有一个值");

            }

            //2.0 将model追加到EF容器中的

            DbEntityEntry entry = db.Entry(model);

            entry.State = EntityState.Unchanged;

            foreach (var item in propertyNames)

            {

                entry.Property(item).IsModified = true;

            }

        }

        #endregion

        #region 4.0 查

        /// <summary>

        /// 带条件查询

        /// </summary>

        /// <param name="where"></param>

        /// <returns></returns>

        public virtual List<TEntity> QueryWhere(Expression<Func<TEntity, bool>> where)

        {

            return _dbset.Where(where).ToList();

        }

        #endregion

        #region 5.0 统一保存

        /// <summary>

        /// 统一将EF容器对象中的所有代理类生成相应的sql语句发给db服务器执行

        /// </summary>

        /// <returns></returns>

        public virtual int SaveChanges()

        {

            try

            {

                return db.SaveChanges();

            }

            catch (Exception ex)

            {

                throw ex;

            }

        }

        #endregion

    }
BaseDBContent.cs
   public class BaseDBContent

    {

        //获取当前EF上下文的唯一实例

        public static DbContext GetCurrentThreadInstance()

        {

            DbContext obj = CallContext.GetData(typeof(BaseDBContent).FullName) as DbContext;

            if (obj == null)

            {

                obj = new DBContext();

                CallContext.SetData(typeof(BaseDBContent).FullName, obj);

            }

            return obj;

        }

    }
system中User_DAL.cs
    public class User_DAL : BaseDal<User>, User_IDAL

    {

    }
4】bll文件中代码和结构
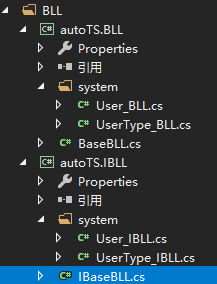
ibll层代码(此层需要引用autoTS.Model)
IBaseBLL.cs
 public interface IBaseBLL<TEntity> where TEntity : class

    {

        #region 1.0 增

        void Add(TEntity model);

        #endregion

        #region 2.0 删

        void Delete(TEntity model, bool isAddedDbContext);

        #endregion

        #region 3.0 改

        /// <summary>

        /// 编辑,约定model 是一个自定义的实体,没有追加到EF容器中的

        /// </summary>

        /// <param name="model"></param>

        void Edit(TEntity model, string[] propertyNames);

        #endregion

        #region 4.0 查

        /// <summary>

        /// 带条件查询

        /// </summary>

        /// <param name="where"></param>

        /// <returns></returns>

        List<TEntity> QueryWhere(Expression<Func<TEntity, bool>> where);

        #endregion

        #region 5.0 统一保存

        /// <summary>

        /// 统一将EF容器对象中的所有代理类生成相应的sql语句发给db服务器执行

        /// </summary>

        /// <returns></returns>

        int SaveChanges();

        #endregion

    }
system文件夹下User_IBLL.cs
 public interface User_IBLL : IBaseBLL<User>

    {

    }
bll层中代码(需要引用autoTS.Model、autoTS.IBLL、autoTS.IDAL)
BaseBLL.cs
  public class BaseBLL<TEntity> : IBaseBLL<TEntity> where TEntity : class

    {

        protected IBaseDal<TEntity> dal = null;

        #region 1.0 增

        public virtual void Add(TEntity model)

        {

            dal.Add(model);

        }

        #endregion

        #region 2.0 删

        public virtual void Delete(TEntity model, bool isAddedDbContext)

        {

            dal.Delete(model, isAddedDbContext);

        }

        #endregion

        #region 3.0 改

        /// <summary>

        /// 编辑,约定model 是一个自定义的实体,没有追加到EF容器中的

        /// </summary>

        /// <param name="model"></param>

        public virtual void Edit(TEntity model, string[] propertyNames)

        {

            dal.Edit(model, propertyNames);

        }

        #endregion

        #region 4.0 查

        /// <summary>

        /// 带条件查询

        /// </summary>

        /// <param name="where"></param>

        /// <returns></returns>

        public virtual List<TEntity> QueryWhere(Expression<Func<TEntity, bool>> where)

        {

            return dal.QueryWhere(where);

        }

        #endregion

        #region 5.0 统一保存

        /// <summary>

        /// 统一将EF容器对象中的所有代理类生成相应的sql语句发给db服务器执行

        /// </summary>

        /// <returns></returns>

        public virtual int SaveChanges()

        {

            return dal.SaveChanges();

        }

        #endregion

    }
system文件中User_BLL.cs
   public class User_BLL : BaseBLL<User>, User_IBLL

    {

        User_IDAL dalSer;

        public User_BLL(User_IDAL dalSer)

        {

            base.dal = dalSer;

            this.dalSer = dalSer;

        }

    }
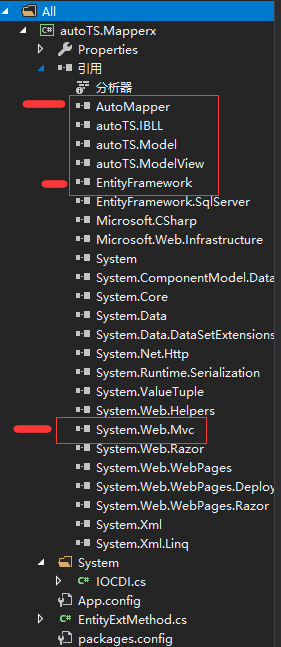
5】公共层all文件夹代码以及结构(圈起来的都是要引用的,前面有红线的则是在nuget中引用 注意引用mvc的版本必须和自己ui层mvc版本一致)
IOCDI.CS
using autoTS.IBLL.system;

using System;

using System.Collections.Generic;

using System.Linq;

using System.Text;

using System.Threading.Tasks;

using System.Web.Mvc;

namespace autoTS.Mapperx.System

{

    public   class IOCDI : Controller

    {

        protected User_IBLL UserSer;

        protected UserType_IBLL UserTypeSer;

    }

}
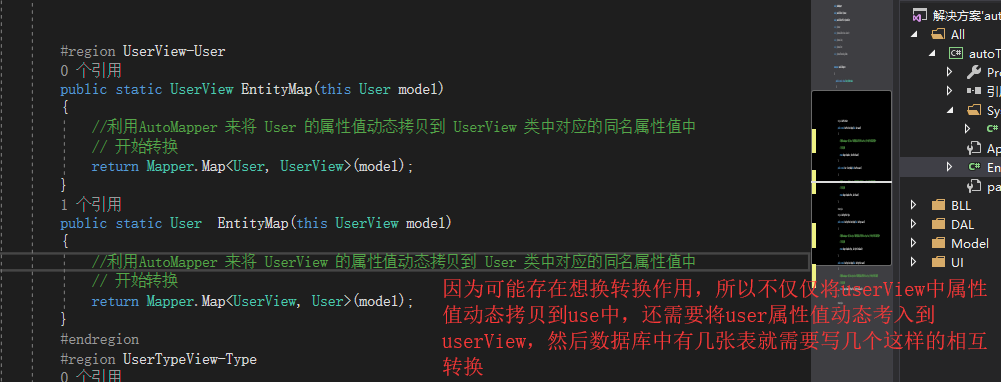
(本次重点)EntityExtMethod.cs中代码是为了实现automapper
using AutoMapper;

using autoTS.Model.System;

using autoTS.ModelView.SystemView;

using System;

using System.Collections.Generic;

using System.Linq;

using System.Text;

using System.Threading.Tasks;

namespace autoTS.Mapperx

{

    public static class EntityExtMethod

    {

        #region UserView-User

        public static UserView EntityMap(this User model)

        {

            //利用AutoMapper 来将 User 的属性值动态拷贝到 UserView 类中对应的同名属性值中

            // 开始转换

            return Mapper.Map<User, UserView>(model);

        }

        public static User  EntityMap(this UserView model)

        {

            //利用AutoMapper 来将 UserView 的属性值动态拷贝到 User 类中对应的同名属性值中

            // 开始转换

            return Mapper.Map<UserView, User>(model);

        }

        #endregion

        #region UserTypeView-Type

        public static UserTypeView EntityMap(this UserType model)

        {

            //利用AutoMapper 来将 UserType 的属性值动态拷贝到 UserTypeView 类中对应的同名属性值中

            // 开始转换

            return Mapper.Map<UserType, UserTypeView>(model);

        }

        public static UserType EntityMap(this UserTypeView model)

        {

            //利用AutoMapper 来将 UserTypeView 的属性值动态拷贝到 UserType 类中对应的同名属性

            // 开始转换

            return Mapper.Map<UserTypeView, UserType>(model);

        }

        #endregion

    }

}
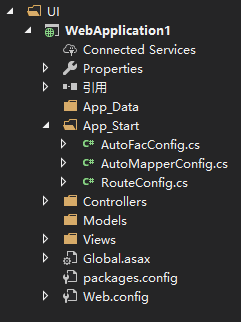
6】最后来到ui层
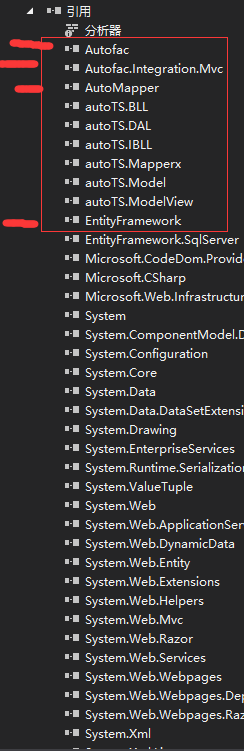 方框里面是引用部分。而前面带红线的则是需要到nuget中引用(注意第二个autofac.integration.MVC是在nuegt中引用autofac.MVC5得到)
首先在app_Start中添加AutoFacConfig.cs(关于这部分内容,之前一份博客已经讲过就不多重复)
using Autofac;

using Autofac.Integration.Mvc;

using System;

using System.Collections.Generic;

using System.Linq;

using System.Reflection;

using System.Web;

using System.Web.Mvc;

namespace WebApplication1.App_Start

{

    public class AutoFacConfig

    { /// <summary>

      /// 负责调用autofac框架实现业务逻辑层和数据仓储层程序集中的类型对象的创建

      /// 负责创建MVC控制器类的对象(调用控制器中的有参构造函数),接管DefaultControllerFactory的工作

      /// </summary>

        public static void Register()

        {

            //实例化一个autofac的创建容器

            var builder = new ContainerBuilder();

            //告诉Autofac框架,将来要创建的控制器类存放在哪个程序集 (IOCtsX.UI)

            Assembly controllerAss = Assembly.Load("WebApplication1");

            builder.RegisterControllers(controllerAss);

            //告诉autofac框架注册数据仓储层所在程序集中的所有类的对象实例

            Assembly respAss = Assembly.Load("autoTS.DAL");

            //创建respAss中的所有类的instance以此类的实现接口存储

            builder.RegisterTypes(respAss.GetTypes()).AsImplementedInterfaces();

            //告诉autofac框架注册业务逻辑层所在程序集中的所有类的对象实例

            Assembly serpAss = Assembly.Load("autoTS.BLL");

            //创建serAss中的所有类的instance以此类的实现接口存储

            builder.RegisterTypes(serpAss.GetTypes()).AsImplementedInterfaces();

            //创建一个Autofac的容器

            var container = builder.Build();

            //将MVC的控制器对象实例 交由autofac来创建

            DependencyResolver.SetResolver(new AutofacDependencyResolver(container));

        }

    }

}
然后再app_Start中添加AutoMapperConfig.cs。这部分一看就是为了实现automapper内容
using AutoMapper;

using autoTS.Model.System;

using autoTS.ModelView.SystemView;

using System;

using System.Collections.Generic;

using System.Linq;

using System.Web;

namespace WebApplication1.App_Start

{

    public class AutoMapperConfig

    {

        public static void Initializex()

        {

            //Entity与DTO的映射 初始化映射的方向 (注册)  写在这里是因为只需要注册一次,

            //放在C:\Users\Fates\source\repos\automapperTS\autoTS.Mapperx\EntityExtMethod.cs 中因为每次使用都会注册从而报错(只需要注册一次)

            Mapper.Initialize(x =>

            {

                x.CreateMap<User, UserView>(); //创建User映射到UserView

                x.CreateMap<UserView, UserType>(); //反之

                x.CreateMap<UserType, UserTypeView>(); //创建UserType映射到UserTypeView

                x.CreateMap<UserTypeView, UserType>(); //反之

            });

        }

    }

}
注意自己引用的automapper,高版本和低版本的写法有些不同,如图

如果不知道自己引用的是低版本还是高版本的话,就写Mapper.CreateMap<user, userView>();看是否报错,如果报错则是高版本的automapper,使用左上图写法,否者用右上图写法。
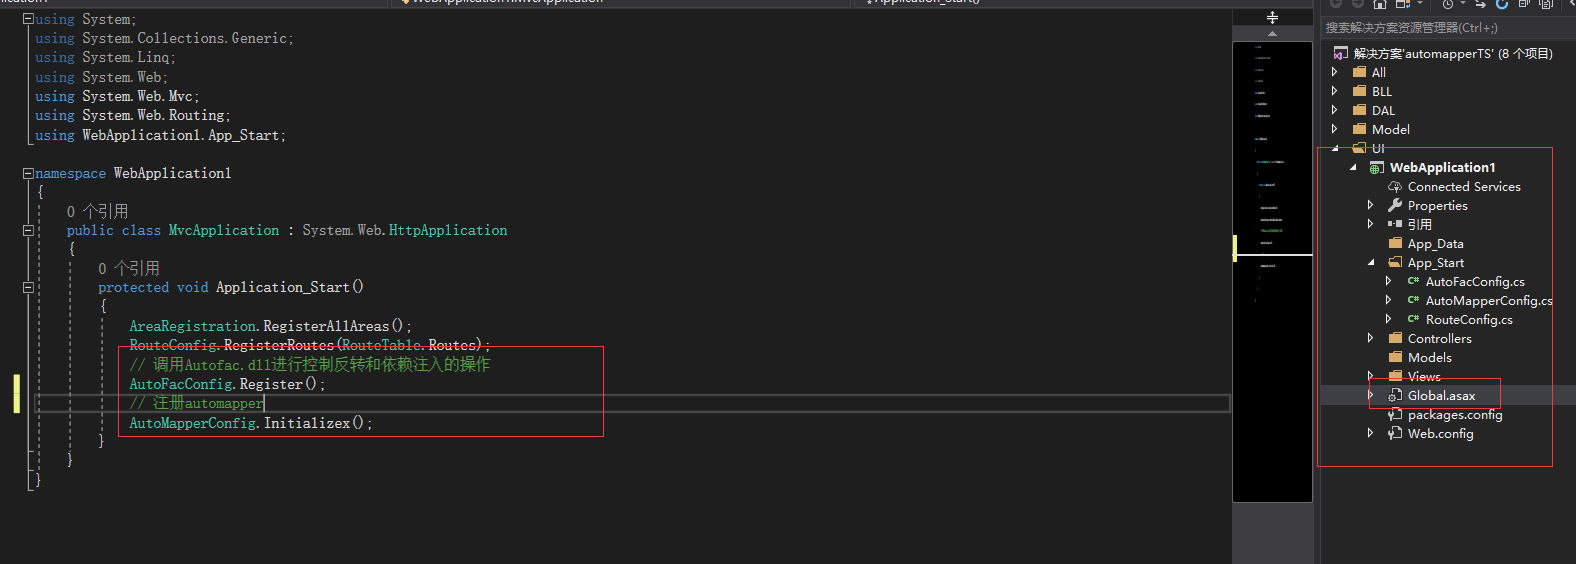
写完这些文件之后去Global.asax中进行注册
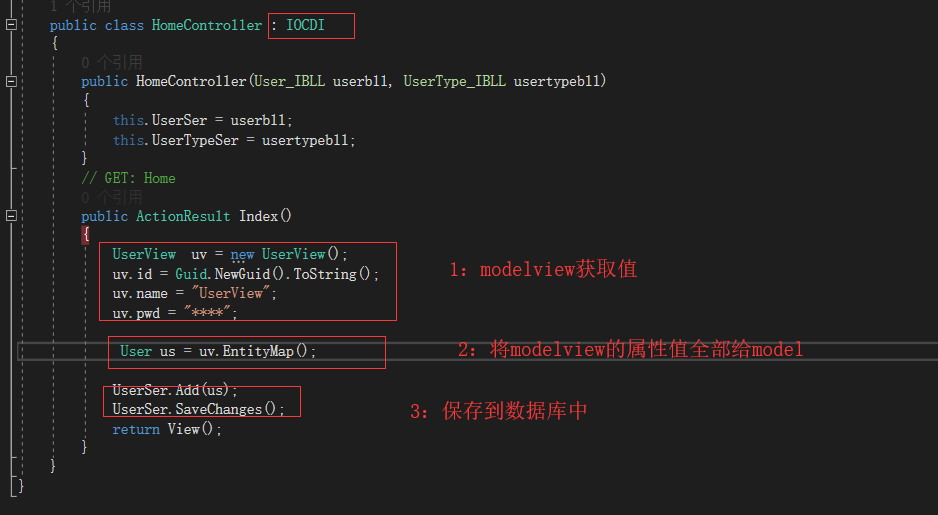
最后,我们来到控制器,写一个demo
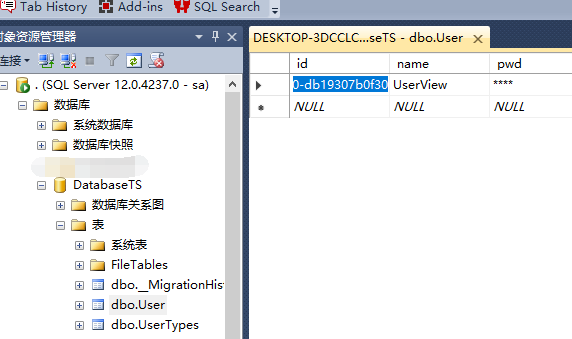
最后来数据库看看结构
【总结】由于博主技术渣渣,所以文章内容不是太深入。只是简单介绍了如何简单的使用automapper,日后待到这一块深入了解之后,必将更新。此文章适合需要入门automapper的小白,跟着文章一步一步走必将写出一个可运行的demo。因为项目的所有代码和引用文件都已经做了详细的说明。如果懒人党的话,稍后会更新demo下载地址。同时也希望各位大牛的的意见与指点。
ioc初步理解(二) 简单实用autofac搭建mvc三层+automapper=》ioc(codeFirst)的更多相关文章
- ioc初步理解(一) 简单实用autofac搭建mvc三层+ioc(codeFirst)
1]首先搭好框架 1.1]搭建ui层 1.2]创建其他内库文件 整个项目基本部分搭建完毕之后如下 2]使用nuget引用文件 先在每一个项目中引入ef 然后再UI层引入以下两个文件autofac和Au ...
- OC基础--常用类的初步介绍与简单实用之集合类
集合类的异同点 一.NSArray\NSMutableArray *有序 *快速创建(只有不可变数组可以):@[obj1, obj2, obj3]; *快速访问元素:数组名[i] *只能存放对象 二. ...
- C# Ioc容器Unity,简单实用
开头先吐槽一下博客园超级不好用,添加图片后就写不动字了,难道是bug 好进入正题,先来说下依赖注入,简单来说就是定义好接口,上层代码调用接口,具体实现通过配置文件方式去指定具体实现类. 首先我们需要通 ...
- Spring(一):Spring入门程序和IoC初步理解
本文是按照狂神说的教学视频学习的笔记,强力推荐,教学深入浅出一遍就懂!b站搜索狂神说或点击下面链接 https://space.bilibili.com/95256449?spm_id_from=33 ...
- verilog阻塞与非阻塞的初步理解(二)
将阻塞模块改为下述代码: module blocking(clk,a,b,c); :] a; input clk; :] b,c; :] b,c; always @(posedge clk) begi ...
- OC基础--常用类的初步介绍与简单实用之NSString
一.NSString:不可变字符串/NSMutableString:可变字符串 1>字符串的常用创建方式: (1)NSString *s1 = @"Chaos"; (2)NS ...
- 使用Autofac在MVC中实现IOC
var builder = new ContainerBuilder(); //注册DispatchService类型到工厂中 builder.RegisterType<DispatchServ ...
- Spring学习笔记--环境搭建和初步理解IOC
Spring框架是一个轻量级的框架,不依赖容器就能够运行,像重量级的框架EJB框架就必须运行在JBoss等支持EJB的容器中,核心思想是IOC,AOP,Spring能够协同Struts,hiberna ...
- 简单实用的Windows命令(二)
昨天简单的记录了几个非常简单实用的Windows命令,不过我又想起来还有两个我在实际的工作中也是经常用到的命令——PING和IPCONFIG,不过我在工作中的使用都是非常简单的,用PING命令检测对应 ...
随机推荐
- laravel5.5解决小程序登陆态的问题
修改一个文件 : vendor\laravel\framework\src\Illuminate\Session\Middleware\StartSession.php 找到getSession()方 ...
- qtchooser
qtchooser 的配置目录: /usr/lib/x86_64-linux-gnu/qtchooser qtchooser 的真实配置目录: /usr/share/qtchooser qtchoos ...
- 【SAP HANA】新建表以及操作数据(3)
账号和数据库都创建好之后,接下来就可以创建表了.来见识一下这个所谓“列式”存储方式的表是长啥样的! 一.可视化新建表 然后输入所需栏位,设置好类型和长度: 上图右上角可以看到类型是Column Sto ...
- 自行实现 dotnet core rpc
前言 小李:“胖子,上头叫你对接我的数据好了没有?” 胖子:“那是你的事,你都不提供数据源,我咋接?” 小李:“你想要什么样的数据源?” 胖子:“我想要一个调用简单点的!” 小李:“我这个数据源是在l ...
- 【Maven篇】---解决Maven线上部署java.lang.ClassNotFoundException和no main manifest attribute解决方法
一.前述 maven 线上部署的话会出现一些问题比如java.lang.ClassNotFoundException或者no main manifest attribute的话,是因为maven 配置 ...
- Unix中的I/O模型
本文所指的I/O均是网络I/O. 一. POSIX对同步.异步I/O的定义 我们先大致看看POSIX对同步.异步的定义,不用细究,重点看我标红的部分就行. 同步I/O会导致请求进程阻塞,直到I/O操作 ...
- jdk源码阅读笔记-HashSet
通过阅读源码发现,HashSet底层的实现源码其实就是调用HashMap的方法实现的,所以如果你阅读过HashMap或对HashMap比较熟悉的话,那么阅读HashSet就很轻松,也很容易理解了.我之 ...
- MyBatis中主键回填的两种实现方式
主键回填其实是一个非常常见的需求,特别是在数据添加的过程中,我们经常需要添加完数据之后,需要获取刚刚添加的数据 id,无论是 Jdbc 还是各种各样的数据库框架都对此提供了相关的支持,本文我就来和和大 ...
- ConcurrentDictionary并发字典知多少?
背景 在上一篇文章你真的了解字典吗?一文中我介绍了Hash Function和字典的工作的基本原理. 有网友在文章底部评论,说我的Remove和Add方法没有考虑线程安全问题. https://doc ...
- 8天入门docker系列 —— 第三天 使用aspnetcore小案例熟悉对镜像的操控
上一篇我们聊到了容器,现在大家应该也知道了,没有镜像就没有容器,所以镜像对docker来说是非常重要的,关于镜像的特性和原理作为入门系列就不阐 述了,我还是通过aspnetcore的小sample去熟 ...