Pytest UI自动化测试实战实例
前言
明天就放假了,4天小长假,是不是很开心!也许很多人要回老家帮家里种地,干农活。其实能陪陪家里人,帮忙干点农活还是挺开心的,希望大家有个愉快的假期!废话不多说哈,今天再来说说pytest吧,经过几周的时间学习,有收获也有疑惑,总之最后还是搞个小项目出来证明自己的努力不没有白费
环境准备
| 序号 | 库/插件/工具 | 安装命令 |
| 1 | 确保您已经安装了python3.x | |
| 2 | 配置python3+pycharm+selenium2开发环境 | |
| 3 | 安装pytest库 | pip install pytest |
| 4 | 安装pytest -html 报告插件 | pip install pytest-html |
| 5 | 安装pypiwin32库(用来模拟按键) | pip install pypiwin32 |
| 6 | 安装openpyxl解析excel文件库 | pip install openpyxl |
| 7 | 安装yagmail发送报告库 | pip install yagmail |
| 8 | 确保已配置火狐或谷歌浏览器及对应驱动 | |
| 9 | 确保已经正确配置好发送邮件的邮箱 |
项目简介
测试地址
测试范围
1.126电子邮箱登录功能测试-验证正确帐号密码登录成功-验证错误用户名密码登录失败(有很多情况,用例里面做了充分的校验)
2.126电子邮箱添加联系人功能测试-验证正确填写必填项数据添加联系人成功-验证缺省必填项数据添加联系人失败-验证必填项字段数据格式错误添加联系人失败
3.126电子邮箱发送邮件功能测试-验证普通邮件发送成功-验证带附件邮件发送成功
项目设计
1.python编程语言设计测试脚本
2.webdriver驱动浏览器并操作页面元素
3.二次封装webdriver Api 操作方法
4.采用PageObject设计模式,设计测试业务流程
5.通过UI对象库存储页面操作元素
6.通过数据文件存储数据,读取数据,参数化测试用例并驱动测试执行
7.通过第三方插件pytest-html生成测试报告
8.通过yagmail第三方库,编写发送报告接口,测试工作完成后自动发送测试报告
代码分析
目录结构
 PytestAutoTestFrameWork

 |—|config

 |——|__init__.py

 |——|conf.py

 |——|config.ini

 |—|data

 |——|__init__.py

 |——|tcData.xlsx

 |—Page

 |——|PageObject.py

 |———|__init__.py

 |———|ContactPage.py

 |———|HomePage.py

 |———|LoginPage.py

 |———|SendMailPage.py

 |——|__init__.py

 |——|BasePage.py

 |—|report

 |—|TestCases

 |——|__init__.py

 |——|conftest.py

 |——|test_confactCase.py

 |——|test_loginCase.py

 |——|test_sendMailCase.py

 |—|util

 |——|__init__.py

 |——|clipboard.py

 |——|keyboard.py

 |——|parseConFile.py

 |——|parseExcelFile.py

 |——|sendMailForReport.py

 |—|conftest.py

 |—|pytest.ini

 |—|RunTestCase.py
目录结构
代码实现
通过126邮箱测试范围分析,我们需要通过设计剪切板,模拟键盘完成附件上传操作,因此我们首先来编写这两个方法
 """

 ------------------------------------

 @Time : 2019/4/15 12:04

 @Auth : linux超

 @File : clipboard.py

 @IDE  : PyCharm

 @Motto: Real warriors,dare to face the bleak warning,dare to face the incisive error!

 ------------------------------------

 """

 import win32con

 import win32clipboard as WC

 class ClipBoard(object):

     '''设置剪切板内容和获取剪切板内容'''

     @staticmethod

     def getText():

         '''获取剪切板的内容'''

         WC.OpenClipboard()

         value = WC.GetClipboardData(win32con.CF_TEXT)

         WC.CloseClipboard()

         return value

     @staticmethod

     def setText(value):

         '''设置剪切板的内容'''

         WC.OpenClipboard()

         WC.EmptyClipboard()

         WC.SetClipboardData(win32con.CF_UNICODETEXT, value)

         WC.CloseClipboard()

 if __name__ == '__main__':

     from selenium import webdriver

     value = 'python'

     driver = webdriver.Firefox()

     driver.get('http://www.baidu.com')

     query = driver.find_element_by_id('kw')

     ClipBoard.setText(value)

     clValue = ClipBoard.getText()

     query.send_keys(clValue.decode('utf-8'))
clipboard.py-操作剪切板
 """

 ------------------------------------

 @Time : 2019/4/15 12:05

 @Auth : linux超

 @File : keyboard.py

 @IDE  : PyCharm

 @Motto: Real warriors,dare to face the bleak warning,dare to face the incisive error!

 ------------------------------------

 """

 # 模拟按键

 import win32api

 import win32con

 import time

 class KeyBoard(object):

     """模拟按键"""

     # 键盘码

     vk_code = {

         'enter' : 0x0D,

         'tab' : 0x09,

         'ctrl' : 0x11,

         'v' : 0x56,

         'a' : 0x41,

         'x' : 0x58

     }

     @staticmethod

     def keyDown(key_name):

         """按下键"""

         key_name = key_name.lower()

         try:

             win32api.keybd_event(KeyBoard.vk_code[key_name], 0, 0, 0)

         except Exception as e:

             print('未按下enter键')

             print(e)

     @staticmethod

     def keyUp(key_name):

         """抬起键"""

         key_name = key_name.lower()

         win32api.keybd_event(KeyBoard.vk_code[key_name], 0, win32con.KEYEVENTF_KEYUP, 0)

     @staticmethod

     def oneKey(key):

         """模拟单个按键"""

         key = key.lower()

         KeyBoard.keyDown(key)

         time.sleep(2)

         KeyBoard.keyUp(key)

     @staticmethod

     def twoKeys(key1, key2):

         """模拟组合按键"""

         key1 = key1.lower()

         key2 = key2.lower()

         KeyBoard.keyDown(key1)

         KeyBoard.keyDown(key2)

         KeyBoard.keyUp(key1)

         KeyBoard.keyUp(key2)

 if __name__ == '__main__':

     from selenium import webdriver

     driver = webdriver.Firefox()

     driver.get('http://www.baidu.com')

     driver.find_element_by_id('kw').send_keys('python')

     KeyBoard.twoKeys('ctrl', 'a')

     KeyBoard.twoKeys('ctrl', 'x')
keyboard.py-模拟键盘
通过测试项目设计,我们需要把测试数据存放在Excel文件中,把页面操作元素存在UI对象库中也就是一个配置文件,那么我们需要对Excel 和 ini文件解析,因此我们开始编写这两个方法,设计UI对象库和测试数据文件
 """

 ------------------------------------

 @Time : 2019/4/22 16:12

 @Auth : linux超

 @File : parseExcelFile.py

 @IDE  : PyCharm

 @Motto: Real warriors,dare to face the bleak warning,dare to face the incisive error!

 ------------------------------------

 """

 from openpyxl import load_workbook

 from config.conf import excelPath

 class ParseExcel(object):

     def __init__(self):

         self.wk = load_workbook(excelPath)

         self.excelFile = excelPath

     def getSheetByName(self, sheetName):

         """获取sheet对象"""

         sheet = self.wk[sheetName]

         return sheet

     def getRowNum(self, sheet):

         """获取有效数据的最大行号"""

         return sheet.max_row

     def getColsNum(self, sheet):

         """获取有效数据的最大列号"""

         return sheet.max_column

     def getRowValues(self, sheet, rowNum):

         """获取某一行的数据"""

         maxColsNum = self.getColsNum(sheet)

         rowValues = []

         for colsNum in range(1, maxColsNum + 1):

             value = sheet.cell(rowNum, colsNum).value

             if value is None:

                 value = ''

             rowValues.append(value)

         return tuple(rowValues)

     def getColumnValues(self, sheet, columnNum):

         """获取某一列的数据"""

         maxRowNum = self.getRowNum(sheet)

         columnValues = []

         for rowNum in range(2, maxRowNum + 1):

             value = sheet.cell(rowNum, columnNum).value

             if value is None:

                 value = ''

             columnValues.append(value)

         return tuple(columnValues)

     def getValueOfCell(self, sheet, rowNum, columnNum):

         """获取某一个单元格的数据"""

         value = sheet.cell(rowNum, columnNum).value

         if value is None:

             value = ''

         return value

     def getAllValuesOfSheet(self, sheet):

         """获取某一个sheet页的所有测试数据,返回一个元祖组成的列表"""

         maxRowNum = self.getRowNum(sheet)

         columnNum = self.getColsNum(sheet)

         allValues = []

         for row in range(2, maxRowNum + 1):

             rowValues = []

             for column in range(1, columnNum + 1):

                 value = sheet.cell(row, column).value

                 if value is None:

                     value = ''

                 rowValues.append(value)

             allValues.append(tuple(rowValues))

         return allValues

 if __name__ == '__main__':

     # excel = ParseExcel()

     # sheet = excel.getSheetByName('login')

     # print('行号:', excel.getRowNum(sheet))

     # print('列号:', excel.getColsNum(sheet))

     #

     # rowvalues = excel.getRowValues(sheet, 1)

     # columnvalues = excel.getColumnValues(sheet, 2)

     # valueofcell = excel.getValueOfCell(sheet, 1, 2)

     # allvalues = excel.getAllValuesOfSheet(sheet)

     #

     # print('第{}行数据{}'.format(1, rowvalues))

     # print('第{}列数据{}'.format(2, columnvalues))

     # print('{}{}单元格的内容{}'.format(1, 2, valueofcell))

     # print('login{}'.format(allvalues))

     excel = ParseExcel()

     sheet = excel.getSheetByName('mail')

     print('行号:', excel.getRowNum(sheet))

     print('列号:', excel.getColsNum(sheet))

     allvalues = excel.getAllValuesOfSheet(sheet)

     print('sendmail{}'.format(allvalues))
parseExcelFile.py-解析Excel文件
 """

 ------------------------------------

 @Time : 2019/4/18 10:54

 @Auth : linux超

 @File : parseConFile.py

 @IDE  : PyCharm

 @Motto: Real warriors,dare to face the bleak warning,dare to face the incisive error!

 ------------------------------------

 """

 import configparser

 from config.conf import configDir

 class ParseConFile(object):

     def __init__(self):

         self.file = configDir

         self.conf = configparser.ConfigParser()

         self.conf.read(self.file, encoding='utf-8')

     def getAllSections(self):

         """获取所有的section,返回一个列表"""

         return self.conf.sections()

     def getAllOptions(self, section):

         """获取指定section下所有的option, 返回列表"""

         return self.conf.options(section)

     def getLocatorsOrAccount(self, section, option):

         """获取指定section, 指定option对应的数据, 返回元祖和字符串"""

         try:

             locator = self.conf.get(section, option)

             if ('->' in locator):

                 locator = tuple(locator.split('->'))

             return locator

         except configparser.NoOptionError as e:

             print('error:', e)

         return 'error: No option "{}" in section: "{}"'.format(option, section)

     def getOptionValue(self, section):

         """获取指定section下所有的option和对应的数据,返回字典"""

         value = dict(self.conf.items(section))

         return value

 if __name__ == '__main__':

     cf = ParseConFile()

     print(cf.getAllSections())

     print(cf.getAllOptions('126LoginAccount'))

     print(cf.getLocatorsOrAccount('126LoginAccount', 'username'))

     print(cf.getOptionValue('126LoginAccount'))
parseConFile.py-解析配置文件
 [126LoginAccount];126邮箱正确的登录账号和密码;运行用例时请更换正确的用户名和密码

 username=linuxxiaochao

 password=xiaochao11520

 [HomePageElements];126邮箱首页菜单栏元素

 homePage=id->_mail_tabitem_0_3text

 mailList=id->_mail_tabitem_1_4text

 applicationCenter=id->_mail_tabitem_2_5text

 inBox=id->_mail_tabitem_3_6text

 [LoginPageElements];126邮箱登录页面的元素

 frame=xpath->//div[@id="loginDiv"]/iframe

 username=xpath->//input[@name="email"]

 password=xpath->//input[@name="password"]

 loginBtn=xpath->//a[@id="dologin"]

 ferrorHead=xpath->//div[@class="ferrorhead"]

 [ContactPageElements];126邮箱添加联系人页面元素

 new_contact=xpath->//span[text()="新建联系人"]

 name=id->input_N

 mail=xpath->//div[@id="iaddress_MAIL_wrap"]//input[@class="nui-ipt-input"]

 star=xpath->//span[@class="nui-chk-text"]/preceding-sibling::span/b

 phone=xpath->//div[@id='iaddress_TEL_wrap']//input[@class='nui-ipt-input']

 comment=id->input_DETAIL

 commit=xpath->//span[text()='确 定']

 tooltip=xpath->//span[text()='请正确填写邮件地址。']

 [SendMailPageElements];126邮箱发送邮件页面元素

 writeMail=xpath->//div[@id='dvNavContainer']//span[text()='写 信']

 addressee=xpath->//input[@aria-label='收件人地址输入框,请输入邮件地址,多人时地址请以分号隔开']

 subject=xpath->//input[contains(@id, '_subjectInput')]

 iframe=xpath->//iframe[@class="APP-editor-iframe"]

 text=xpath->/html/body

 sendBtn=xpath->//header//span[text()='发送']

 expect=xpath->//h1[contains(@id,'_succInfo')]

 uploadAttachment=xpath->//div[@title="点击添加附件"]

 delete=xpath->//a[text()='删除']
config.ini
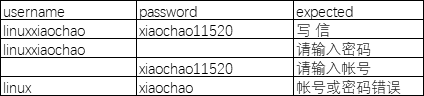
新建excel文件,分3个sheet,分别为:login,contact,mail #每个sheet中数据可自行填写,驱动测试用例执行不同的数据进行测试
login
contact


数据,UI对象库,解析方法都已经有了,接下来通过PageObject模式设计编写每个页面的操作及封装126邮箱的功能,以便后续设计用例调用
 """

 ------------------------------------

 @Time : 2019/4/20 8:45

 @Auth : linux超

 @File : BasePage.py

 @IDE  : PyCharm

 @Motto: Real warriors,dare to face the bleak warning,dare to face the incisive error!

 ------------------------------------

 """

 import time

 from selenium.webdriver.support import expected_conditions as EC

 from selenium.webdriver.support.wait import WebDriverWait as wd

 from selenium.webdriver.common.by import By

 from selenium.common.exceptions import NoSuchWindowException, TimeoutException, \

     NoAlertPresentException, NoSuchFrameException

 from selenium import webdriver

 from util.clipboard import ClipBoard

 from util.keyboard import KeyBoard

 from util.parseConFile import ParseConFile

 from util.parseExcelFile import ParseExcel

 class BasePage(object):

     """

     结合显示等待封装一些selenium 内置方法

     """

     cf = ParseConFile()

     excel = ParseExcel()

     def __init__(self, driver, outTime=30):

         self.byDic = {

         'id': By.ID,

         'name': By.NAME,

         'class_name': By.CLASS_NAME,

         'xpath': By.XPATH,

         'link_text': By.LINK_TEXT

         }

         self.driver = driver

         self.outTime = outTime

     def findElement(self, by, locator):

         """

         find alone element

         :param by: eg: id, name, xpath, css.....

         :param locator: id, name, xpath for str

         :return: element object

         """

         try:

             print('[Info:Starting find the element "{}" by "{}"!]'.format(locator, by))

             element = wd(self.driver, self.outTime).until(lambda x : x.find_element(by, locator))

         except TimeoutException as t:

             print('error: found "{}" timeout!'.format(locator), t)

         except NoSuchWindowException as e:

             print('error: no such "{}"'.format(locator), e)

         except Exception as e:

             raise e

         else:

             # print('[Info:Had found the element "{}" by "{}"!]'.format(locator, by))

             return element

     def findElements(self, by, locator):

         """

         find group elements

         :param by: eg: id, name, xpath, css.....

         :param locator: eg: id, name, xpath for str

         :return: elements object

         """

         try:

             print('[Info:start find the elements "{}" by "{}"!]'.format(locator, by))

             elements = wd(self.driver, self.outTime).until(lambda x : x.find_element(by, locator))

         except TimeoutException as t:

             print(t)

         except NoSuchWindowException as e:

             print(e)

         except Exception as e:

             raise e

         else:

             # print('[Info:Had found the elements "{}" by "{}"!]'.format(locator, by))

             return elements

     def isElementExsit(self, by, locator):

         """

         assert element if exist

         :param by: eg: id, name, xpath, css.....

         :param locator: eg: id, name, xpath for str

         :return: if element return True else return false

         """

         if by.lower() in self.byDic:

             try:

                 wd(self.driver, self.outTime).\

                     until(EC.visibility_of_element_located((self.byDic[by], locator)))

             except TimeoutException:

                 print('Error: element "{}" time out!'.format(locator))

                 return False

             except NoSuchWindowException:

                 print('Error: element "{}" not exsit!'.format(locator))

                 return False

             return True

         else:

             print('the "{}" error!'.format(by))

     def isClick(self, by, locator):

         """判断是否可点击,返回元素对象"""

         if by.lower() in self.byDic:

             try:

                 element = wd(self.driver, self.outTime).\

                     until(EC.element_to_be_clickable((self.byDic[by], locator)))

             except Exception:

                 return False

             return element

         else:

             print('the "{}" error!'.format(by))

     def isAlertAndSwitchToIt(self):

         """

         assert alert if exsit

         :return: alert obj

         """

         try:

             re = wd(self.driver, self.outTime).until(EC.alert_is_present())

         except NoAlertPresentException:

             return False

         except Exception:

             return False

         return re

     def switchToFrame(self, by, locator):

         """判断frame是否存在,存在就跳到frame"""

         print('info:switching to iframe "{}"'.format(locator))

         if by.lower() in self.byDic:

             try:

                 wd(self.driver, self.outTime).\

                     until(EC.frame_to_be_available_and_switch_to_it((self.byDic[by], locator)))

             except TimeoutException as t:

                 print('error: found "{}" timeout!'.format(locator), t)

             except NoSuchFrameException as e:

                 print('error: no such "{}"'.format(locator), e)

             except Exception as e:

                 raise e

         else:

             print('the "{}" error!'.format(by))

     def switchToDefaultFrame(self):

         """返回默认的frame"""

         print('info:switch back to default iframe')

         try:

             self.driver.switch_to.default_content()

         except Exception as e:

             print(e)

     def getAlertText(self):

         """获取alert的提示信息"""

         if self.isAlertAndSwitchToIt():

             alert = self.isAlertAndSwitchToIt()

             return alert.text

         else:

             return None

     def getElementText(self, by, locator, name=None):

         """获取某一个元素的text信息"""

         try:

             element = self.findElement(by, locator)

             if name:

                 return element.get_attribute(name)

             else:

                 return element.text

         except:

             print('get "{}" text failed return None'.format(locator))

             return None

     def loadUrl(self, url):

         """加载url"""

         print('info: string upload url "{}"'.format(url))

         self.driver.get(url)

     def getSource(self):

         """获取页面源码"""

         return self.driver.page_source

     def sendKeys(self, by, locator, value=''):

         """写数据"""

         print('info:input "{}"'.format(value))

         try:

             element = self.findElement(by, locator)

             element.send_keys(value)

         except AttributeError as e:

             print(e)

     def clear(self, by, locator):

         """清理数据"""

         print('info:clearing value')

         try:

             element = self.findElement(by, locator)

             element.clear()

         except AttributeError as e:

             print(e)

     def click(self, by, locator):

         """点击某个元素"""

         print('info:click "{}"'.format(locator))

         element = self.isClick(by, locator)

         if element:

             element.click()

         else:

             print('the "{}" unclickable!')

     def sleep(self, num=0):

         """强制等待"""

         print('info:sleep "{}" minutes'.format(num))

         time.sleep(num)

     def ctrlV(self, value):

         """ctrl + V 粘贴"""

         print('info:pasting "{}"'.format(value))

         ClipBoard.setText(value)

         self.sleep(3)

         KeyBoard.twoKeys('ctrl', 'v')

     def enterKey(self):

         """enter 回车键"""

         print('info:keydown enter')

         KeyBoard.oneKey('enter')

     def waitElementtobelocated(self, by, locator):

         """显示等待某个元素出现,且可见"""

         print('info:waiting "{}" to be located'.format(locator))

         try:

             wd(self.driver, self.outTime).until(EC.visibility_of_element_located((self.byDic[by], locator)))

         except TimeoutException as t:

             print('error: found "{}" timeout!'.format(locator), t)

         except NoSuchWindowException as e:

             print('error: no such "{}"'.format(locator), e)

         except Exception as e:

             raise e

     def assertValueInSource(self, value):

         """断言某个关键字是否存在页面源码中"""

         print('info:assert "{}" in page source'.format(value))

         source = self.getSource()

         assert value in source, '关键字"{}"不存在源码中!'.format(value)

     def assertStringContainsValue(self, String, value):

         """断言某段字符串包含另一个字符串"""

         print('info:assert "{}" contains "{}"'.format(String, value))

         assert value in String, '"{}"不包含"{}"!'.format(String, value)

     @staticmethod

     def getSheet(sheetName):

         """获取某个sheet页的对象"""

         sheet = BasePage.excel.getSheetByName(sheetName)

         return sheet

 if __name__ == "__main__":

     driver = webdriver.Firefox()

     frame = ('xpath', '//div[@id="loginDiv"]/ifram')

     wait = BasePage(driver)

     driver.get('https://mail.126.com/')

     wait.switchToFrame(*frame)

     username = wait.findElement('xpath', '//input[@name="email"]')

     username.send_keys('账号')

     if wait.isElementExsit('xpath', '//input[@name="password"]'):

         wait.findElement('xpath', '//input[@name="password"]').send_keys('xiaochao11520')

     wait.click('xpath', '//a[@id="dologin"]')
BasePage.py-webdriver二次封装
 """

 ------------------------------------

 @Time : 2019/4/20 12:28

 @Auth : linux超

 @File : HomePage.py

 @IDE  : PyCharm

 @Motto: Real warriors,dare to face the bleak warning,dare to face the incisive error!

 ------------------------------------

 """

 from Page.BasePage import BasePage

 class HomePage(BasePage):

     # 配置文件读取元素

     homePage = BasePage.cf.getLocatorsOrAccount('HomePageElements', 'homePage')

     mailList = BasePage.cf.getLocatorsOrAccount('HomePageElements', 'mailList')

     applicationCenter = BasePage.cf.getLocatorsOrAccount('HomePageElements', 'applicationCenter')

     inBox = BasePage.cf.getLocatorsOrAccount('HomePageElements', 'inBox')

     '''首页菜单选项'''

     def selectMenu(self, Menu='mailList'):

         """邮箱首页选择菜单"""

         if Menu == 'mailList':

             self.click(*HomePage.mailList)

         elif Menu == 'homePage':

             self.click(*HomePage.homePage)

         elif Menu == 'applicationCenter':

             self.click(*HomePage.applicationCenter)

         elif Menu == 'inBox':

             self.click(*HomePage.inBox)

         else:

             raise ValueError('''

             菜单选择错误!

             homePage->首页

             mailList->通讯录

             applicationCenter->应用中心

             inBox->收件箱''')

 if __name__=='__main__':

     from selenium import webdriver

     from Page.PageObject.LoginPage import LoginPage

     driver = webdriver.Firefox()

     login = LoginPage(driver)

     login.login('账号', 'xiaochao11520')

     home = HomePage(driver)

     home.selectMenu()
HomePage.py-邮箱首页选择菜单
 """

 ------------------------------------

 @Time : 2019/4/20 12:28

 @Auth : linux超

 @File : LoginPage.py

 @IDE  : PyCharm

 @Motto: Real warriors,dare to face the bleak warning,dare to face the incisive error!

 ------------------------------------

 """

 from Page.BasePage import BasePage

 class LoginPage(BasePage):

     # 配置文件读取元素

     frame = BasePage.cf.getLocatorsOrAccount('LoginPageElements', 'frame')

     username = BasePage.cf.getLocatorsOrAccount('LoginPageElements', 'username')

     password = BasePage.cf.getLocatorsOrAccount('LoginPageElements', 'password')

     loginBtn = BasePage.cf.getLocatorsOrAccount('LoginPageElements', 'loginBtn')

     ferrorHead = BasePage.cf.getLocatorsOrAccount('LoginPageElements', 'ferrorHead')  # 登录失败提示

     def login(self, userName, passWord):

         '''登录'''

         print('-------staring login-------')

         self.loadUrl('https://mail.126.com')

         self.switchToFrame(*LoginPage.frame)

         self.clear(*LoginPage.username)

         self.sendKeys(*LoginPage.username, userName)

         self.clear(*LoginPage.password)

         self.sendKeys(*LoginPage.password, passWord)

         self.click(*LoginPage.loginBtn)

         self.switchToDefaultFrame()

         print('---------end login---------')

     # add at 2019/04/19

     def assertTextEqString(self, expected, name = None):

         '''断言提示信息是否与期望的值相等'''

         self.switchToFrame(*LoginPage.frame)

         text = self.getElementText(*LoginPage.ferrorHead, name)

         self.switchToDefaultFrame()

         print('info: assert "{}" == "{}"'.format(text, expected))

         assert text == expected, '{} != {}'.format(text, expected)

 if __name__=="__main__":

     from selenium import webdriver

     driver = webdriver.Firefox()

     login = LoginPage(driver, 30)

     login.login('lin', '')

     login.assertTextEqString('请输入密码')
LoginPage.py-封装登录功能
 """

 ------------------------------------

 @Time : 2019/4/20 12:29

 @Auth : linux超

 @File : ContactPage.py

 @IDE  : PyCharm

 @Motto: Real warriors,dare to face the bleak warning,dare to face the incisive error!

 ------------------------------------

 """

 from Page.BasePage import BasePage

 class ContactPage(BasePage):

     # 配置文件读取元素

     new_contact = BasePage.cf.getLocatorsOrAccount('ContactPageElements', 'new_contact')

     name = BasePage.cf.getLocatorsOrAccount('ContactPageElements', 'name')

     mail = BasePage.cf.getLocatorsOrAccount('ContactPageElements', 'mail')

     star = BasePage.cf.getLocatorsOrAccount('ContactPageElements', 'star')

     phone = BasePage.cf.getLocatorsOrAccount('ContactPageElements', 'phone')

     comment = BasePage.cf.getLocatorsOrAccount('ContactPageElements', 'comment')

     commit = BasePage.cf.getLocatorsOrAccount('ContactPageElements', 'commit')

     errortip = BasePage.cf.getLocatorsOrAccount('ContactPageElements', 'tooltip')  # 错误提示

     def newContact(self, Name, Mail, Star, Phone, Comment):

         """添加联系人"""

         print('--------string add contact--------')

         self.click(*ContactPage.new_contact)

         self.sendKeys(*ContactPage.name, Name)

         self.sendKeys(*ContactPage.mail, Mail)

         if Star == '':

             self.click(*ContactPage.star)

         self.sendKeys(*ContactPage.phone, Phone)

         self.sendKeys(*ContactPage.comment, Comment)

         self.click(*ContactPage.commit)

         print('--------end add contact--------')

     def assertErrorTip(self, excepted):

         """断言联系人添加失败时是否有提示信息"""

         text = self.getElementText(*ContactPage.errortip)

         print('info: assert "{}"=="{}"'.format(text, excepted))

         assert text == excepted

 if __name__ == '__main__':

     from selenium import webdriver

     from Page.PageObject.LoginPage import LoginPage

     from Page.PageObject.HomePage import HomePage

     driver = webdriver.Firefox()

     home = HomePage(driver)

     login = LoginPage(driver)

     contact = ContactPage(driver)

     login.login('账号', 'xiaochao11520')

     home.selectMenu()

     contact.newContact('281754041@qq.com')
ContactPage.py-封装添加联系人功能
 """

 ------------------------------------

 @Time : 2019/4/20 9:16

 @Auth : linux超

 @File : SendMailPage.py

 @IDE  : PyCharm

 @Motto: Real warriors,dare to face the bleak warning,dare to face the incisive error!

 ------------------------------------

 """

 from Page.BasePage import BasePage

 class SendMailPage(BasePage):

     # 配置文件读取元素

     writeMail = BasePage.cf.getLocatorsOrAccount('SendMailPageElements', 'writeMail')

     addressee = BasePage.cf.getLocatorsOrAccount('SendMailPageElements', 'addressee')

     subject = BasePage.cf.getLocatorsOrAccount('SendMailPageElements', 'subject')

     iframe = BasePage.cf.getLocatorsOrAccount('SendMailPageElements', 'iframe')

     text = BasePage.cf.getLocatorsOrAccount('SendMailPageElements', 'text')

     sendBtn = BasePage.cf.getLocatorsOrAccount('SendMailPageElements', 'sendBtn')

     expect = BasePage.cf.getLocatorsOrAccount('SendMailPageElements', 'expect')

     uploadAttachment = BasePage.cf.getLocatorsOrAccount('SendMailPageElements', 'uploadAttachment')

     delete = BasePage.cf.getLocatorsOrAccount('SendMailPageElements', 'delete')

     def sendMail(self, Address, Subject, Text, PFA=''):

         """发送邮件功能"""

         print('------------string send mail---------------------')

         self.click(*SendMailPage.writeMail)

         self.sendKeys(*SendMailPage.addressee, Address)

         self.sendKeys(*SendMailPage.subject, Subject)

         self.switchToFrame(*SendMailPage.iframe)

         self.sendKeys(*SendMailPage.text, Text)

         self.switchToDefaultFrame()

         if PFA:

             self.click(*SendMailPage.uploadAttachment)

             self.ctrlV(PFA)

             self.enterKey()

             self.waitElementtobelocated(*SendMailPage.delete)

         self.click(*SendMailPage.sendBtn)

         print('------------end send mail---------------------')

 if __name__=='__main__':

     from Page.PageObject.LoginPage import LoginPage

     from selenium import webdriver

     driver = webdriver.Firefox()

     login = LoginPage(driver)

     login.login('账号', 'xiaochao11520')

     sendMail = SendMailPage(driver)

     sendMail.sendMail('281754043@qq.com', 'pytest', 'pytest实战实例', 1, 'D:\KeyWordDriverTestFrameWork\geckodriver.log')
SendMailPage.py-封装发送邮件功能
所有的准备工作都已经做好了,还有一个问题,我们的添加联系人和发送邮件应该是否应该在已经登录的前提下测试呢?答案是肯定的。所以我们在用例同目录下新建conftest.py文件并调用登录功能(为什么这么做,不明白的小伙伴可以去看一下我之前的文章,关于conftest.py的原理)
 """

 ------------------------------------

 @Time : 2019/4/20 15:10

 @Auth : linux超

 @File : conftest.py

 @IDE  : PyCharm

 @Motto: Real warriors,dare to face the bleak warning,dare to face the incisive error!

 ------------------------------------

 """

 import pytest

 from Page.PageObject.LoginPage import LoginPage

 # 从配置文件中获取正确的用户名和密码

 userName = LoginPage.cf.getLocatorsOrAccount('126LoginAccount', 'username')

 passWord = LoginPage.cf.getLocatorsOrAccount('126LoginAccount', 'password')

 @pytest.fixture(scope='function')

 def login(driver):

     '''除登录用例,每一个用例的前置条件'''

     print('------------staring login------------')

     loginFunc = LoginPage(driver, 30)

     loginFunc.login(userName, passWord)

     yield

     print('------------end login------------')

     driver.delete_all_cookies()
conftest.py-同用例目录下,调用登录功能
ok,开始编写测试用例啦
 """

 ------------------------------------

 @Time : 2019/4/20 14:10

 @Auth : linux超

 @File : test_loginCase.py

 @IDE  : PyCharm

 @Motto: Real warriors,dare to face the bleak warning,dare to face the incisive error!

 ------------------------------------

 """

 import pytest

 from Page.PageObject.LoginPage import LoginPage

 @pytest.mark.loginTest

 class TestLogin(object):

     # 测试数据

     loginSheet = LoginPage.getSheet('login')

     data = LoginPage.excel.getAllValuesOfSheet(loginSheet)

     # 正确的帐号和密码

     userName = LoginPage.cf.getLocatorsOrAccount('126LoginAccount', 'username')

     passWord = LoginPage.cf.getLocatorsOrAccount('126LoginAccount', 'password')

     @pytest.fixture()

     def teardown_func(self, driver):

         """

         执行每个用例之后要清除一下cookie,

         否则你第一个账号登录之后,重新加载网址还是登录状态,无法测试后面的账号

         """

         yield

         driver.delete_all_cookies()

     @pytest.mark.parametrize('username, password, expect', data)

     def test_login(self, teardown_func, driver, username, password, expect):

         """测试登录"""

         login = LoginPage(driver, 30)

         login.login(username, password)

         login.sleep(5)

         # 增加登录失败时, 对提示信息的验证

         if username == TestLogin.userName and password == TestLogin.passWord:

             login.assertValueInSource(expect)

         elif username == '':

             login.assertTextEqString(expect)

         elif username != '' and password == '':

             login.assertTextEqString(expect)

         elif username == '' and password == '':

             login.assertTextEqString(expect)

         else:

             login.assertTextEqString(expect)

 if __name__ == "__main__":

     pytest.main(['-v', 'test_loginCase.py'])
test_loginCase.py-登录功能测试
 """

 ------------------------------------

 @Time : 2019/4/20 16:15

 @Auth : linux超

 @File : test_contactCase.py

 @IDE  : PyCharm

 @Motto: Real warriors,dare to face the bleak warning,dare to face the incisive error!

 ------------------------------------

 """

 import re

 import pytest

 from Page.PageObject.HomePage import HomePage

 from Page.PageObject.ContactPage import ContactPage

 @pytest.mark.conatctTest

 class TestAddContact(object):

     # 测试数据

     contactSheet = ContactPage.getSheet('contact')

     data = ContactPage.excel.getAllValuesOfSheet(contactSheet)

     @pytest.mark.newcontact

     @pytest.mark.parametrize('Name, Mail, Star, Phone, Comment, expect', data)

     def test_NewContact(self, driver, login, Name, Mail, Star, Phone, Comment, expect):

         """测试添加联系人"""

         home_page = HomePage(driver)

         contact_page = ContactPage(driver)

         home_page.selectMenu()

         contact_page.newContact(Name, Mail, Star, Phone, Comment)

         home_page.sleep(5)

         # 校验错误的邮箱是否提示信息正确

         if re.match(r'^.{1,}@[0-9a-zA-Z]{1,13}\..*$', Mail):

             contact_page.assertValueInSource(expect)

         else:

             contact_page.assertErrorTip(expect)

 if __name__ == '__main__':

     pytest.main(['-v', 'test_contactCase.py'])
test_contactCase.py-添加联系人功能测试
 """

 ------------------------------------

 @Time : 2019/4/20 10:04

 @Auth : linux超

 @File : test_sendMailCase.py

 @IDE  : PyCharm

 @Motto: Real warriors,dare to face the bleak warning,dare to face the incisive error!

 ------------------------------------

 """

 import pytest

 from Page.PageObject.SendMailPage import SendMailPage

 @pytest.mark.sendMailTest

 class TestSendMail(object):

     sendMailSheet = SendMailPage.getSheet('mail')

     data = SendMailPage.excel.getAllValuesOfSheet(sendMailSheet)

     @pytest.mark.sendmail

     @pytest.mark.parametrize('Address, Subject, Text, PFA', data)

     def test_sendMail(self, driver, login, Address, Subject, Text,PFA):

         """测试发送邮件,包括带附件的邮件"""

         send_mail = SendMailPage(driver)

         send_mail.sendMail(Address, Subject, Text, PFA)

         send_mail.sleep(5)

         assert send_mail.isElementExsit(*SendMailPage.expect)

 if __name__=='__main__':

     pytest.main(['-v', 'test_sendMailCase.py'])
test_sendMailCase.py-发送邮件功能测试
问题
用例已经写完了,有两个问题
1.有没有发现我们的报告怎么生成的?也没有失败用例截图?
2.我们貌似并没有编写驱动浏览器的代码?
现在我们来解决这个两个问题
根据pytest的conftest.py文件的原理,我们可以把驱动浏览器的代码写在一个全局的conftest.py文件里面。报告生成其实是通过命令 pytest --html=‘report.html’ --self-contained-html生成的,但是这样的报告对用例的描述不是很清晰,且没有对失败用例截图,也不方便我们分析项目的缺陷,我们也可以填写代码放到这个文件里面(关于报告修改的文章)
 """

 ------------------------------------

 @Time : 2019/4/12 14:10

 @Auth : linux超

 @File : conftest.py

 @IDE  : PyCharm

 @Motto: Real warriors,dare to face the bleak warning,dare to face the incisive error!

 ------------------------------------

 """

 import pytest

 from selenium import webdriver

 from py._xmlgen import html

 _driver = None

 # 测试失败时添加截图和测试用例描述(用例的注释信息)

 @pytest.mark.hookwrapper

 def pytest_runtest_makereport(item):

     """

     当测试失败的时候,自动截图,展示到html报告中

     :param item:

     """

     pytest_html = item.config.pluginmanager.getplugin('html')

     outcome = yield

     report = outcome.get_result()

     extra = getattr(report, 'extra', [])

     if report.when == 'call' or report.when == "setup":

         xfail = hasattr(report, 'wasxfail')

         if (report.skipped and xfail) or (report.failed and not xfail):

             file_name = report.nodeid.replace("::", "_")+".png"

             screen_img = _capture_screenshot()

             if file_name:

                 html = '<div><img src="data:image/png;base64,%s" alt="screenshot" style="width:600px;height:300px;" ' \

                        'onclick="window.open(this.src)" align="right"/></div>' % screen_img

                 extra.append(pytest_html.extras.html(html))

         report.extra = extra

         report.description = str(item.function.__doc__)

         report.nodeid = report.nodeid.encode("utf-8").decode("unicode_escape")

 @pytest.mark.optionalhook

 def pytest_html_results_table_header(cells):

     cells.insert(1, html.th('Description'))

     cells.insert(2, html.th('Test_nodeid'))

     cells.pop(2)

 @pytest.mark.optionalhook

 def pytest_html_results_table_row(report, cells):

     cells.insert(1, html.td(report.description))

     cells.insert(2, html.td(report.nodeid))

     cells.pop(2)

 def _capture_screenshot():

     """

     截图保存为base64

     :return:

     """

     return _driver.get_screenshot_as_base64()

 # 这里我设置的级别是模块级别,也就是每个测试文件运行一次

 # 可以设置为session,全部用例执行一次,但是针对126邮箱的话

 # 登录次数太多会叫你验证,如果验证就没法执行用例了,我没有对验证处理(处理比较复杂)

 @pytest.fixture(scope='module')

 def driver():

     global _driver

     print('------------open browser------------')

     _driver = webdriver.Firefox()

     yield _driver

     print('------------close browser------------')

     _driver.quit()
conftest.py-全局conftest.py文件
最后呢,为了减小项目维护成本,我们把一些全局的配置项,放到我们的功能配置文件中共全局使用,包括运行用例的一些命令字符串,可以自行修改
 """

 ------------------------------------

 @Time : 2019/4/20 16:50

 @Auth : linux超

 @File : conf.py

 @IDE  : PyCharm

 @Motto: Real warriors,dare to face the bleak warning,dare to face the incisive error!

 ------------------------------------

 """

 from datetime import datetime

 import os

 # 项目根目录

 projectDir = os.path.dirname(os.path.dirname(os.path.abspath(__file__)))

 # 报告目录

 reportDir = os.path.join(projectDir, 'report')

 # ui对象库config.ini文件所在目录

 configDir = os.path.join(projectDir, 'config', 'config.ini')

 # 测试数据所在目录

 excelPath = os.path.join(projectDir, 'data', 'tcData.xlsx')

 # 当前时间

 currentTime = datetime.now().strftime('%H_%M_%S')

 # 邮件配置信息

 # 邮件服务器

 smtpServer = 'smtp.qq.com'

 # 发送者

 fromUser = '账号@qq.com'

 # 发送者密码

 fromPassWord = 'mhxvqpewblldbjhf'

 # 接收者

 toUser = ['账号@qq.com']# 可以同时发送给多人,追加到列表中

 # 邮件标题

 subject = 'xx项目自动化测试报告'

 # 邮件正文

 contents = '测试报告正文'

 # 报告名称

 htmlName = r'{}\testReport{}.html'.format(reportDir, currentTime)

 # 脚本执行命令

 args = r'pytest --html=' + htmlName+ ' ' + '--self-contained-html'

 # modify by linuxchao at 2019/4/25

 args_login = r'pytest --html='+ htmlName+ ' ' + '-m' + ' ' + 'loginTest'+ ' --self-contained-html'

 args_contact = r'pytest --html='+ htmlName+ ' ' + '-m' + ' ' + 'contactTest'+ ' --self-contained-html'

 args_sendmail = r'pytest --html='+ htmlName+ ' ' + '-m' + ' ' + 'sendMailTest'+ ' --self-contained-html'
conf.py-全局配置文件
运行项目
通过命令运行
1.cmd切换到项目的根目录,执行pytest --html=‘report.html’ --self-contained-html命令(此运行方式,无法发送测试报告邮件)
这种方式感觉有点low,我们换另外一种方式,可以通过os模块自动执行相关命令,编写运行用例代码
 """

 ------------------------------------

 @Time : 2019/4/15 16:14

 @Auth : linux超

 @File : RunTestCase.py

 @IDE  : PyCharm

 @Motto: Real warriors,dare to face the bleak warning,dare to face the incisive error!

 ------------------------------------

 """

 import sys

 sys.path.append('.')

 from config.conf import *

 from util.sendMailForReprot import SendMailWithReport

 def main():

     # 判断项目的根目录是否在sys.path中,没有就添加

     if projectDir not in sys.path:

         sys.path.append(projectDir)

     # 执行用例

     os.system(args)

     # 发送邮件

     SendMailWithReport.send_mail(

         smtpServer, fromUser, fromPassWord,

         toUser, subject, contents,

         htmlName)

 if __name__ == '__main__':

     main()
RunTestCase.py-执行用例文件
我们可以直接执行这个文件执行所用的测试用例了!
其实我们运行用例往往不只是 使用pytest --html=‘report.html’ --self-contained-html 这样一个简单的命令运行,通常会添加很多的命令选项,比如-v,-q,-s等等,那么怎么办呢?这时候就用到了pytest.ini配置文件了
只添加了几个简单的命令选项(pytest.ini具体使用及原理)
 [pytest]

 addopts=-vqs

 testpaths=./TestCases

 markers=

     loginTest: Run login test cases

     contactTest: Run add contact test cases

     sendMailTest: Run send mail test cases
pytest.ini-pytest配置文件
测试输出
1.自动生成html格式报告,其中报告里面附带用例执行日志明细,及用例失败自动截图(部分报告展示)
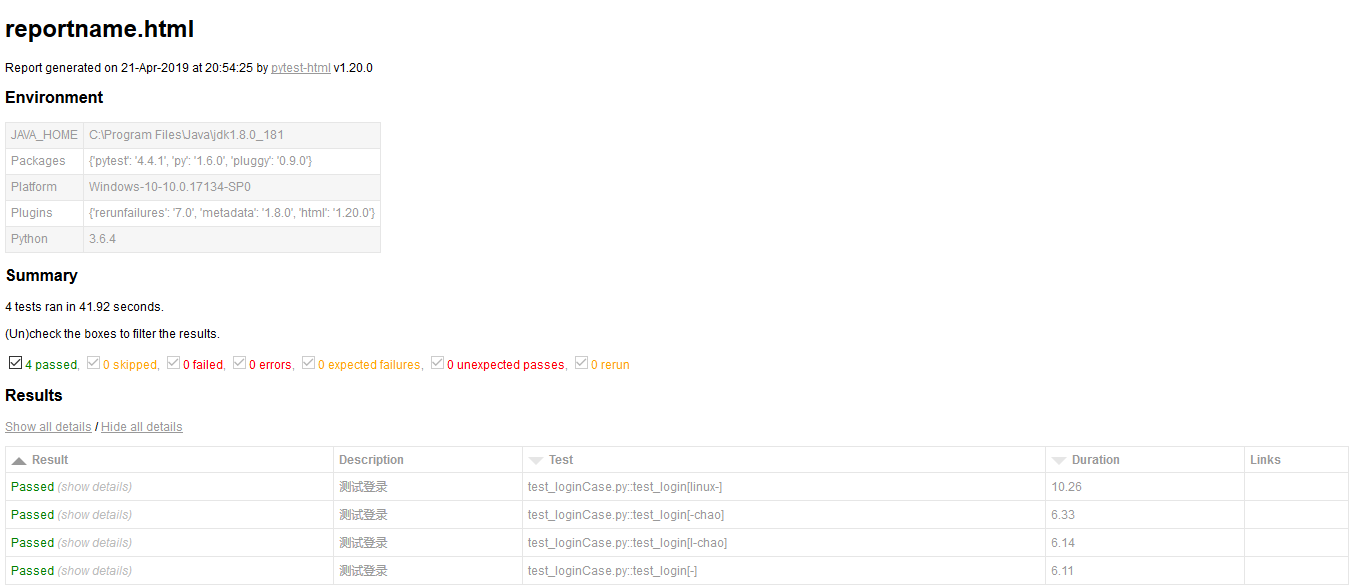

2.自动发送测试邮件给指定用户

项目源码
源码在本人github上,可自行下载!
PS:最后还是附上我们的QQ交流群:878565760 真心希望所有对测试感兴趣,想入门,想提升自己测试能力的小伙伴加入!
Pytest UI自动化测试实战实例的更多相关文章
- UI自动化测试实战
前言 前面我们已经搭建好了wordpress网站,如果需要查看运行效果可以看我前面的搭建文章,下面我们来进行自动化测试的练习. 示例 首先我们测试自动登陆 import unittest from s ...
- 使用AirtestProject+pytest做支付宝小程序UI自动化测试
一,前言 1,背景 因公司业务需要做支付宝小程序的UI自动化测试,于是在网上查找小程序的自动化资料,发现微信小程序是有自己的测试框架的,但几乎找不到支付宝小程序UI自动化测试相关的资料.白piao失败 ...
- UI自动化测试框架(项目实战)python、Selenium(日志、邮件、pageobject)
其实百度UI自动化测试框架,会出来很多相关的信息,不过就没有找到纯项目的,无法拿来使用的:所以我最近就写了一个简单,不过可以拿来在真正项目中可以使用的测试框架. 项目的地址:https://githu ...
- Selenium 与自动化测试 —— 《Selenium 2 自动化测试实战》读书笔记
背景 最近在弄 appium,然后顺便发现了 Selenium 框架和这本书,恰好这本书也介绍了一些软件测试&自动化测试的理论知识,遂拿过来学习学习.所以本文几乎没有实践内容,大多都是概念和工 ...
- selenium2自动化测试实战--基于Python语言
自动化测试基础 一. 软件测试分类 1.1 根据项目流程阶段划分软件测试 1.1.1 单元测试 单元测试(或模块测试)是对程序中的单个子程序或具有独立功能的代码段进行测试的过程. 1.1.2 集成测试 ...
- selenium2 Webdriver + Java 自动化测试实战和完全教程
selenium2 Webdriver + Java 自动化测试实战和完全教程一.快速开始 博客分类: Selenium-webdriverselenium webdriver 学习selenium ...
- Selenium2学习-016-WebUI自动化实战实例-014-Selenium 窗口选择
在日常的 WebUI 自动化测试脚本编写过程中,经常需要打开新的页面,或者在多个打开的页面之间进行切换,以对页面元素进行相应的操作,以模拟用户的行为,实现 UI 的自动化测试.在过往的时间中,经常有初 ...
- Selenium2学习-010-WebUI自动化实战实例-008-Selenium 操作下拉列表实例-Select
此文主要讲述用 Java 编写 Selenium 自动化测试脚本编写过程中,对下拉列表框 Select 的操作. 下拉列表是 Web UI 自动化测试过程中使用率非常高的,通常有两种形式的下拉列表,一 ...
- Selenium2学习-009-WebUI自动化实战实例-007-Selenium 8种元素定位实战实例源代码(百度首页搜索录入框及登录链接)
此 文主要讲述用 Java 编写 Selenium 自动化测试脚本编写过程中,通过 ID.name.xpath.cssSelector.linkText.className.partialLinkTe ...
随机推荐
- 相同内容 yaml 与 json 格式对比
关联数组: yaml person: name: 张三 age: 24 json { "person": { "name": "张三", . ...
- Chiaki Sequence Revisited HDU - 6304 lowbit找规律法
Problem Description Chiaki is interested in an infinite sequence a1,a2,a3,..., which is defined as f ...
- 装饰器--decorator3
装饰器添加返回值 import time def timer(func): def wrapper(*args,**kwargs): #wrapper包装的意思 start_time = time.t ...
- NOIP模拟6
期望得分:100+100+100=300 实际得分:0+100+90=190 T1 superman 二分给每条边加多少,判断是否存在负环 #include<queue> #include ...
- [USACO14JAN]Recording the Moolympics
题目描述 Being a fan of all cold-weather sports (especially those involving cows), Farmer John wants to ...
- POJ 1228 Grandpa's Estate 凸包 唯一性
LINK 题意:给出一个点集,问能否够构成一个稳定凸包,即加入新点后仍然不变. 思路:对凸包的唯一性判断,对任意边判断是否存在三点及三点以上共线,如果有边不满足条件则NO,注意使用水平序,这样一来共线 ...
- JVM调优总结(4):分代垃圾回收
为什么要分代 分代的垃圾回收策略,是基于这样一个事实:不同的对象的生命周期是不一样的.因此,不同生命周期的对象可以采取不同的收集方式,以便提高回收效率. 在Java程序运行的过程中,会产生大量的对象, ...
- Elasticsearch——QueryBuilder简单查询
elasticsearch中存储的全部文档 1.matchAllQuery() matchAllQuery()方法用来匹配全部文档 public class QueryTest { pub ...
- 【BZOJ】2154: Crash的数字表格 莫比乌斯反演
[题意]给定n,m,求Σlcm(i,j),1<=i<=n,1<=j<=m,n,m<=10^7. [算法]数论(莫比乌斯反演) [题解] $$ans=\sum_{i\leq ...
- Milking Cows 挤牛奶
1.2.1 Milking Cows 挤牛奶 Time Limit: 1 Sec Memory Limit: 64 MBSubmit: 554 Solved: 108[Submit][Status ...