Android单个按钮自定义Dialog
代码改变世界
Android单个按钮自定义Dialog
dialog_layout.xml
<?xml version="1.0" encoding="utf-8"?>
<RelativeLayout xmlns:android="http://schemas.android.com/apk/res/android"
android:layout_width="match_parent"
android:layout_height="match_parent"
android:orientation="vertical"> <LinearLayout
android:layout_width="260dp"
android:layout_height="wrap_content"
android:layout_centerInParent="true"
android:background="@drawable/shape_radius"
android:orientation="vertical"> <ImageView
android:layout_width="wrap_content"
android:layout_height="wrap_content"
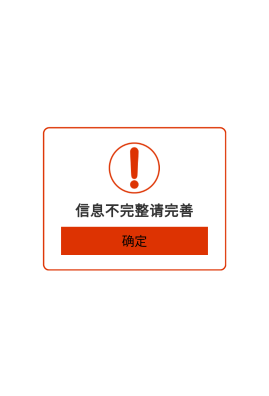
android:src="@mipmap/warning"
android:layout_marginTop="20dp"
android:layout_gravity="center_horizontal"/> <TextView
android:id="@+id/message"
android:layout_width="wrap_content"
android:layout_height="wrap_content"
android:layout_marginTop="10dp"
android:textSize="20dp"
android:layout_gravity="center_horizontal"
android:text="信息不完整请完善"
android:textStyle="bold"/> <Button
android:layout_width="match_parent"
android:layout_height="40dp"
android:text="确定"
android:layout_marginLeft="20dp"
android:layout_marginRight="20dp"
android:layout_marginTop="10dp"
android:layout_marginBottom="20dp"
android:background="#DD3302"/>
</LinearLayout>
</RelativeLayout>
自定义背景
shape_radius.xml
<?xml version="1.0" encoding="utf-8"?>

<shape xmlns:android="http://schemas.android.com/apk/res/android">

    <!-- 实心 -->

    <solid android:color="@android:color/white" />

    <!-- 边框 -->

    <stroke

        android:width="2dp"

        android:color="#DD3302" />

    <!-- 圆角 -->

    <corners android:radius="8dp" />

    <!-- 边距 -->

    <padding

        android:bottom="2dp"

        android:left="6dp"

        android:right="6dp"

        android:top="2dp" />

</shape>
OneButtonDialog.java
package com.lianpos.devfoucs.view;

import android.app.Dialog;
import android.content.Context;
import android.os.Bundle;
import android.view.View;
import android.widget.Button;
import android.widget.TextView;

import com.lianpos.activity.R;

/**
 * 一个按钮的dialog
 * Created by wangshuai on 2017/10/31 0031.
 */

public class OneButtonDialog extends Dialog {

    private Button yes;//确定按钮
    private TextView messageTv;//消息提示文本
    private String messageStr;//从外界设置的消息文本
    //确定文本和取消文本的显示内容
    private String yesStr;
    private onYesOnclickListener yesOnclickListener;//确定按钮被点击了的监听器

    /**
     * 设置确定按钮的显示内容和监听
     *
     * @param
     * @param onYesOnclickListener
     */
    public void setYesOnclickListener(onYesOnclickListener onYesOnclickListener) {
        this.yesOnclickListener = onYesOnclickListener;
    }

    public OneButtonDialog(Context context) {
        super(context, R.style.MyDialog);
    }

    @Override
    protected void onCreate(Bundle savedInstanceState) {
        super.onCreate(savedInstanceState);
        setContentView(R.layout.dialog_layout);
        //按空白处不能取消动画
        setCanceledOnTouchOutside(false);

        //初始化界面控件
        initView();
        //初始化界面数据
        initData();
        //初始化界面控件的事件
        initEvent();

    }

    /**
     * 初始化界面的确定和取消监听器
     */
    private void initEvent() {
        //设置确定按钮被点击后,向外界提供监听
        yes.setOnClickListener(new View.OnClickListener() {
            @Override
            public void onClick(View v) {
                if (yesOnclickListener != null) {
                    yesOnclickListener.onYesClick();
                }
            }
        });
    }

    /**
     * 初始化界面控件的显示数据
     */
    private void initData() {
        //如果用户自定了message
        if (messageStr != null) {
            messageTv.setText(messageStr);
        }
        //如果设置按钮的文字
//        if (yesStr != null) {
//            yes.setText(yesStr);
//        }
    }

    /**
     * 初始化界面控件
     */
    private void initView() {
        messageTv = (TextView) findViewById(R.id.message);
        yes = (Button) findViewById(R.id.yesButton);
    }

    /**
     * 从外界Activity为Dialog设置dialog的message
     *
     * @param message
     */
    public void setMessage(String message) {
        messageStr = message;
    }

    /**
     * 设置确定按钮和取消被点击的接口
     */
    public interface onYesOnclickListener {
        public void onYesClick();
    }
}
style.xml
<!--自定义dialog背景全透明无边框theme -->

    <style name="MyDialog" parent="android:style/Theme.Dialog">

        <!--背景颜色及和透明程度-->

        <item name="android:windowBackground">@android:color/transparent</item>

        <!--是否去除标题 -->

        <item name="android:windowNoTitle">true</item>

        <!--是否去除边框-->

        <item name="android:windowFrame">@null</item>

        <!--是否浮现在activity之上-->

        <item name="android:windowIsFloating">true</item>

        <!--是否模糊-->

        <item name="android:backgroundDimEnabled">true</item>

    </style>
使用:
oneButtonDialog = new OneButtonDialog(RegisterActivity.this);
oneButtonDialog.setMessage("确定退出应用?");
oneButtonDialog.setYesOnclickListener(new OneButtonDialog.onYesOnclickListener() {
    @Override
    public void onYesClick() {
        Toast.makeText(RegisterActivity.this,"点击了--确定--按钮",Toast.LENGTH_LONG).show();
        oneButtonDialog.dismiss();
    }
});
oneButtonDialog.show();
Android单个按钮自定义Dialog的更多相关文章
- Android中制作自定义dialog对话框的实例
http://www.jb51.net/article/83319.htm 这篇文章主要介绍了Android中制作自定义dialog对话框的实例分享,安卓自带的Dialog显然不够用,因而我们要继 ...
- Android开发之自定义Dialog简单实现
本文着重研究了自定义对话框,通过一下步骤即可清晰的理解原理,通过更改界面设置和style类型,可以应用在各种各样适合自己的App中. 首先来看一下效果图: 首先是activity的界面 点击了上述图片 ...
- Android 开发之自定义Dialog及UI的实现
我们在开发中,经常会自定义Dialog,因为原生的AlertDialog无法满足我们的需求,这个时候就需要自定义Dialog,那么如何自定义呢,其实不难,就是有点繁琐而已.也就是自定义一个UI的xml ...
- Android 自定义Dialog类,并在Activity中实现按钮监听。
实际开发中,经常会用到Dialog,比如退出时候会弹出是否退出,或者还有一些编辑框也会用Dialog实现,效果图如下: 开发中遇到的问题无非在于如果在Activity中监听这个Dialog中实现的 ...
- Android—自定义Dialog
在 Android 日常的开发中,Dialog 使用是比较广泛的.无论是提示一个提示语,还是确认信息,还是有一定交互的(弹出验证码,输入账号密码登录等等)对话框. 而我们去看一下原生的对话框,虽然随着 ...
- Android自定义Dialog
Android开发过程中,常常会遇到一些需求场景——在界面上弹出一个弹框,对用户进行提醒并让用户进行某些选择性的操作, 如退出登录时的弹窗,让用户选择“退出”还是“取消”等操作. Android系统提 ...
- Android的一个自定义的动态添加Dialog类
android里面会有自己内置的Dialog的提示框,也算是比较方便的了,但是为了省点时间,我们在项目里面添加了一个自己的Dialog类,这个类实现了能够动态的添加按钮和一些提示语句或者其他的显示效果 ...
- Android编程心得-设计一个可重用的自定义Dialog
我们在实际开发过程中,会遇到一个问题,我们的Dialog如果使用一般的方法进行设置调用出来,会有很多的重复代码,如何将Dialog按照自己的思路设计呢,并让其可重用呢,下面我来介绍一下 ...
- Android自定义Dialog(美化界面)
前言:在做项目的时候,发现dialog界面太丑陋,从csdn上下载了一份自定义dialog的源码,在他的基础上对界面进行美化...有需要的朋友可以直接拿走 效果图如下: 主要代码: /** * 自定义 ...
随机推荐
- LPCTSTR和CString的关系
类型理解 LPCTSTR类型: L表示long指针 这是为了兼容Windows 3.1等16位操作系统遗留下来的,在win32中以及其他的32位操作系统中, long指针和near指针及far修饰符都 ...
- path与classpath区别(转)
转自http://blog.csdn.net/mydreamongo/article/details/8155408 1.path的作用 path是系统用来指定可执行文件的完整路径,即使不在path中 ...
- MySQL流程控制和存储过程介绍
/*定义变量方式1:set @变量名=值;方式2:select 值 into @变量名;方式3:declare 变量名 类型(字符串类型加范围) default 值; in参数 入参的值会仅在存储过程 ...
- docker配置国内镜像
1. 配置 root@ros-OptiPlex-3050:~# cat /etc/docker/daemon.json { "graph": "/mnt/docke ...
- maven打包错误:java.lang.IllegalStateException: Unable to find a @SpringBootConfiguration, you need to use @ContextConfiguration or @SpringBootTest(classes=...) with your test
Tests run: 1, Failures: 0, Errors: 1, Skipped: 0, Time elapsed: 0.118 sec <<< FAILURE! - in ...
- 使用JDK自带的jmap和jhat监控处于运行状态的Java进程
对于处于运行状态中的Java进程,JDK自带了很多工具,允许Java开发人员监控运行进程中的各种状态,比如该进程内部创建了多少个对象实例,消耗了多少内存,等等. 本文基于JDK1.8而写成. 我下面写 ...
- Codeforces Round #318 (Div. 2) D Bear and Blocks (数学)
不难发现在一次操作以后,hi=min(hi-1,hi-1,hi+1),迭代这个式子得到k次操作以后hi=min(hi-j-(k-j),hi-k,hi+j-(k-j)),j = 1,2,3... 当k ...
- 实验3 分支&循环语句(1)
part 1 1.在循环中使用控制语句continue和break,其功能区别是: continue:只控制本次循环的结束. break:终止并跳出循环,之后的循环也不再执行. 2.在两层嵌套循环中 ...
- Python字符编码补充
字符编码: Python字符编码贯穿Python学习的始终,现在应用的是Python2中字符编码的问题是很多的. 这次是要彻底解决Python字符编码的问题!!! 1 字符编码的发展过程: 1 .AS ...
- 几句话总结一个算法之RNN、LSTM和GRU
RNN 一般神经网络隐层的计算是h=g(w * x),其中g是激活函数,相比于一般神经网络,RNN需要考虑之前序列的信息,因此它的隐藏h的计算除了当前输入还要考虑上一个状态的隐藏,h=g(w*x+w' ...