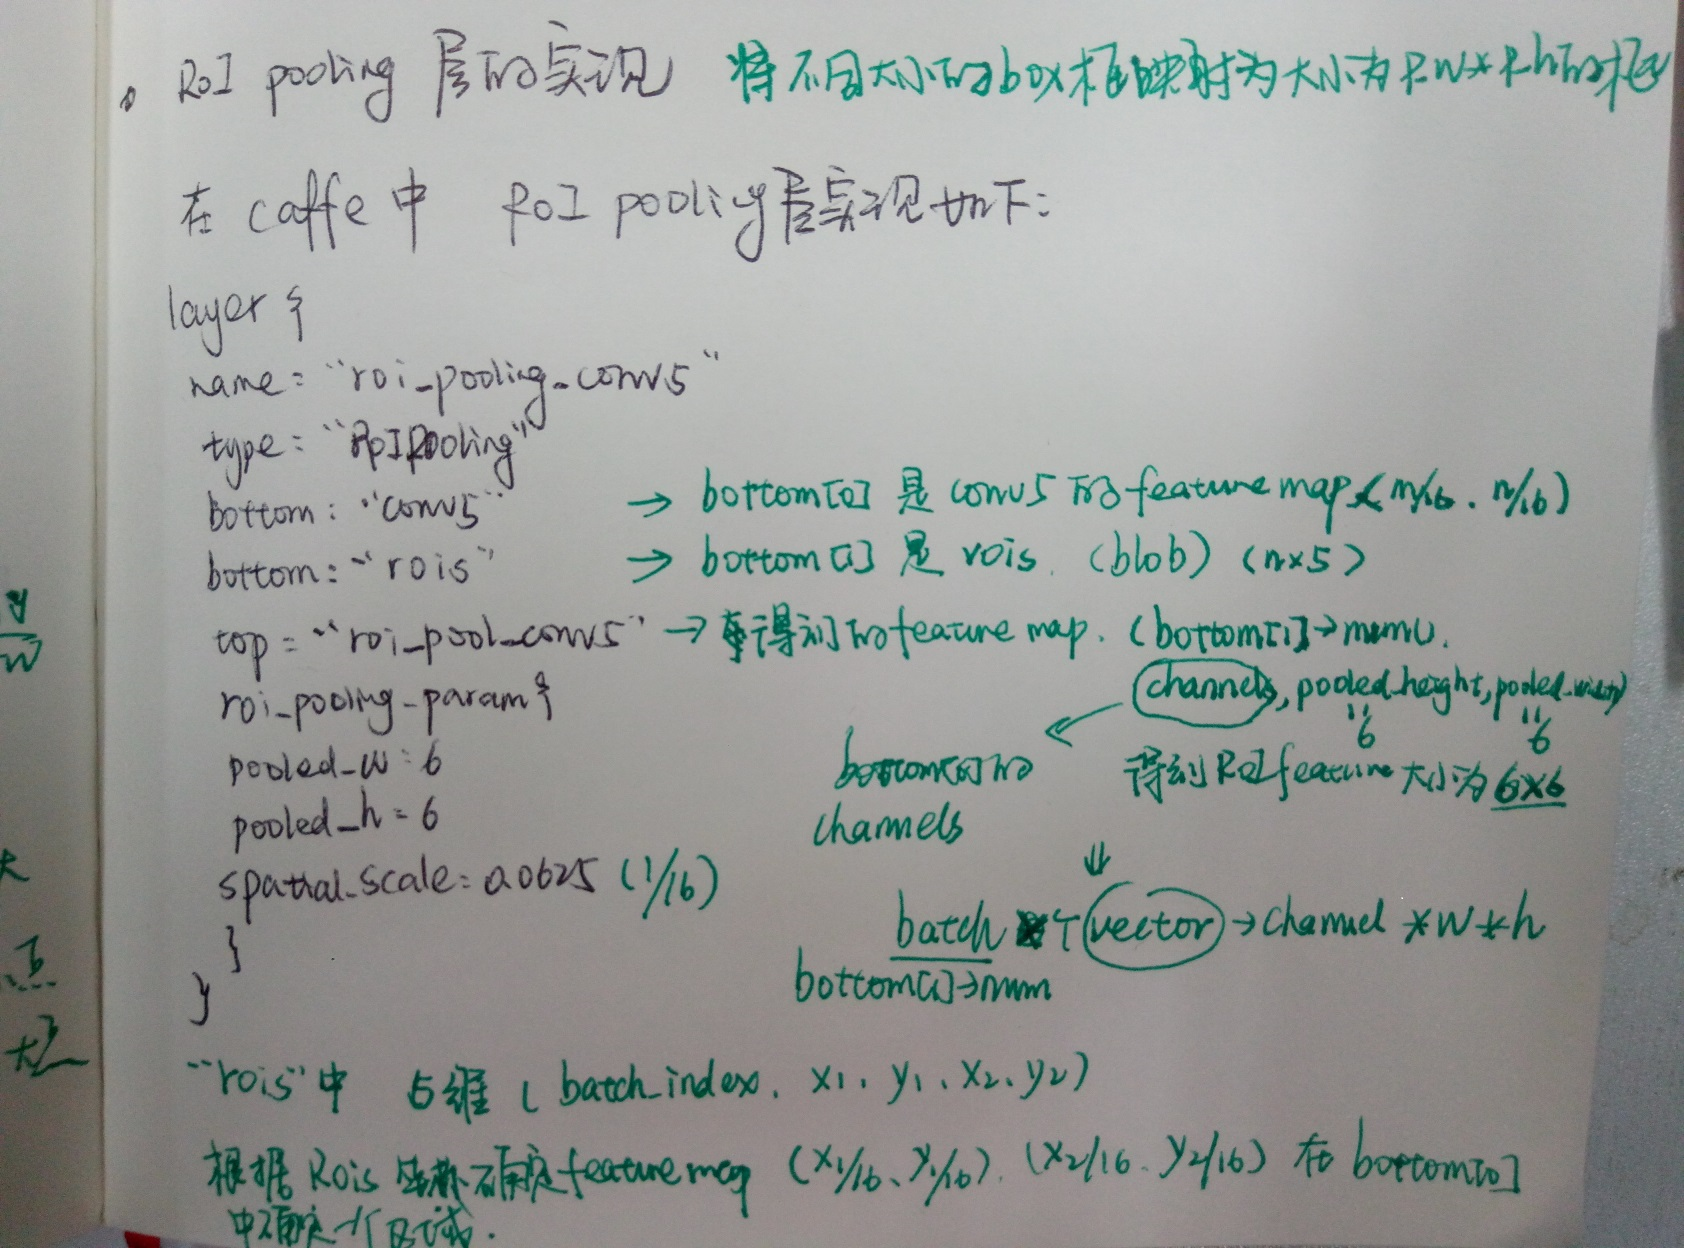
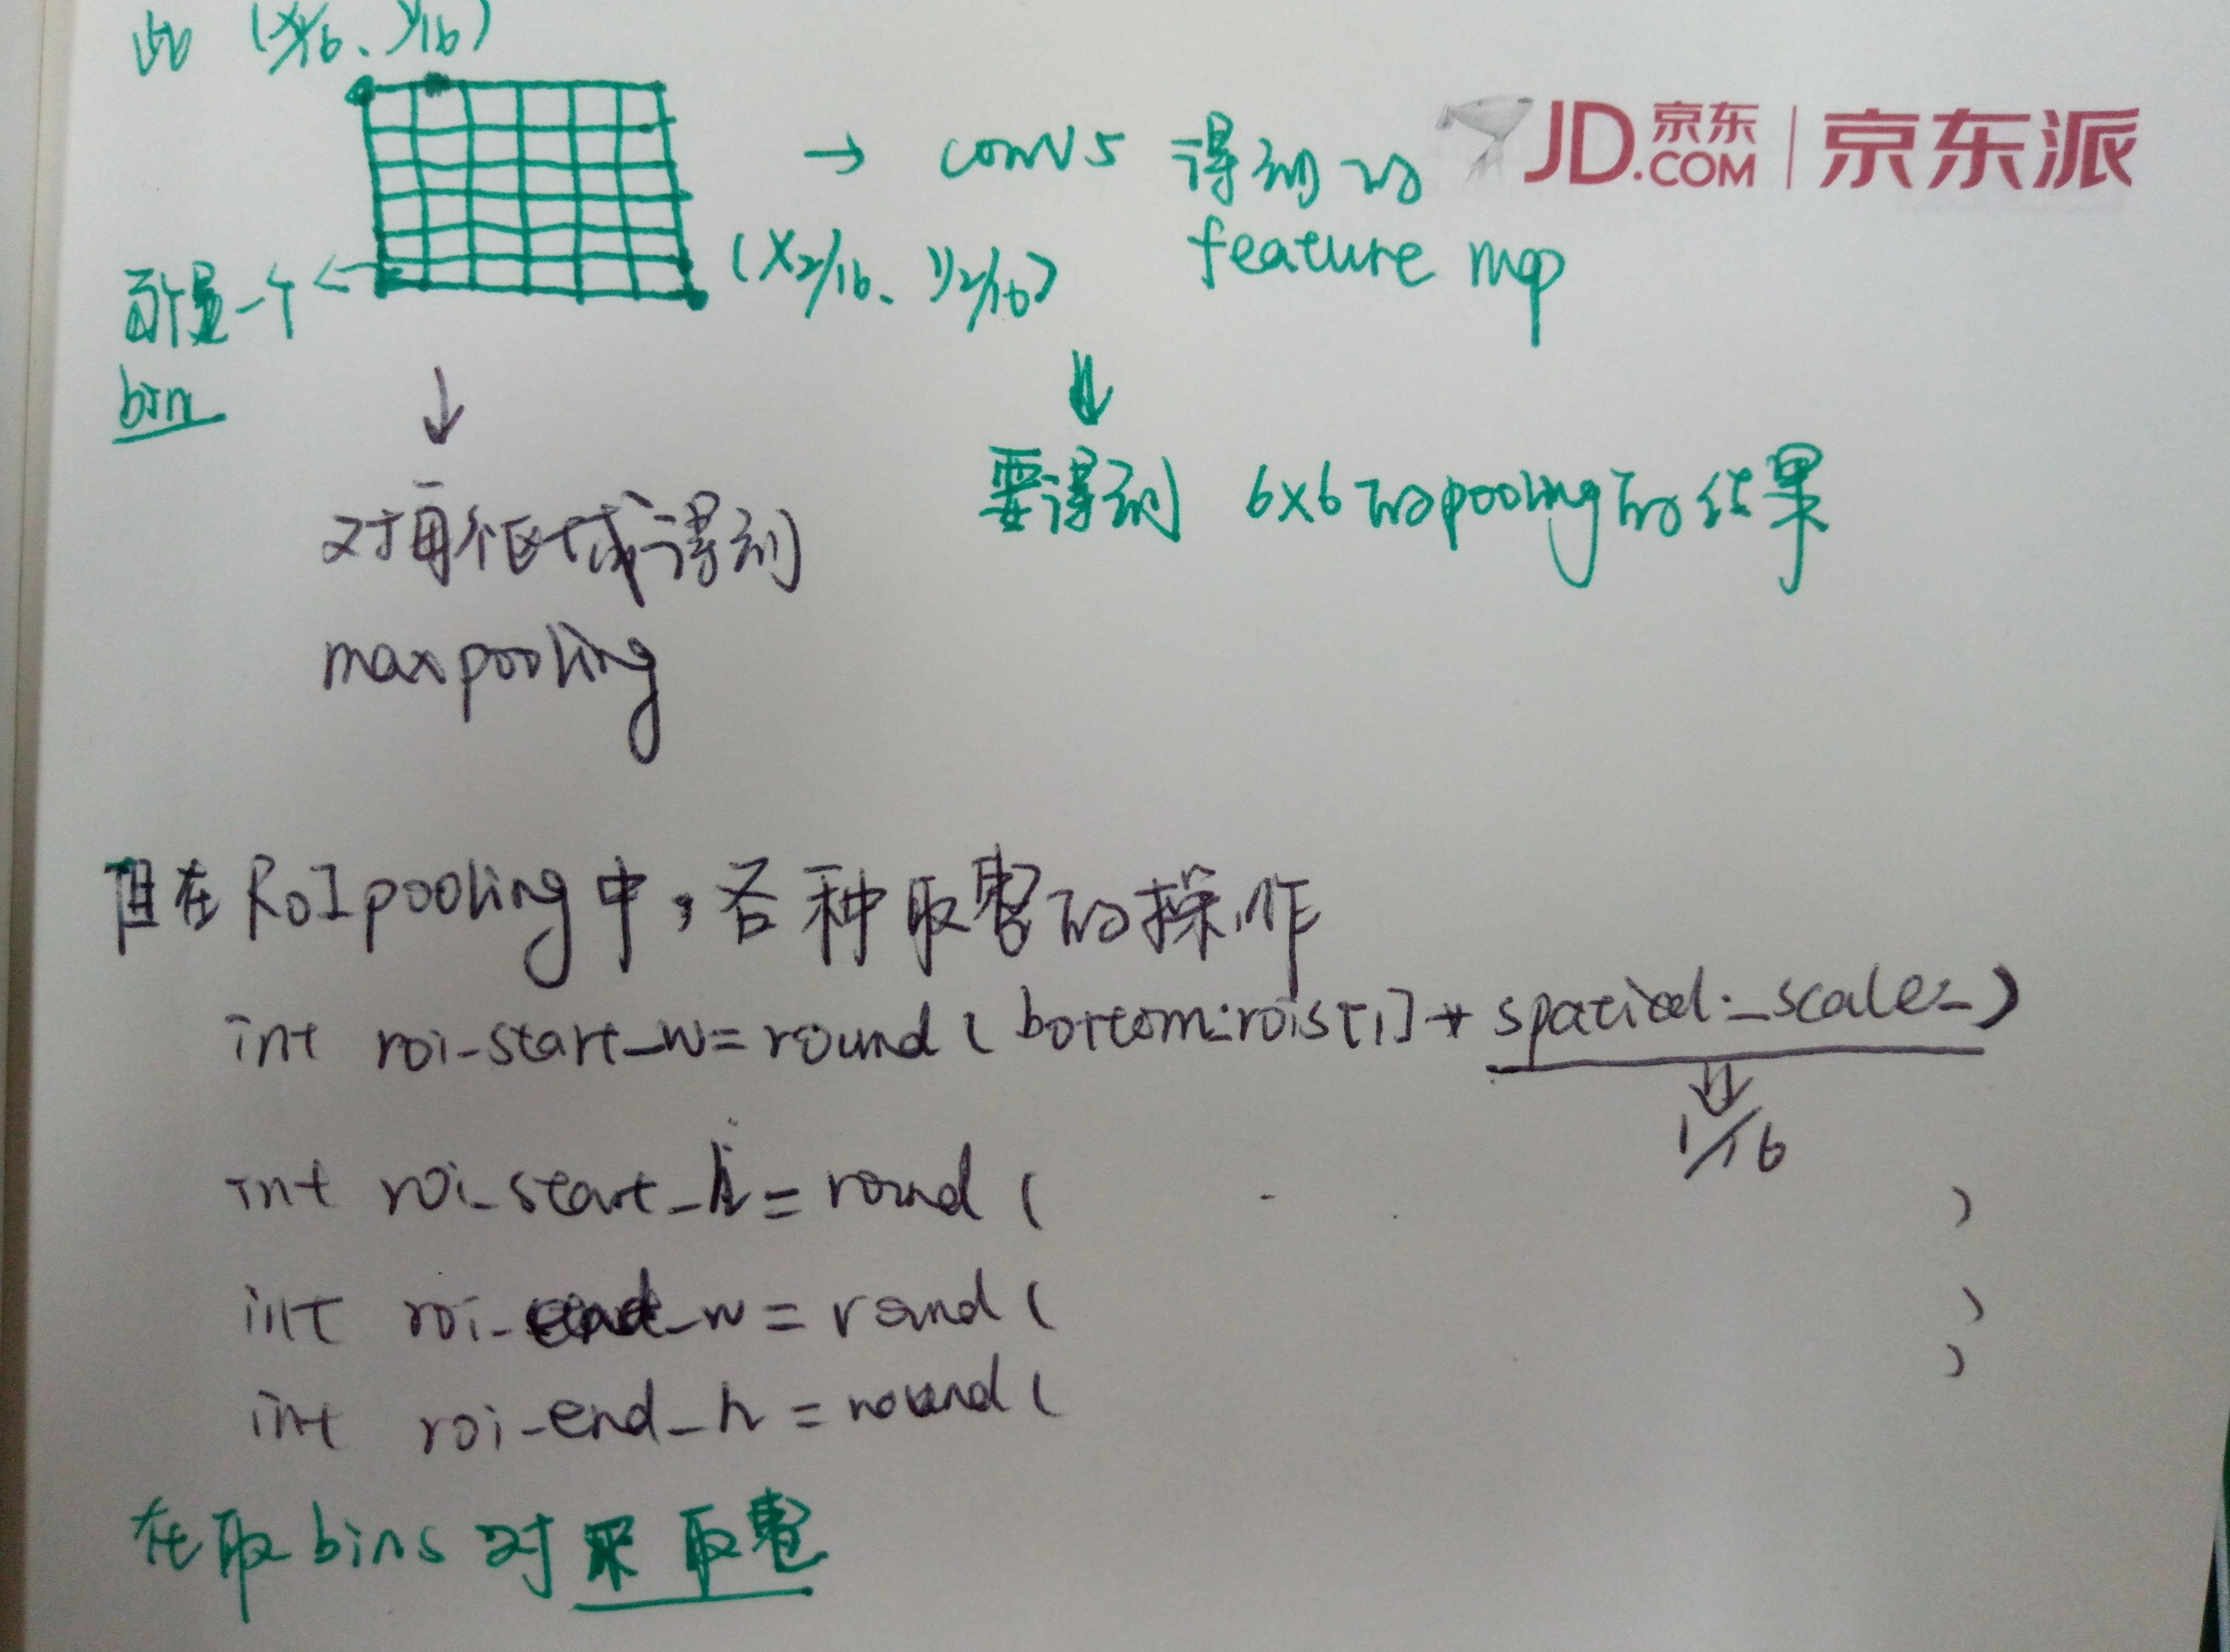
RoIPooling

 、
、
代码:
template <typename Dtype>

void ROIPoolingLayer<Dtype>::Forward_cpu(const vector<Blob<Dtype>*>& bottom,

      const vector<Blob<Dtype>*>& top) {

  //输入有两部分组成,data和rois

  const Dtype* bottom_data = bottom[0]->cpu_data();

  const Dtype* bottom_rois = bottom[1]->cpu_data();

  // Number of ROIs

  int num_rois = bottom[1]->num();

  int batch_size = bottom[0]->num();

  int top_count = top[0]->count();

  Dtype* top_data = top[0]->mutable_cpu_data();

  caffe_set(top_count, Dtype(-FLT_MAX), top_data);

  int* argmax_data = max_idx_.mutable_cpu_data();

  caffe_set(top_count, -1, argmax_data);

  // For each ROI R = [batch_index x1 y1 x2 y2]: max pool over R

  for (int n = 0; n < num_rois; ++n) {

    int roi_batch_ind = bottom_rois[0];

    //把原图的坐标映射到feature map上面

    int roi_start_w = round(bottom_rois[1] * spatial_scale_);

    int roi_start_h = round(bottom_rois[2] * spatial_scale_);

    int roi_end_w = round(bottom_rois[3] * spatial_scale_);

    int roi_end_h = round(bottom_rois[4] * spatial_scale_);

    //计算每个roi在feature map上面的大小

    int roi_height = max(roi_end_h - roi_start_h + 1, 1);

    int roi_width = max(roi_end_w - roi_start_w + 1, 1);

    //pooling之后的feature map的一个值对应于pooling之前的feature map上的大小

    //注:由于roi的大小不一致,所以每次都需要计算一次

    const Dtype bin_size_h = static_cast<Dtype>(roi_height)

                             / static_cast<Dtype>(pooled_height_);

    const Dtype bin_size_w = static_cast<Dtype>(roi_width)

                             / static_cast<Dtype>(pooled_width_);

    //找到对应的roi的feature map,如果input data的batch size为1

    //那么roi_batch_ind=0

    const Dtype* batch_data = bottom_data + bottom[0]->offset(roi_batch_ind);

    //pooling的过程是针对每一个channel的,所以需要循环遍历

    for (int c = 0; c < channels_; ++c) {

      //计算output的每一个值,所以需要遍历一遍output,然后求出所有值

      for (int ph = 0; ph < pooled_height_; ++ph) {

        for (int pw = 0; pw < pooled_width_; ++pw) {

          // Compute pooling region for this output unit:

          //  start (included) = floor(ph * roi_height / pooled_height_)

          //  end (excluded) = ceil((ph + 1) * roi_height / pooled_height_)

          // 计算output上的一点对应于input上面区域的大小[hstart, wstart, hend, wend]

          int hstart = static_cast<int>(floor(static_cast<Dtype>(ph)

                                              * bin_size_h));

          int hend = static_cast<int>(ceil(static_cast<Dtype>(ph + 1)

                                           * bin_size_h));

          int wstart = static_cast<int>(floor(static_cast<Dtype>(pw)

                                              * bin_size_w));

          int wend = static_cast<int>(ceil(static_cast<Dtype>(pw + 1)

                                           * bin_size_w));

          //将映射后的区域平动到对应的位置[hstart, wstart, hend, wend]

          hstart = min(max(hstart + roi_start_h, 0), height_);

          hend = min(max(hend + roi_start_h, 0), height_);

          wstart = min(max(wstart + roi_start_w, 0), width_);

          wend = min(max(wend + roi_start_w, 0), width_);

          //如果映射后的矩形框不符合

          bool is_empty = (hend <= hstart) || (wend <= wstart);

          //pool_index指的是此时计算的output的值对应于output的位置

          const int pool_index = ph * pooled_width_ + pw;

          //如果矩形不符合,此处output的值设为0,此处的对应于输入区域的最大值为-1

          if (is_empty) {

            top_data[pool_index] = 0;

            argmax_data[pool_index] = -1;

          }

          //遍历output的值对应于input的区域块

          for (int h = hstart; h < hend; ++h) {

            for (int w = wstart; w < wend; ++w) {

             // 对应于input上的位置

              const int index = h * width_ + w;

              //计算区域块的最大值,保存在output对应的位置上

              //同时记录最大值的索引

              if (batch_data[index] > top_data[pool_index]) {

                top_data[pool_index] = batch_data[index];

                argmax_data[pool_index] = index;

              }

            }

          }

        }

      }

      // Increment all data pointers by one channel

      batch_data += bottom[0]->offset(0, 1);

      top_data += top[0]->offset(0, 1);

      argmax_data += max_idx_.offset(0, 1);

    }

    // Increment ROI data pointer

    bottom_rois += bottom[1]->offset(1);

  }

}
RoIPooling的更多相关文章
- RoIPooling、RoIAlign笔记
一).RoIPooling 这个可以在Faster RCNN中使用以便使生成的候选框region proposal映射产生固定大小的feature map 先贴出一张图,接着通过这图解释RoiPool ...
- RoIPooling与RoIAlign的区别
一.RoIPooling与RoIAlign 1.1.RoIPooling 通过对Faster RCNN的学习我妈了解的RolPooling可以使生成的候选框region proposal映射产生固定大 ...
- ROIAlign, ROIPooling及ROIWarp对比
RoI Pooling 实现从原图ROI区域映射到卷积区域最后pooling到固定大小的功能,然后通过池化把该区域的尺寸归一化成卷积网络输入的尺寸. ROIAlign 上面RoI Pooling从原图 ...
- python读取caffemodel文件
caffemodel是二进制的protobuf文件,利用protobuf的python接口可以读取它,解析出需要的内容 不少算法都是用预训练模型在自己数据上微调,即加载"caffemodel ...
- Faster-RCNN 训练自己的数据
在前一篇随笔中,数据制作成了VOC2007格式,可以用于Faster-RCNN的训练. 1.针对数据的修改 修改datasets\VOCdevkit2007\VOCcode\VOCinit.m,我只做 ...
- [OpenCV] Face Detection
即将进入涉及大量数学知识的阶段,先读下“别人家”的博文放松一下. 读罢该文,基本能了解面部识别领域的整体状况. 后生可畏. 结尾的Google Facenet中的2亿数据集,仿佛隐约听到:“你们都玩儿 ...
- (转) 技术揭秘:海康威视PASCAL VOC2012目标检测权威评测夺冠之道
技术揭秘:海康威视PASCAL VOC2012目标检测权威评测夺冠之道 原创 2016-09-21 钟巧勇 深度学习大讲堂 点击上方“深度学习大讲堂”可订阅哦!深度学习大讲堂是高质量原创内容平台,邀请 ...
- 大规模视觉识别挑战赛ILSVRC2015各团队结果和方法 Large Scale Visual Recognition Challenge 2015
Large Scale Visual Recognition Challenge 2015 (ILSVRC2015) Legend: Yellow background = winner in thi ...
- 海康威视研究院ImageNet2016竞赛经验分享
原文链接:https://zhuanlan.zhihu.com/p/23249000 目录 场景分类 数据增强 数据增强对最后的识别性能和泛化能力都有着非常重要的作用.我们使用下面这些数据增强方法. ...
随机推荐
- django 模型层(2)
Django 模型层(2) 多表操作---模型之间的关系 1 一对一:作者----作者详细信息 2 一对多:书籍----出版社 3 多对多:书籍----作者 一 创建模型(主键(id)自动创建) 没 ...
- Building Lambda Architecture with Spark Streaming
The versatility of Apache Spark’s API for both batch/ETL and streaming workloads brings the promise ...
- 保护 .NET Core 项目的敏感信息
我们的项目中几乎都会有配置文件,里面可能会存储一些敏感信息,比如数据库连接字符串.第三方 API 的 AppKey 和 SecretKey 等. 对于开源项目,这些敏感信息肯定不能随着源代码一起提交到 ...
- 全局css控制<td>标签属性
td { text-align: center; /*设置水平居中*/ vertical-align: middle; /*设置垂直居中*/ height:50px; / ...
- python 项目自动生成requirements.txt文件
主要使用目的: 任何应用程序通常需要设置安装所需并依赖一组类库来满足工作要求.通过requirements.txt可以一次性安装程序所需要和依赖的包. 为工程生成requirements.txt的两种 ...
- PS外挂滤镜调出清晰对比照片
最终效果 一.打开原图. 二.我们使用类似第一部分的相同方法,但设置上略有不同,我们将光线放在不同的地方.复制底层,执行滤镜-LUCIS ART水彩滤镜-LUCISART 选择 雕刻 设置参数为25. ...
- openstack搭建之-horizon配置(14)
一.ctrl控制节点安装horizon #安装软件yum install openstack-dashboard -y vim /etc/openstack-dashboard/local_setti ...
- springboot使用多数据源以及配置
1. 首先在application中配置数据源地址 my.datasource.koi.type=com.alibaba.druid.pool.DruidDataSource my.datasourc ...
- ABP中模块初始化过程(二)
在上一篇介绍在StartUp类中的ConfigureService()中的AddAbp方法后我们再来重点说一说在Configure()方法中的UserAbp()方法,还是和前面的一样我们来通过代码来进 ...
- python之生成器和列表推导式
一.生成器函数 1.生成器 就是自己用python代码写的迭代器,生成器的本质就是迭代器(所以自带了__iter__方法和__next__方法,不需要我们去实现). 2.构建生成器的两种方式 1,生成 ...
