EntityFramework Code-First 简易教程(六)-------领域类配置之DataAnnotations
EF Code-First提供了一个可以用在领域类或其属性上的DataAnnotation特性集合,DataAnnotation特性会覆盖默认的EF约定。
DataAnnotation存在于两个命名空间里:
System.ComponentModel.DataAnnotations和System.ComponentModel.DataAnnotations.Schema
注意: DataAnnotations只提供了一部分的配置选项,全部的配置选项在Fluent API中。
System.ComponentModel.DataAnnotations 包含的特性:
| Attribute | 描述 |
|---|---|
| Key | 标记一个属性,其将会在关系表中被映射成主键 |
| Timestamp | 标记一个属性,其将会在数据库中被映射成一个不为null的tiamestamp(时间戳)列 |
| ConcurrencyCheck | 这个属性允许你标记一个或多个属性,被标记的属性将会在用户编辑或删除entity的时候进行并发检查 |
| Required | 强制约束,该属性必须有数据,不能为null(同样适用MVC) |
| MinLength | 确保数组或字符串长度达到最小长度 |
| MaxLength | 数据库中列的长度的最大值 |
| StringLength | 在数据字段中指定字符允许的最大长度和最小长度 |
System.ComponentModel.DataAnnotations.Schema 包含的特性:
| Attribute | 描述 |
|---|---|
| Table | 指定被映射的类在数据库生成的表名 |
| Column | 指定被映射的属性在表中的列名和数据类型 |
| Index | 在指定列上创建索引(仅EF6.1以上版本支持) |
| ForeignKey | 给导航属性指定外键属性 |
| NotMapped | 标记的属性不会被映射到数据库 |
| DatabaseGenerated | 指定的属性将会映射成数据库表中的计算列,所以这个属性应是只读的。也可以用在把属性映射成标识列(自增长列) |
| InverseProperty | 当两个类之间包含多重关系的时候,默认约定会排列组合他们的导航属性组合并一一创建外键,InverseProperty可以标记实际的主外键关系,从而过滤掉因排列组合出来的无用外键 |
| ComplexType | 标记一个类为复杂类型 |
下面我们来详细介绍各个特性:
1、Key:
Key特性应用在类的属性上。Code-First默认约定将名称是"Id"或者{类名}+"Id"的属性创建为一个主键列,Key特性覆写了默认约定,我们可以把任何想要成为的主键的属性标记为Key而不管它是什么名称。
代码如下:
- using System.ComponentModel.DataAnnotations;
- public class Student
- {
- public Student()
- {
- }
- [Key]
- public int StudentKey { get; set; }
- public string StudentName { get; set; }
- }
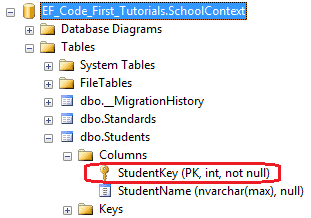
数据库中,Students表中的StudentKey列被创建成了主键
我们也可以用用Key特性和Column特性创建混合主键,如下代码所示:
- using System.ComponentModel.DataAnnotations;
- public class Student
- {
- public Student()
- {
- }
- [Key]
- [Column(Order=)]
- public int StudentKey1 { get; set; }
- [Key]
- [Column(Order=)]
- public int StudentKey2 { get; set; }
- public string StudentName { get; set; }
- }
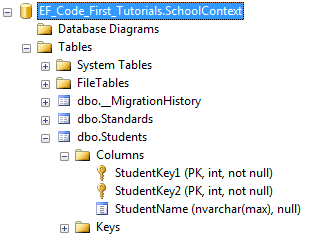
根据上面的代码,在Students表中,创建出了混合主键StudentKey1和StudentKey2
注意: 当Key特性应用在单整型类型的属性上时,会将其创建为一个标识列,而混合键无论它是不是整型类型,都不会创建标识列。Key特性除了无符号整型(unsinged integers),可以应用在如string、datatime、decimal等任何数据类型上。
2、TimeStamp:
TimeStamp特性只能用在数据类型为byte array的属性上,TimeStamp特性会在数据库表中创建一个timestamp属性的列,Code-First自动使用TimeStamp列进行并发检查。
(关于并发检查,可以参考Gyoung的笔记:Entity Framework 并发处理)
代码如下:
- using System.ComponentModel.DataAnnotations;
- public class Student
- {
- public Student()
- {
- }
- public int StudentKey { get; set; }
- public string StudentName { get; set; }
- [TimeStamp]
- public byte[] RowVersion { get; set; }
- }
再次强调,标记TimeStamp特性的属性类型必须是byte数组。
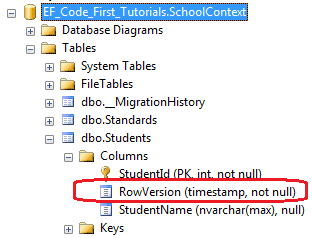
这样,在数据库Students表中就把RowVersion列创建成了timestamp(时间戳)
3、ConcurrencyCheck:
当EF对表执行update命令时,Code-First会把标记了ConcurrencyCheck特性的列中的值插入到SQL语句的“where”子句中来进行并发检查。如下代码:
- using System.ComponentModel.DataAnnotations;
- public class Student
- {
- public Student()
- {
- }
- public int StudentId { get; set; }
- [ConcurrencyCheck]
- public string StudentName { get; set; }
- }
如上所示,StudentName属性上标记了ConcurrencyCheck特性,所以Code-First会在update命令中把StudentName列包含进去以进行乐观并发检查(有关乐观并发和悲观并发,上面Gyoung的笔记有介绍,这里就不多讨论)。如下代码所示:
- exec sp_executesql N'UPDATE [dbo].[Students]
- SET [StudentName] = @0
- WHERE (([StudentId] = @1) AND ([StudentName] = @2))
- ',N'@0 nvarchar(max) ,@1 int,@2 nvarchar(max) ',@0=N'Steve',@1=1,@2=N'Bill'
- go
注意:TimeStamp特性只能用在single byte数组属性上,然而ConcurrencyCheck特性可以用在任何数量和任何数据类型的属性上。
4、Required:
应用了Required特性的属性,将会在数据库表中创建一个不为null的列,需要留意的是,Required也是MVC的验证特性。
代码如下:
- using System.ComponentModel.DataAnnotations;
- public class Student
- {
- public Student()
- {
- }
- public int StudentID { get; set; }
- [Required]
- public string StudentName { get; set; }
- }
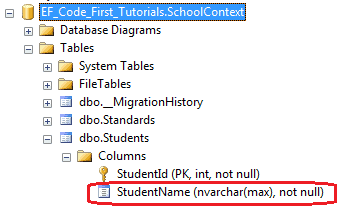
在数据库中,StudentName列已经被创建成不为空。
5、MaxLength & MinLength:
Maxlength特性用在String或array类型的属性上,EF Code-First将会把列的大小设置成指定值。值得注意的是,Maxlength也是MVC的验证特性。
代码如下:
- using System.ComponentModel.DataAnnotations;
- public class Student
- {
- public Student()
- {
- }
- public int StudentID { get; set; }
- [MaxLength()]
- public string StudentName { get; set; }
- }
因为StudentName属性被指定了[Maxlength(50)]特性,所以在数据库中StudentName列被创建成nvarchar(50)。
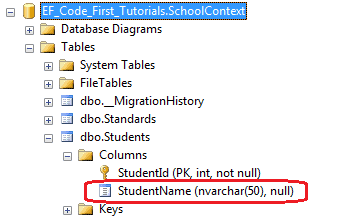
Entity Framework也会验证被标记了MaxLength特性的属性的值,如果该值大于被标记的最大值,EF将会抛出EntityValidationError。
MinLength:
MinLength特性是EF的一个验证特性,其在数据库模式中不起作用。如果我们对标记了MinLength特性的属性赋值(string或者array),其长度小于指定的最小值,那么EF仍然会抛出EntityValidationError。
MinLength特性可以和MaxLength特性一起使用,如下代码所示:
- using System.ComponentModel.DataAnnotations;
- public class Student
- {
- public Student()
- {
- }
- public int StudentID { get; set; }
- [MaxLength(),MinLength()]
- public string StudentName { get; set; }
- }
如上代码所示,StudentName属性取值指定了只能是2-50个字符长度之间。
6、StringLength:
StringLength应用在string类型的属性上,EF Code-First将会用StringLength指定的长度设置列的大小。和Required以及Maxlength一样,StringLength也是MVC的验证特性。
看下面的代码:
- using System.ComponentModel.DataAnnotations;
- public class Student
- {
- public Student()
- {
- }
- public int StudentID { get; set; }
- [StringLength()]
- public string StudentName { get; set; }
- }
根据代码中StudentName属性的[StringLength(50)]特性,在数据库中,将会创建一个nvarchar(50)的列,如下所示:

同理,EF也将会验证StringLength特性中的值,如果用户输入的值大于指定的长度,将会抛出EntityValidationError。
7、Table:
Table特性应用在类上,默认的Code-First约定将会创建一个和类名同名的表名,Table特性覆写默认的约定,EF Code-First将会创建一个以Table特性里指定的字符串为名称的表。
代码如下:
- using System.ComponentModel.DataAnnotations.Schema;
- [Table("StudentMaster")]
- public class Student
- {
- public Student()
- {
- }
- public int StudentID { get; set; }
- public string StudentName { get; set; }
- }
如上所示,Student类上应用了Table["StudentMaster"]特性,所以Code-First会覆写默认的约定,创建一个名称为StudentMaster的表名
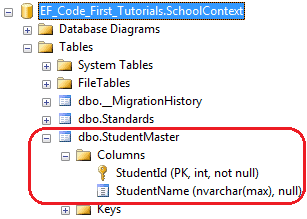
我们也可以用Table特性为表指定一个架构名,代码如下所示:
- using System.ComponentModel.DataAnnotations.Schema;
- [Table("StudentMaster", Schema="Admin")]
- public class Student
- {
- public Student()
- {
- }
- public int StudentID { get; set; }
- public string StudentName { get; set; }
- }
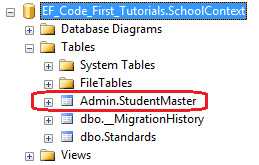
数据库如下,Code-First将会在Admin架构下创建一个StudentMaster表
8、Column:
Column特性应用在类的属性上,和Table特性一样,如果不指定Column特性的值,将会默认创建和属性同名的列,否则就会创建指定的值。
看如下代码:
- using System.ComponentModel.DataAnnotations.Schema;
- public class Student
- {
- public Student()
- {
- }
- public int StudentID { get; set; }
- [Column("Name")]
- public string StudentName { get; set; }
- }
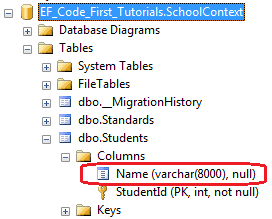
如上所示,Column["Name"]特性应用在StudentName属性上,所以Code-First将会创建一个以"Name"为名的列来代替默认的"StudentName"列名。数据库如下:
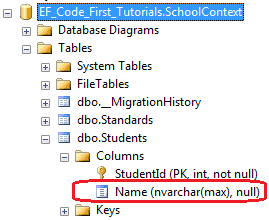
我们也可以使用Column特性为列指定排序(order)和类型(type),代码如下:
- using System.ComponentModel.DataAnnotations.Schema;
- public class Student
- {
- public Student()
- {
- }
- public int StudentID { get; set; }
- [Column("Name", Order=, TypeName="varchar")]
- public string StudentName { get; set; }
- }
上面的代码在数据库Students表中创建了一个属性为varchar,排序第一的列Name
9、ForeignKey:
ForeignKey特性应用在类的属性上。默认的Code-First约定预料外键属性名与主键属性名匹配,如下代码:
- public class Student
- {
- public Student()
- {
- }
- public int StudentID { get; set; }
- public string StudentName { get; set; }
- //Foreign key for Standard
- public int StandardId { get; set; }
- public Standard Standard { get; set; }
- }
- public class Standard
- {
- public Standard()
- {
- }
- public int StandardId { get; set; }
- public string StandardName { get; set; }
- public ICollection<Student> Students { get; set; }
- }
- }
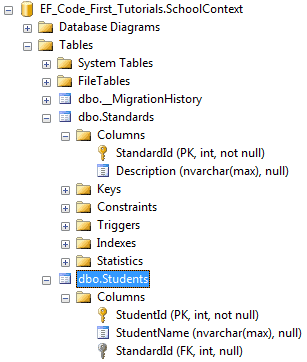
如上代码所示,Student类包含了外键属性StandardId,其又是Standard类的主键属性,这样,Code-First将会在Students表中创建一个StandardId外键列。
ForeignKey特性覆写了默认约定,我们可以把外键属性列设置成不同名称,代码如下:
- public class Student
- {
- public Student()
- {
- }
- public int StudentID { get; set; }
- public string StudentName { get; set; }
- //Foreign key for Standard
- public int StandardRefId { get; set; }
- [ForeignKey("StandardRefId")]
- public Standard Standard { get; set; }
- }
- public class Standard
- {
- public Standard()
- {
- }
- public int StandardId { get; set; }
- public string StandardName { get; set; }
- public ICollection<Student> Students { get; set; }
- }
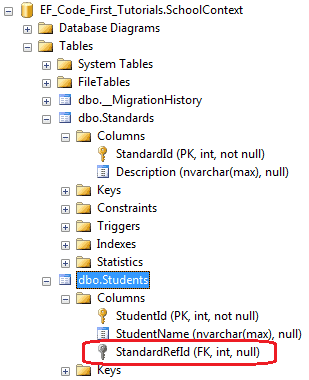
如上代码所示,Student类包含了StandardRefId外键属性,我们使用ForeignKey["StandardRefId"]特性指定在Standard导航属性上,所以Code-First将会把StandardRefId作为外键,生成数据库如下所示:
ForeignKey特性也可以用在外键属性上,只要指定好它的导航属性,即Standard属性,如下所示:
- public class Student
- {
- public Student()
- {
- }
- public int StudentID { get; set; }
- public string StudentName { get; set; }
- //Foreign key for Standard
- [ForeignKey("Standard")]
- public int StandardRefId { get; set; }
- public Standard Standard { get; set; }
- }
- public class Standard
- {
- public Standard()
- {
- }
- public int StandardId { get; set; }
- public string StandardName { get; set; }
- public ICollection<Student> Students { get; set; }
- }
这段代码和上面把ForeignKey特性定义在Standard属性上的效果是一样的,在数据库生成的Students表都创建了StandardRefId外键列。
10、NotMapped:
NotMapped特性用在类的属性上,默认Code-First约定会为那些所有包含了getter和setter的属性创建列,NotMapped可以覆写默认的约定,让那些标记了NotMapped特性的属性不会在数据库里创建列。代码如下:
- using System.ComponentModel.DataAnnotations;
- public class Student
- {
- public Student()
- {
- }
- public int StudentId { get; set; }
- public string StudentName { get; set; }
- [NotMapped]
- public int Age { get; set; }
- }
如上代码所示,NotMapped特性应用在Age属性上,所以Code-First不会在Students表中创建Age列。
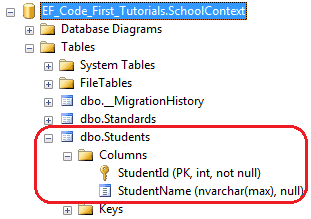
Code-First也不会为那些没有getter和setter的属性创建列,在下面代码例子中,Code-First不会为FirstName和Age创建列。
- using System.ComponentModel.DataAnnotations;
- public class Student
- {
- public Student()
- {
- }
- private int _age = ;
- public int StudentId { get; set; }
- public string StudentName { get; set; }
- public string FirstName { get{ return StudentName;} }
- public string Age { set{ _age = value;} }
- }
11、InverseProperty:
我们已经知道,如果类中没有包含外键属性,Code-First默认约定会创建一个{类名}_{主键}的外键列。当我们类与类之间有多个关系的时候,就可以使用InverseProperty特性。
代码如下:
- public class Student
- {
- public Student()
- {
- }
- public int StudentID { get; set; }
- public string StudentName { get; set; }
- public Standard CurrentStandard { get; set; }
- public Standard PreviousStandard { get; set; }
- }
- public class Standard
- {
- public Standard()
- {
- }
- public int StandardId { get; set; }
- public string StandardName { get; set; }
- public ICollection<Student> CurrentStudents { get; set; }
- public ICollection<Student> PreviousStudents { get; set; }
- }
- }
如上代码所示,Student类包含了两个Standard类的导航属性,同样的,Standard类包含了两个Student类的集合导航属性,Code-First将会为这种关系创建4个列。如下所示:
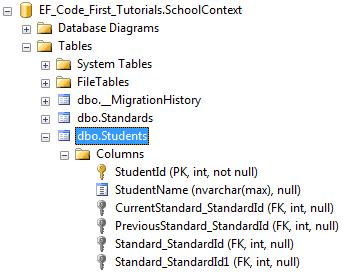
InverseProperty覆写了这种默认约定并且指定对齐属性,下面的代码在Standard类中使用InverseProperty特性修复这个问题。
- public class Student
- {
- public Student()
- {
- }
- public int StudentID { get; set; }
- public string StudentName { get; set; }
- public Standard CurrentStandard { get; set; }
- public Standard PreviousStandard { get; set; }
- }
- public class Standard
- {
- public Standard()
- {
- }
- public int StandardId { get; set; }
- public string StandardName { get; set; }
- [InverseProperty("CurrentStandard")]
- public ICollection<Student> CurrentStudents { get; set; }
- [InverseProperty("PreviousStandard")]
- public ICollection<Student> PreviousStudents { get; set; }
- }
- }
如上代码所示,我们在CurrentStudents和PreviousStudents属性上应用了InverseProperty特性,并且指定哪个Student类的引用属性属于它,所以现在,Code-First在Student表中仅仅会创建两个外键了。如下图所示:
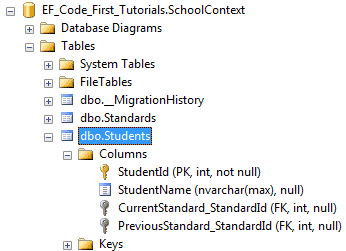
当然,如果你想改外键名称,我们就给导航属性加上ForeignKey特性,如下代码所示:
- public class Student
- {
- public Student()
- {
- }
- public int StudentID { get; set; }
- public string StudentName { get; set; }
- public int CurrentStandardId { get; set; }
- public int PreviousStandardId { get; set; }
- [ForeignKey("CurrentStandardId")]
- public Standard CurrentStandard { get; set; }
- [ForeignKey("PreviousStandardId")]
- public Standard PreviousStandard { get; set; }
- }
- public class Standard
- {
- public Standard()
- {
- }
- public int StandardId { get; set; }
- public string StandardName { get; set; }
- [InverseProperty("CurrentStandard")]
- public ICollection<Student> CurrentStudents { get; set; }
- [InverseProperty("PreviousStandard")]
- public ICollection<Student> PreviousStudents { get; set; }
- }
上面的代码将会创建出下面的数据库表和列,我们可以看出,外键的名称已经改变了。
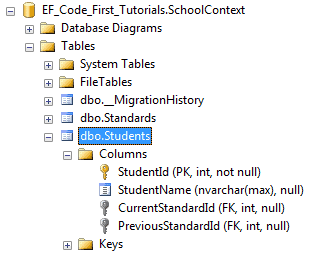
到此,DataAnnotation已经介绍完了,如果有什么不明白,或者我没讲清楚的地方,请大家留言~如有错误,也希望大神指出,不甚感激!
下篇开始,我们开始讲Fluent API,嗯,先睡了。。。
EntityFramework Code-First 简易教程(六)-------领域类配置之DataAnnotations的更多相关文章
- EntityFramework Code-First—领域类配置之DataAnnotations
本文出自:https://www.cnblogs.com/tang-tang/p/5510574.html 一.摘要 EF Code-First提供了一个可以用在领域类或其属性上的DataAnnota ...
- EntityFramework Code-First 简易教程(七)-------领域类配置之Fluent API
Fluent API配置: 前面我们已经了解到使用DataAnotations特性来覆写Code-First默认约定,现在我们来学习Fluent API. Fluent API是另一种配置领域类的方法 ...
- EntityFramework Code-First 简易教程(五)-------领域类配置
前言:在前篇中,总是把领域类(Domain Class)翻译成模型类,因为我的理解它就是一个现实对象的抽象模型,不知道对不对.以防止将来可能的歧义,这篇开始还是直接对Domain Class直译. 前 ...
- WebGL简易教程(六):第一个三维示例(使用模型视图投影变换)
目录 1. 概述 2. 示例:绘制多个三角形 2.1. Triangle_MVPMatrix.html 2.2. Triangle_MVPMatrix.js 2.2.1. 数据加入Z值 2.2.2. ...
- EntityFramework Code-First-------领域类配置之DataAnnotations
EF Code-First提供了一个可以用在领域类或其属性上的DataAnnotation特性集合,DataAnnotation特性会覆盖默认的EF约定. DataAnnotation存在于两个命名空 ...
- Entity Frame Code First 简易教程
简介 什么是ORM 搭建Entity FrameWork CodeFirst应用 数据库迁移 表属性常见配置 Entity FrameWork 一对多.多对多 一.简介 Entity Framewor ...
- Dart 语言简易教程系列
google Fuchsia系统 及 dart语言简介 在 InteIIiJ IDEA 中搭建 Dart 的开发环境 Dart Linux 开发环境搭建 Dart 语言简易教程(一) Dart 语言简 ...
- WebGL简易教程(七):绘制一个矩形体
目录 1. 概述 2. 示例 2.1. 顶点索引绘制 2.2. MVP矩阵设置 2.2.1. 模型矩阵 2.2.2. 投影矩阵 2.2.3. 视图矩阵 2.2.4. MVP矩阵 3. 结果 4. 参考 ...
- WebGL简易教程——目录
目录 1. 绪论 2. 目录 3. 资源 1. 绪论 最近研究WebGL,看了<WebGL编程指南>这本书,结合自己的专业知识写的一系列教程.之前在看OpenGL/WebGL的时候总是感觉 ...
随机推荐
- [Swift]LeetCode1024. 视频拼接 | Video Stitching
You are given a series of video clips from a sporting event that lasted T seconds. These video clip ...
- Android开发:修改eclipse里的Android虚拟机路径
一.发现问题: 今天打开电脑发现C盘缩了不少,这才意识到:eclipse里配置的安卓虚拟机默认放在了C盘里. 当然,在不同的电脑上可能路径有所不同,我的默认路径是:C:\Users\lenovo\.a ...
- 开发常用的 Android 函数库
第三方函数库(译者注:包括第三方提供的 SDK,开源函数库)以惊人的方式助力着 Android 开发,借助这些其他开发人员辛勤工作的成果,我们开发起来更轻松和快捷.目前存在成千上万的函数库,如何选择正 ...
- Linux中断程序命令
在运行 python 脚本的时候想要中断程序,发现如下情况: ctrl+c 居然无法中断程序! 这时候尝试 ctrl+d 还是毫无效果,最后尝试 ctrl+\: 查看该程序是否还在运行 ps aux ...
- ios 自动化构建 code-select: error: tool 'xcodebuild' requires Xcode, but active developer directory.....
问题描述: Pod installation complete! There are 2 dependencies from the Podfile and 3 total pods installe ...
- Net Configuration Agent
提出Configuration Agent这样一个东西可能会让人感到奇怪,对于配置信息读取什么还需要一个Agent;那Agent的作用是什么,能达到一个怎样的目的,下面讲解为何需要Agent和其重要性 ...
- 浅谈cookie和session
Cookie简介 Cookie(复数形态Cookies),中文名称为“小型文本文件”,指某些网站为了辨别用户身份或存储用户相关信息而存储在用户本地终端(Client Side) 上的数据(通常为加密数 ...
- App阅读pdf和扫描二维码功能
在之前开发的Android手机App中,需要实现阅读pdf和扫描二维码的功能,在github 上找到大牛封装好包,亲测可用. 阅读pdf: https://github.com/barteksc/An ...
- zookeeper配置记录
1. 准备三台机器,系统CentOS6 2. 将JDK和zookeeper安装包解压到目录 tar -zxvf jdk1.8.0_181-linux-x64.tar.gz -C /javatools ...
- 廖雪峰老师博客学习《通过生成器generator生成列表式杨辉三角》
说明:这是我接触生成器概念后,自己对它的理解,可能比较表面,没深入理解,也可能有错误.后续校正错误认知,将有关generator作为一个tag了! 希望以后能活用. 先贴出自己写的triangles( ...
