【Win10】实现控件倒影效果
先引入个小广告:
最近买了台小米盒子折腾下,发觉 UI 还是挺漂亮的,特别是主页那个倒影效果。

(图随便找的,就是上面图片底部的那个倒影效果。)
好了,广告结束,回归正题,这个倒影效果我个人觉得是挺不错的,那么有没有办法在 Win10 中实现呢?
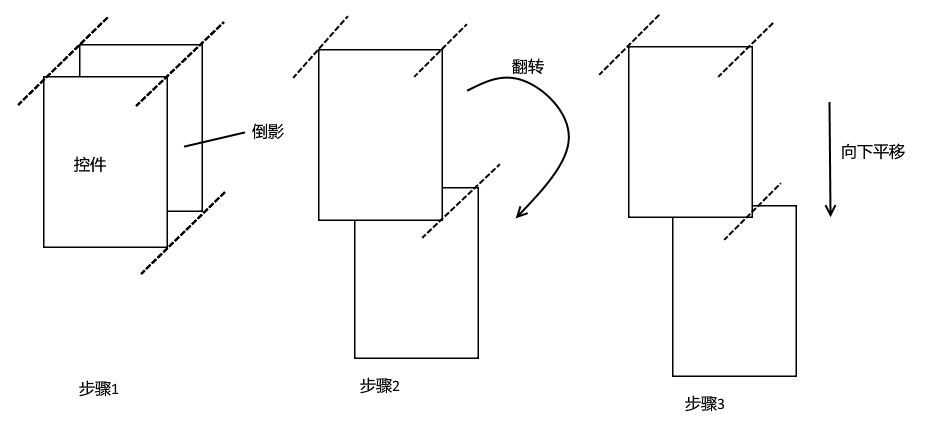
稍微分析了一下,大概层次是这样的:

简单点来说,就是倒影显示跟控件显示一样,然后往下翻转,再平移一下就好了。最后再对倒影加个渐变透明就 perfect 了。
翻转、平移都很容易,使用 RenderTransform 就可以了。麻烦就麻烦在如何让倒影的显示跟控件的显示相同。
在 WinRT 里,是没有 VisualBrush 这种东西的,因此我们得另寻他径。俗语说:上帝关闭一扇门的同时也为你打开一扇窗。微软虽然去掉 VisualBrush,但是给了我们 RenderTargetBitmap 这种获取绝大部分控件当前样貌的神器。(MediaElement 获取不了,WebView 则需另外使用 WebViewBrush 来获取,这里我们忽略掉这两个不是常见需求的家伙。)
那么我们就可以将倒影设置为 Image 控件,然后赋值上 RenderTargetBitmap 就可以了。但问题又来了,我们应该什么时候去抓一次控件的外貌?查阅 MSDN 得知,LayoutUpdated 事件可以帮到我们。
还等什么,立马开始编写我们的代码。
创建我们的项目,新建一个名字叫做 ReflectionPanel 的模板化控件。
然后定义我们的控件模板如下:
- <ResourceDictionary xmlns="http://schemas.microsoft.com/winfx/2006/xaml/presentation"
- xmlns:x="http://schemas.microsoft.com/winfx/2006/xaml"
- xmlns:local="using:ReflectionPanelDemo"
- xmlns:controls="using:ReflectionPanelDemo.Controls">
- <Style TargetType="controls:ReflectionPanel">
- <Setter Property="HorizontalAlignment"
- Value="Center" />
- <Setter Property="VerticalAlignment"
- Value="Center" />
- <Setter Property="Template">
- <Setter.Value>
- <ControlTemplate TargetType="controls:ReflectionPanel">
- <Grid x:Name="RootLayout"
- Background="{TemplateBinding Background}">
- <!--#region 倒影-->
- <!--以控件底部中心作为变换点-->
- <Image x:Name="ReflectionImage"
- Stretch="None"
- RenderTransformOrigin="0.5,1">
- <Image.RenderTransform>
- <TransformGroup>
- <!--以控件底部反转控件-->
- <ScaleTransform ScaleY="-1" />
- <!--倒影与实际内容的间距-->
- <TranslateTransform x:Name="SpacingTransform"
- Y="0" />
- </TransformGroup>
- </Image.RenderTransform>
- </Image>
- <!--#endregion-->
- <!--#region 实际内容-->
- <ContentControl x:Name="ContentBorder"
- Content="{TemplateBinding Content}" />
- <!--#endregion-->
- </Grid>
- </ControlTemplate>
- </Setter.Value>
- </Setter>
- </Style>
- </ResourceDictionary>
这样对应上之前的分析了。
接下来编写 cs 代码。
- protected override void OnApplyTemplate()
- {
- FrameworkElement rootLayout = (FrameworkElement)this.GetTemplateChild("RootLayout");
- // 实际内容容器。
- this._contentBorder = (ContentControl)this.GetTemplateChild("ContentBorder");
- // 倒影图片。
- this._reflectionImage = (Image)this.GetTemplateChild("ReflectionImage");
- // 倒影位移。
- this._spacingTransform = (TranslateTransform)this.GetTemplateChild("SpacingTransform");
- this._spacingTransform.Y = this.ReflectionSpacing;
- if (DesignMode.DesignModeEnabled == false)
- {
- rootLayout.LayoutUpdated += this.RootLayoutChanged;
- }
- }
- private async void RootLayoutChanged(object sender, object e)
- {
- try
- {
- // 呈现控件到图像源。
- RenderTargetBitmap contentRender = new RenderTargetBitmap();
- await contentRender.RenderAsync(this._contentBorder);
- // 设置倒影图片。
- this._reflectionImage.Source = contentRender;
- }
- catch
- {
- }
- }
这里是最关键的代码。详细可以看文章末尾提供的 demo。
接下来尝试一下吧。

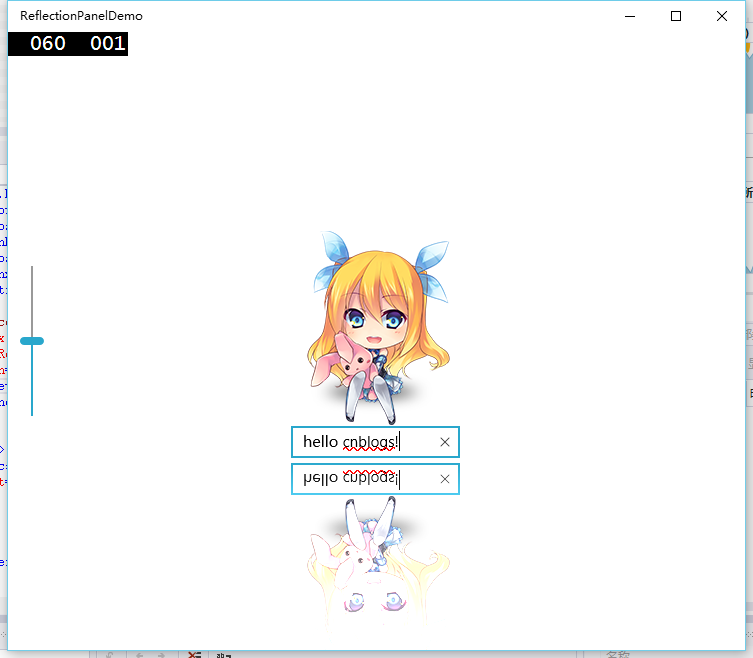
感觉还不错的说。
最后,我们来做渐变的半透明效果。
在 WinRT 里,由于没了 OpacityMask 属性,因此我们还是从图片入手吧。
RenderTargetBitmap 有一个叫 GetPixelsAsync 的方法,可以获取到图片的数据,格式是以 BGRA8 的格式,这里联动一下老周的 blog 好了(http://www.cnblogs.com/tcjiaan/p/4231886.html)。
简单点说,就是每 4 个 byte 代表一个像素。我们再简单分析下需求,那么可以得出,图片最顶部是最透明的,最底部是最不透明的。
经过简单的数学计算,我们可以写出以下代码:
- // 获取图像数据。
- byte[] bgra8 = (await contentRender.GetPixelsAsync()).ToArray();
- // 获取图像高度和宽度。
- int width = contentRender.PixelWidth;
- int height = contentRender.PixelHeight;
- for (int i = ; i < bgra8.Length; i += )
- {
- // 获取该像素原来的 A 通道。
- byte a = bgra8[i + ];
- // 计算该像素的 Y 轴坐标。
- int y = (i / ) / width;
- // 计算新的 A 通道值。
- bgra8[i + ] = (byte)(a * y / height);
- }
最后我们将修改后的 data 弄到 Image 控件上去就 ok 了。这里我们使用 WriteableBitmap。
- WriteableBitmap outputBitmap = new WriteableBitmap(width, height);
- bgra8.CopyTo(outputBitmap.PixelBuffer);
- // 设置倒影图片。
- this._reflectionImage.Source = outputBitmap;
大功告成,看一下 Demo 的效果。

最后附带完整 Demo 下载:ReflectionPanelDemo.zip
【Win10】实现控件倒影效果的更多相关文章
- Delphi XE2 新控件 布局Panel TGridPanel TFlowPanel
Delphi XE2 新控件 Firemonkey 布局Panel Windows平台VCl TGridPanel TFlowPanel FMX 跨平台 TLayout TGridLayout TFl ...
- 【Win10】SplitView控件
SplitView是Win10中的新控件. 用于呈现两部分视图. 一个视图是主要内容,另一个视图是用于导航.(也就是通常说的汉堡菜单.) 主要结构: <SplitView> <Spl ...
- 【Win10开发】相对布局——RelativePanel控件
我们知道,Win10引入了Universal Windows Platform,那么我们针对不同的平台该有不同的布局,此时我们就需要相对布局,就会用到RelativePanel这个控件.我们不再将控件 ...
- 模仿win10样式,基于jquery的时间控件
工作需要,写了一个基于jquery的时间控件,仿win10系统时间控件格式. 目前基本功能都有了,但时间格式只实现少数,但由于结构设计已经充分优化,填充起来非常容易. 这个控件相对网上其他的时间控件, ...
- win10 uwp 拖动控件
我们会使用控件拖动,可以让我们做出好看的动画,那么我们如何移动控件,我将会告诉大家多个方法.其中第一个是最差的,最后的才是我希望大神你去用. Margin 移动 我们可以使用Margin移动,但这是w ...
- WPF中Popup控件在Win7以及Win10等中的对齐点方式不一样的解决方案 - 简书
原文:WPF中Popup控件在Win7以及Win10等中的对齐点方式不一样的解决方案 - 简书 最近项目中使用弹出控件Popup,发现弹出框的对齐方式在不同的系统中存在不同(Popup在win10上是 ...
- Win10 UWP开发系列——开源控件库:UWPCommunityToolkit
在开发应用的过程中,不可避免的会使用第三方类库.之前用过一个WinRTXamlToolkit.UWP,现在微软官方发布了一个新的开源控件库—— UWPCommunityToolkit 项目代码托管在G ...
- 【Win10】【Win2D】实现控件阴影效果
学过 WPF 的都知道,在 WPF 中,为控件添加一个阴影效果是相当容易的. <Border Width="100" Height="100" Backg ...
- 【WIN10】基本控件
先發個下載地址: http://yunpan.cn/cHuCqYzvsWFAL 访问密码 3470 說明一下.這個示例只是最簡單的演示,並不能提供太大的實用價值. 後面會介紹 Bing & ...
随机推荐
- Alpha Level (Significance Level)
1.Alpha Level (Significance Level,显著水平): What is it? 显著性水平α是指当零假设是正确的,但做出了错误决策的概率(即一类错误的概率).Alpha水平( ...
- jquery读取本地文件,Windows上报错。XMLHttpRequest cannot load xxx. Cross origin requests are only supported for protocol schemes: http, data, chrome, chrome-extension, https, chrome-extension-resource.k.cors.a.c
问题: 测试报告,使用本地的json.txt文件,结果文件读取失败,报错如下: XMLHttpRequest cannot load xxx. Cross origin requests are on ...
- Failed to execute goal org.mybatis.generator:mybatis-generator-maven-plugin:generate (default-cli) on project : <properties> resource does not exist
使用mybatis-generator自动生成mapper.dao等文件时,报错如下: org.apache.maven.lifecycle.LifecycleExecutionException: ...
- SVN的基本操作
右键SVN Commit 提交成功了,我们把SVN的服务器端刷新一下 所有的操作如果只是删除本地的文件都不会影响服务器端的文件,除非右键SVN Commit删除文件或者是新增文件才会对服务器端的仓库里 ...
- clion register
1. 使用 activation code 激活 安装完软件后,启动,在要求输入注册码的界面(菜单栏 ⇒ help ⇒ register)选择“License server”输入“http://ide ...
- hover
hover - Bing dictionary US[ˈhɒvə(r)] v.盘旋:徘徊:犹豫:巡弋 网络翱翔:悬停:盘旋于
- Python3自动化运维
一.系统基础信息模块详解 点击链接查看:https://www.cnblogs.com/hwlong/p/9084576.html 二.业务服务监控详解 点击链接查看:https://www.cnbl ...
- 9-sort使用时的错误
/* 矩形嵌套 题目内容: 有n个矩形,每个矩形可以用a,b来描述,表示长和宽.矩形X(a,b)可以嵌套在矩形 ...
- VINS-mono详细解读
VINS-mono详细解读 极品巧克力 前言 Vins-mono是香港科技大学开源的一个VIO算法,https://github.com/HKUST-Aerial-Robotics/VINS-Mono ...
- spring框架之数组,集合(List,Set,Map),Properties等的注入
先编写User类: package com.huida.demo4; import java.util.Arrays; import java.util.List; import java.util. ...
