linux_12
一、主从复制及主主复制的实现
主从复制
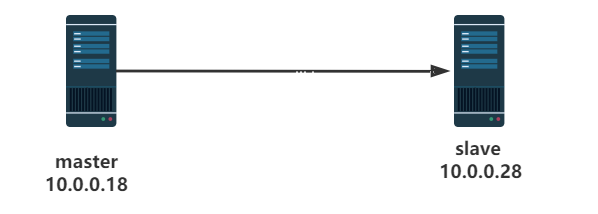
- master配置
# yum -y install mysql-server

# systemctl enable --now

# vim /etc/my.cnf.d/mysql-server.cnf

[mysqld]

server-id =18

log-bin=/data/logbin/mysql-bin

binlog_format=row

# systemctl restart mysqld

mysql> create user repluser@'10.0.0.%' identified by '123456';

mysql> grant replication slave on *.* to repluser@'10.0.0.%';

mysql> show master logs;

+------------------+-----------+-----------+

| Log_name         | File_size | Encrypted |

+------------------+-----------+-----------+

| mysql-bin.000001 |       179 | No        |

| mysql-bin.000002 |       681 | No        |

+------------------+-----------+-----------+

mysql > source hellodb_innodb.sql
- slave配置
# yum -y install mysql-server

# systemctl enable --now

# vi /etc/my.cnf.d/mysql-server

[mysqld]

server-id=28

log-bin=/data/logbin/mysql-bin

binlog_format=row

read_only=on

# mkdir /data/logbin -pv

# chown mysql.mysql /data/logbin

# systemctl restart mysqld

mysql > CHANGE MASTER TO \

MASTER_HOST='10.0.0.18', \

MASTER_USER='repluser', \

MASTER_PASSWORD='123456', \

MASTER_PORT=3306, \

MASTER_LOG_FILE='mysql-bin.000002', \

MASTER_LOG_POS=681;

mysql > start slave;

mysql > show slave status\G

*************************** 1. row ***************************

               Slave_IO_State: Waiting for source to send event

                  Master_Host: 10.0.0.18

                  Master_User: repluser

                  Master_Port: 3306

                Connect_Retry: 60

              Master_Log_File: mysql-bin.000001

          Read_Master_Log_Pos: 24432

               Relay_Log_File: slave-relay-bin.000002

                Relay_Log_Pos: 24075

        Relay_Master_Log_File: mysql-bin.000001

             Slave_IO_Running: Yes

            Slave_SQL_Running: Yes

                    ...省略...
- 验证主从复制
[root@slave ~]# mysql

mysql > showdatabases;

+--------------------+

| Database           |

+--------------------+

| hellodb            |

| information_schema |

| mycat              |

| mysql              |

| performance_schema |

| sys                |

+--------------------+

6 rows in set (0.00 sec)

# 从节点上可以查看到数据库hellodb,说明已经完成主从复制
主主复制
两个主,主主复制。但实际上只用一个主,当有一个主挂了。只需要将虚拟ip指向剩下的主,因为本身是主,无需配置。配置一个触发器,触发加上一个从就实现无缝连接且自动。
- 在master1配置
# vim /etc/my.cnf.d/mysql-server.cnf

[mysqld]

server-id=8

log-bin

auto_increment_offset=1 	#开始点

auto_increment_increment=2 	#增长幅度

# systemctl start mysqld

mysql > show master logs;

+--------------------+-----------+

| Log_name | File_size           |

+--------------------+-----------+

| mariadb-bin.000001 | 28303     |

| mariadb-bin.000002 | 386       |

+--------------------+-----------+

mysql> create user repluser@'10.0.0.%' identified by 'magedu';

mysql> grant replication slave on *.* to repluser@'10.0.0.%';
- 实现单向主从复制
在master2配置

# vim /etc/my.cnf.d/mariadb-server.cnf

[mysqld]

server-id=18

log-bin

auto_increment_offset=2 	#开始点

auto_increment_increment=2 	#增长幅度

# systemctl start mysqld

mysql > CHANGE MASTER TO

-> MASTER_HOST='10.0.0.8',

-> MASTER_USER='repluser',

-> MASTER_PASSWORD='magedu',

-> MASTER_PORT=3306,

-> MASTER_LOG_FILE='mariadb-bin.000002',

-> MASTER_LOG_POS=386;

mysql > start slave;	# 此时单向复制已完成

mysql > show master logs; #查看二进制位置

+--------------------+-----------+

| Log_name           | File_size |

+--------------------+-----------+

| mariadb-bin.000001 | 28303     |

| mariadb-bin.000002 | 344       |

+--------------------+-----------+

2 rows in set (0.001 sec)
- 实现双向复制
在master1配置

mysql > CHANGE MASTER TO

-> MASTER_HOST='10.0.0.18',

-> MASTER_USER='repluser',

-> MASTER_PASSWORD='magedu',

-> MASTER_PORT=3306,

-> MASTER_LOG_FILE='mariadb-bin.000002',

-> MASTER_LOG_POS=344;

mysql > start slave;
二、xtrabackup实现全量+增量+binlog恢复库
1 备份过程

  1)完全备份:

	[root@centos8 ~]#yum -y install percona-xtrabackup-80-8.0.23-16.1.el8.x86_64.rpm

	[root@centos8 ~]#mkdir /backup/

	[root@centos8 ~]#xtrabackup -uroot -pmagedu --backup --target-dir=/backup/base

  2)第一次修改数据,第一次增量备份

	[root@centos8 ~]#xtrabackup -uroot -pmagedu --backup --target-dir=/backup/inc1 \ --incremental-basedir=/backup/base

  3)第二次修改数据,第二次增量备份

	[root@centos8 ~]#xtrabackup -uroot -pmagedu --backup --target-dir=/backup/inc2 \ --incremental-basedir=/backup/inc1

  4)[root@centos8 ~]#scp -r /backup/* 10.0.0.18:/backup/

2还原过程

  1)预准备完成备份

	[root@centos8 ~]#yum -y install percona-xtrabackup-80-8.0.23-16.1.el8.x86_64.rpm

	[root@centos8 ~]#xtrabackup --prepare --apply-log-only --target-dir=/backup/base

  2)合并第1次增量备份到完全备份

	[root@centos8 ~]#xtrabackup --prepare --apply-log-only --target-dir=/backup/base --incremental-dir=/backup/inc1

  3)合并第2次增量备份到完全备份

	[root@centos8 ~]#xtrabackup --prepare --target-dir=/backup/base --incrementaldir=/backup/inc2

  4)复制到数据库目录

	[root@centos8 ~]#xtrabackup --copy-back --target-dir=/backup/base

  5)还原属性

	[root@centos8 ~]#chown -R mysql:mysql /var/lib/mysql

  6)启动服务

	[root@centos8 ~]#service mysqld start
三、MyCAT实现MySQL读写分离
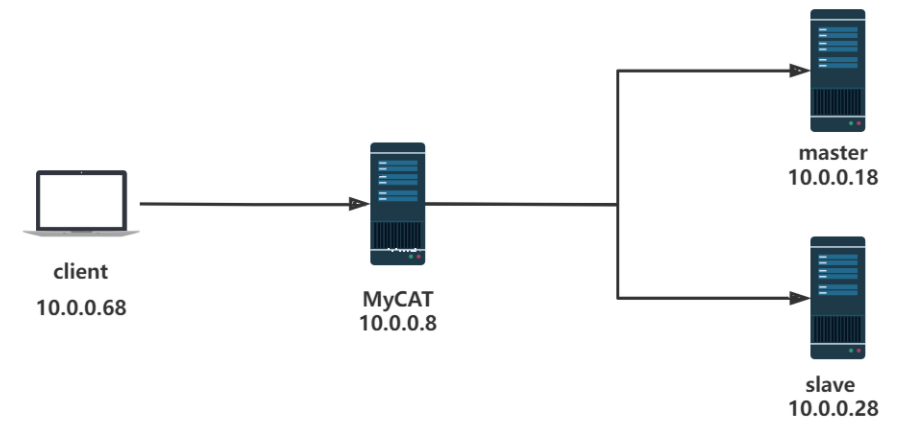
1 环境准备
# systemctl stop firewalld

# setenforce 0

# 时间同步
2 搭建主从
# master配置

# vim /etc/my.cnf.d/mysql-server.cnf

[mysqld]

server-id =18

log-bin=/data/logbin/mysql-bin

binlog_format=row

# systemctl restart mysqld

mysql> create user repluser@'10.0.0.%' identified by '123456';

mysql> grant replication slave on *.* to repluser@'10.0.0.%';

mysql> show master logs;

+------------------+-----------+-----------+

| Log_name         | File_size | Encrypted |

+------------------+-----------+-----------+

| mysql-bin.000001 |       179 | No        |

| mysql-bin.000002 |       681 | No        |

+------------------+-----------+-----------+

mysql > source hellodb_innodb.sql

# slave配置

# vi /etc/my.cnf.d/mysql-server

[mysqld]

server-id=28

log-bin=/data/logbin/mysql-bin

binlog_format=row

read_only=on

# mkdir /data/logbin -pv

# chown mysql.mysql /data/logbin

# systemctl restart mysqld

mysql > CHANGE MASTER TO \

MASTER_HOST='10.0.0.18', \

MASTER_USER='repluser', \

MASTER_PASSWORD='123456', \

MASTER_PORT=3306, \

MASTER_LOG_FILE='mysql-bin.000002', \

MASTER_LOG_POS=681;

mysql > start slave;

mysql > show slave status\G

mysql > show databases;
3 安装并启动MyCAT代理
# yum -y install java

# java -version

openjdk version "1.8.0_312"

OpenJDK Runtime Environment (build 1.8.0_312-b07)

OpenJDK 64-Bit Server VM (build 25.312-b07, mixed mode)

# wget http://dl.mycat.org.cn/1.6.7.4/Mycat-server-1.6.7.4-release/Mycat-server-1.6.7.4-release-20200105164103-linux.tar.gz

# mkdir /apps

# tar xvf Mycat-server-1.6.7.4-release-20200105164103-linux.tar.gz -C /apps

# echo 'PATH=/apps/mycat/bin:$PATH' > /etc/profile.d/mycat.sh

# source /etc/profile.d/mycat.sh

# mycat start

Starting Mycat-server..

# tail /apps/mycat/logs/wrapper.log

...

successfully. see logs in logs/mycat.log

# 在client端测试连接mycat

[root@client ~]#mysql -uroot -p123456 -h 10.0.0.8 -P8066

mysql > show databases;

+----------+

| DATABASE |

+----------+

| TESTDB   |

+----------+

mysql > mysql> use TESTDB	#还并没有真正的与后端数据库建立连接

Reading table information for completion of table and column names

You can turn off this feature to get a quicker startup with -A
4 修改mycat配置文件
1)# 修改连接端口

# vi /apps/mycat/conf/server.xml

/serverPort		#搜索serverPort,将注释段符号删掉: <!--   -->,将端口号改成3306。配置如下:

	<property name="serverPort">3306</property> <property name="managerPort">9066</property>

	<property name="idleTimeout">300000</property> <property name="bindIp">0.0.0.0</property>

	<property name="dataNodeIdleCheckPeriod">300000</property>  <!--5 * 60 * 1000L; //连接空闲检查 -->

	<property name="frontWriteQueueSize">4096</property> <property name="processors">32</property>

2)# 更改mycat的默认密码

/password    #配置如下:

    <user name="root" defaultAccount="true">			#连接Mycat的用户名

        <property name="password">magedu</property>		#连接Mycat的密码

        <property name="schemas">TESTDB</property>		#数据库名要和schema.xml相对应

3)# 修改schema.xml实现读写分离策略

# vi /apps/mycat/conf/schema.xml

<?xml version="1.0"?>

<!DOCTYPE mycat:schema SYSTEM "schema.dtd">

<mycat:schema xmlns:mycat="http://io.mycat/">

	<schema name="TESTDB" checkSQLschema="false" sqlMaxLimit="100" dataNode="dn1">

	</schema>

	<dataNode name="dn1" dataHost="localhost1" database="hellodb" />

	<dataHost name="localhost1" maxCon="1000" minCon="10" balance="1" >

			  writeType="0" dbType="mysql" dbDriver="native" switchType="1" slaveThreshold="100">

		<heartbeat>select user()</heartbeat>

		<writeHost host="host1" url="10.0.0.18:3306" user="root" password="hellodb">

		 <readHost host="host2" url="10.0.0.28:3306" user="root" password="hellodb" />

		</writeHost>

	</dataHost>

</mycat:schema>

4)#重新启动mycat

# mycat restart
5 创建授权用户连接mycat
# 在master配置

mysql > create database mycat;

mysql > create user 'root'@'10.0.0.%' identified by 'hellodb';

mysql > grant all on *.* to root@'10.0.0.%';
6 在client端测试
[root@clietn ~]# mysql -uroot -pmagedu -h10.0.0.8

`验证读操作

mysql> select @@server_id;

+-------------+

| @@server_id |

+-------------+

|          28 |

+-------------+

1 row in set (0.01 sec)

mysql> select @@hostname;

+------------+

| @@hostname |

+------------+

| slave      |

+------------+

1 row in set (0.00 sec)

`验证写操作

mysql > select * from teachers;

+-----+---------------+-----+--------+

| TID | Name          | Age | Gender |

+-----+---------------+-----+--------+

|   1 | Song Jiang    |  45 | M      |

|   2 | Zhang Sanfeng |  94 | M      |

|   3 | Miejue Shitai |  77 | F      |

|   4 | Lin Chaoying  |  93 | F      |

+-----+---------------+-----+--------+

4 rows in set (0.01 sec)

mysql > update teachers set age=@@server_id where tid=4;

mysql> select * from teachers;

+-----+---------------+-----+--------+

| TID | Name          | Age | Gender |

+-----+---------------+-----+--------+

|   1 | Song Jiang    |  45 | M      |

|   2 | Zhang Sanfeng |  94 | M      |

|   3 | Miejue Shitai |  77 | F      |

|   4 | Lin Chaoying  |  18 | F      |

+-----+---------------+-----+--------+
ansible常用模块介绍
ping 模块
检查指定节点机器是否能连通,用法很简单,不涉及参数。如果被检测的主机在线,则返回pong
# ansible 192.168.137.102 -m ping

192.168.137.102 | SUCCESS => {

    "changed": false,

    "ping": "pong"

}
setup模块
setup模块用于收集远程主机的一些基本信息。
常用参数:
filter :用于进行条件过滤。如果设置,仅返回匹配过滤条件的信息。
#获取ip地址
[root@localhost ~]# ansible 192.168.137.102 -m setup -a "filter=ansible_all_ipv4_addresses"
192.168.137.102 | SUCCESS => {
"ansible_facts": {
"ansible_all_ipv4_addresses": [
"192.168.137.102"
]
},
"changed": false
}
##获取系统版本
[root@localhost ~]# ansible 192.168.137.102 -m setup -a "filter=ansible_distribution"
192.168.137.102 | SUCCESS => {
"ansible_facts": {
"ansible_distribution": "CentOS"
},
"changed": false
}
command 模块
command 模块可以帮助我们在远程主机上执行命令,使用的时候可以不用 加 -m 指定。command 是ansible 默认使用的模块。 (可以在配置文件中修改默认模块)
# default module name for /usr/bin/ansible

#module_name = command
注意:使用command在远程主机执行命令的时候,不会经过shell处理。如果命令带有重定向,管道符等会失效。
# ansible 192.168.137.102 -a 'uptime'
192.168.137.102 | SUCCESS | rc=0 >>
15:44:41 up 1:33, 2 users, load average: 0.00, 0.01, 0.05
# ansible 192.168.137.102 -a 'ls /root/'
192.168.137.102 | SUCCESS | rc=0 >>
anaconda-ks.cfg
shell 模块
shell 模块可以帮助我们在远程主机上执行命令。与 command 模块不同的是,shell 模块在远程主机中执行命令时,会经过远程主机上的 /bin/sh 程序处理。
与command模块使用方法类似,只不过支持管道,重定向,变量符等等。由于command比较安全有可预知性,所以我们平时用的时候最好用command。command无法满足需求时,在使用shell。
 首先创建一个shell脚本

 vim  /tmp/test.sh  //加入内容

 #!/bin/bash

 echo `date` > /tmp/ansible_test.txt

 然后把该脚本分发到各个机器上

 ansible testhost -m copy -a "src=/tmp/test.sh dest=/tmp/test.sh mode=0755"

 最后是批量执行该shell脚本

 ansible testhost -m shell -a "/tmp/test.sh"
linux_12的更多相关文章
随机推荐
- CSS基础 精灵图的使用
使用步骤1.创建盒子 <div class="one"></div> 2.使用PxCook量取图标大小,将图标的宽高设置成为盒子的宽高 ...
- Centos下查看cpu核数
1.概念物理CPU:实际Server中插槽上的CPU个数.物理cpu数量:可以数不重复的 physical id 有几个. 2.逻辑CPULinux用户对 /proc/cpuinfo 这个文件肯定不陌 ...
- vue备用
handleCheck (item) { if (item.isChecked) { this.checkData.push(item.id) this.checkData = _.uniqWith( ...
- HDU 1754 I Hate It(线段数-单点更新)
原题链接:I Hate It 题目分析:这个是线段树的基本操作--更新和查询,属于基础题,也就相当于一个模板吧,这里就不再多说了. 代码如下:(PS:特别注意--输入输出用 不然会超时) #incl ...
- MySQL注入点写webshell的五种方式
0x00 写数据的前提 1,在mysql的配置文件 my.ini 中,secure_file_priv="c:/wamp64/tmp" 被注释 或者 `secure_file_pr ...
- HttpRunner3的用例是怎么运行起来的
在PyCharm中打开examples/httpbin/basic_test.py: 首先映入眼帘的是左上角那个绿色小箭头,点了一下,可以直接运行,意味着HttpRunner是能够直接被pytest驱 ...
- 源代码管理git地址从http改为https,提交400错误
推送400错误 cmd 执行 git config --global http.sslVerify false 推送地址,修改http 为 https 就可以正常提交了
- 12.25 补充总结-jsp标签
注:标签引用时,需在jsp 头部添加如下语句 <%@taglib uri="http://java.sun.com/jsp/jstl/core" prefix="c ...
- 【转载】ASP.NET前台代码绑定
ASP.NET前台代码绑定后台变量方法总结http://www.cnblogs.com/lerit/archive/2010/10/22/1858007.html ASP.NET前台无法访问后台int ...
- golang中值类型的嵌入式字段和指针类型的嵌入式字段
总结: 1. 值类型的嵌入式字段,该类型拥有值类型的方法集,没有值指针类型的方法集 2. 指针类型的嵌入式字段,该类型拥有值指针类型的方法集,没有值类型的方法集,并且,该类型的指针类型也有值指针类型的 ...